
Universal Audio Apollo x16D Quickstart Guide
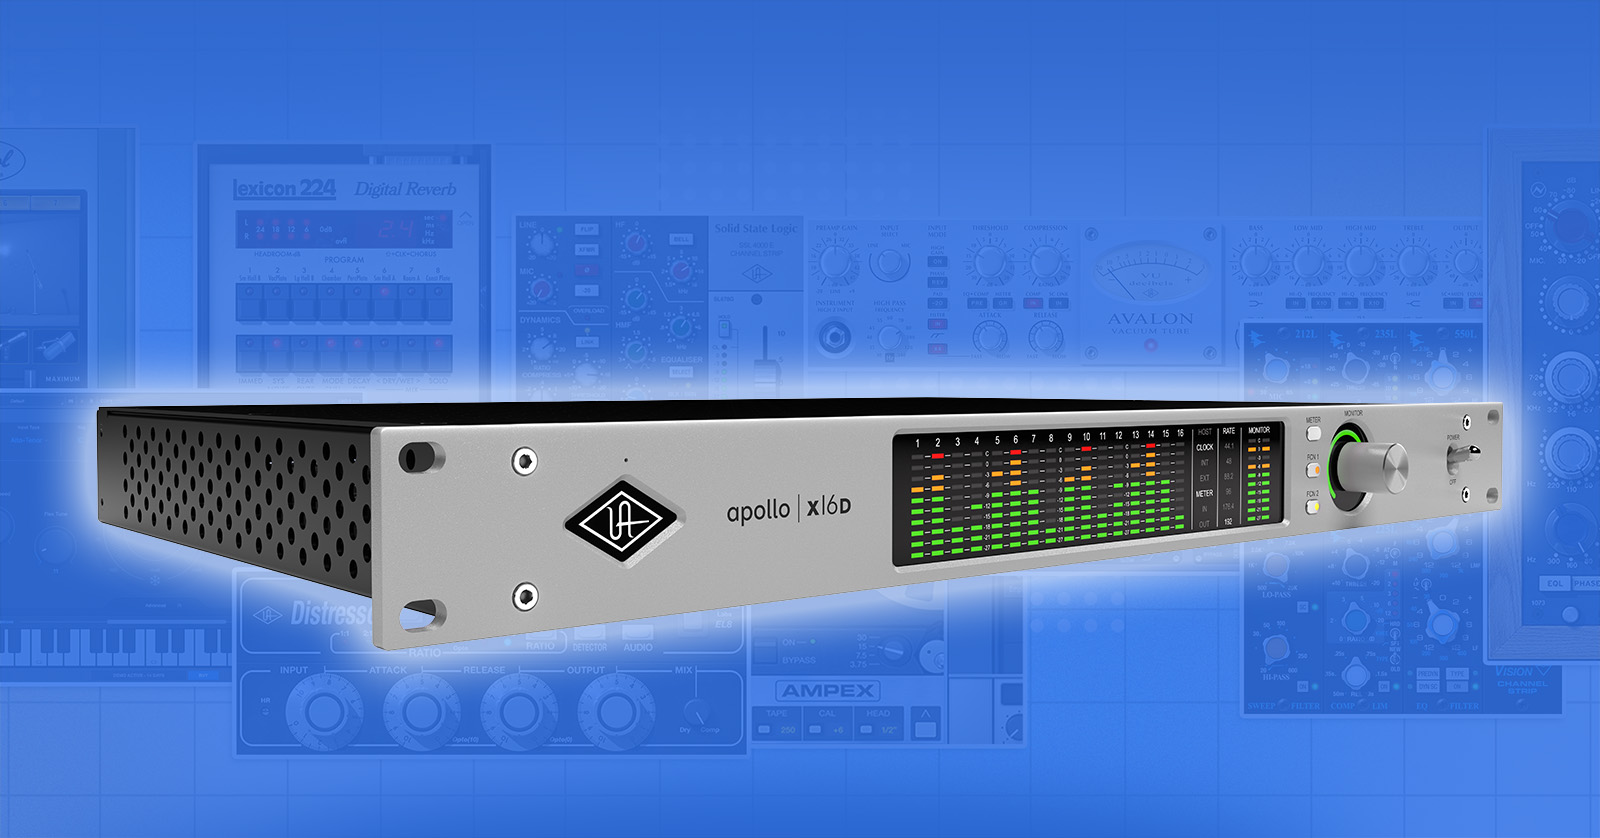
The UA Apollo x16D provides Apollo X sound and UAD plug-in processing over Thunderbolt and Dante for live and studio sound. Here’s how to get set up.
- Register Your Purchase and Download the Software
- Connecting Your Apollo x16D
- Getting Started with the Apollo x16D and Dante
Register Your Purchase and Download the Software
Download UA Connect
Before you can use your Apollo x16D, you must create a user account with Universal Audio. Next, download and install the UA Connect app. In this app, register your hardware, and then you will be presented with the UA software you need to use the x16D.

Your UA account’s device-registration page
On your computer, go to the Universal Audio registration page. Create a new account or log in with your existing account.
On the Register Your Device page, pull down the menu to select your model. Click Begin.
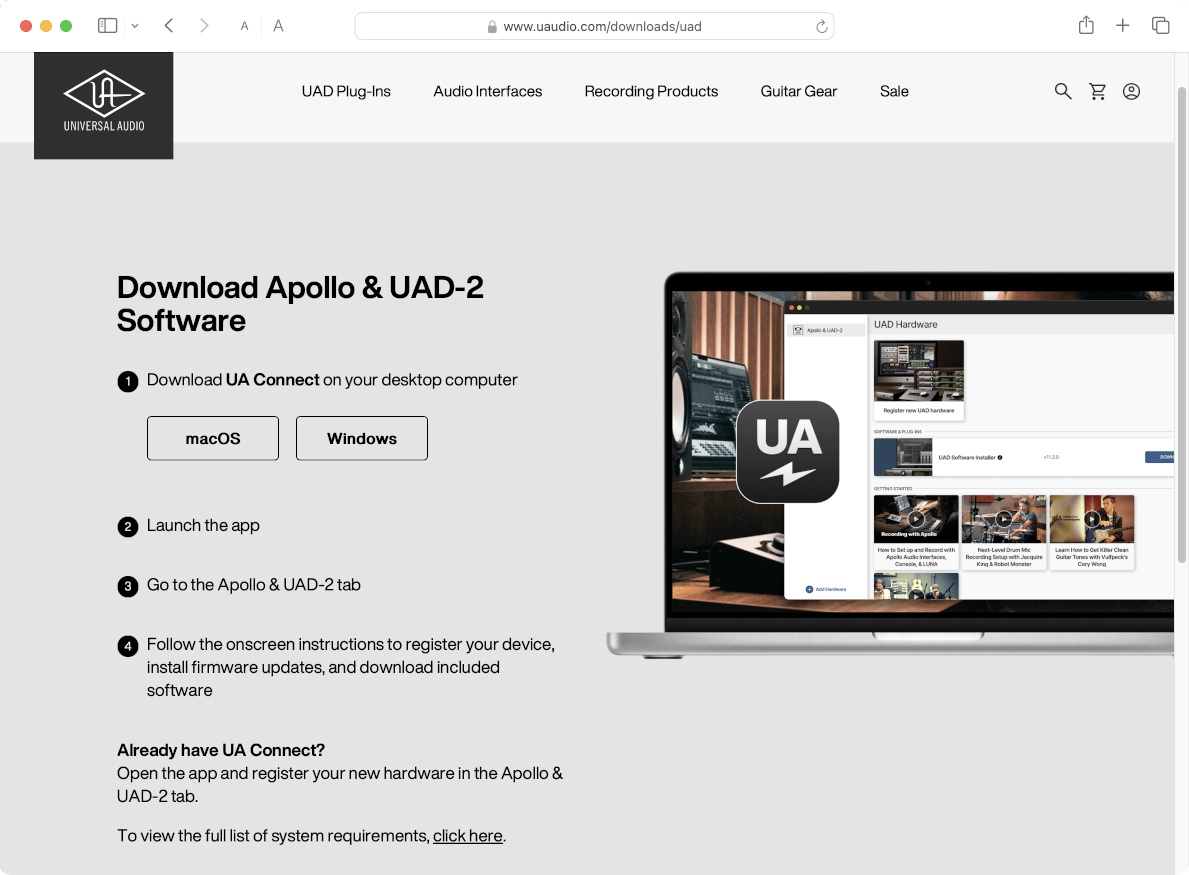
The Download page, where you download the UA Connect app
On the Download page, under Download UA Connect, click the button for macOS or Windows.
Go to your Downloads folder. Run the installer and follow the prompts.
Download the Apollo x16D User Manuals
From the Universal Audio Apollo Hardware Manuals page, download the latest version of the Apollo x16D Hardware Manual.
From the Universal Audio Apollo Software Manuals page, download the Apollo Thunderbolt Software Manual, which explains how to operate the software tools with your DAW.
The UAD Console Manual is provided online, so bookmark it. UAD Console is the app you run on your Mac or your Windows PC to configure and operate the UAD-2 plug-ins. You will need to reference information about using Dante in the Apollo x16D Networked Audio chapter.
Download the UAD Plug-ins Manual, a vast reference for using all the plug-ins available on the Apollo x16D.
You will also want to reference the online Dante Controller User Guide on the website of Audinate, the Dante company. From the front page, you can download a copy of the guide.
Connect the Apollo x16D over Thunderbolt
The installation procedure works best when your Apollo x16D is connected to your computer via Thunderbolt and powered on, so that UA Connect can recognize your Apollo x16D.
Connect the Apollo x16D to your Mac or your Windows PC using a Thunderbolt 3 cable. Follow these instructions for Mac and Windows PC to configure your computer to recognize an Apollo device over Thunderbolt.
Launch the UA Connect App
Now that your computer recognizes your Apollo x16D, launch the UA Connect app.
- Log in to the app using your UA customer account email address and password. Select Remember Me, then click Log In.
- In the pane on the left, at the bottom, you will see Add Hardware. Click the plus sign.
- In the Set Up Your Hardware dialog, enter your product’s serial number. Click Enter.
- You will be returned to your web browser to complete your purchase registration on the UA website.
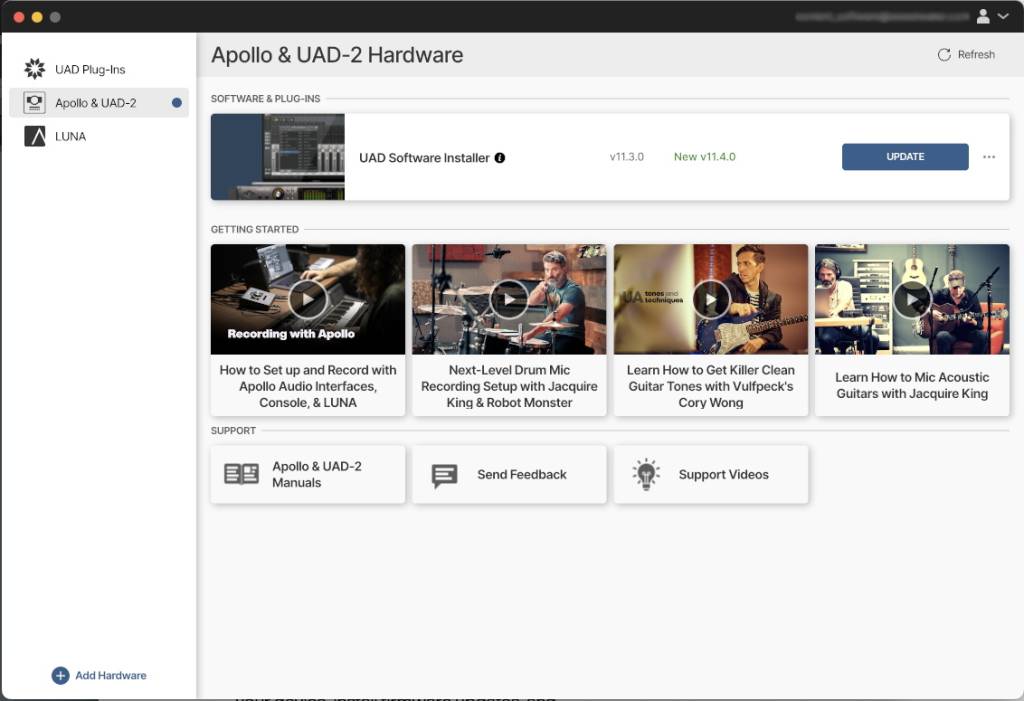
Finding the UAD Software Installer in the UA Connect app
Now that you have registered your hardware, go back to the UA Connect app.
- In the pane on the left, select Apollo & UAD-2.
- In the pane on the right, you will now see the UAD Software Installer. Click to download and install it. Be patient, as it’s a large download. Follow all prompts until your installation is complete.
On macOS, you will receive prompts that you need to open System Settings and grant permission in the Privacy & Security section to allow the new software to function. Learn more in Sweetwater’s Universal Audio Apollo, Satellite, and UAD-2 PCIe Thunderbolt Mac Setup guide.
Download UAD Console, LUNA, and Your Plug-ins
Now that you have installed the UAD Software Installer, go back to UA Connect, where you can install:
- UAD plug-ins
- UAD Console, the mixer app that you use alongside your DAW to configure all signal-routing and plug-in assignments and configurations for your Apollo or Satellite
- LUNA, Universal Audio’s DAW designed to integrate with your Apollo or Satellite and the UAD Console
Authorize Your Plug-ins
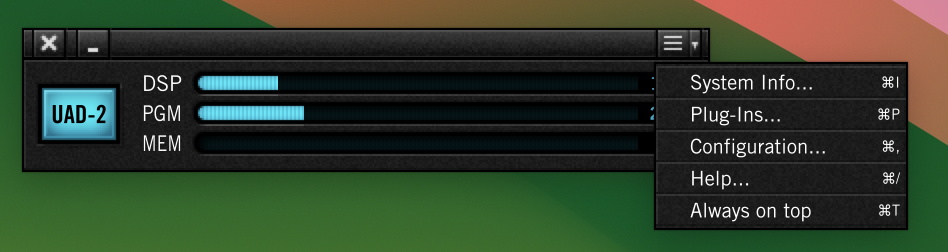
With your UA device connected to your computer and powered on, launch the UAD Meter & Control Panel app that UA Connect installed earlier.
From the menu on the right, select Plug-Ins.
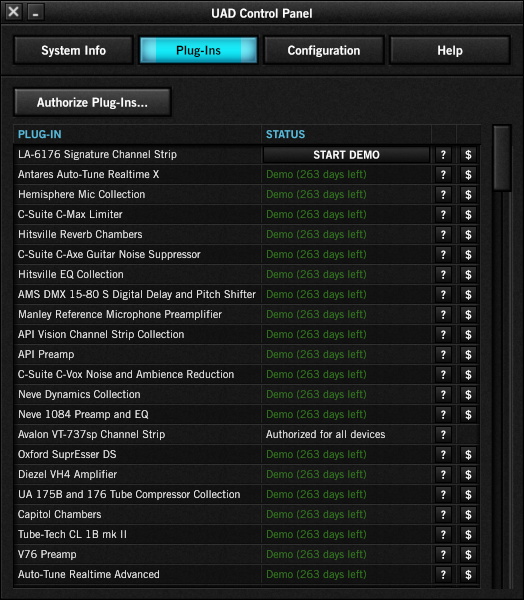
Authorizing in the UAD Meter & Control Panel Plug-Ins tab
In the Plug-Ins tab, click Authorize Plug-Ins.
Learn more in the Universal Audio support article Authorizing UAD-2 DSP Plug-Ins.
UAD Console

UAD Console
UAD Console is the app where you assign plug-ins and set up and control your Apollo x16D. With a design similar to LUNA, Universal Audio’s DAW, it provides a familiar, mixer-like layout. Your computer connects with UAD Console over the Thunderbolt cable connection.
Learn more in the Universal Audio support page Learn to Use Console.
Update the Universal Audio firmware
The Apollo x16D has two firmwares that are updated in separate procedures: one for the Universal Audio firmware, and one for the Dante component. Your Apollo x16D may not function until you carry out both updates. We will explain the Dante procedure in the section below, Download Dante Controller from the Audinate company.
With your Apollo x16D connected to your computer via Thunderbolt and powered on, launch UAD Console. It will prompt you if your device has an older firmware that needs to be updated to be compatible with the newest version of the UAD software package. When you see the firmware update message, click the Load button, then wait while the installation proceeds.
IMPORTANT: Do not turn off the power to your UA device or to the computer, and do not disconnect the device from your computer while the update is underway. Wait until UA Connect displays the message “Power Off UAD Device.”
Wait until UAD Console displays the message “Power Off UAD Device.” Power your device off and wait several seconds. Then power it on again.
Download Dante Controller from the Audinate company
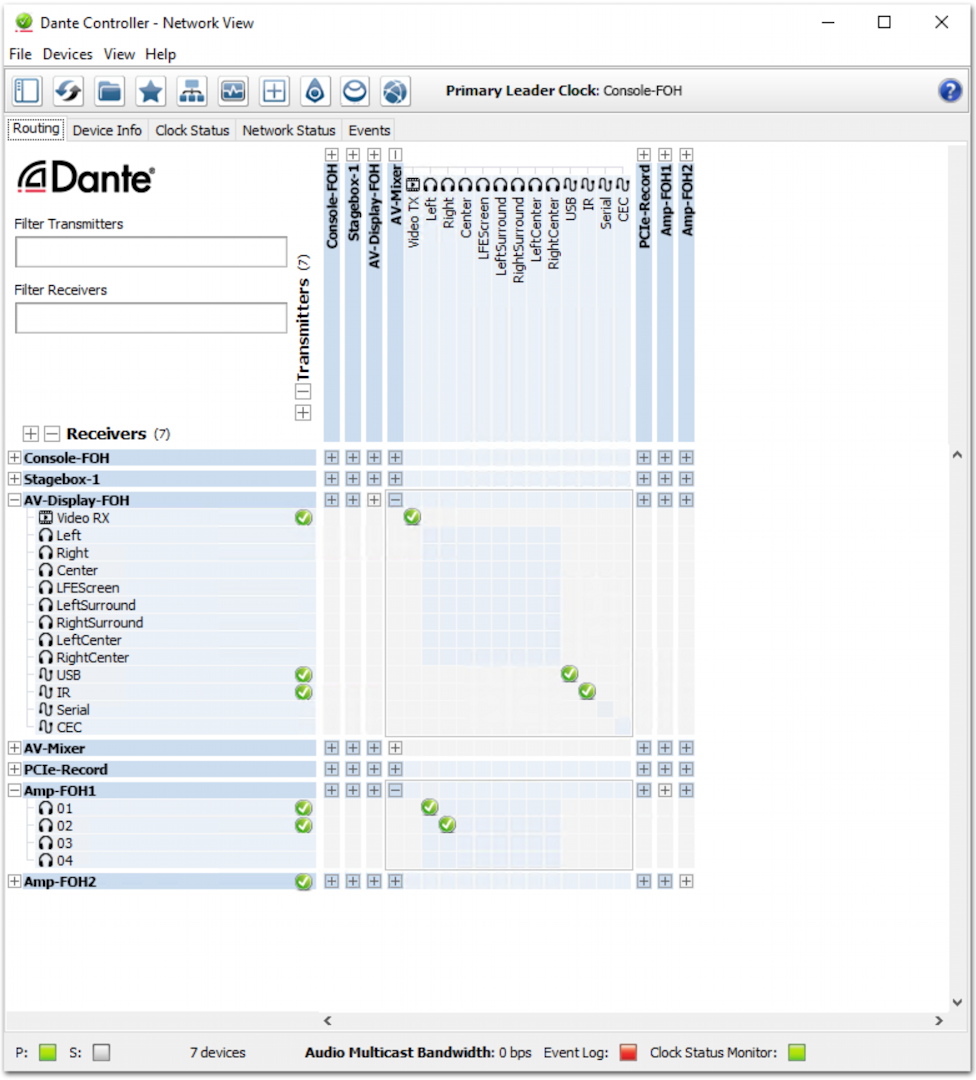
Dante Controller
You need to run the Dante Controller app on your computer alongside UAD Console to handle the signal routing and configuration for the Apollo x16D. Dante Controller is provided by the Audinate company. Your computer connects with Dante Controller over an Ethernet cable connection. See the section below, Ethernet (Dante).
While the UAD Console app is used to assign plug-ins and set up and control signals on the Apollo x16D, the 16 Dante channel-routing assignments themselves (called “subscriptions” in Dante-speak) are configured in the Dante Controller app, along with other essential features such as word clock. When using UAD Console with the Apollo x16D, there are several settings in Console that will open Dante Controller.
To get Dante Controller for your Mac or your Windows PC, go to the Log in page on the Audinate website. Log in with your account credentials or create a new account.
Once you’re logged in, go to the Support tab. Select Download Software,and download Dante Controller for macOS or Windows. Follow the installation instructions.
Connect the Apollo x16D to Your Computer via Ethernet
See the section below, Ethernet (Dante) for instructions on connecting your Apollo x16D to your computer via Ethernet.
Update the Dante Firmware
IMPORTANT: Do not turn off the power to your UA device or to the computer, and do not disconnect the device from your computer while the Dante update is underway. Wait for the Dante Updater app to confirm that the update is complete.
The first time you use your Apollo x16D, it is likely that it will require firmware updates both for the Universal Audio component and the Dante component. The Dante component’s firmware can only be updated through the Dante Controller app, and not through the Universal Audio software.
When your Apollo x16D is powered on and connected to your computer with an Ethernet cable, the Dante Controller app will indicate if the Dante component of your Apollo x16D needs to have its firmware updated.
Dante Controller will launch a separate app, Dante Updater, which will carry out the update.
Follow the instructions in the Dante Controller User Guide > Dante Updater.
Connecting Your Apollo x16D
Back Panel
In addition to the two Thunderbolt 3 ports and the two 1-gigabit Dante Ethernet ports (discussed below), the Apollo x16D provides:
Power In
Use only the included power supply, with its 4-pin XLR locking connection. Use the Power switch on the front panel to turn the unit on and off.
Word Clock
The two BNC connections provide one means of hooking up an external digital clock source. This is an option if you do not wish to configure the Apollo x16D to get its clocking signal over your Dante network or over the AES/EBU port.
75-ohm Word Clock Termination Switch
Depress the switch to engage word clock termination when required.
AES/EBU
To connect to AES/EBU-compatible gear, use XLR cables at 110 ohms that are specifically designed for AES/EBU digital audio. Don’t use conventional microphone cables. The AES/EBU connection can provide two channels of digital I/O and can be configured for sample-rate conversion on input. The AES/EBU connection can also be configured for a digital clocking signal. Another option is to configure the ports to mirror the analog Monitor outputs to route to another AES/EBU device.
Monitor Output
These balanced XLR jacks provide stereo analog audio to a monitoring system. The monitor outputs are independent from the 16 network outputs.
Thunderbolt and Dante
You need to connect your Apollo x16D to your computer with both a Thunderbolt 3 cable and an Ethernet cable.
Thunderbolt
The Thunderbolt connection enables you to run the UA Console app to configure and run your plug-ins and to transmit digital audio to and from your computer via that route.
With your x16D connected to your computer using a Thunderbolt cable, you can use the second Thunderbolt port on the Apollo X16D to daisy-chain additional Apollo and Thunderbolt devices to the host computer.
A recent-model Mac will provide Thunderbolt 3, Thunderbolt 4, or Thunderbolt 5 connections. If you have a Windows PC, it needs to be a model that comes with Thunderbolt 3 or 4 on the motherboard.
Learn more about using Apollo Thunderbolt devices on Mac or Windows in these Sweetcare articles:
Universal Audio Apollo, Satellite, and UAD-2 PCIe Thunderbolt Mac Setup
Universal Audio Apollo Thunderbolt Windows Setup
Ethernet (Dante)
Connect a Dante Ethernet port on your Apollo x16D to your computer using an Ethernet cable, either directly or through a Dante-capable Ethernet network switch.
If your computer does not have an Ethernet port, you can connect it to a suitable Thunderbolt or USB-C hub or dongle that provides an Ethernet port. Connect an Ethernet cable from that port to your network switch or directly to the Apollo x16D, if desired.
Connecting the Apollo x16D to a network switch while also connecting your computer to the switch using an Ethernet cable is the better choice. This way, your computer can connect to the internet while working with the Apollo x16D, assuming your network switch is also connected to your router and to the internet.
Note that Dante Controller is for controlling devices and setting up the routing for audio signals between the various Dante audio or video devices on the network. Dante Controller does not receive or transmit audio in and of itself.
The two Ethernet ports on the Apollo x16D can be configured for either Switched or Redundant mode, according to how you have designed your Dante network topology. Learn more in the Universal Audio UAD Console Manual > Apollo x16D Networked Audio > Switched Mode and Redundant Mode with Apollo x16D.
Getting Started with the Apollo x16D and Dante
Here’s Universal Audio’s video to help you get oriented.
Universal Audio: Getting Started with Apollo x16D & Dante
Related Articles
When you need help, Sweetwater has the answers!
Our knowledge base contains over 28,000 expertly written tech articles that will give you answers and help you get the most out of your gear. Our pro musicians and gear experts update content daily to keep you informed and on your way. Best of all, it’s totally FREE, and it’s just another reason that you get more at Sweetwater.com.


Offer applies only to single-receipt qualifying purchases. Select manufacturers may require that only the manufacturer’s products qualify towards the minimum purchase amount needed to be eligible for promotional financing. Otherwise, an invoice that meets the minimum purchase amount and contains at least one qualifying manufacturer product is eligible for promotional financing. No interest will be charged on promo purchase balance, and equal monthly payments are required on promo purchase until it is paid in full. The payments equal the amount financed divided by the number of months in the promo period, rounded up to the next whole dollar. These payments may be higher than the payments that would be required if this purchase was a non-promo purchase. During the last month(s) of the promo period the required monthly payment may be reduced due to the prior months’ rounding. Regular account terms apply to non-promo purchases. New Accounts as of 07/31/2025: Purchase APR is 34.99%. Penalty APR is 39.99%. Min Interest Charge is $2. Existing cardholders: See your credit card agreement terms. Subject to credit approval.
Offer applies only to single-receipt qualifying purchases. No interest will be charged on the promo balance if you pay it off, in full, within the promo period. If you do not, interest will be charged on the promo balance from the purchase date. The required minimum monthly payments may or may not pay off the promo balance before the end of the promo period, depending on purchase amount, promo length and payment allocation. Regular account terms apply to non-promo purchases and, after promo period ends, to the promo balance. New Accounts as of 07/31/2025: Purchase APR is 34.99%. Penalty APR is 39.99%. Min Interest Charge is $2. Existing cardholders: See your credit card agreement terms. Subject to credit approval.
The estimated required monthly payment shown which excludes taxes and delivery equals the amount financed divided by the number of months in the promo period, rounded up to the next cent. During the last month(s) of the promo period the required monthly payment may be reduced due to this rounding. These payments apply only with the financing offer shown. If you make these payments by the due date each month, you should pay off this amount financed within the promo period, if it is the only balance you are paying off. If you have other balances on your account, this payment will be added to any other minimum monthly payments.
Applies only to select items from this manufacturer. Ask your Sweetwater Sales Engineer for more details.