
AlphaTheta DDJ-GRV6 Quickstart Guide
In this guide, we will show you how to register, set up, and use the AlphaTheta DDJ-GRV6. Follow the sections below to get started.
Register the DDJ-GRV6
Before getting connected, you need to register the DDJ-GRV6 with Pioneer DJ. Once it’s registered, you will gain access to the firmware and software necessary for the controller to work correctly. Keep your Sweetwater invoice handy; you’ll need to enter some information during registration!
- Log in to your Pioneer DJ account. If you don’t have one yet, create it here.
- Once you’re logged in, click your name at the top-right corner of the page, then click the blue Register Product box.
- In the Product Name field, type, then select the DDJ-GRV6.
- Enter the serial number that’s on the bottom side of the unit, plus the purchase date and the place of purchase. Click Register.
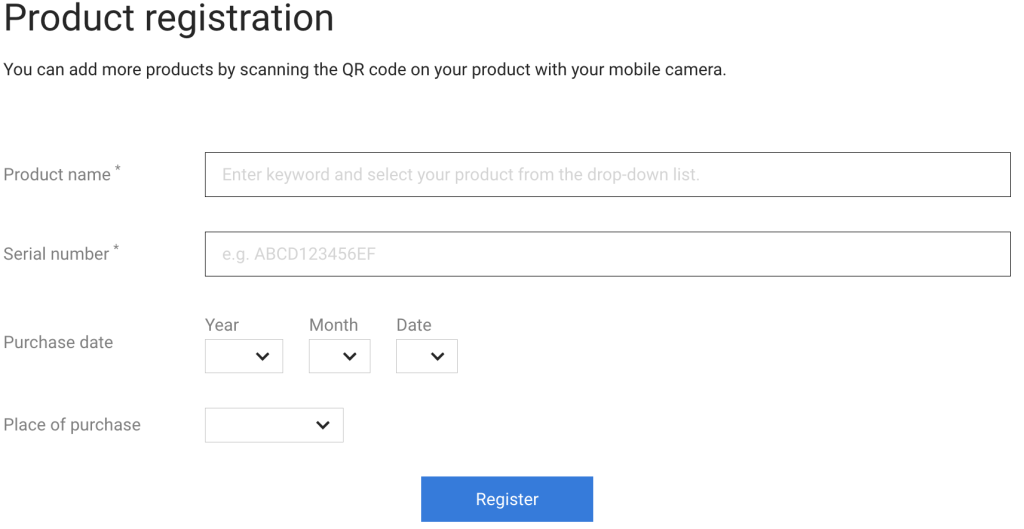
Click here to register the DDJ-GRV6.
rekordbox and Serato Activation
The DDJ-GRV6 is compatible with both rekordbox and Serato DJ Pro. To unlock the software, all you need to do is download and install the software, connect the DJ controller to your computer, and launch the software. This will unlock the full version of the software.
Setup and Connections
IMPORTANT! Make sure the power source is less than 24V and 9V DC power for mobile connections.
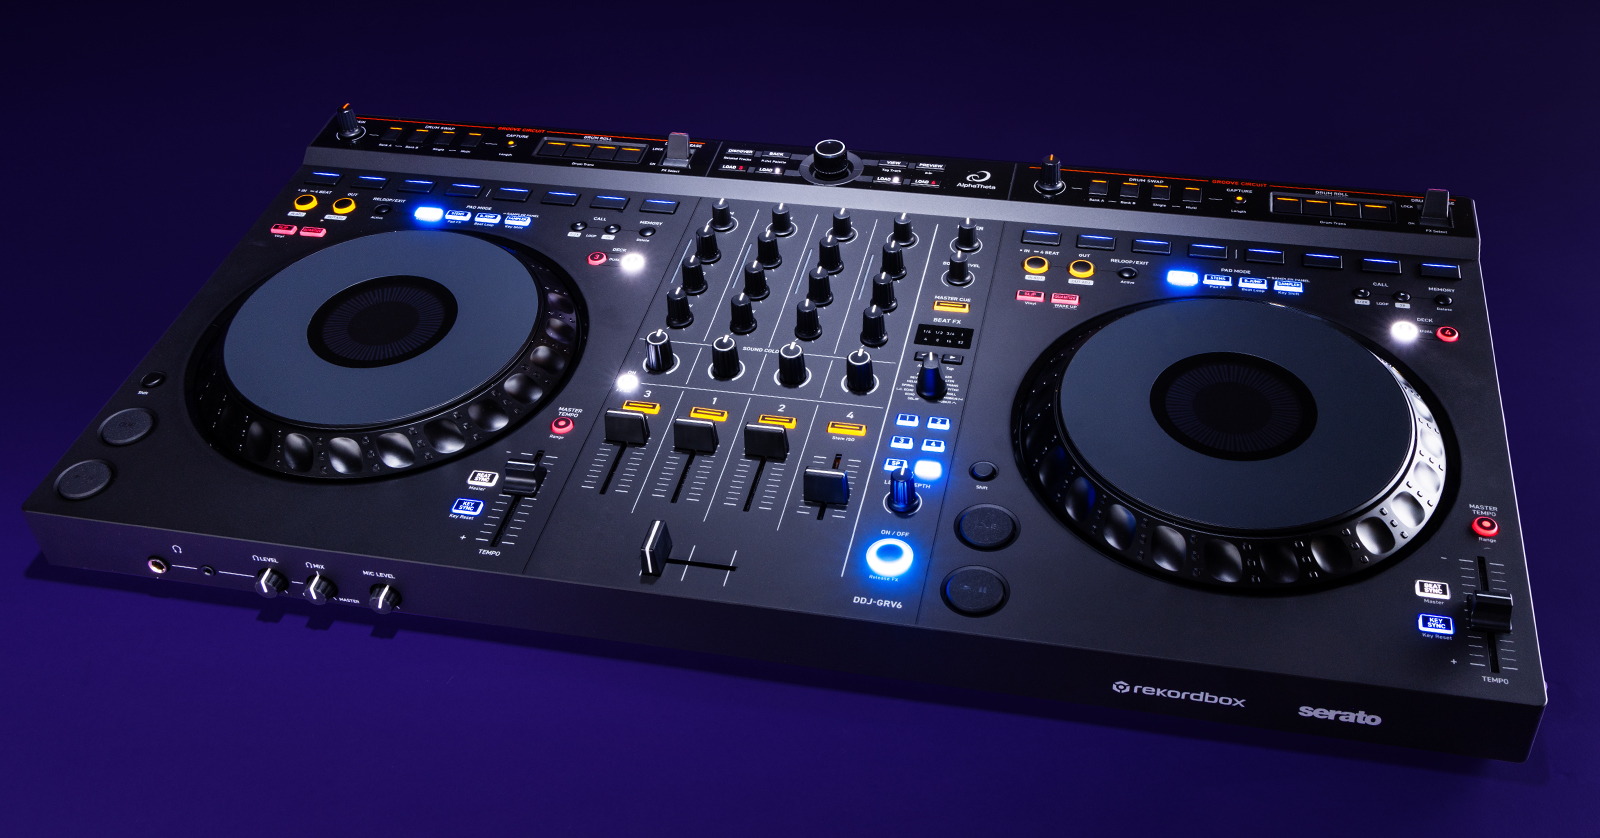
The AlphaTheta DDJ-GRV6 has standard DJ controller connections, such as RCA, 1/4-inch outputs, and 1/4-inch headphone and microphone jacks. It also has USB-C jacks for both power and computer and mobile connections. Learn more in our DJ Setup Guide.
- The DDJ-GRV6 is class compliant on both PC and Mac. This means no additional driver software is required.
- Make sure you connect 1/4-inch outputs to a balanced speaker, mixer, or power amp. There will be noise and low output if you’ve connected to an unbalanced output device.
- If you’re using the DDJ-GRV6 with an Android device, and the audio sounds off while in STEREO mode, then flip the switch to MONO.
- When you’re connecting the DDJ-GRV6 to a USB-C device, make sure to use the cable included in the box.
- If you’re using a mobile battery (power bank), make sure it doesn’t have power-save or auto-sleep features.
- The DJ controller may not function correctly if:
- The computer’s power supply capacity is too low.
- Other USB devices that require bus power are connected to your computer.
- Connected headphone impedance is lower than 32 ohms.
- A mono cable is connected to the headphone output.
Android and iOS Compatibility
Through using the rekordbox mobile app and other compatible streaming music services, the DDJ-GRV6 is compatible with most Android and iOS devices. Simply go to the Google Play store or the App Store, download the rekordbox app, and follow the app’s instructions.
If you are using the app, you’ll need to make sure the DJ controller is connected to the wall or to a USB mobile power supply.
Working with the DDJ-GRV6
The DDJ-GRV6 is compatible with both rekordbox and Serato DJ, making it a perfect DJ controller for anyone out there. The main functions are like other DJ controllers, but there are some unique features that set it apart from the rest.
Now that your DJ rig is set up and connected to your rig, we’ll cover the basics to get you up and running. Be sure to also refer to the DDJ-GRV6 instruction manual and our DJ controller quickstart guide for more details.
rekordbox
NOTE: Groove Circuit technology is exclusive to rekordbox. It is not available for rekordbox with Android devices, iOS devices, or Serato DJ.
The Groove Circuit feature allows you to swap your track’s drum loops on the fly. Once a drum loop is assigned to the slot, you can use it to replace the drums of your current track. To use this, you must enable the Stems function. Check out rekordbox’s support page to learn more about Groove Circuit and Stem integration.
- Launch rekordbox, navigate to Preferences, and choose Extensions.
- Click the Stems tab, then click Enable the STEMS Function and Enable the GROOVE CIRCUIT Function.
- When enabling Stems, select the option to choose quality over speed. It will take longer to process, but you will get much better results than if you select speed.
- Once Stems are enabled, you can click the Groove Circuit (crossing right arrow) button to open the Groove Circuit panel.
- You can now press one of the four Drum Swap buttons to replace the drums.
- Hold Shift and press the Bank A and Bank B buttons to cycle through the two banks of four drum loops loaded in rekordbox.
- Use the four Drum Roll buttons to perform a loop roll.
Capturing loops
There are plenty of great factory preset loops already available, but if you’d like to use a drum loop from a song, you can capture and assign it as one of the playable grooves.
IMPORTANT! You need to make sure it is aligned exactly on the downbeat, or else it won’t line up or quantize correctly.
- Load the track of the drum loop you wish to capture to a deck.
- Press Capture at the beginning of where you want to start capturing the beat.
- To change the capture length, hold Shift and press Capture. The loop length is in multiples of four, with the minimum length being four beats.
- The number of times you press Capture will change the length of the loop in increments. For example, if you hold Shift and press the Capture button three times, it will capture 16 beats.
- Press one of the DRUM SWAP (1–4) buttons to assign the loop.
Serato DJ Pro
NOTE: The included overlay layout sticker will provide visual aid to determine the button functions specific to Serato DJ.
The Groove Circuit is different in Serato DJ from in rekordbox. Instead of swapping drum loops, it will control the Stems and Stems FX in Serato DJ. Just like rekordbox, however, you will need to make sure that Stems are enabled in the software.
- Launch Serato DJ, making sure the Analyze Stems feature is enabled in the preferences.
- Click and drag the track(s) you want to split into the Stems crate. Once you see the Stem icon located next to the track in your library, you can use the DJ controller’s Stem features.
- It will create a separate Stem file and store it on your hard drive.
- On the DDJ-GRV6, press the Stem track(s) you want to work with (vocal, melody, bass, or drums), then use the Stems Roll buttons to roll the Stem.
Stem FX
You can control four different Stem FX directly from the DDJ-GRV6. You can apply the selected effect to any Stem track that is currently selected.
- Press the Shift button, then use the four Stem buttons to select the effect (Echo Out, Roll Out, Braker, or Delay).
- Let go of Shift,then choose the Stem tracks whose effects you want to alter.
- While the track is playing, use the FX switch to either temporarily enable the effect (ON)or apply the effect (LOCK).
Related Articles
When you need help, Sweetwater has the answers!
Our knowledge base contains over 28,000 expertly written tech articles that will give you answers and help you get the most out of your gear. Our pro musicians and gear experts update content daily to keep you informed and on your way. Best of all, it’s totally FREE, and it’s just another reason that you get more at Sweetwater.com.


Offer applies only to single-receipt qualifying purchases. Select manufacturers may require that only the manufacturer’s products qualify towards the minimum purchase amount needed to be eligible for promotional financing. Otherwise, an invoice that meets the minimum purchase amount and contains at least one qualifying manufacturer product is eligible for promotional financing. No interest will be charged on promo purchase balance, and equal monthly payments are required on promo purchase until it is paid in full. The payments equal the amount financed divided by the number of months in the promo period, rounded up to the next whole dollar. These payments may be higher than the payments that would be required if this purchase was a non-promo purchase. During the last month(s) of the promo period the required monthly payment may be reduced due to the prior months’ rounding. Regular account terms apply to non-promo purchases. New Accounts as of 07/31/2025: Purchase APR is 34.99%. Penalty APR is 39.99%. Min Interest Charge is $2. Existing cardholders: See your credit card agreement terms. Subject to credit approval.
Offer applies only to single-receipt qualifying purchases. No interest will be charged on the promo balance if you pay it off, in full, within the promo period. If you do not, interest will be charged on the promo balance from the purchase date. The required minimum monthly payments may or may not pay off the promo balance before the end of the promo period, depending on purchase amount, promo length and payment allocation. Regular account terms apply to non-promo purchases and, after promo period ends, to the promo balance. New Accounts as of 07/31/2025: Purchase APR is 34.99%. Penalty APR is 39.99%. Min Interest Charge is $2. Existing cardholders: See your credit card agreement terms. Subject to credit approval.
The estimated required monthly payment shown which excludes taxes and delivery equals the amount financed divided by the number of months in the promo period, rounded up to the next cent. During the last month(s) of the promo period the required monthly payment may be reduced due to this rounding. These payments apply only with the financing offer shown. If you make these payments by the due date each month, you should pay off this amount financed within the promo period, if it is the only balance you are paying off. If you have other balances on your account, this payment will be added to any other minimum monthly payments.
Applies only to select items from this manufacturer. Ask your Sweetwater Sales Engineer for more details.