
Getting Started With Serato DJ
Serato is the industry-standard software for DJs all around the world. There are many features to discover within Serato, so this guide will cover the basics to get started with your first DJ set. Be sure to check out the Serato User Manual for more information!
Navigating Serato
Before we show you how to get started for the first time in the Serato DJ software, we will help you navigate the software so you get a better feel for the layout and don’t get overwhelmed.
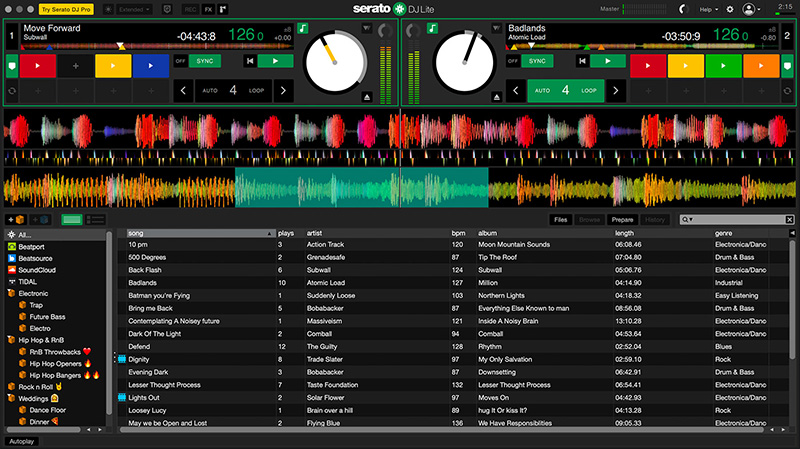
Serato is broken up into four main areas: Deck controls, Waveform display, Music library, and Crates. There are features and options to access within each area while using the software. Here are some tips for working in each area.
Deck Controls
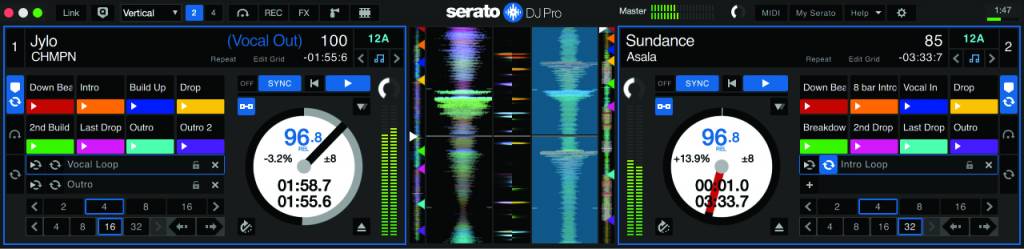
The Deck controls are used to control the main parameters of the track, such as syncing tempo, adding cue points and loops, adjusting the track volume, and navigating track locations.
- Clicking and dragging the waveform in the Deck controls is a great way to quickly jump to a specific part of the song.
- Click the note (keylock) button to retain the track’s key when the tempo has changed.
- Double-click the back button to load the previous song added to that track.
- Press the Cues & Loops button, then click the + buttons to add cue points to the selected track.
- Click the Sync button to sync the tempos of the currently loaded tracks.
- If the tempos differ by more than approximately 2–3 bpm, engage the keylock so the pitches are retained.
Waveform Display

The Waveform display is self-explanatory: it’s where you’ll see the waveform of each track. The primary function within the Waveform display is clicking and dragging the waveform to scrub the track. This is very important, especially when fine-tuning the alignment of tracks.
Music Library
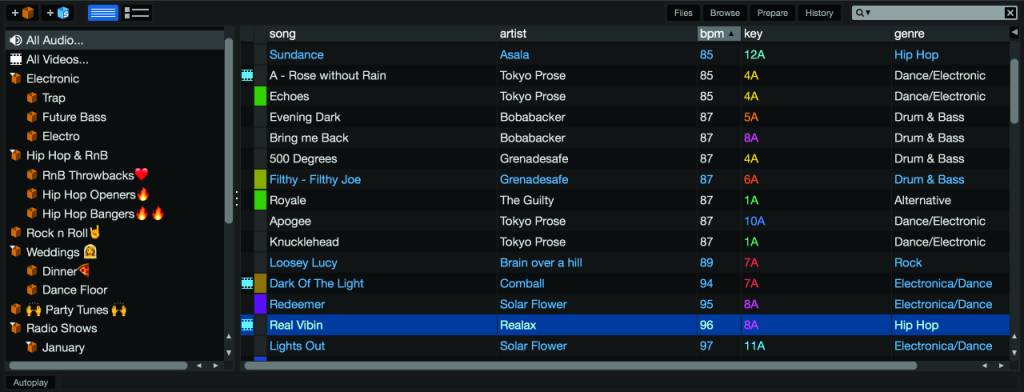
All the music that has been loaded into Serato DJ lives in the Music library section. You can sort tracks by song, number of plays, artist, bpm, album, and length. This is also where you’ll load and analyze all your tracks. You can also add comments for each track, which is great when organizing and creating your library and crates.
- Click the left arrow on the right of the Music library (underneath the search bar) to show you fields you want to add or remove (genre, tempo, length, etc.).
- You may notice an icon to the left of the track name. This indicates a specific status of the song, such as the track being corrupt, missing, or locked. Check out the Serato DJ manual for a complete list of status icons and descriptions.
- Double-click a track’s field (e.g., genre, artist) to update the tag. For example, if a song doesn’t have a genre listed, but you know the genre is EDM, double-click the genre box on the track and type “EDM”. This will be important, especially if you’re creating smart crates.
Crates

Crates are essentially playlists, and it’s how you’ll sort your music for later use. What’s great is that you can add the same song to multiple crates. For example, if an EDM song fits multiple categories, just click and drag the song from the Music library to each crate. To create a crate, simply click the Add Crate button, then rename it. You can also create subcrates, which help organize your tracks even further.
- We highly recommend renaming your crate to something easily identifiable, such as Hip-hop Set, Dance Set, or Party Mix Set.
- Create subcrates by creating a blank crate, renaming it, then dragging and dropping it into another. This is great, especially if your song is part of a subgenre or if you want specific songs within a crate to be grouped together.
Smart crates
NOTE: The Smart Crate feature is only available for Serato DJ Pro users.
The Smart Crate feature allows you to create and update special crates based on a specific set of rules you select. This is especially useful if you have an extensive music library or want to import a particular batch of songs without scrolling through your library. Check out Serato’s video below to learn more about smart crates!
How to Use Smart Crates | Serato Pro Tip
How to Load Music in Serato DJ
IMPORTANT: While almost every audio file format is supported, there are some you cannot import, such as DRM-protected files. Visit Serato’s support page for more information.
Importing songs to Serato is straightforward, no matter where the music is stored. When importing your songs from a computer or external hard drive, click Files, navigate to the folder or file location, then click and drag them to the Music library. Alternatively, you can click and drag a folder to the Crate section, which will then create a new crate with only those songs. Doing it this way is great if you already have dedicated genre folders on your computer and you don’t want to sort through your entire library.
- Once your music is loaded into your Music library, click Analyze Files. This allows Serato to analyze the track’s key and bpm.
- Be patient, as it may take some time to analyze the tracks. The more tracks you analyze, the longer it will take.
- Drag and drop selected songs into a crate.
Importing Playlists from Apple Music (iTunes)
One of the most popular ways to import playlists to Serato is through Apple Music, formerly known as iTunes. You need to go through a few additional steps so Serato can load your iTunes library.
- Click the gear (settings) icon located at the top right of Serato, click Library + Display, then check the Show iTunes Library box. This will let Serato and Music sync.
- Close out of Serato, launch Apple Music (iTunes), and create a playlist.
- Go to Music’s Preferences, select Files, then uncheck the Keep Music Media Folder organized and Copy Files to Music Media Folder when adding to library boxes.
- Go to Music’s Preferences, select Advanced, then check the box that says Share iTunes Library XML with other applications.
- Relaunch Serato. Your iTunes library should now appear in the Crates section.
Stem Separation in Serato DJ
TIP: Creating stems in Serato will create a separate Serato-specific stem file. Make sure you have enough space on your storage drive, as files can be large (a 3-minute song will be approximately 35MB), which can add up!
Stem separation splits one audio track into four different elements in Serato. This is great for remixing, allowing you to change the vibe and make your set sound unique. In Serato, stem separation splits the audio track into vocals, drums, bass, and melodies.
- If you don’t have a DJ controller connected, stem separation is limited to two elements: vocal (acapella) and instruments.
If you load a track directly to a deck without analyzing it, separation will take a few moments each time. Analyzing stems beforehand is the best option if you want to work with them on the fly.
Doing so will require more processing power and storage space, but it will occur as soon as you load the track to a deck.
- Click the Preferences (gear) icon to open the DJ Preferences window, then click Analyze Stems. This enables stem separation.
- Click the Preferences (gear) icon to return to the main Performance screen.
- Click and drag the track to the Stems Crate. A gray stem icon should now appear on the left.
- Drag the stem icon to one of the decks after the stem icon is white. You can now work with stems!
How to use Real-Time Audio Separation in Serato DJ Pro (STEMS)
Serato DJ Stems Tutorials
Additional Serato DJ Resources
Serato DJ Pro Tutorials (Playlist)
Serato DJ Lite Tutorials (Playlist)
How to Use FX in Serato DJ Pro
How to Half or Double BPMS
Related Articles
When you need help, Sweetwater has the answers!
Our knowledge base contains over 28,000 expertly written tech articles that will give you answers and help you get the most out of your gear. Our pro musicians and gear experts update content daily to keep you informed and on your way. Best of all, it’s totally FREE, and it’s just another reason that you get more at Sweetwater.com.


Offer applies only to single-receipt qualifying purchases. Select manufacturers may require that only the manufacturer’s products qualify towards the minimum purchase amount needed to be eligible for promotional financing. Otherwise, an invoice that meets the minimum purchase amount and contains at least one qualifying manufacturer product is eligible for promotional financing. No interest will be charged on promo purchase balance, and equal monthly payments are required on promo purchase until it is paid in full. The payments equal the amount financed divided by the number of months in the promo period, rounded up to the next whole dollar. These payments may be higher than the payments that would be required if this purchase was a non-promo purchase. During the last month(s) of the promo period the required monthly payment may be reduced due to the prior months’ rounding. Regular account terms apply to non-promo purchases. New Accounts as of 07/31/2025: Purchase APR is 34.99%. Penalty APR is 39.99%. Min Interest Charge is $2. Existing cardholders: See your credit card agreement terms. Subject to credit approval.
Offer applies only to single-receipt qualifying purchases. No interest will be charged on the promo balance if you pay it off, in full, within the promo period. If you do not, interest will be charged on the promo balance from the purchase date. The required minimum monthly payments may or may not pay off the promo balance before the end of the promo period, depending on purchase amount, promo length and payment allocation. Regular account terms apply to non-promo purchases and, after promo period ends, to the promo balance. New Accounts as of 07/31/2025: Purchase APR is 34.99%. Penalty APR is 39.99%. Min Interest Charge is $2. Existing cardholders: See your credit card agreement terms. Subject to credit approval.
The estimated required monthly payment shown which excludes taxes and delivery equals the amount financed divided by the number of months in the promo period, rounded up to the next cent. During the last month(s) of the promo period the required monthly payment may be reduced due to this rounding. These payments apply only with the financing offer shown. If you make these payments by the due date each month, you should pay off this amount financed within the promo period, if it is the only balance you are paying off. If you have other balances on your account, this payment will be added to any other minimum monthly payments.
Applies only to select items from this manufacturer. Ask your Sweetwater Sales Engineer for more details.