
Alesis Strata Prime Setup Guide
The Alesis Strata Prime electronic drum kit is second to none. It is an excellent choice for any studio or touring drummer. In this guide, we’ll show you how to set up and use it for the first time. As this kit is packed with features, this article only scratches the surface, so be sure to check out the Strata Prime manual to learn more. Follow the sections below to get started.
- Strata Prime Setup and Connections
- Strata Prime Hi-hat Calibration
- Update the Strata Prime Module Settings
- Working with Samples on the Strata Prime
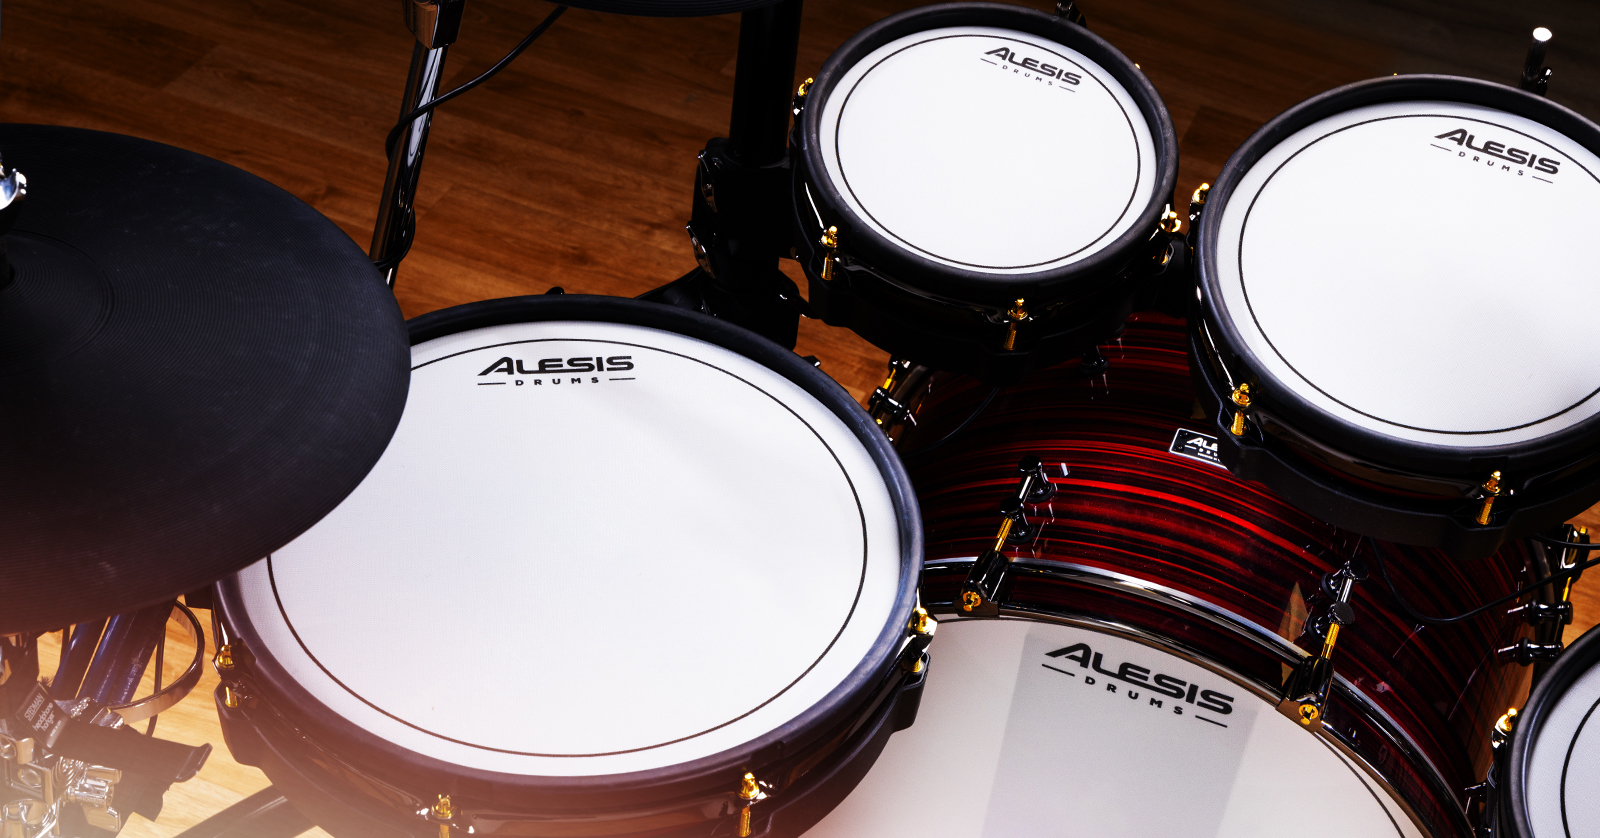
Strata Setup and Connections
Setting up the Alesis Strata Prime is straightforward. Just follow the assembly instructions included in the box. Here are a few tips for setting up your kit.
- Keep the cabling tidy by using hook-and-loop straps or zip ties to secure the cables to the rack. This will not only make the kit look clean, but it will also help prevent tangles.
- Use a drum rug underneath the Strata to prevent slipping. This also prevents the kit from absorbing vibrations that can lead to false triggering.
- Label the cables since plenty of connections are available on the Strata Prime module. Doing so lets you know that you connected the correct cable to its associated pad.
- Make sure the cymbals and drum pads aren’t too close together. Ensuring they don’t touch prevents false triggering.
- Fully tighten the L-clamps attached to the rack, and fully tighten the pads to the L-clamps.
- Make sure the cymbal pads are on securely. They should swing freely just like regular cymbals, but attaching them too loosely or too tightly can cause vibration and result in false triggering.
- Make sure your kick drum pedal has a plastic or wood beater. Felt beaters will wear down the mesh head, resulting in tears.
Bass Drum Assembly
- Attach your bass drum pedal to the bass drum before attaching the spurs.
- Loosen the bass drum spurs so the bass drum is touching the ground.
- Lift the bass drum until the spurs lock into place, then tighten them.
Strata Prime Drum Kit Overview | Alesis Drums
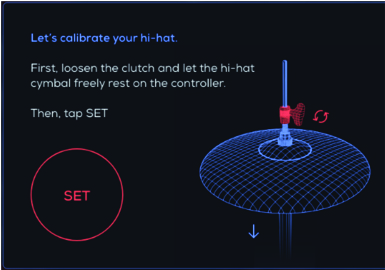
Strata Prime Hi-hat Calibration
Hi-hat calibration is vitally important with any electronic drum kit. Without calibration, hi-hat performance won’t be natural. Unlike other electronic kits, where calibration requires diving through menus, Alesis has made the process straightforward, so you can spend more time playing and less time menu diving.
- Loosen the hi-hat clutch so the hi-hat is resting on the trigger module.
- Press Trigger Edit, then press HH Setup at the top-right corner of the display.
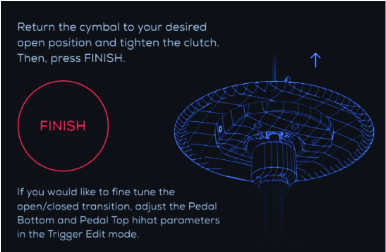
- Press Set on the display, raise the hi-hat back to the playing position by hand, and tighten the clutch.
- Holding the pedal down and tightening it may cause it to trigger mistakenly.
- Press Finish. Follow the on-screen prompts.
- Once you’re back in the Hi-hat Setup menu, use the last three knobs on the module to fine-tune the settings.
Update the Strata Prime Module Settings
TIP: If you’re having difficulty finding the correct settings, adjust the pad tension for more natural stick- and beater responses, as the pad heads come shipped under high tension.
After everything is set up and connected, you must update the pad and module settings. The factory default settings are a great starting point. However, not all drummers are the same, so fine-tuning will make your playing experience with the Strata Prime more enjoyable. It may take a little time, but it’s worth it!
Adjust Trigger Performance
The pads have 360-degree playability, so adjusting settings such as sensitivity and threshold is crucial. These settings can all be found in the Trigger Edit menu.
- Press the Kit button, then press Trigger Edit,which islocated on the left side of the screen.
- Double-tap the pad you wish to edit. You will then see it lit red on the display.
- Use the encoder knobs to adjust the settings. Test it at different dynamics to ensure you get the most accurate reading!
Crosstalk Learning
Crosstalk is the byproduct of hitting a pad too hard, causing other pads to trigger. This is one of the most frustrating issues an electronic drum kit player runs into. Alesis has added a feature known as Crosstalk Learning, which will automatically prevent crosstalk from occurring.
- Double-tap the drum on which you wish to enable crosstalk learning.
- Press Learn XTalk. Follow the on-screen instructions.
- After completing the Crosstalk Learning process, use the first two encoders to fine-tune the crosstalk settings.
Using Third-party Drum Pads
NOTE: Third-party pads not included in the list below aren’t verified and may not work correctly.
While it’s recommended to use Alesis Strata Prime pads when expanding your kit, you can also use some dual- and triple pads from Roland and Yamaha that have full functionality. Alesis has made it easy to incorporate these pads.
- Press the Kit button, then choose Trigger Edit.
- Double-tap the drum you want to assign, then scroll and choose the appropriate pad to add it. Alternatively, you can use the encoder knob.
- Verify that the pad you use matches the pad selected in the module!
Here is the complete list of fully compatible third-party drum pads:
Roland
- PD-105
- PD-128
- PDA-100
- PDA140F
- PDX-100
- PDX-12
- PDX-6
- PDX-8
Yamaha
- XP105T-M
- XP125SD-M
- XP125T-M
Working with Samples on the Strata Prime
Working with samples on the Strata Prime module couldn’t be easier. It comes with more than 40GB of high-quality BFD samples and an additional 80GB for custom samples! Alesis has made it easy to work with them, too, as everything you need is on the display. No menu diving is necessary! Here’s how to change a sample.
- Press the Kit button, then select Kit Edit.
- Double-tap the drum graphic you want to change, locate the sample on the left side of the screen, and then double-tap it to apply the changes.
- Single-tap a sample from left to right to preview the velocity of the sample.
- Single-tap the drum graphic to preview the sample at a fixed velocity.
Importing Samples
NOTE: The following file types are supported: .WAV, .MP3, and .AIFF
One great thing you about the Strata Prime is its ability to import custom samples via thumb drive or SD card!
- Press the Kit button, then press the Import icon to open the Import screen.
- Use the encoder knob to select the sample you wish to import, then press it to import the sample.
- Press the Kit button to get back to the main Kit screen, press Library, and use the encoder to navigate to User.
Related Articles
When you need help, Sweetwater has the answers!
Our knowledge base contains over 28,000 expertly written tech articles that will give you answers and help you get the most out of your gear. Our pro musicians and gear experts update content daily to keep you informed and on your way. Best of all, it’s totally FREE, and it’s just another reason that you get more at Sweetwater.com.

