
How to Install Windows 10
Getting started with Windows 10 installation
In this guide, we will show you different ways of installing and reinstalling the Windows 10 operating system on your computer. Before upgrading, verify your PC, audio/MIDI devices, and DAW/plug-in software are each compatible and officially supported for the latest version of Windows 10. Follow the sections below to get started.
When to install Windows 10
While you don’t have to reinstall Windows 10 regularly, there may be a time where you’ll need to perform a clean installation. The most common reasons are when you get a new system hard drive, build a PC, or if you need to upgrade from an older version (i.e., Windows 7 or Windows 8).
If you’ve done extensive troubleshooting and you’re experiencing sluggish performance, have corrupt system files, or having issues with Windows functions (i.e., startup, shutdown, memory issues) even after extensive troubleshooting, performing a clean install of Windows 10 may be the only option.
Even installing non-reputable third-party software can cause issues that can potentially install useless (and potentially harmful) registry files on your computer, resulting in needing to reinstall.
Create a backup before installing Windows 10
We cannot stress enough how important it is to back up personal files from your system disk (i.e., DAW projects, audio files, photos, etc.) Unless there’s nothing important, performing a clean install of Windows 10 without a backup can be very time-consuming. You may need to reinstall driver software, plug-ins, and virtual instruments all over again. So before reinstalling Windows, be sure to back up your files to a secondary hard drive.
Here are a few tips to consider before installing or reinstalling Windows:
- Download the latest driver installers for any of your devices such as your audio interface, network adapter (i.e., router), and graphics card and place them on the backup drive. This will get you up and running much faster.
- Create a list of all the software and apps you have. To make things easier, consider downloading Belarc Advisor, which will scan your hard drive and create a detailed list of all drivers and software installed on your computer.
Windows 10 activation
Make sure you have a Microsoft account linked to your computer, as your product key is linked to that account. If an account isn’t linked, you may need to find your product key to reactivate Windows. Follow these steps to check if your copy of Windows 10 is linked to your Microsoft account
- Click the Windows icon on the toolbar, click the Settings (cog) icon, then select Update & Security.
- Next, click Activation. If it says Windows 10 is activated with a digital license linked to your Microsoft account, you won’t have to do anything further.
- If it only says Windows 10 is activated with a digital license, go back to the Settings window, click Accounts, then select Your info.
- Click Sign in with a Microsoft account, follow the on-screen instructions, go back to the Activation window, and verify it says Windows 10 is activated with a digital license linked to your Microsoft account.
How to install Windows 10
There are three methods of installing Windows 10: Reset this PC, Fresh Start, and performing a clean install using the Windows 10 installer tool. If you can boot into Windows 10 and just need a clean reinstallation, you can use the Reset this PC or Fresh Start feature. However, if this is your first time installing Windows or can’t boot into Windows, you’ll need to use the Windows 10 installer tool and perform a clean reinstallation. If you’re reinstalling Windows, don’t forget to back up any important files!
Reset this PC
Think of the Reset this PC feature as a factory reset. Windows 10 will be reinstalled but will revert to the original version of Windows 10 that was initially installed, and it will also reinstall any software that was shipped with your computer. For example, if you purchased a pre-built computer from a store, it will reinstall any drivers and software (i.e., bloatware, trialware) that were originally included.
Using this option will let you keep personal files, and you won’t need to reactivate your Windows 10 license, but Windows will need to install all of its updates, which, depending on the version you’re running, can take quite some time. You’ll need to reinstall any apps you have. Since it reinstalls directly from the disk partition, no internet connection is required.
- Click the Windows icon on the toolbar, type reset, then select Reset this PC.
- Under Reset this PC, click Get Started.
- Select Keep my files or Remove everything, then follow the on-screen instructions.
- Keep my files will remove any installed software and apps, resets Windows settings, but won’t delete any of your personal data (i.e., pictures, documents, music files).
- Remove everything is self-explanatory. Instead of keeping your files, it will remove all apps and personal data, as if you just turned your computer on for the first time.
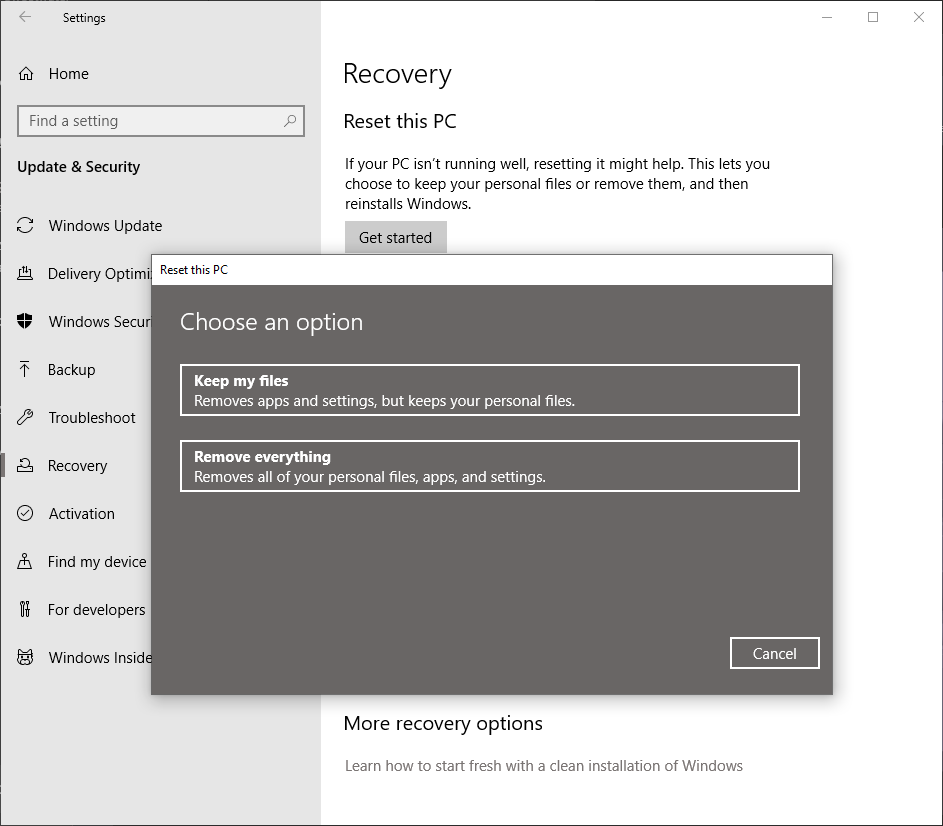
Reset this PC window.
Fresh Start
The Fresh Start option is similar to Reset this PC in that it resets Windows 10 and will remove any apps and drivers you installed. However, instead of reinstalling the original version of Windows you installed, it will reinstall the latest Windows version from the Microsoft Store, and you won’t lose any personal files. You must have an internet connection to perform the Fresh Start.
- Click the Windows icon on the toolbar, then click the Settings (cog) icon.
- Navigate to Update and Security, click Recovery on the left side of the window, then click Learn how to start fresh with a clean installation of Windows.
- When the Did you mean to switch apps? Window appears, click Yes.
- Select Get started, then click Next.
- On the following Window, it will show you which apps will be uninstalled. Please take note, as you will need to reinstall them once the process is complete.
- Click Next once more to begin the installation process.
- Depending on your internet connection, the process will take 20-45 minutes.
- After installation, follow the on-screen prompts to complete the installation process.

Fresh Start window.
Clean installation
If the Reset this PC or Fresh Start options didn’t work, or if your computer can’t boot into Windows at all, you will need to perform a clean install of Windows 10. What this does is it erases the previous version of Windows 10 and replaces it with the new one. The vital difference between this and the other options is that it actually deletes the partitions on the system disk where Windows 10 resides.
The installation is a two-step process. You first need to create the installer. Once that’s created, you can then perform the installation. Before you begin a clean installation, however, be sure to have the following items:
- Windows 10 Media Creation tool
- USB thumb drive with at least 8GB of space or a blank DVD (if using the .iso file).
- Internet connection
- Windows 10 Product Key (if necessary)
Create the Windows 10 installer
- Go to the Microsoft website and download the Windows 10 Media Creation tool.
- Navigate to your Downloads folder, and double-click MediaCreationToolxxxx .exe file.
- Read the Microsoft Terms and click Accept.
- Select Create installation media (USB flash drive, DVD, or ISO file) for another PC and click Next.
- On the next screen, If you need to change the language, Edition, or architecture (32-bit or 64-bit), uncheck the Use recommended settings for this PC and use the dropdown boxes to update the installer.
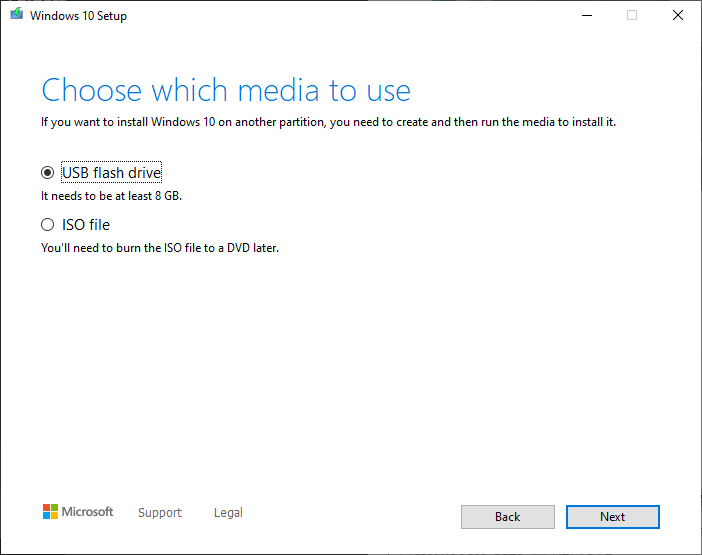
- Choose the media you plan on placing the Windows 10 installer on.
- If you choose ISO file, you will need a blank DVD and burn it to the disc before installing. CD-R and CD-RW’s are not compatible.
- Select the drive you want to place the Windows 10 installer on, click Next, then click Finish.
- If using a USB thumb drive, connect it to your computer. It will also automatically format the drive, so be sure to back up any data on the drive beforehand.
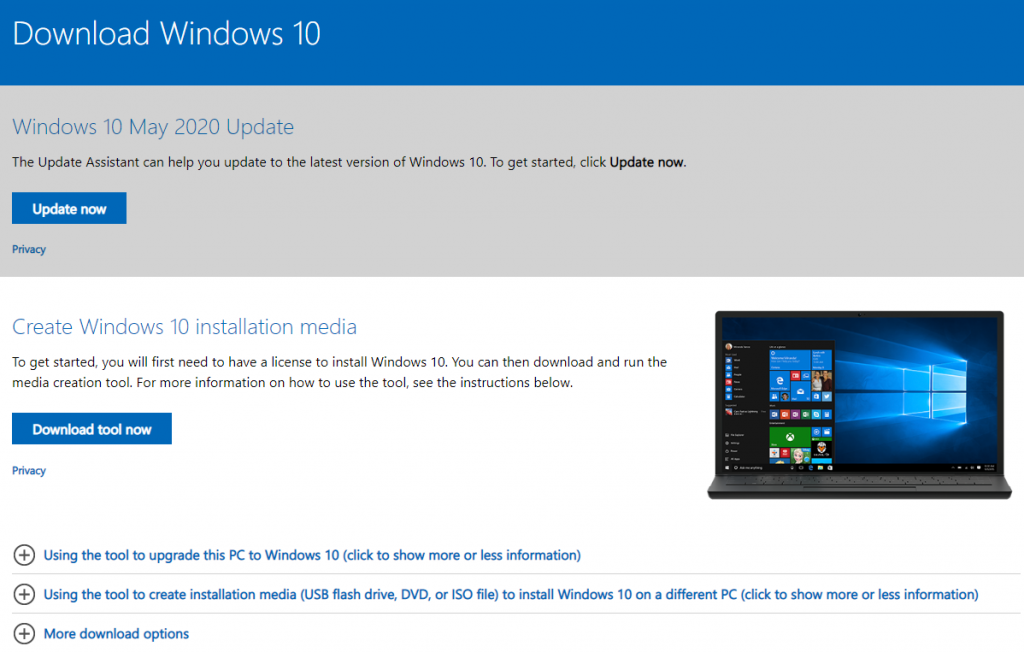
Click the image to download the Windows Media Creation tool.
Run the Windows 10 installer
Depending on the situation, there are two ways to run the Windows 10 installer. If your computer boots, but the Refresh this PC or Fresh Start doesn’t fix your issue, you can install it via the Recovery window within Windows Settings. If your computer doesn’t boot into Windows at all, or if you’re installing Windows on a new computer, you’ll need to go into your BIOS/UEFI and run the installer there.
- If your computer boots but Refresh or Fresh Start didn’t work
- First time installation or if your computer doesn’t boot into Windows 10
If your computer boots but Refresh or Fresh Start didn’t work
With your USB thumb drive or DVD that the ISO file is burned to is inserted into your computer, follow these steps.
- Click the Windows icon, then click the cog (settings) icon.
- Go to Update & Security, then select Recovery.
- Click Restart now under the Advanced Startup section.
- Choose Select a device, then select the external media that the Windows 10 installer is located (DVD, USB thumb drive).
- In the window that appears, choose the options most applicable to you, then click Next.
- Choose Install now, check I accept, then select Custom: Install Windows only (advanced).
- Your computer will then display the list of drives and partitions currently connected. If you have multiple drives connected, you’ll only need to delete the partitions on the drive you want Windows 10 installed to.
- Highlight each partition on that drive and ONLY that drive, select Delete, then click OK.
- Follow the step above for all partitions EXCEPT the one that says Unallocated Space. When you’ve completed that, only Drive 0 Unallocated Space should be listed. Once finished, click Next.
- The Installing Windows window will appear. Once complete, your computer will restart.
- When the computer restarts, it may try to boot from the external media (DVD, thumb drive). When you receive a prompt to choose the language/keyboard layout, disconnect the external media, then click OK. Your computer will restart once more.
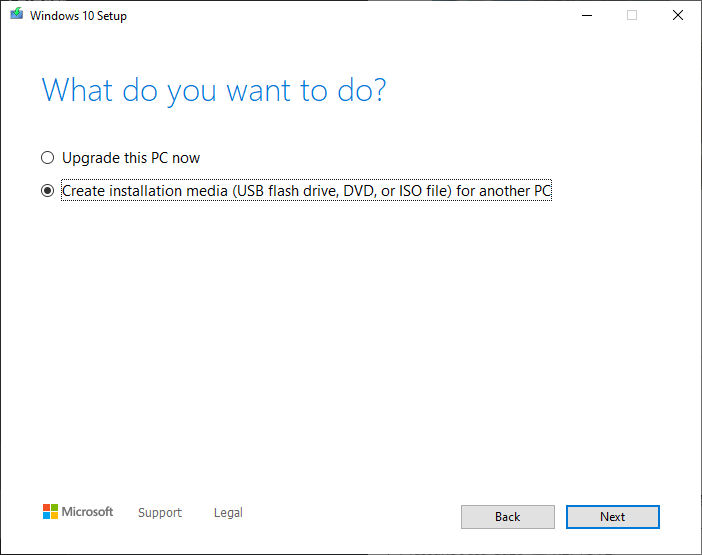

Clean installation windows from the Recovery menu. Click to enlarge.
First time installation or if your computer doesn’t boot into Windows 10
Note: Your computer will restart multiple times during a clean installation and will take some time to install.
With your USB thumb drive or DVD that has the ISO file on it is inserted in your computer, follow these steps. This should only be performed if you feel comfortable making changes. If you aren’t sure what motherboard you have, check out our article on how to check your PC’s specs.
IMPORTANT: You’ll need enter your BIOS/UEFI when installing Windows 10 this way. Since there are many different types of motherboards on the market, you will need to refer to your motherboard’s owner’s manual to learn how to access the BIOS/UEFI.
- Disconnect any non-essential USB peripherals such as your external hard drives, iLok, and audio interface.
- Turn on your computer while pressing the Function key associated with your motherboard to enter your BIOS/UEFI.
- Please refer to your motherboard’s owner’s manual to confirm which Function key launches the BIOS/UEFI.
- Change the boot order so that your USB thumb drive or DVD is set to boot first.
- Save the changes and exit. Once you exit, it should boot into the Windows 10 installer.
- On the next window, choose Install now, check I accept, then select Custom: Install Windows only (advanced).
- If this is your first time installing Windows or if it prompts you to enter your Product Key, do so now.
- Your computer will then display the list of drives and partitions currently connected. If you have multiple drives connected, you’ll only need to delete the partitions on the drive you want Windows 10 installed to.
- Highlight each partition on that drive and ONLY that drive, select Delete, then click OK.
- Follow the step above for all partitions EXCEPT the one that says Unallocated Space. When you’ve completed that, only Drive 0 Unallocated Space should be listed. Once finished, click Next.
Related Articles
When you need help, Sweetwater has the answers!
Our knowledge base contains over 28,000 expertly written tech articles that will give you answers and help you get the most out of your gear. Our pro musicians and gear experts update content daily to keep you informed and on your way. Best of all, it’s totally FREE, and it’s just another reason that you get more at Sweetwater.com.

