
Windows 10 Disk Management Explained
Getting started with Windows 10 Disk Management
In this guide, we will explain what the Windows 10 Disk Management utility is, how to get there, and how to navigate it. Follow the sections below to get started.
- What is Windows 10 Disk Management?
- How to get to Disk Management on Windows 10
- Navigating Disk Management
- Troubleshooting hard drives in Disk Management
What is Windows 10 Disk Management?
Windows 10 Disk Management is a built-in utility that allows you to see and manage any internal and external hard drives connected to your computer. While in Disk Management, you can format and reformat hard drives, create partitions, and view various information such as the status, capacity, and percentage of free space available. You also can rename hard drives, assign them specific disk letters, and change the size of partitions on that drive.
If you’re formatting an external hard drive for the first time, you’ll need to open the Disk Management utility so the computer can communicate with it properly. While some external hard drives come with their own configuration software, it’s always good practice to check Disk Management to ensure everything is formatted correctly.
Shop All External Hard Drives 💾
How to get to Disk Management on Windows 10
You can get to the Disk Management utility in several ways, including using the command prompt and searching via This PC, but these are the two fastest and most convenient ways to access it.
- Right-click the Windows icon, then click Disk Management.
- Left-click the Windows icon, type Disk Management, then click Create and format hard disk partitions.
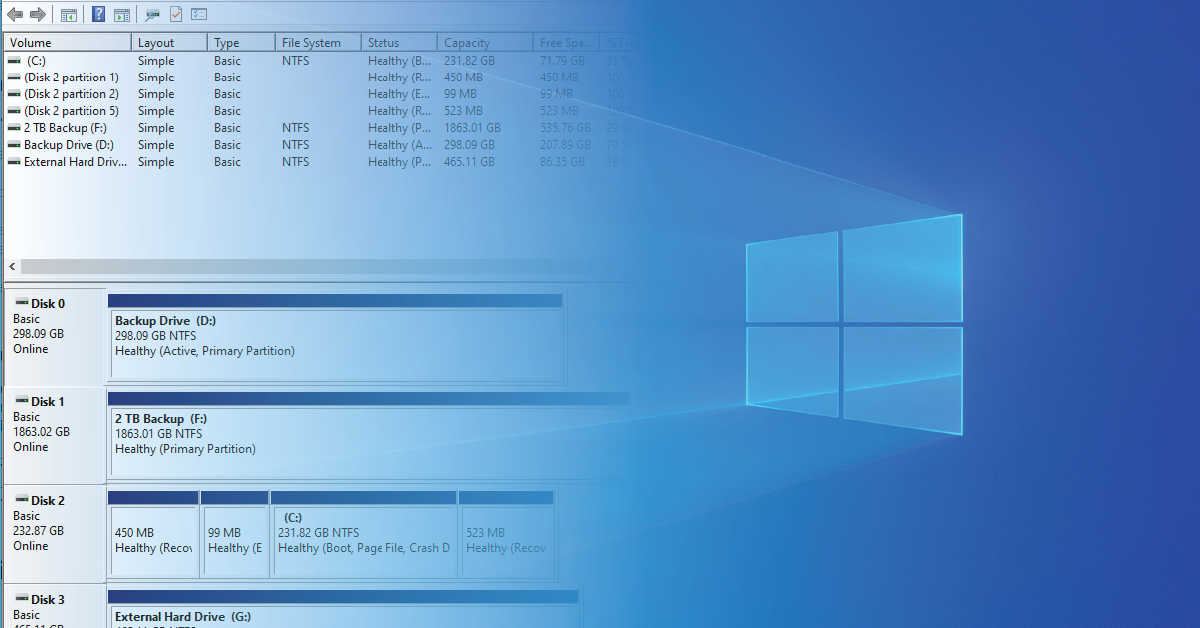
Navigating Disk Management
Once the Disk Management window appears, there are a few things you’ll see. You’ll see an overview of all of the volumes of your connected hard drives on the top half. On the bottom half of the screen, you will see similar information, but instead of the number of volumes, you’ll see the number and graphical view of partitions on each drive and the health of all disks connected.
IMPORTANT: If this is your first time using the Disk Management utility, we recommend only performing basic functions such as disk initialization and disk formatting. Performing advanced functions (i.e., creating dynamic disks or virtual hard drives) without prior knowledge may cause issues with your hard drive.
- The window is fully customizable via the View menu, meaning that you can change the layout, appearance, and color of disk regions.
- Right-click the Volumes listed on the top half of the screen to format, change drive letters, and view advanced properties of the hard drive.
- Right-click the Disks on the bottom half of the screen to convert drives to create new volumes, convert to dynamic and GPT disks, and view advanced properties of the hard drive.
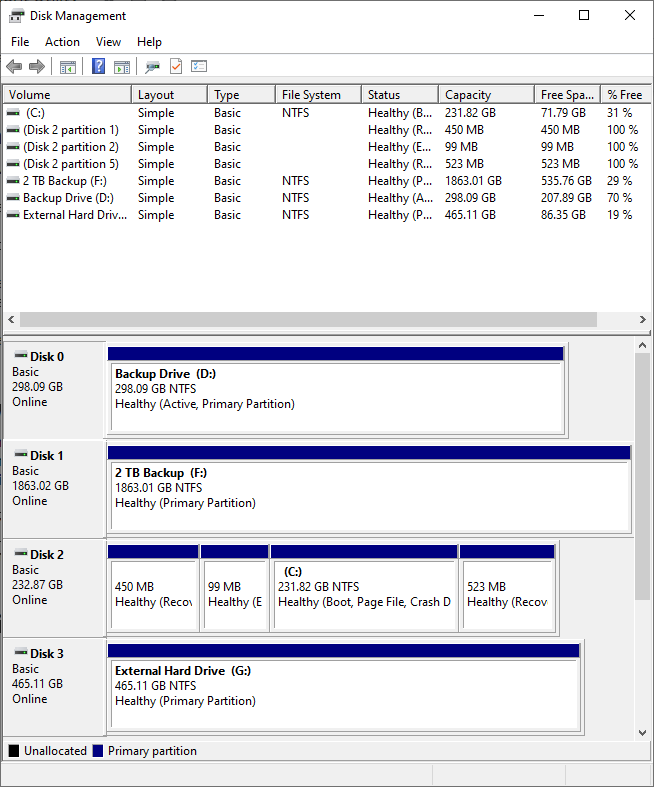
Disk Management screen.
What’s the difference between a volume and a partition?
The terms volume and partition can often be confused for one another. In the Disk Management utility, you’ll notice Volumes listed on the top, but Partitions listed at the bottom.
Partitions are allotted amounts of space assigned to a disk and functions as if it’s a physically separate drive. A Volume is a partition after it has been created then formatted, which means it’s ready to be used. When you open File Explorer, the Volumes will appear as separate “hard drives.”
If the partition is created but isn’t formatted, you won’t be able to access that portion of the hard drive. For example, if you create a 50GB partition on your hard drive but don’t format it, you won’t be able to store any data there.
To make things simple, let’s use a filing cabinet as an example. Think of your hard drive as the cabinet and the Partitions the drawers. Once you separate the drawers, then you would add the hanging file frames and file hangers. This would be formatting the drive. Once you put your folders in the drawer, it is then considered a Volume.
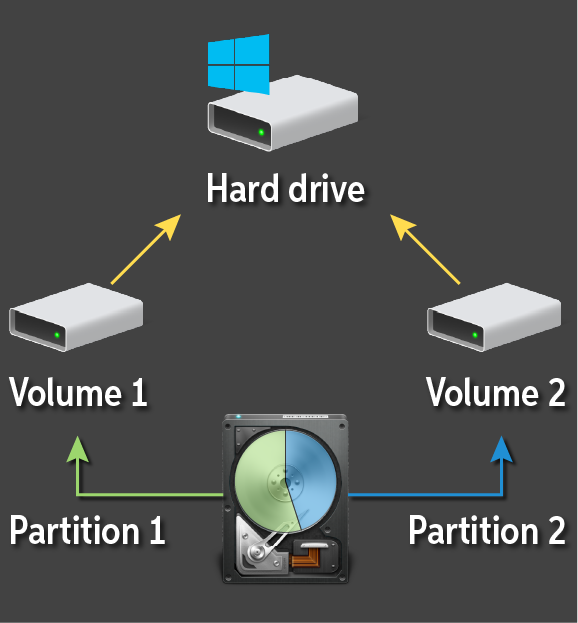
How partitions and volumes work.
Troubleshooting hard drives in Disk Management
There may be times when you’re having problems with an internal or external hard drive, and you’ll need to access the Disk Management utility. This could include a drive not being recognized by your computer, you’re unable to access a particular volume, or the drive intermittently connects and disconnects. If this is a hard drive you’ve been using for some time, this could mean your hard drive is potentially failing. However, if it’s a new hard drive, it’s more often than not merely because it hasn’t been set up correctly.
It’s very important that you always back up your files. If a hard drive fails and you don’t back up your data, you will lose a lot of precious time and hard work.
IMPORTANT: Initializing and reformatting hard drives will erase all data. If you do have to reinitialize and have essential data, you may need to contact a reputable hard drive data recovery company such as Seagate or Glyph to recover your data.
- If you see one of the following messages, perform these steps.
- Not Initialized: right-click the disk and select Initialize.
- Offline: right-click the disk and select Online.
- If the partition says Unallocated (shown as a black bar), be sure to format it to create a new volume.
- Make sure the hard drive is assigned a drive letter. If it doesn’t, right-click the volume in question, then select Change Drive Letters and Paths.
- If the hard drive in question is external, disconnect and reconnect it, then navigate to Action and select Rescan Disks.
Related Articles
When you need help, Sweetwater has the answers!
Our knowledge base contains over 28,000 expertly written tech articles that will give you answers and help you get the most out of your gear. Our pro musicians and gear experts update content daily to keep you informed and on your way. Best of all, it’s totally FREE, and it’s just another reason that you get more at Sweetwater.com.


Offer applies only to single-receipt qualifying purchases. Select manufacturers may require that only the manufacturer’s products qualify towards the minimum purchase amount needed to be eligible for promotional financing. Otherwise, an invoice that meets the minimum purchase amount and contains at least one qualifying manufacturer product is eligible for promotional financing. No interest will be charged on promo purchase balance, and equal monthly payments are required on promo purchase until it is paid in full. The payments equal the amount financed divided by the number of months in the promo period, rounded up to the next whole dollar. These payments may be higher than the payments that would be required if this purchase was a non-promo purchase. During the last month(s) of the promo period the required monthly payment may be reduced due to the prior months’ rounding. Regular account terms apply to non-promo purchases. New Accounts as of 07/31/2025: Purchase APR is 34.99%. Penalty APR is 39.99%. Min Interest Charge is $2. Existing cardholders: See your credit card agreement terms. Subject to credit approval.
Offer applies only to single-receipt qualifying purchases. No interest will be charged on the promo balance if you pay it off, in full, within the promo period. If you do not, interest will be charged on the promo balance from the purchase date. The required minimum monthly payments may or may not pay off the promo balance before the end of the promo period, depending on purchase amount, promo length and payment allocation. Regular account terms apply to non-promo purchases and, after promo period ends, to the promo balance. New Accounts as of 07/31/2025: Purchase APR is 34.99%. Penalty APR is 39.99%. Min Interest Charge is $2. Existing cardholders: See your credit card agreement terms. Subject to credit approval.
The estimated required monthly payment shown which excludes taxes and delivery equals the amount financed divided by the number of months in the promo period, rounded up to the next cent. During the last month(s) of the promo period the required monthly payment may be reduced due to this rounding. These payments apply only with the financing offer shown. If you make these payments by the due date each month, you should pay off this amount financed within the promo period, if it is the only balance you are paying off. If you have other balances on your account, this payment will be added to any other minimum monthly payments.
Applies only to select items from this manufacturer. Ask your Sweetwater Sales Engineer for more details.