
Getting Started With Addictive Drums
XLN Audio’s Addictive Drums 2 is a phenomenal virtual instrument to use in your recording projects, so in this guide, we will show you how to set up, navigate, and use the software for the first time. Follow the sections below to get started.
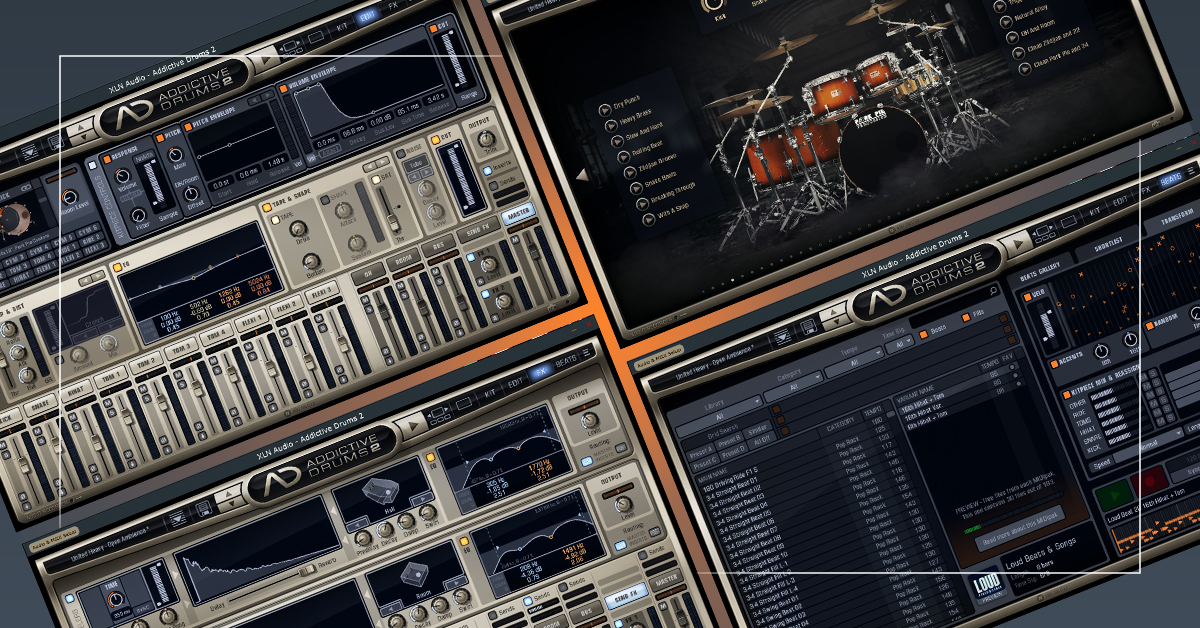
Navigate the software
Whether you use Addictive Drums 2 as a standalone instrument or as a virtual instrument plug-in inside your DAW, the layout (GUI) of the software remains the same. XLN Audio has made navigation easy, meaning you have more time creating and less time having to dive through menus!
Gallery and Explore
Two ways to view and edit kits are via Gallery or Explore. When you select a kit in the Gallery view, it will then take you to the Explore view, which allows you to preview any loops associated with the kit. You can also select a kit in the Explore view by clicking the Left and Right arrows.
- Addictive Drum 2 kits you have not purchased will be listed as Preview. You can select and preview the kits but will not be able to edit them.
Addictive Drums 2 Spotlight: Find Your Sound
Kit
IMPORTANT: You currently cannot import custom samples in Addictive Drums 2.
While in the Kit window, you can select, add, or remove samples, mute and solo them, and adjust the input levels.
- Change the sample by clicking the sample name (e.g., 14×5 Pearl Reference) or using the Up and Down arrows located on the left of the sample.
- Click the L button to the left of the sample name to view an illustrated version of the drum or cymbal and show all available samples for that slot.
- Click the E button to the right of the sample name to enter the Edit window.
Edit
The Edit window is self-explanatory. The top half is dedicated to the raw sound characteristics, such as the pitch, response, and volume envelope. The middle area is specifically made for the sample’s ‘mixing’ characteristics like the mic placement, EQ compressor, and more.
- The Main pitch affects the sample’s pitch, and the Offset pitch blends the pitch of the overhead and room channels. Using these in tandem helps give you an excellent, layered sound.
- The Tone Designer (Kick and Snare only) alters the length of the frequency response.
FX
Just like the Edit window, the FX window is straightforward. This is where you will change the reverb and decay characteristics of the sample.
Addictive Drums 2 Spotlight: Tweak Your Sound
How to enable multi-out in your DAW
You can assign drums to separate tracks when you use Addictive Drums 2 inside a DAW. This is known as multi-out, which is often used to mix drums separately. This gives you complete control over individual drums’ levels, effects, and sidechaining. Follow these steps to enable multi-out in your DAW.
- Load Addictive Drums as an Instrument track.
- Some DAWs may list Addictive Drums as both Stereo and Multi-Out. If this is the case, be sure to select Multi-Out.
- Navigate to a window within Addictive Drums that shows the mixer. At the bottom of each track, you will notice down arrows.
- Click the drum channel’s down arrow and select Pre-fader, Pre-fader + Master, Post-fader, or Post-fader + Master.
- Follow your DAW’s instructions to complete setting up a multi-output virtual instrument track.
How to Control Your Addictive Drums Mix In Your DAW
Separate Output Modes In Addictive Drums 2
Create a custom drum kit
Excellent kits come with Addictive Drummer 2, but XLN Audio has made it easy for you to create your own kits.
- Click the Kit tab. Alternatively, click the Edit tab.
- Click the drum or cymbal’s name (e.g., 10×8 Pork Pie Custom) to open a dropdown box, then scroll up and down to select the sample you want to load.
- Alternatively, click the L button to pull up a graphical version and show all available samples for that slot.
- Once you’ve built the perfect custom kit, click the Disk icon, rename it, then click Save.
- Use the Type tabs to organize your kits even further.
- Use the Sound Ideal slider to organize your kits and libraries by the amount of processing used.
How to Create Cymbal Stacks
How to Pick The Best Drums For Your Song
Working with MIDI
Now that you know how to navigate the software, we’ll show you how to work with MIDI inside Addictive Drums 2. This includes MIDI mapping and working with MIDI loops.
MIDI mapping
If you have an electronic drum kit or MIDI controller, you can change the mapping of the MIDI notes to optimize your performance. XLN Audio has made the process straightforward, so follow these steps to change the mapping.
- Connect your external MIDI controller or drum kit to your computer, then launch Addictive Drums 2.
- Click the Menu (three lines) icon at the top right of the Addictive Drums GUI, then click Map Window…
- If you own an electronic drum kit, use the Map Preset dropdown box and select the model of the drum kit that’s connected.
- If your drum kit isn’t listed, or if you’re using a MIDI controller, keep it set to AD2.
- If you want to change the MIDI note, the sample is assigned to, select the drum, click Learn, then press the MIDI controller key/pad to remap the sample.
Addictive Drums 2 – Map it Your Way
MIDI drum loops
While you can’t edit drum loops within Addictive Drums 2, you can transform various settings like the dynamics and length, then import them into your DAW. The process is straightforward, as well.
- Click Beats, then select the groove you want from the list located on the left.
- Click Transform, then change the parameters as necessary.
- Once you’re happy with the loop, click and drag it into your DAW. After you’ve imported the loop, you can then edit the beat.
Building a Beat With Addictive Drums 2
Customize Any Beat in Addictive Drums 2
Related Articles
When you need help, Sweetwater has the answers!
Our knowledge base contains over 28,000 expertly written tech articles that will give you answers and help you get the most out of your gear. Our pro musicians and gear experts update content daily to keep you informed and on your way. Best of all, it’s totally FREE, and it’s just another reason that you get more at Sweetwater.com.


Offer applies only to single-receipt qualifying purchases. Select manufacturers may require that only the manufacturer’s products qualify towards the minimum purchase amount needed to be eligible for promotional financing. Otherwise, an invoice that meets the minimum purchase amount and contains at least one qualifying manufacturer product is eligible for promotional financing. No interest will be charged on promo purchase balance, and equal monthly payments are required on promo purchase until it is paid in full. The payments equal the amount financed divided by the number of months in the promo period, rounded up to the next whole dollar. These payments may be higher than the payments that would be required if this purchase was a non-promo purchase. During the last month(s) of the promo period the required monthly payment may be reduced due to the prior months’ rounding. Regular account terms apply to non-promo purchases. New Accounts as of 07/31/2025: Purchase APR is 34.99%. Penalty APR is 39.99%. Min Interest Charge is $2. Existing cardholders: See your credit card agreement terms. Subject to credit approval.
Offer applies only to single-receipt qualifying purchases. No interest will be charged on the promo balance if you pay it off, in full, within the promo period. If you do not, interest will be charged on the promo balance from the purchase date. The required minimum monthly payments may or may not pay off the promo balance before the end of the promo period, depending on purchase amount, promo length and payment allocation. Regular account terms apply to non-promo purchases and, after promo period ends, to the promo balance. New Accounts as of 07/31/2025: Purchase APR is 34.99%. Penalty APR is 39.99%. Min Interest Charge is $2. Existing cardholders: See your credit card agreement terms. Subject to credit approval.
The estimated required monthly payment shown which excludes taxes and delivery equals the amount financed divided by the number of months in the promo period, rounded up to the next cent. During the last month(s) of the promo period the required monthly payment may be reduced due to this rounding. These payments apply only with the financing offer shown. If you make these payments by the due date each month, you should pay off this amount financed within the promo period, if it is the only balance you are paying off. If you have other balances on your account, this payment will be added to any other minimum monthly payments.
Applies only to select items from this manufacturer. Ask your Sweetwater Sales Engineer for more details.