
Computer Audio Basics for Home Studios
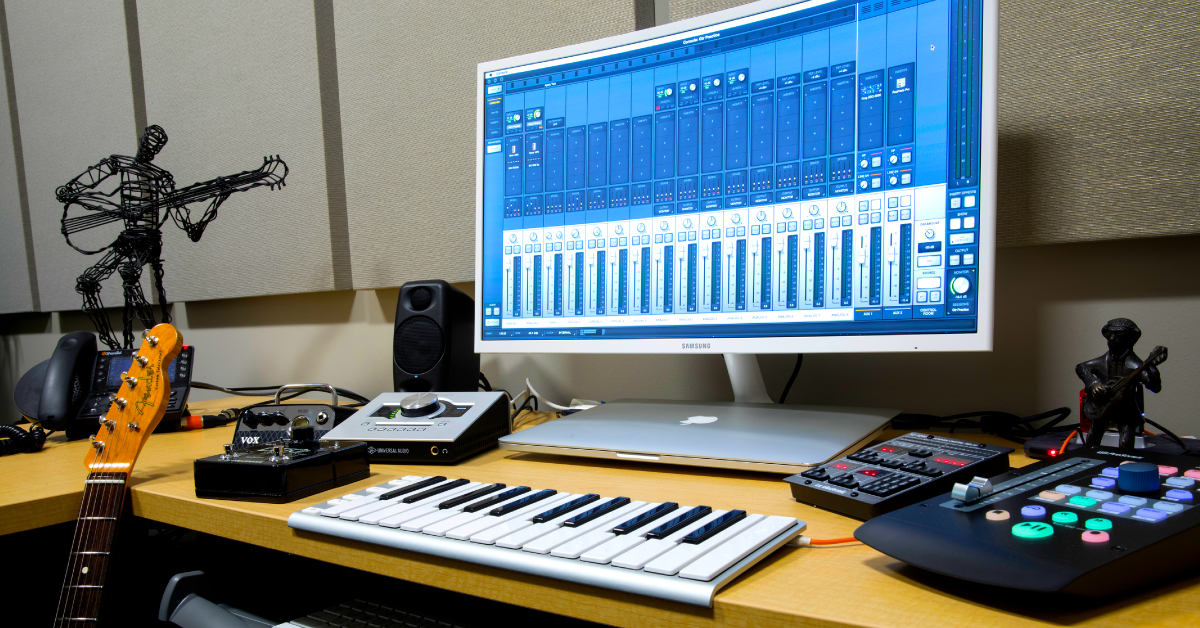
If you’re new to the world of recording or are building a home studio for the first time, then this article is for you. In this guide, we’ll discuss the basics of audio in your home studio and how to manage it with your computer software as well as your audio interface. Follow the sections below to get started.
What is audio playback?
Audio playback is based on the native PC or macOS sound settings and is determined by the settings for your computer’s outputand inputdevices. Computers can play back audio from multiple sources simultaneously, such as audio streaming software, video games, or your DAW, with the aid of your computer’s motherboard/sound card audio drivers. (Think of these software drivers as “technology translators.” They allow hardware from lots of different manufacturers to communicate with each other.) Without the correct drivers installed and implemented, audio input and output will not be achieved. For example, without an output device like a computer’s built-in speakers, the audio has no destination and won’t be heard.
Computer audio playback
For applications that don’t have dedicated sound device settings (a web browser, for example), your computer will default to the native OS audio driver settings. This is fine for the most part, but DAWs such as Cubase and Pro Tools prefer the use of specialized drivers that are optimized for their specific input and output settings.
DAW playback
Some DAWs and other audio streaming software have dedicated input and output sound settings that are completely independent from the standard native OS sound settings. The playback from hardware can be customized within your DAW. It can be the main stereo audio outputs, a secondary pair of studio monitors, headphones, or a combination of all three. But for recording, you often need to monitor the direct signal from inputs connected to your interface, such as a live microphone or guitar, so you may need to adjust the blend/balance of DAW playback and direct monitoring.
Audio interfaces and sound cards
External hardware, such as an audio interface, has its own playback configuration. This is typically aided by separate drivers. Most interfaces come with unique standalone software applications where you can update various software and hardware settings such as routing configurations (for headphone monitoring, as an example). Before anything else, go to the manufacturer’s website and check to see if any driver software is necessary.
Setting up an audio interface on Mac
- From the Menu Bar, click the Apple icon and select System Preferences.
- Click Sound (look for the speaker icon).
- Under the Input and Output tabs, select your audio interface as the primary playback and recording device.
Setting up an audio interface on PC
TIP: It’s always good practice to install the audio driver before connecting your audio interface. If you don’t, then it may create an audio driver conflict, which will result in connectivity issues.
- Right-click the Speaker icon on the Windows taskbar and select Open Sound Settings.
- Use the dropdown boxes in the Input and Output sections to select the audio interface as the default input and output device.
- While in the Sound Settings menu, we highly recommend disabling Exclusive Mode to ensure the best performance possible. Check out our guide to learn how to disable Exclusive Mode.
Third-party audio drivers
Most manufacturers create their own audio driver software in order for their interface to work correctly. Once installed, the audio interface can then be selected within your audio streaming software.
Remember, applications that don’t have separate sound settings do not rely on the type of driver installed. Instead, the software will use the playback engine currently set as the default input and output.
Class-compliant audio interfaces
Some interfaces are class-compliant, which means they are designed to work in tandem with your native OS sound settings, and no additional driver software is required. While class-compliant interfaces use your OS sound settings, many DAWs require a certain driver protocol (e.g., ASIO), so an aggregate device or other driver may be needed.
Audio interface integration with your DAW
Setting up your audio interface within a DAW is undoubtedly the most important thing to do in the computer audio recording world. While you may be tempted to launch your DAW and press record, you’ll likely need to take the time to make sure everything is set up correctly, or else you may encounter problems.
Headphone routing
Earlier in this article, we mentioned using an interface’s standalone software to set up headphone routing. However, some interfaces may not have the capability or the number of hardware outputs necessary, so you may need to get a dedicated headphone distribution amp and update the routing within your DAW. You’ll then go into your DAW’s audio settings and create a cue mix. Every DAW is different, but the headphone routing settings commonly rely on the use of aux tracks. Be sure to check out the DAW’s owner’s manual for instructions on updating its settings and how to create monitor mixes.
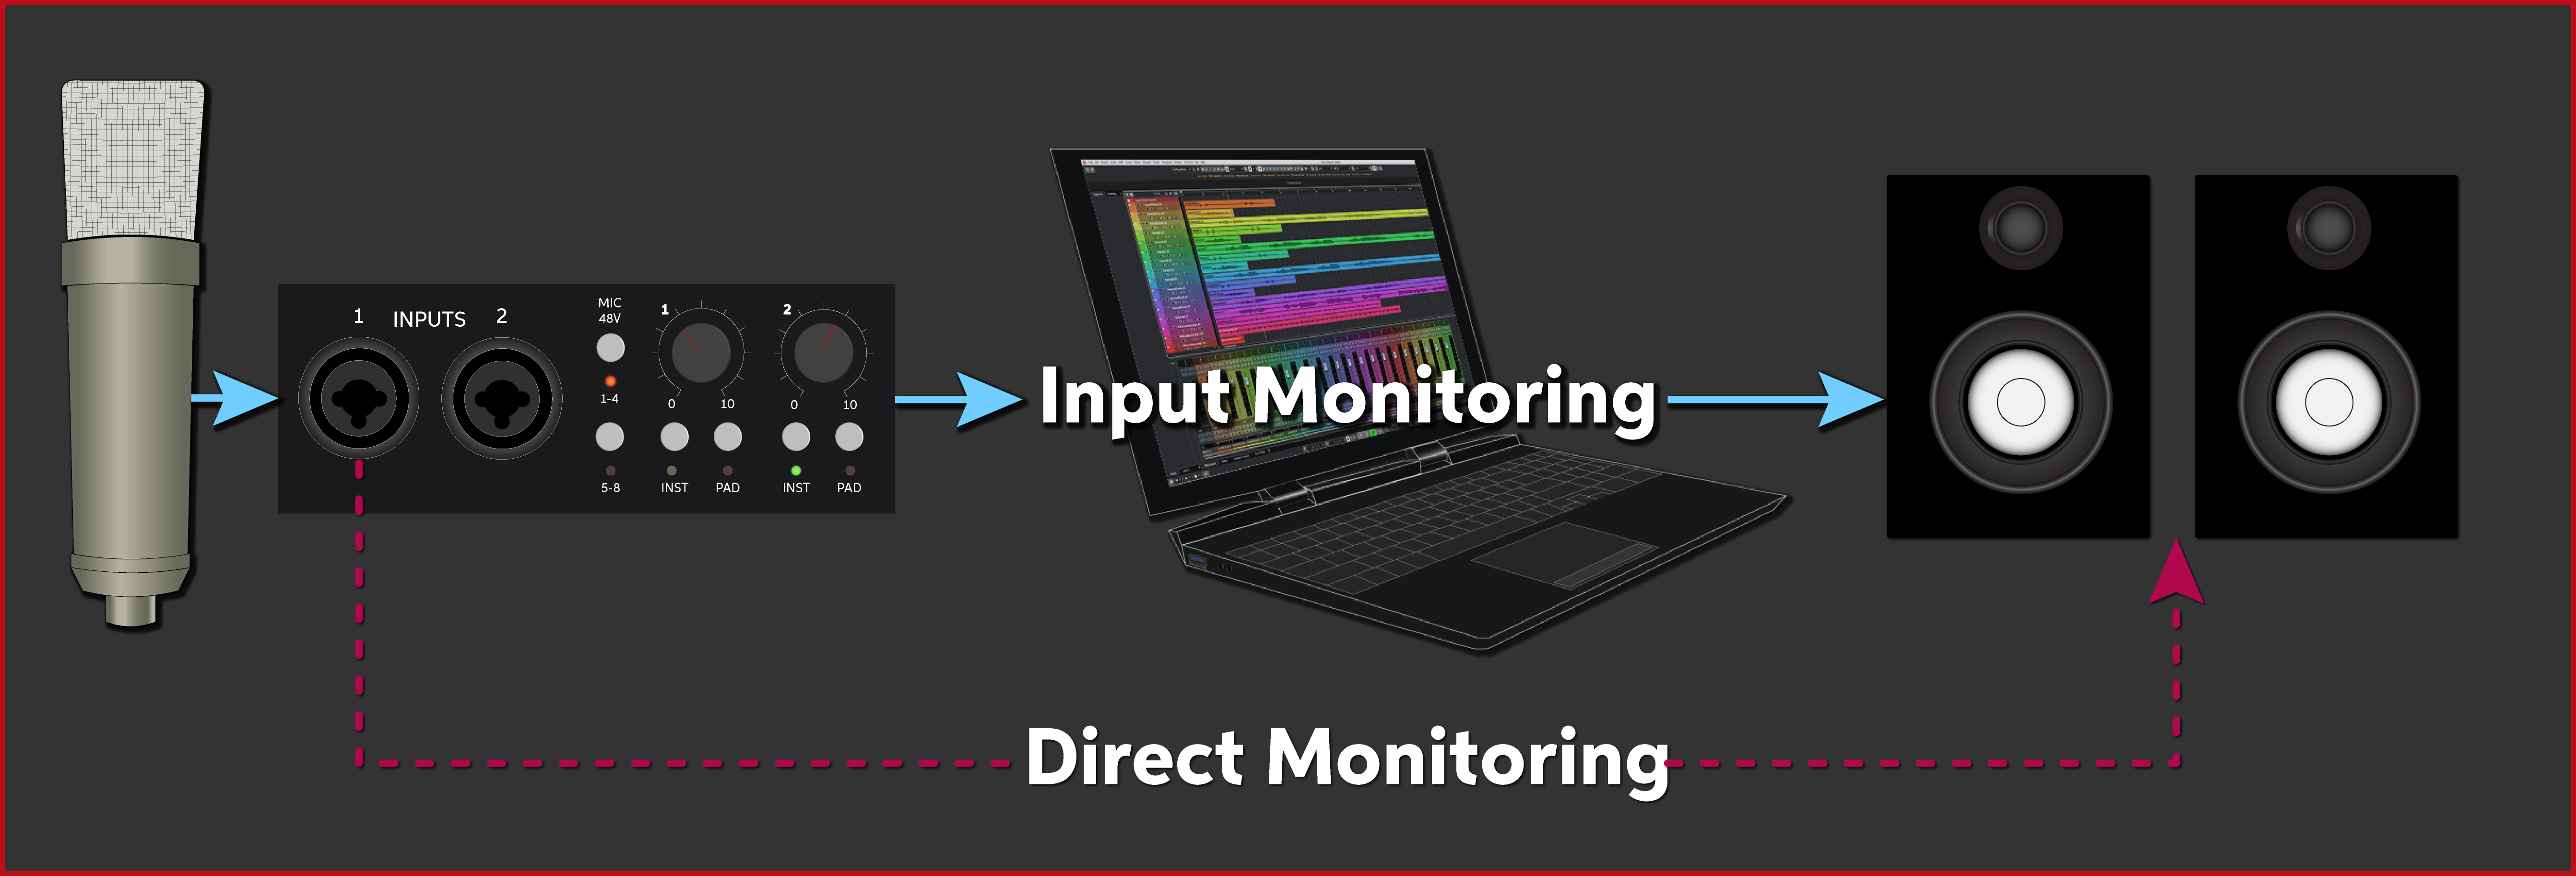
Direct monitoring
TIP: If you have a computer that can handle very low buffer sizes, you may not need to enable direct monitoring when recording tracks that have effects plug-ins. If you do need to track while hearing the processed signal, then use the fewest number of plug-ins possible.
Direct monitoring allows you to use the signal coming in from your signal source (guitar, vocal mic, keyboard, etc.) and feed it directly to your headphones, so the signal bypasses your computer (avoiding any latency [delay] that might introduce) and is sent directly to your headphone and line outputs. Depending on what you’re recording, you may want to choose one option over the other, so here are a few examples to help steer you in the right direction.
Playback vs. Direct monitoring on an audio interface
Recording vocals
- Direct monitoring will bypass all effect inserts on the vocal track and will be monitored directly from the audio output.
- Direct monitoring can be recorded in time with the rest of the music and not with potential latency that would result in a doubling, chorus-like effect.
Recording guitars
- If you have direct monitoring enabled when using a guitar amp sim plug-in, the guitar amp sim’s signal is considered the processed (wet)signal.
- If direct monitoring is enabled and you have your headphones on, you’ll only hear the dry guitar signal.
Fortunately, many interfaces nowadays solve this issue with a direct monitor blend (some units label it as a mixer) feature, sometimes in the form of a knob on the interface or in its standalone routing software. This gives you the best of both worlds because you’ll be able to hear the post-processed input signal while recording, and you also won’t experience latency.
- If the knob/fader is turned to the Playback or DAW position, you’ll hear less of the input (dry) signal and more of the return signal from the DAW. If the knob/fader is turned to the Input position, you’ll hear more of yourself and less of the playback signal.
TIP: Sometimes people may think something is wrong with their hardware or software because they can’t hear post-processed input signal. Most of the time, it’s because direct monitoring is enabled. If you’re ever in a situation like this, the first step in troubleshooting is to double-check and make sure you don’t have direct monitoring enabled. Sometimes the easiest solution can get overlooked!
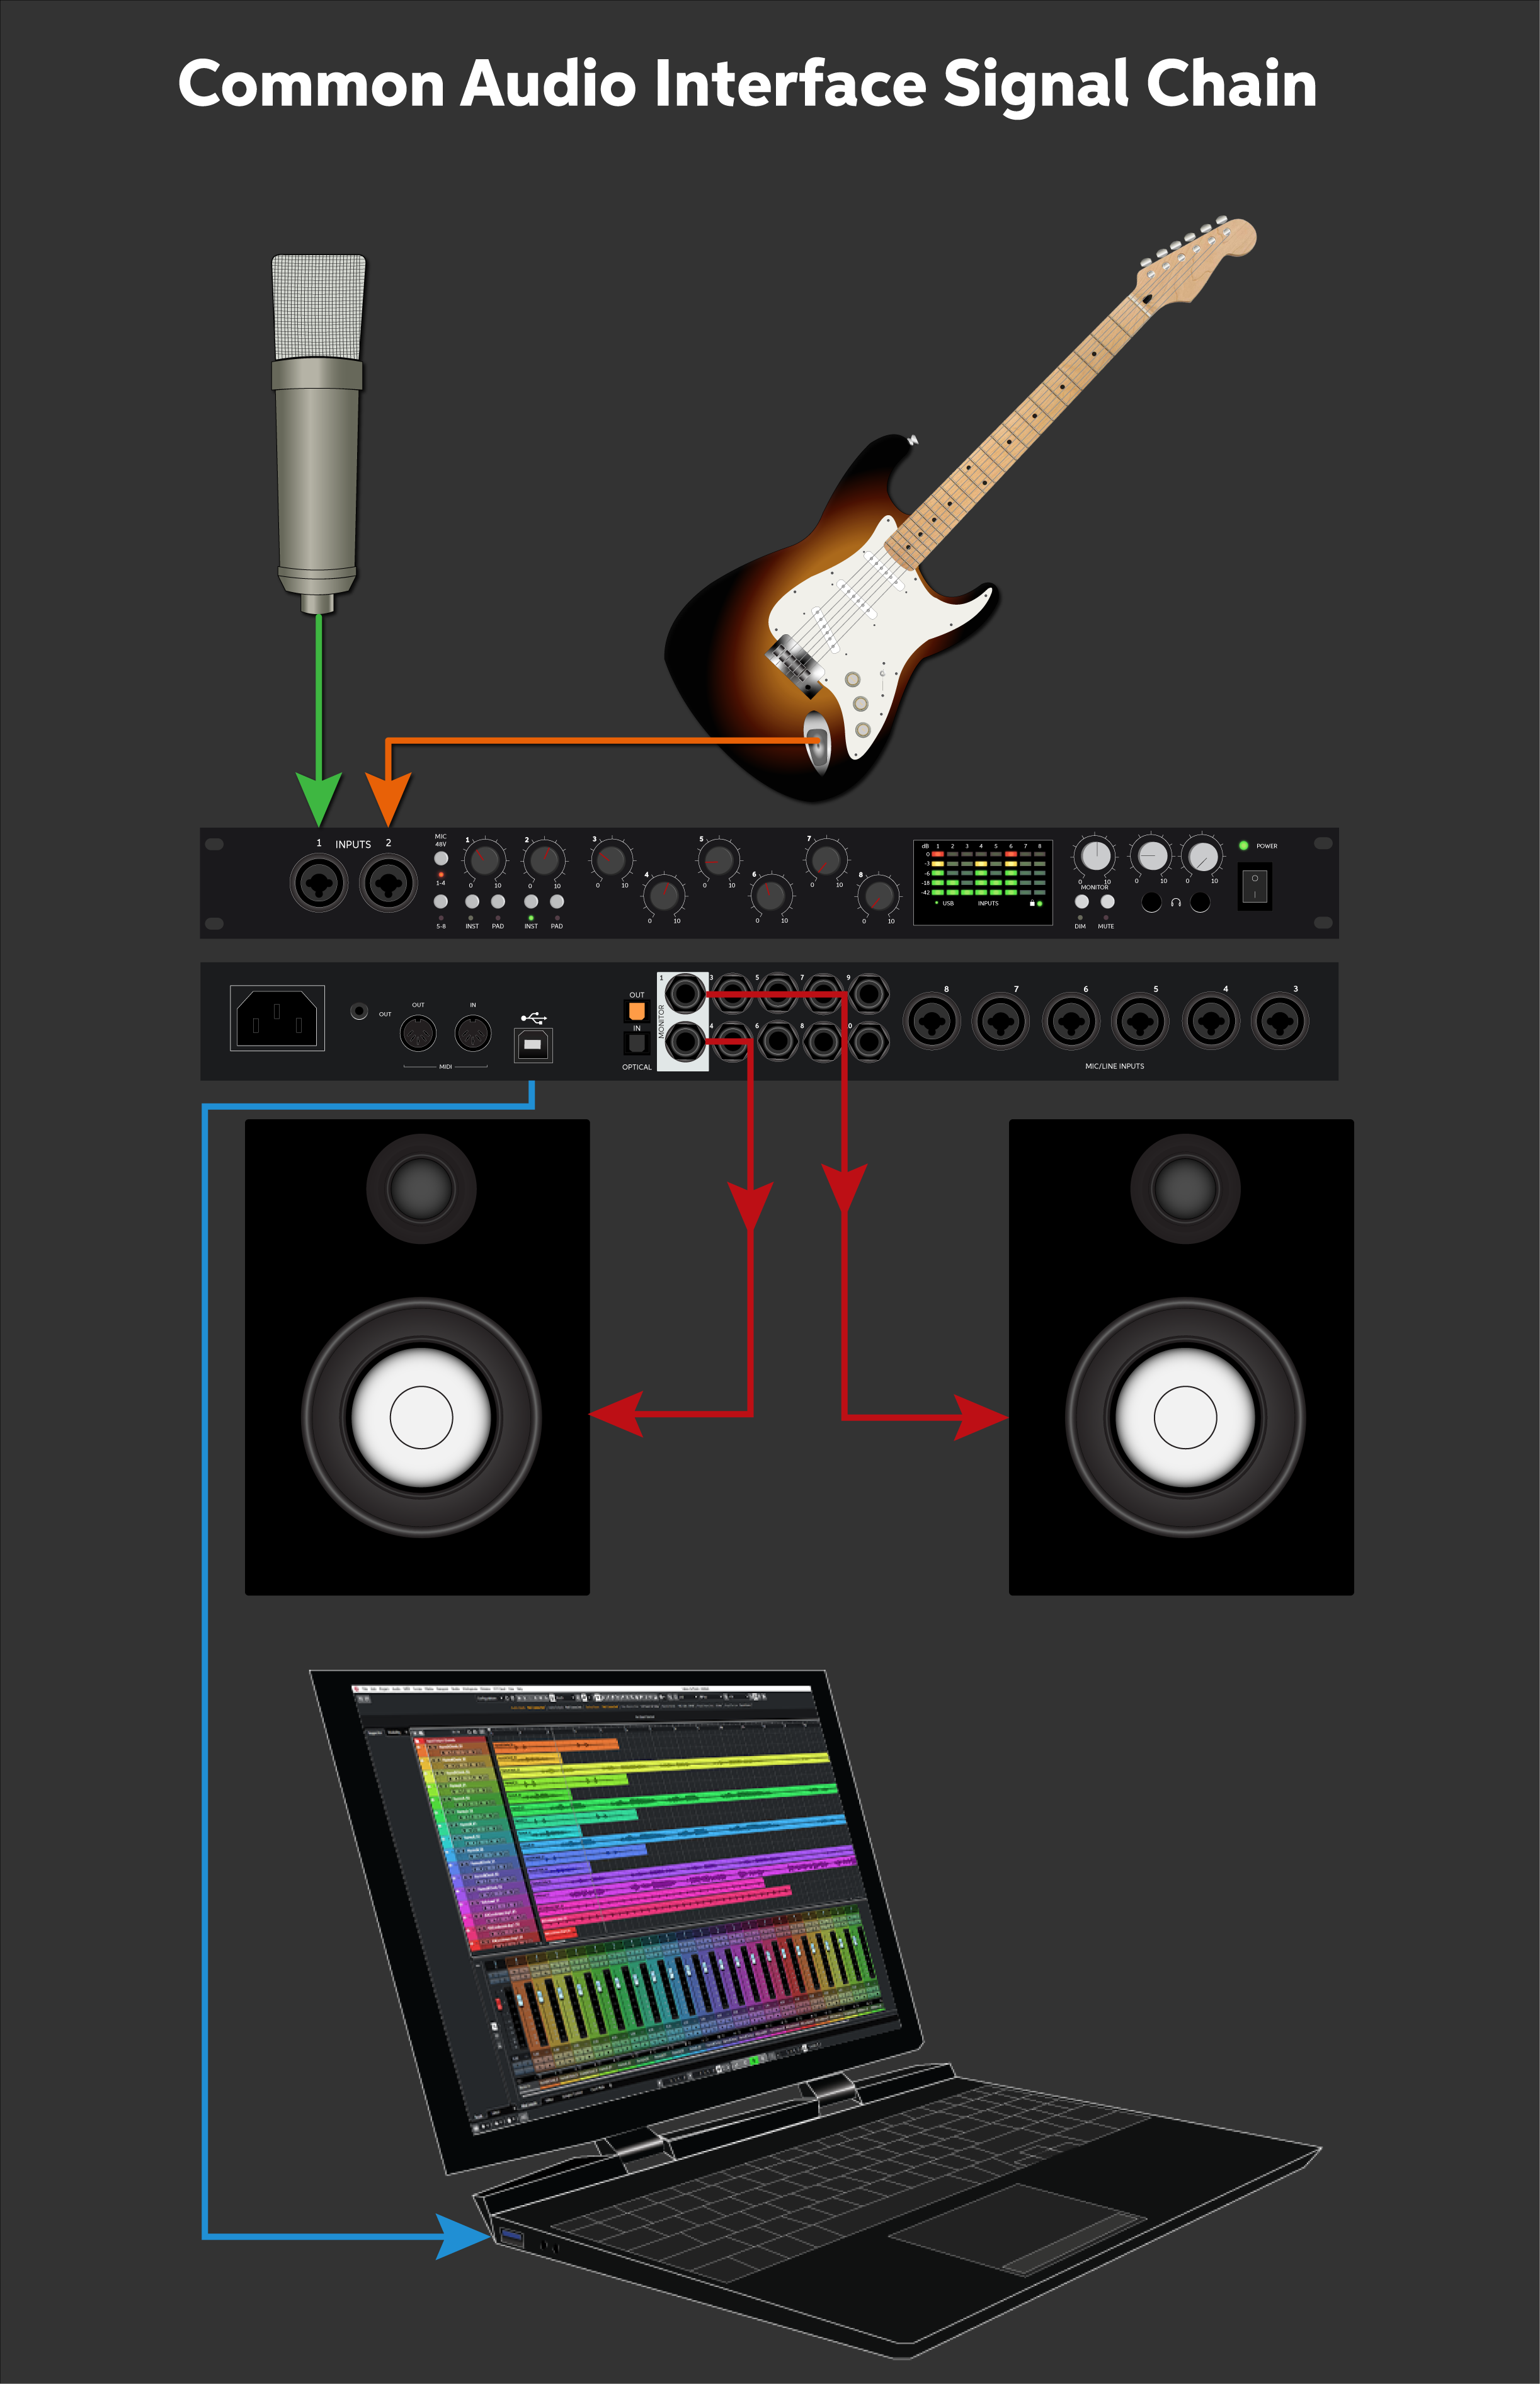
Common audio interface signal chain
Is your interface not showing up?
If your interface isn’t showing up when you try to select it in your DAW, then reconnect the interface by unplugging it and plugging it back in. If you are using a TASCAM interface, try reconfiguring the USB connections so that the TASCAM interface is connected directly to your computer, not through a hub (powered or passive) or router. If the problem persists, try a different USB port or cable. Visit our Windows and Mac guides for more tips on resolving audio device connectivity.
Marcus Scott – How to Record Vocals At Home
Getting the Most from Your Home Studio Gear
5 Tips for Better Mixes
How to Make Your Bedroom Studio Sound Great
Related Articles
When you need help, Sweetwater has the answers!
Our knowledge base contains over 28,000 expertly written tech articles that will give you answers and help you get the most out of your gear. Our pro musicians and gear experts update content daily to keep you informed and on your way. Best of all, it’s totally FREE, and it’s just another reason that you get more at Sweetwater.com.


Offer applies only to single-receipt qualifying purchases. Select manufacturers may require that only the manufacturer’s products qualify towards the minimum purchase amount needed to be eligible for promotional financing. Otherwise, an invoice that meets the minimum purchase amount and contains at least one qualifying manufacturer product is eligible for promotional financing. No interest will be charged on promo purchase balance, and equal monthly payments are required on promo purchase until it is paid in full. The payments equal the amount financed divided by the number of months in the promo period, rounded up to the next whole dollar. These payments may be higher than the payments that would be required if this purchase was a non-promo purchase. During the last month(s) of the promo period the required monthly payment may be reduced due to the prior months’ rounding. Regular account terms apply to non-promo purchases. New Accounts as of 07/31/2025: Purchase APR is 34.99%. Penalty APR is 39.99%. Min Interest Charge is $2. Existing cardholders: See your credit card agreement terms. Subject to credit approval.
Offer applies only to single-receipt qualifying purchases. No interest will be charged on the promo balance if you pay it off, in full, within the promo period. If you do not, interest will be charged on the promo balance from the purchase date. The required minimum monthly payments may or may not pay off the promo balance before the end of the promo period, depending on purchase amount, promo length and payment allocation. Regular account terms apply to non-promo purchases and, after promo period ends, to the promo balance. New Accounts as of 07/31/2025: Purchase APR is 34.99%. Penalty APR is 39.99%. Min Interest Charge is $2. Existing cardholders: See your credit card agreement terms. Subject to credit approval.
The estimated required monthly payment shown which excludes taxes and delivery equals the amount financed divided by the number of months in the promo period, rounded up to the next cent. During the last month(s) of the promo period the required monthly payment may be reduced due to this rounding. These payments apply only with the financing offer shown. If you make these payments by the due date each month, you should pay off this amount financed within the promo period, if it is the only balance you are paying off. If you have other balances on your account, this payment will be added to any other minimum monthly payments.
Applies only to select items from this manufacturer. Ask your Sweetwater Sales Engineer for more details.