
Resolving Audio Interface Issues on Windows 10
Audio interfaces are the heart of every digital studio. In this article, we’ll show you how to resolve audio interface issues on your Windows PC. Whether you have no sound, the USB ports are not working, or your output device isn’t showing up, following this guide will get you back in business. Mac users can read more in our Resolving Audio Interface Issues on Mac.
- Windows audio device connectivity
- Windows sound settings
- Audio device not detected
- Install ASIO4All
- Related content
Windows audio device connectivity
Many audio devices and software apps for Windows often require the use of an audio interface to playback or record audio. To make sure an audio device is connecting correctly, check the compatibility and drivers, sleep settings, connections, and the startup sequence.
Compatibility and drivers
Before we get started, check that your audio interface is compatible with your computer. Compare your computer’s specifications with the audio device’s system requirements on the manufacturer’s product page. If your interface isn’t compatible, you may need to update/roll back your operating system or use an interface that is compatible. If you are setting up your audio interface for the first time, make sure to first install the latest compatible driver software available from the manufacturer. You can find your interface’s available downloads on the manufacturer’s product page or on our driver index.
Update interface drivers
- Visit our driver index page and click on your device’s manufacturer.
- Find and download the device’s driver software.
- Run the driver installer and restart your computer.
.zip file downloads
On Windows, you first need to extract .zip files before running the software’s installer file. Learn more about .zip files on our How to Zip and Unzip Files page.
Windows sleep settings
Windows gives you a lot of features that allow you to manage the efficiency of your PC. For instance, when your hard drive is put to sleep, the operating system un-mounts audio and MIDI drivers. It’s sort of like Windows kicking everyone out before it puts the drive(s) to bed. Unfortunately, when it wakes up, the drivers are gone and you have to restart your PC to reconnect them. If you have not done so yet, read our PC Optimization Guide for Windows to update your PC’s settings. Once your computer has been optimized, continue below to manage USB connections.
USB hubs
Computer audio production often involves connecting a few external devices to your computer. Audio interfaces prefer to be connected directly to your computer. Although hubs are a convenient way to connect multiple devices to the same USB port, they may prevent your interface from properly communicating with your computer –this is especially true with passive hubs.
While larger audio interfaces have dedicated power supplies, smaller interfaces are often bus powered and receive power when your computer is turned on. If your external devices draw more power than your hub can provide, you may experience loss in connectivity and performance of your interface. Make sure to connect your audio interface directly to your computer, especially when troubleshooting.
Connecting to a powered USB hub
While we do not recommend connecting audio interfaces to USB hubs, some interfaces may work perfectly fine in that environment. For best results, use a hub with its own power supply adapter, not powered from your computer.
Startup sequence
In this example, we’re going to restart your entire system. This includes your audio interface, hard drives, MIDI controllers, etc.. Bookmark this page in your web browser so you can access it after the restart.
Windows studio computer startup order
Power everything off. Then, power on in the following order:
- Connect and power on your audio interface.
- Power on your computer.
- Power on your speaker monitors.
Powering up your system in the correct order is essential for reliable communication between your devices. Basically, turn your computer on last and off first. Once started, computers usually need a few moments to perform startup tasks, like scanning for drivers and launching background applications. When your computer is ready to go, check that your audio interface is detected and available within your sound settings by following the steps in the next section.
Windows sound settings
Now that you’ve successfully restarted your system, your audio interface should be a selectable audio device in Windows and your DAW. If you are getting sound from your computer speakers instead of your audio interface, then you probably just need to update your sound settings. Read below to select your audio interface as the playback device for Windows and other related software.
Update default Windows sound settings
Apps like Microsoft Edge, iTunes, and Spotify will playback through the device that is selected in Windows Sound settings. Open the Sound window and select your audio interface in the Playback and Recording tabs. Next, test it by playing one of our sweet videos. If you don’t hear anything, try relaunching your web browser.
Select the output and input for your PC
- From your Windows taskbar, right-click the sound icon and select Playback devices.
- Select your audio interface. Then, click Set Default.
- Click OK to close the menu.
- Windows 10 Sound settings can also be accessed from the Control Panel or simply by searching Sound.
Disable exclusive mode
Select the audio playback device before launching any apps, otherwise you will need to relaunch them before sound will playback. Some applications may also take over your interface during start up. Disable this feature by turning off exclusive mode. Check out our guide to learn more about how to turn off exclusive mode.
If your interface does not show up in these tabs, there might be a cable connection or driver issue. Check the cable and if it still doesn’t show up, it’s probably the driver. Go to Device not Detected to continue troubleshooting.
DAW sound settings
Other applications like DAWs, standalone virtual instruments, and even Skype have their own audio settings. You will usually find them in a Preferences, Options, or Settings menu.
If correctly connected, audio devices are automatically detected and selected by your DAW when launched. If your DAW plays back through your computer speakers or you hear nothing at all, reselect your audio device within these settings.
Select DAW audio playback device
- Launch your DAW.
- Open DAW settings/preferences.
- Locate and select your audio interface.
Update the DAW I/O routing
Even though you’ve selected your audio interface in your DAW, you may also need to check that the DAW’s inputs and outputs are configured correctly to send audio to your speakers & headphones.
Audio device not detected
If your device is not detected within Windows Sound or DAW settings, then we need to dig a little deeper. First, check if your device is detected in Device Manager. If your device doesn’t show up there, you may have a hardware problem. Try unplugging/re-plugging, different ports on the computer, and different cables to see if it appears.
Once your device shows up in Device Manager, check that it also appears in Sound Settings. If not, you probably need to reinstall (or just install) the latest driver (see Driver Reinstall below).
Check Device Manager
Device Manager is useful for investigating hardware specifications and connections on your Windows PC. In audio production, we like to use this menu for checking that our devices are connected and communicating with the rest of the system. If your device does not appear in this list, reseat the cable connected to your computer or try a different port.
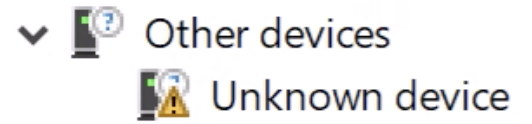
If your audio device shows up as an Unknown device or has a yellow caution symbol, you will need to uninstall the device and then reinstall the latest driver (see Driver Reinstall below).
How to check Device Manager
- Right-click the Windows icon and choose Device Manager.
- Select Sound, video and game controllers and locate your device.
- Right-click your device and choose Properties to uninstall the device and view driver details.
Reinstall audio device driver
If your system is still not detecting or communicating properly with your device, then we will need to reinstall the interface’s driver software. Drivers are often bundled with control panel software which allows you to remotely control your audio interface. Some audio interfaces are class-compliant and do not require driver software to operate. If your interface is class-compliant, install the ASIO4ALL audio driver (below) instead of your computer’s generic driver.
View our driver software index and locate your interface’s manufacturer. Click it to view their page, find your product, then download and install the latest compatible driver software. We recommend uninstalling the current driver and then removing the device before reinstalling.
Once the driver is installed, shut your system down and follow the startup sequence. Your audio device should now be detected by your computer. Test playback by following the steps in Windows sound settings.
Reinstalling audio device drivers
- Uninstall the driver, power everything off, and disconnect your audio interface.
- Restart your computer, reinstall the drivers and power your computer off.
- With your computer off, reconnect your audio interface and power it up.
- Power on your computer.
Install ASIO4All
PC’s come with generic system audio drivers, but they’re not the best choice for audio production. The ASIO4All driver is optimized for this purpose and runs much smoother than a generic audio driver in recording situations. When using ASIO4All, use the Off-Line Settings to select which playback devices to use in your DAW or other audio software.
Related content
- PC Optimization Guide for Windows 10
- How to Back Up Windows 10
- How to Format an External Hard Drive on Windows 10
When you need help, Sweetwater has the answers!
Our knowledge base contains over 28,000 expertly written tech articles that will give you answers and help you get the most out of your gear. Our pro musicians and gear experts update content daily to keep you informed and on your way. Best of all, it’s totally FREE, and it’s just another reason that you get more at Sweetwater.com.


Offer applies only to single-receipt qualifying purchases. Select manufacturers may require that only the manufacturer’s products qualify towards the minimum purchase amount needed to be eligible for promotional financing. Otherwise, an invoice that meets the minimum purchase amount and contains at least one qualifying manufacturer product is eligible for promotional financing. No interest will be charged on promo purchase balance, and equal monthly payments are required on promo purchase until it is paid in full. The payments equal the amount financed divided by the number of months in the promo period, rounded up to the next whole dollar. These payments may be higher than the payments that would be required if this purchase was a non-promo purchase. During the last month(s) of the promo period the required monthly payment may be reduced due to the prior months’ rounding. Regular account terms apply to non-promo purchases. New Accounts as of 07/31/2025: Purchase APR is 34.99%. Penalty APR is 39.99%. Min Interest Charge is $2. Existing cardholders: See your credit card agreement terms. Subject to credit approval.
Offer applies only to single-receipt qualifying purchases. No interest will be charged on the promo balance if you pay it off, in full, within the promo period. If you do not, interest will be charged on the promo balance from the purchase date. The required minimum monthly payments may or may not pay off the promo balance before the end of the promo period, depending on purchase amount, promo length and payment allocation. Regular account terms apply to non-promo purchases and, after promo period ends, to the promo balance. New Accounts as of 07/31/2025: Purchase APR is 34.99%. Penalty APR is 39.99%. Min Interest Charge is $2. Existing cardholders: See your credit card agreement terms. Subject to credit approval.
The estimated required monthly payment shown which excludes taxes and delivery equals the amount financed divided by the number of months in the promo period, rounded up to the next cent. During the last month(s) of the promo period the required monthly payment may be reduced due to this rounding. These payments apply only with the financing offer shown. If you make these payments by the due date each month, you should pay off this amount financed within the promo period, if it is the only balance you are paying off. If you have other balances on your account, this payment will be added to any other minimum monthly payments.
Applies only to select items from this manufacturer. Ask your Sweetwater Sales Engineer for more details.