
How to Use Focusrite Control 2
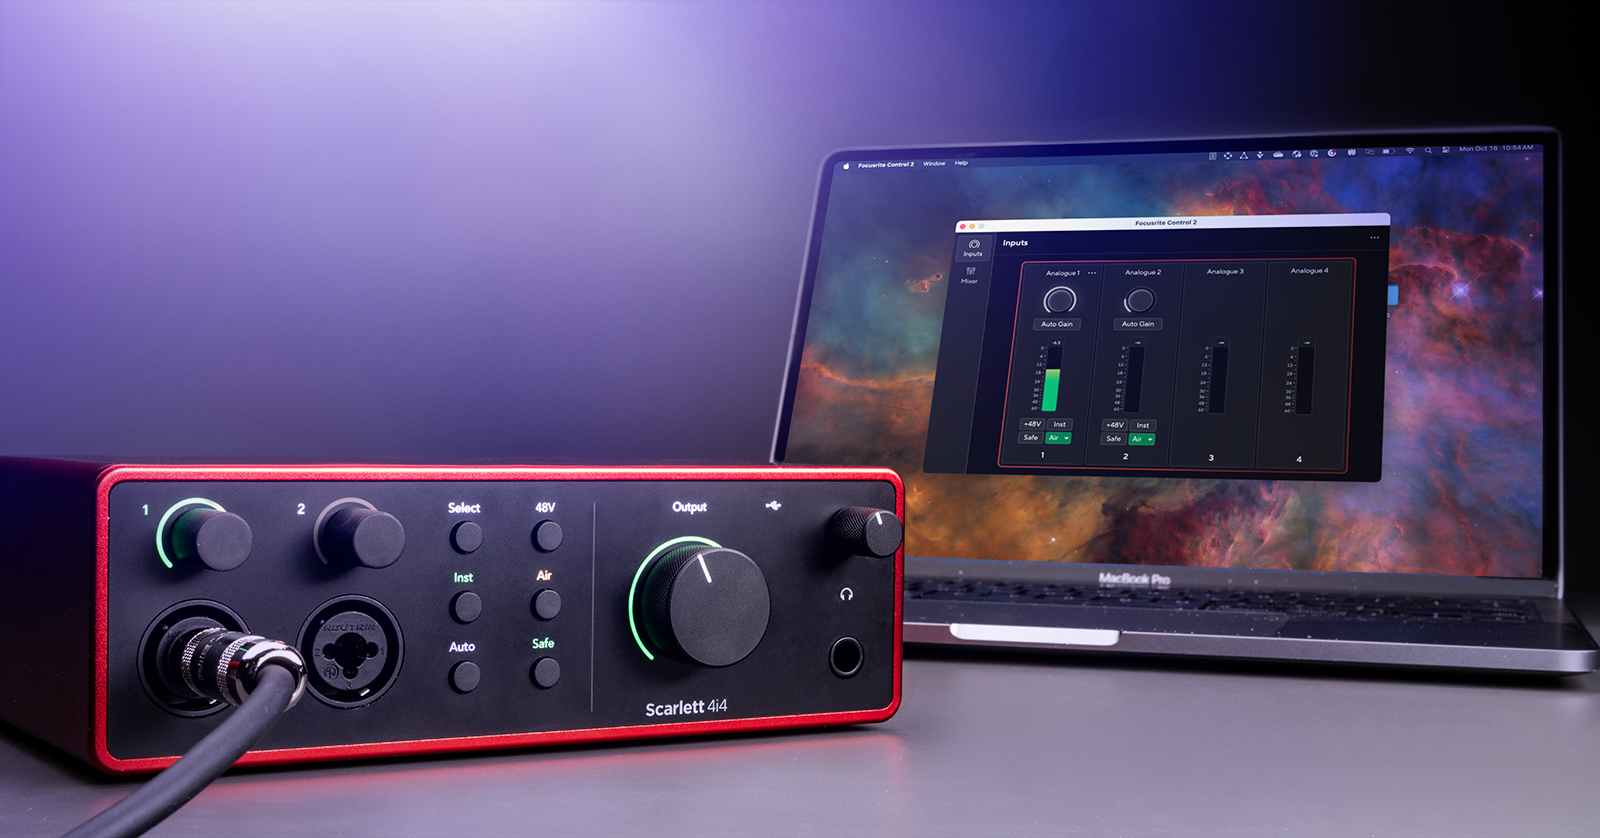
Focusrite Control 2 is the software-control application required to unlock the full potential of your Focusrite Scarlett interface. This guide will cover the basics of navigating the software and explain how to route audio using the software. Follow the sections below to get started.
- Focusrite Scarlett Firmware Update
- Navigating Focusrite Control 2
- How to Route Audio in Focusrite Control 2
Focusrite Scarlett Firmware Update
IMPORTANT! Do not disconnect the Scarlett interface from your computer during the firmware update!
Focusrite will periodically release firmware updates for your Scarlett interface. They have made it easy to update the interface, as it’s done with just the click of a button in the software. This means you don’t have to download additional driver software or navigate menus.
If new firmware is released, you will be prompted to update it when you first launch Focusrite Control 2.
To update, click Update Scarlett when prompted. During the firmware update process, the Scarlett will power cycle. After the update process is complete, you just need to click Continue!.
Updating Focusrite Control 2
Like your Scarlett interface, Focusrite will update the Focusrite Control 2 software periodically. These updates often add new features, increase performance, and address issues in the current version.
Whenever an update is available, you will receive a notification. Unless you don’t have an Internet connection, we recommend updating the software when prompted. This way, you can access all the new features without installing them later.
Navigating Focusrite Control 2
Focusrite Control 2 is the standalone software for making various changes to your Focusrite Scarlett interface. This includes controlling channel gain, updating input and output routing, and changing the sample rate. You will be working with two main windows: Input and Mixer.
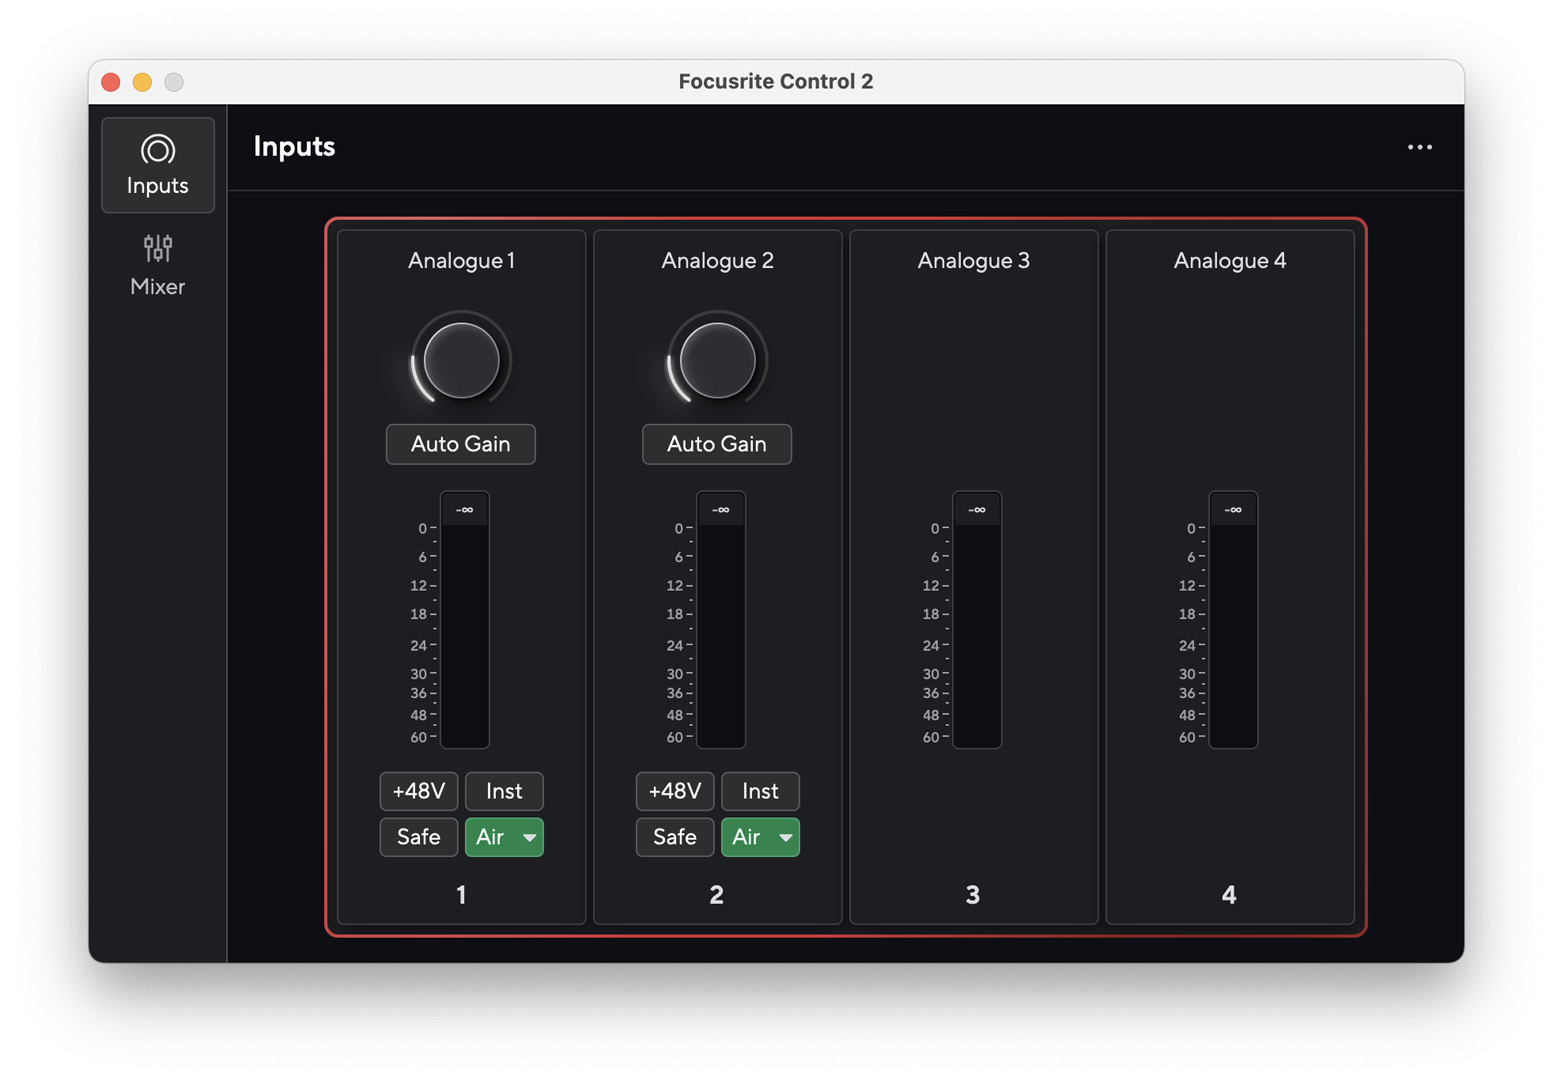
Input
The Input window lets you view the VU meters for each channel. It also lets you turn the Phantom Power on and off, change the input source, set the preamp type, and enable Auto Gain and Clip Safe. While you can adjust these settings directly on the interface, adjusting these settings in Focusrite Control 2 gives you more control and visual aid on what changes are being made.
- Click INST to switch between instrument-level and line-level signals.
- If you are using a condenser microphone, click +48V to enable phantom power. Ensure that you enable phantom power after connecting the microphone, and you turn it off before disconnecting the microphone, or else you run the risk of damaging the microphone or interface.
- You can link the inputs so both have the same settings. You can link or unlink them by hovering over one of the channels, clicking the … icon, and selecting Link with Analogue 1/2. To unlink them, click Split channels.
Auto Gain
While you can manually adjust the gain directly on the interface, you can also use Auto Gain. When you click Auto Gain, it will detect the input signal and automatically change it so it’s set to the right level.
- Click Auto Gain. You will see blue rings “counting down” on both your Scarlett and in Focusrite Control 2.
- Play or sing at performance level until the blue ring disappears.
- After the ring disappears, your gain is set! Ensure you’re performing as long as possible to get the most accurate result.
Air Preamps
NOTE: The Air feature is only available on Inputs 1 and 2.
The 4th Generation Scarletts already have fantastic, clean preamps built into the interface. However, they have also included Air Mode, which engages an analog circuit that provides more presence and clarity to your input signal. This is especially useful for vocals, as it will help them stand out.
Unlike the 3rd Generation Scarletts, the 4th Generation Scarletts also have an Air Mode + Drive feature. Not only will this provide more presence and clarity, but it also adds more warmth and harmonics.
- While you can enable Air directly from your interface, you can also do so by clicking the channel’s Air button. If you click the Down arrow, you can select between Presence (Air) or Presence + Drive (Air + Drive).
What Is Clip Safe Mode?
When you click a channel’s Safe button, it will enable Clip Safe mode. When enabled, Focusrite Control will actively detect your input signal and will automatically adjust the gain on the fly so your signal doesn’t clip. Using this ensures that you can record solid takes every time, no matter how loudly you play.
Mixer
You can update your input and output routing, panning, and output levels within the Mixer window. One great thing is that you can create three separate mixes all separated from each other. This is especially useful for headphone mixes or for sending output signals to multiple sources.
IMPORTANT! Each output source can only be fed to one mix. For example, Outputs 1 and 2 can be sent to Mix A but cannot be sent to Mix B or Mix C.
- Click Mix A, Mix B, or Mix C.
- Adjust the input and output levels and panning.
- Click the Pencil icon, then select the output sources you wish to assign the mix.
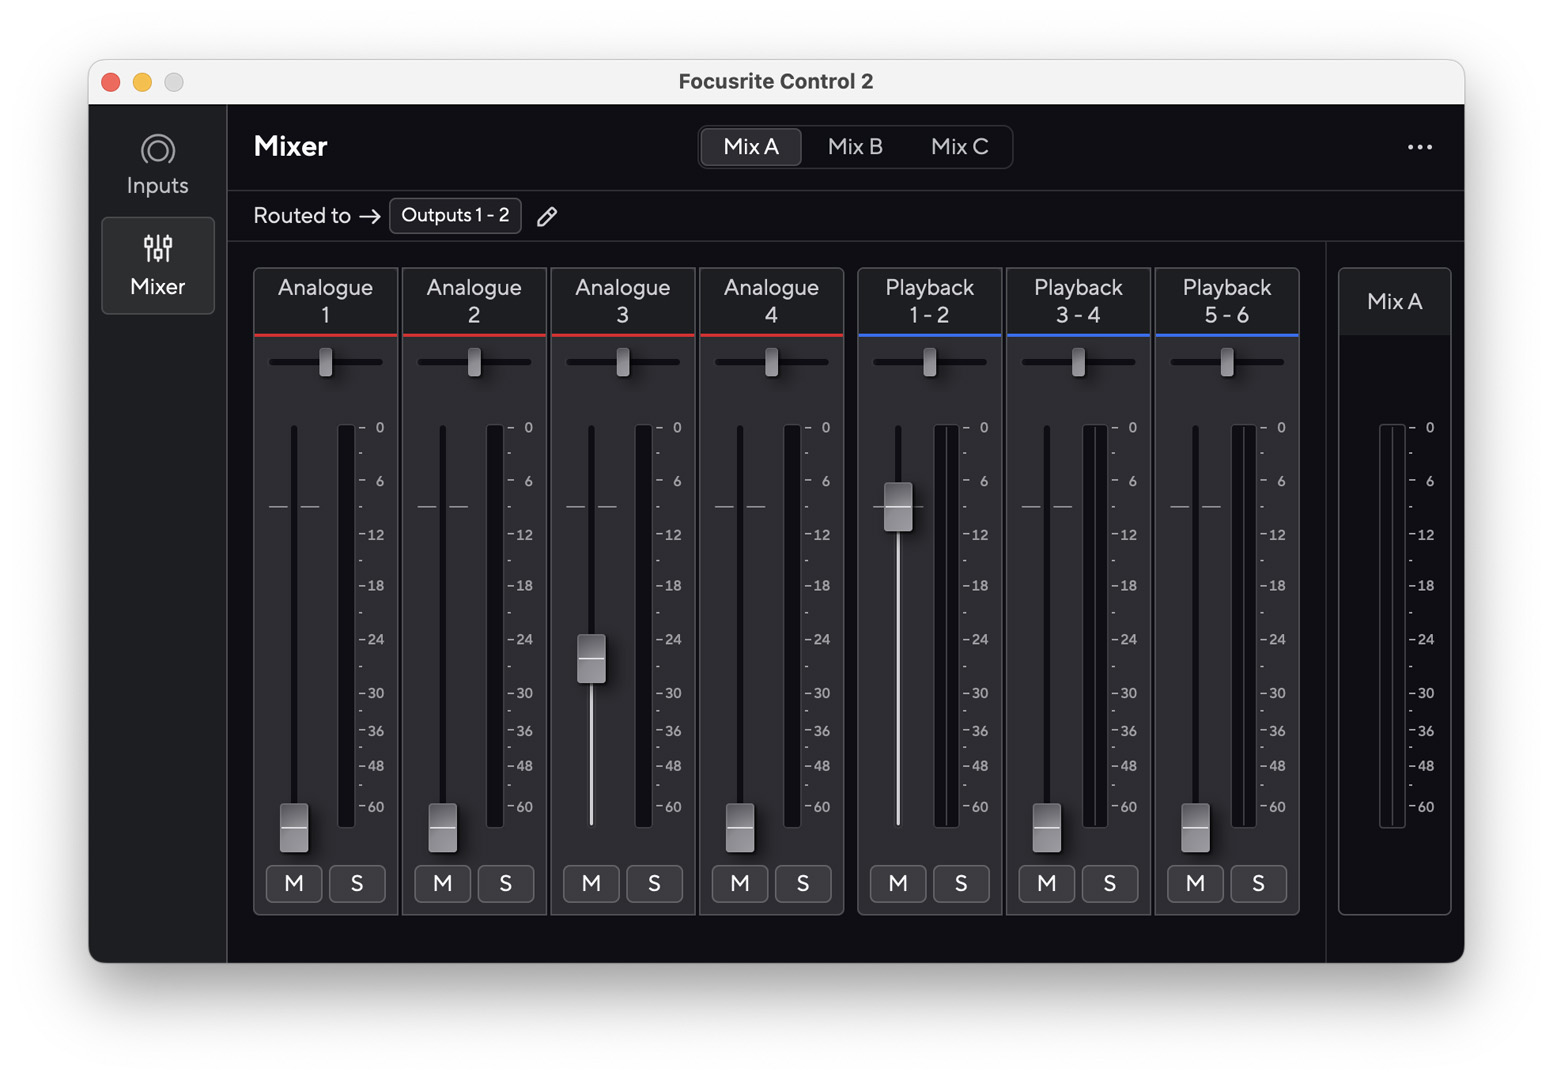
Loopback
Using the Loopback feature, you can route and record computer audio back through the Scarlett in Focusrite Control 2. Loopback is assigned to Inputs 5 and 6. So, when recording loopback audio in your DAW, set the track’s input channel to 5 or 6. Check out our guide on audio loopback to learn more!
Related Articles
When you need help, Sweetwater has the answers!
Our knowledge base contains over 28,000 expertly written tech articles that will give you answers and help you get the most out of your gear. Our pro musicians and gear experts update content daily to keep you informed and on your way. Best of all, it’s totally FREE, and it’s just another reason that you get more at Sweetwater.com.


Offer applies only to single-receipt qualifying purchases. Select manufacturers may require that only the manufacturer’s products qualify towards the minimum purchase amount needed to be eligible for promotional financing. Otherwise, an invoice that meets the minimum purchase amount and contains at least one qualifying manufacturer product is eligible for promotional financing. No interest will be charged on promo purchase balance, and equal monthly payments are required on promo purchase until it is paid in full. The payments equal the amount financed divided by the number of months in the promo period, rounded up to the next whole dollar. These payments may be higher than the payments that would be required if this purchase was a non-promo purchase. During the last month(s) of the promo period the required monthly payment may be reduced due to the prior months’ rounding. Regular account terms apply to non-promo purchases. New Accounts as of 07/31/2025: Purchase APR is 34.99%. Penalty APR is 39.99%. Min Interest Charge is $2. Existing cardholders: See your credit card agreement terms. Subject to credit approval.
Offer applies only to single-receipt qualifying purchases. No interest will be charged on the promo balance if you pay it off, in full, within the promo period. If you do not, interest will be charged on the promo balance from the purchase date. The required minimum monthly payments may or may not pay off the promo balance before the end of the promo period, depending on purchase amount, promo length and payment allocation. Regular account terms apply to non-promo purchases and, after promo period ends, to the promo balance. New Accounts as of 07/31/2025: Purchase APR is 34.99%. Penalty APR is 39.99%. Min Interest Charge is $2. Existing cardholders: See your credit card agreement terms. Subject to credit approval.
The estimated required monthly payment shown which excludes taxes and delivery equals the amount financed divided by the number of months in the promo period, rounded up to the next cent. During the last month(s) of the promo period the required monthly payment may be reduced due to this rounding. These payments apply only with the financing offer shown. If you make these payments by the due date each month, you should pay off this amount financed within the promo period, if it is the only balance you are paying off. If you have other balances on your account, this payment will be added to any other minimum monthly payments.
Applies only to select items from this manufacturer. Ask your Sweetwater Sales Engineer for more details.