
Focusrite Scarlett OctoPre Quickstart Guide
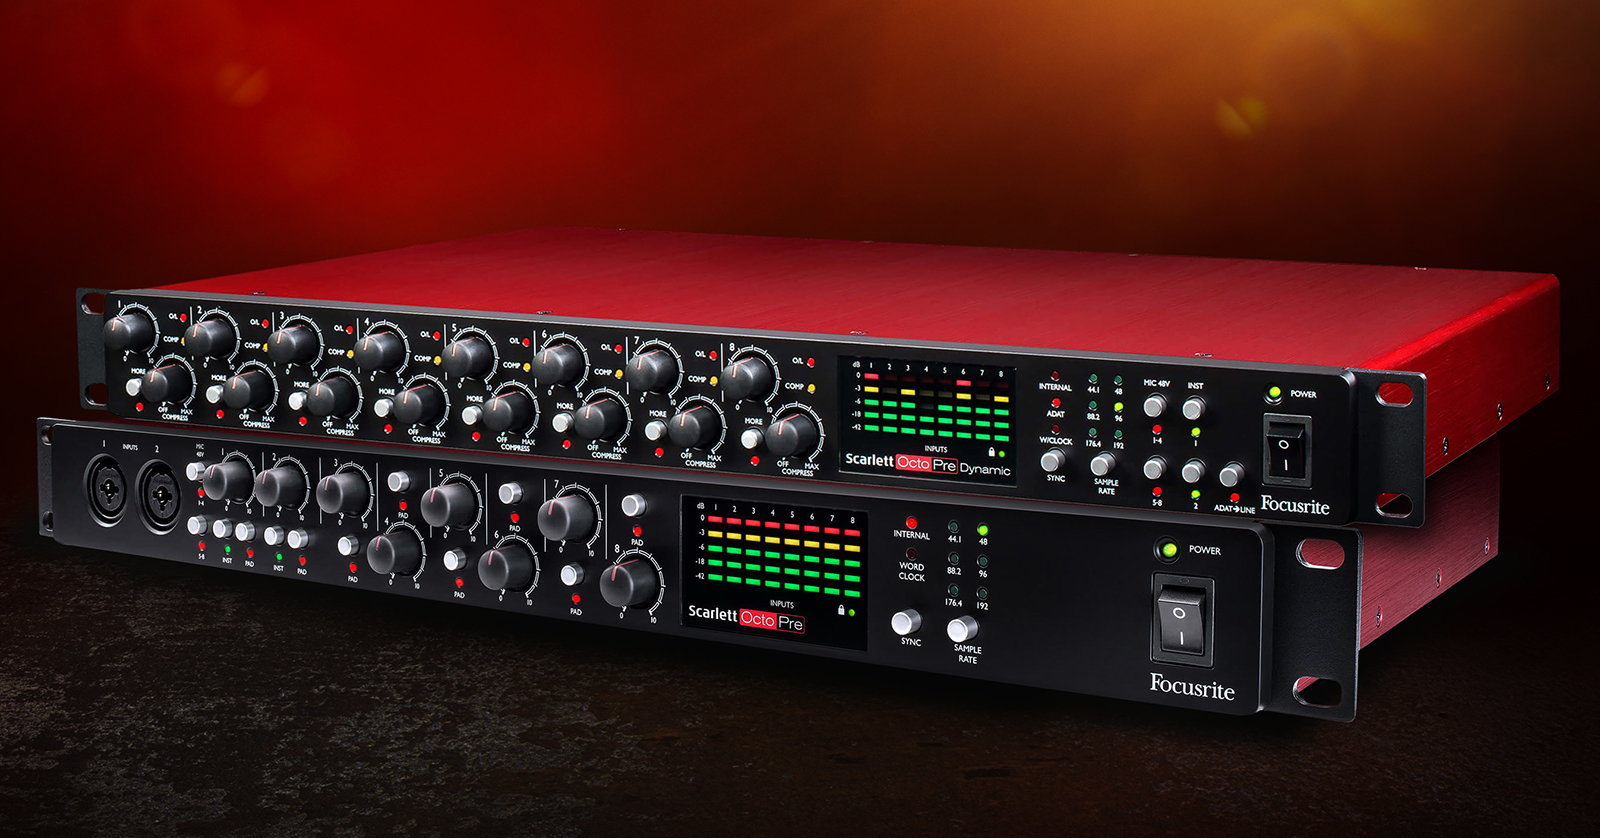
The Focusrite Scarlett OctoPre and Scarlett OctoPre Dynamic are cost-effective solutions for adding inputs and high-quality preamps to an existing audio interface with ADAT expansion capabilities. Let us help you get connected.
- Register Your Purchase and Get Your Bundled Software
- Scarlett OctoPre and OctoPre Dynamic Connections and Controls
- Connecting Your Scarlett OctoPre
- Using the Scarlett OctoPre with an Analog Mixer
- Using the OctoPre Dynamic for More Analog Outputs from Your DAW
- Using Compression on the Scarlett OctoPre Dynamic
Register Your Purchase and Get Your Bundled Software
Take a moment to register your purchase with Focusrite.
The OctoPre comes bundled with a collection of effects plug-ins and virtual instruments that you can download for use in your DAW on your Mac or Windows PC. Registering your hardware gives you access to these plug-ins.
Registration
Be sure to save a copy of your sales receipt, as Focusrite will ask for it if you need warranty service within their three-year warranty period.
- Go to the Focusrite registration page. If you have an existing account, log in. If not, create a new account.
- On your account page, click Register a new product.
- Enter your product’s serial number.
- Download the Scarlett OctoPre User Guide or the Scarlett OctoPre Dynamic User Guide.
Bundled Software
After you register, on the My Hardware page, you will see your product. Click on the Looking for your bundled software? link.
Scroll through the list of software. You can click on View details on each item to learn more.
Here’s a tip: while Focusrite provides several useful plug-ins, none of them are necessary to get started with the OctoPre.
Since the pieces of software in the bundle are from third parties, you will need to download, install, register, and activate each one separately.
At this point, you may wish to skip ahead and get to work with your OctoPre. You can return to the website and check out the bundled software later.
Scarlett OctoPre and OctoPre Dynamic Connections and Controls
Connections and Cables
Analog Audio Inputs
The OctoPre’s combi jacks can accept a balanced XLR cable, an unbalanced cable with a 1/4-inch TS plug, or a balanced cable with a 1/4-inch TRS plug.
When an XLR connector is attached, the preamp on that channel configures itself for a microphone-level signal.
If a 1/4-inch plug is attached, the preamp configures itself for a line-level signal.
Channels 1 and 2 have an INST button that configures the input for an unbalanced, high-impedance instrument signal, such as that from an electric guitar.
Analog Audio Outputs
The analog audio outputs accept a balanced cable with a 1/4-inch TRS plug.
Digital Audio Connections
ADAT digital audio connections are made with TOSLink optical cables.
The OctoPre has two ADAT Out ports.
The OctoPre Dynamic has two ADAT Out ports and two ADAT In ports, enabling additional functions explained below.
Word Clock
Word Clock connections are made with coaxial cables with BNC connectors.
Front Panel Controls
The essential functions of the OctoPre and the OctoPre Dynamic are the same, although the control layouts vary.
Scarlett OctoPre
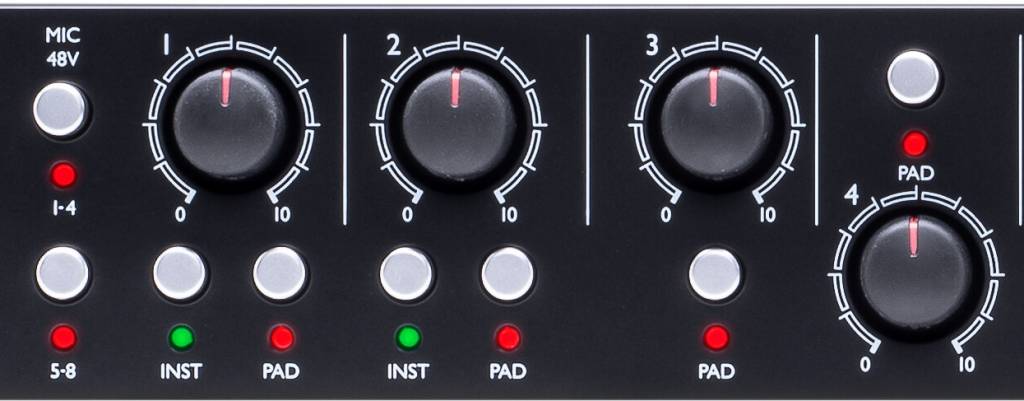
Channel controls for the Scarlett OctoPre
- Each channel has an input gain control knob. Set gain levels for each channel while using the eight LED dB meters on the right side of the front panel.
- Each channel has a Pad latching switchwhich reduces gain by 8 dB. A red LED indicates that it is engaged.
- The first two channels have an INST latching switch to configure the input for an unbalanced, high-impedance instrument signal. A green LED indicates that it is engaged.
- The two MIC 48V latching switches provide phantom power for use with condenser microphones and for channels 1–4 and 5–8, respectively. A red LED under each indicates that phantom power is engaged. Phantom power is only applied to the XLR contacts of the combi connectors. For more information, consult the OctoPre User Guide section Phantom Power.
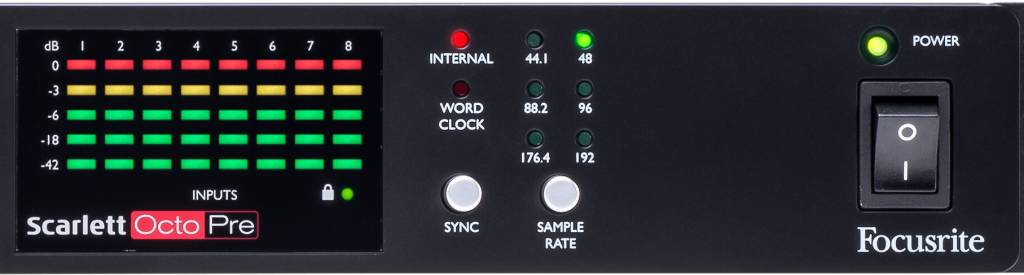
Right front panel controls for the Scarlett OctoPre
- The eight-channel LED dB meters show the input signal levels.
- Use the Sample Rate switch to select the desired value. The sample rate must match that of the audio interface you are connecting to.
- Use the Sync button to select whether the OctoPre is the clock source (Internal) or whether the OctoPre will receive Word Clock from an external device.
- The green LED next to the lock icon below the LED dB meters indicates that the unit has locked to the sync source.
Differences with the Scarlett OctoPre Dynamic
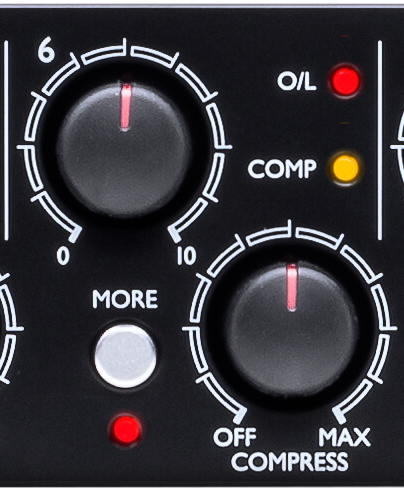
Channel controls for the Scarlett OctoPre Dynamic
- The OctoPre Dynamic channels do not have a Pad button. This is not needed on this model because its preamplifiers are designed with greater headroom than those of the OctoPre.
- Each channel has an O/L (Overload) LED. If this red light appears, the gain is set too high.
- The Compress function and the More button are discussed below.
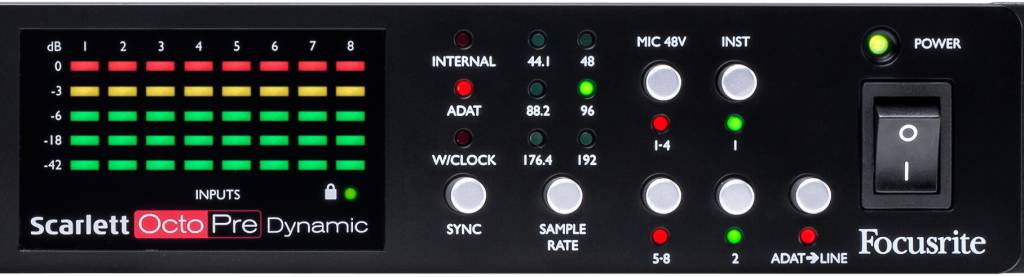
Right front panel controls for the Scarlett OctoPre Dynamic
- The Sync function on the OctoPre Dynamic has a third option, ADAT, for receiving sync over an ADAT In port rather than the Word Clock BNC connection.
- The ADAT > Line function is discussed below.
Connecting Your Scarlett OctoPre
There are two main uses for the Scarlett OctoPre:
- To add more analog inputs to an audio interface with an ADAT connection
- To add high-quality “front end” microphone preamplifiers to an analog mixer using analog cables
There is a third use for the Scarlett OctoPre Dynamic, which has an additional ADAT In port. When paired with an audio interface with an ADAT Out port, you can send eight analog output channels from your DAW to the OctoPre. You can then send the analog outputs from the OctoPre to an analog mixer. This is called ADAT Line Mode.
Sample Rate vs. Channel Count over ADAT
To send the signals from your preamp inputs to the audio interface, you connect an optical cable to the ADAT port.
The number of ADAT channels that can be transmitted on one cable decreases as you increase the sample rate.
You can send eight channels at 44.1 kHz or 48 kHz but only four channels at 96 kHz and two channels at 192 kHz.
If your audio interface has a second ADAT input, you can connect two optical cables to transmit eight channels at 96 kHz (SMUX-II mode) or four channels at 192 kHz (SMUX-IV mode).
SMUX, or S/MUX, stands for Sample Multiplexing.
Consult the Example Setups section of the OctoPre User Guide or the Example Setups section of the OctoPre Dynamic User Guide for details.
Sync and Word Clock
When you pass digital audio between devices, all devices must be synchronized to the sample rate using a control signal called word clock. In every setup, one device is set to send out the word clock, and all other devices are set to receive the word clock.
In some cases, word clock can be sent over the ADAT optical cable along with the digital audio channels. In others, the ADAT connection is used for the digital audio channels, while the word clock is sent separately over the BNC coaxial cable connections.
There are several options. The first three apply to both the OctoPre and OctoPre Dynamic.
OctoPre as Clock Source Master via ADAT
- Connect the OctoPre to the audio interface via the ADAT Out port.
- Set the audio interface to receive word clock from its ADAT input.
- Set the sample rates on both devices to the same value.
OctoPre as Clock Source Master via word clock
- Connect the OctoPre to the audio interface via the ADAT Out port.
- Connect a BNC cable from the Word Clock Out on the OctoPre to the Word Clock In on your audio interface.
- Set the audio interface to receive word clock externally through its Word Clock In port.
- Set the sample rates on both devices to the same value.
OctoPre as Clock Source Slave via word clock
- Connect the OctoPre to the audio interface via the ADAT Out port.
- Connect a BNC cable from the Word Clock In on the OctoPre to the Word Clock Out on your audio interface.
- On the OctoPre, set the Sync switch to Word Clock.
- Set the sample rates on both devices to the same value.
OctoPre Dynamic as Clock Source Slave via ADAT
This fourth option is available on the OctoPre Dynamic, which has a pair of ADAT In ports in addition to a pair of ADAT Out ports.
- Connect the Scarlett OctoPre Dynamic’s ADAT Out port(s) to the audio interface’s ADAT input.
- Connect the audio interface’s ADAT output to one of the Scarlett OctoPre Dynamic’s ADAT IN ports.
- On the OctoPre, set the SYNC button to ADAT. The LED will illuminate.
- Set the sample rates on both devices to the same value.
For more information about synchronization and word clock, check out Sweetwater’s guide:
Using the Scarlett OctoPre with an Analog Mixer
To use either model of OctoPre’s mic preamplifiers in a purely analog fashion, connected to any device that can accept 8 channels of analog audio, you need to make sure you have the correct cable connections on both ends.
ADAT and BNC, sample rates, and word clock don’t come into this scenario.
Consult the OctoPre User Guide section Scarlett OctoPre with analogue mixing desk.
Using the OctoPre Dynamic for More Analog Outputs from Your DAW
This special application requires an audio interface with an ADAT Out port. Consult the OctoPre Dynamic User Guide section Example Setups: ADAT > Line mode.
Using Compression on the Scarlett OctoPre Dynamic

Compression controls on the Scarlett OctoPre Dynamic
Each channel on the OctoPre Dynamic has a “one-knob” compressor, which makes using it really easy. Turning the knob results in a combined threshold and gain makeup function. As the threshold is reduced, the gain is automatically increased.
The compressor has a 2:1 ratio. Pressing the More button turns on a red LED and changes the ratio to 4:1.
The COMP LED glows yellow when the compression effect is applying gain reduction to the signal on that channel.
For more info, consult the OctoPre Dynamic User Guide section: Compressor.
Check out these Sweetwater videos to learn more about compression.
Focusrite Resources
Related Articles
When you need help, Sweetwater has the answers!
Our knowledge base contains over 28,000 expertly written tech articles that will give you answers and help you get the most out of your gear. Our pro musicians and gear experts update content daily to keep you informed and on your way. Best of all, it’s totally FREE, and it’s just another reason that you get more at Sweetwater.com.

