
Windows 11 PC Optimization for Recording
In this guide, we will show you how to optimize your Windows 11 PC for audio and recording. This means we will show you how to configure your system’s preferences, drivers, and how to choose the correct settings inside your DAW. Follow the sections below to get started.
- Basic Windows 11 optimizations
- Update drivers and firmware
- Power plan settings and Windows 11 disk optimizations
- Windows 11, DAW, and audio/MIDI connections
Basic Windows 11 optimizations
Let’s cover the basics first. Basic system maintenance and file management are the building blocks of a solid PC. Without performing these regularly, your computer can become bogged down, which slows performance that can affect your workflow in the studio.
Windows 11 system maintenance
There are some simple ways to optimize your Windows 11 computer. While these may seem trivial, these minor optimizations can make a big difference!
- Unless they’re necessary, close any unused programs while using your DAW.
- Disable third-party startup services such as OneDrive, Skype, Cortana, SpotifyWebHelper, and iTunes.
- Hold Ctrl+Shift+Esc on your keyboard to pull up Task Manager. Next, click the Startup tab. Locate and right-click on any non-essential services, and select Disable.
- Perform malware and antivirus scans once every week or so to make sure your computer isn’t infected.
- We highly recommend using the built-in Windows antivirus software, Windows Defender. Third-party antivirus software can use quite a bit of your computer’s resources, typically takes up a lot of hard drive space, and may cause software to run incorrectly. For example, a legitimate third-party plug-in might not work because it could be flagged as a malicious file, since the antivirus software may not recognize it as safe.
- Remove non-essential preinstalled software (bloatware) if you use a pre-configured computer, such as the one you would get from a retailer. These programs are unnecessary, take up hard drive space, and slow your computer to a crawl.
- Do not uninstall Microsoft Edge. While you may not use it as your primary browser, uninstalling it can cause crashes.
- Uninstall any programs that you haven’t used in a while to free up hard drive space.
- While Windows 11 updates won’t be forced as they were on Windows 10, be sure to check that the OS is up to date. To do this, click the Windows icon, type “Update”, then click Check for updates.
- Fortunately, Windows 11 updates are 40% smaller and will install in the background, which means you can keep working on your projects and won’t have to worry about wasting time waiting on installation and having to constantly reboot.
Delete unnecessary files
Before optimizing your hard disk, you’ll want to delete any unnecessary files, as they can add up over time. The less space you have on your hard drive (especially your boot drive), the slower your computer will become. If you have 20 takes in an audio or video project and will only use three, that’s 17 useless files just taking up space on your hard drive. So, locate your DAW’s project folder and delete any unnecessary takes.
Clean your PC
IMPORTANT: Power off, disconnect, and let your computer discharge for approximately 15 minutes before cleaning.
While it’s often overlooked, you should give your computer, fans, and vents a good, proper cleaning at least once a season. We highly recommend cleaning everything more frequently if you have pets that wander in the room. The more dust (and pet hair) accumulates, the more clogged the vents and fans can become, which results in overheating. All you need is some compressed air, isopropyl alcohol, cotton swabs, and a microfiber cloth. If you don’t feel comfortable opening your desktop’s case, take it to a local computer shop for cleaning.
Location, location, location!
The location of your PC matters, as well! Some PC users prefer to place their computer on a desk or rack, while others may prefer it on a stand. As long as it’s well ventilated (meaning the intake and exhaust fans aren’t blocked) and you check for dust frequently, you should be fine!
Not only does the position of the PC matter, but the room itself also plays a role. As the temperature in the room fluctuates, so will your computer’s temperature. While the max CPU temperature tolerance can vary from processor to processor, the consensus is that you begin to enter the “danger zone” once your PC reaches 80°C, as this can cause throttling and, even worse, crashes.
Depending on your cooling system, the coolest your computer will get is the same or a little above the room’s temperature (especially with fan-only cooling systems). So, when you’re setting up your studio, consider the average temperature of that room throughout the year, and try and keep it temperature controlled. This is especially true in the summer when it gets warm. If you’re working on a large project that pushes your PC to the limits and the ambient temperature is pretty warm, you’re more susceptible to hard crashes and overheating.
To monitor your temperatures, we highly recommend using the third-party software CPUID HWMonitor. This software will give you a real-time breakdown of the temperature and voltage for nearly every PC hardware component.
What is throttling?
If your computer begins to reach the maximum temperature limit, your processor will begin to throttle. This means that the CPU will automatically slow down, or throttle, to conserve energy and reduce the amount of heat it generates. This can happen more frequently if you overclock the computer with an inadequate cooling system or if you’re in a very warm room.
TIP: While a little uncommon, overheating can be caused by dried or chipped thermal paste. This means the old paste will need to be cleaned off the processor and new paste reapplied. We strongly recommend taking it to a professional for this procedure.
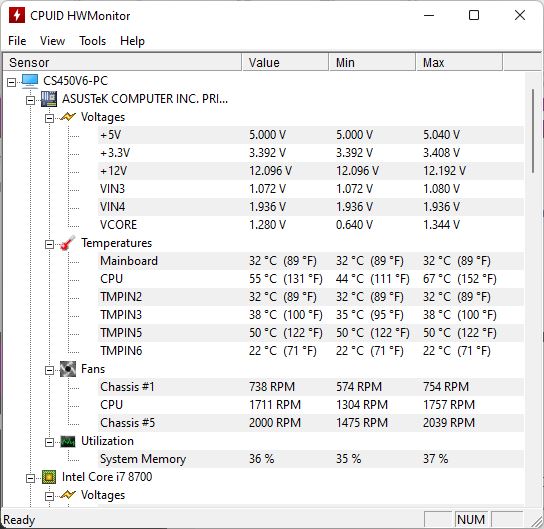
CPUID HWMonitor
Windows 11 file management
Having your programs and files organized is an essential part of optimizing any PC. This is particularly true for audio engineers and studios. Not only will it make things easier to find, but it also makes it easier to keep track of how much space you have on your hard drive(s).
- Use dedicated drives for your DAW projects, virtual instrument libraries, and plug-ins. The more available space on your boot drive, the better the performance you’ll get from Windows 11.
- Don’t move files and folders between locations unless necessary. If you do move any files, you’ll receive an error the next time you launch your project and will need to relink them.
Hardware connections
You may not think about it much, but where and how you’re connecting your hardware to your PC can make a world of difference, especially when using your DAW. Doing so will allow you to use your gear to its full potential. Not just that, but it’s the first thing you should do when troubleshooting connectivity issues.
- Connect USB 2.0 devices to USB 2.0 ports and USB 3.0 devices to USB 3.0 ports, if possible. While you can connect one to the other, your device will be capped at the USB 2.0 speed if you mix them.
- If your USB device has a power supply, use that instead of relying on bus power, mainly when using laptops. If external devices draw more power than your computer can provide, it may result in connectivity issues and overall poor performance.
- Know the difference between USB-C and Thunderbolt cables. While they both use the same connector, a USB device that has a USB-C connector is not compatible with Thunderbolt 3 peripherals. Check out our inSync article, “What Thunderbolt 3 and USB-C Mean to Musicians and Engineers,” to learn more.
- Always use the USB cable that came with your hardware. Using generic third-party cables may not provide a quality connection to your Windows 11 PC.
- If your PC or laptop has a limited amount of USB connections, then configure it so that audio interfaces and MIDI controllers are connected directly to your computer.
- We recommend using a powered USB hub for peripherals and dongles such as eLicenser and iLok keys. Passive hubs can work but may not provide enough power to transfer data.
Update drivers and firmware
One critical optimization for your Windows 11 computer is updating the drivers and firmware of both your external devices and internal computer components. Having out-of-date drivers or firmware can be the root cause of many issues, including problems with playback and recording, so if you are having problems, the first thing to do is update the drivers and firmware (if applicable).
External devices
Some external devices, such as audio interfaces, MIDI keyboards, and DAW controllers, are class-compliant, meaning no additional drivers or firmware are required (plug and play). However, most will require specific drivers to connect to and communicate with your PC correctly. If a driver isn’t listed on the hardware manufacturer’s website, that usually means it’s class-compliant, and no additional drivers need to be installed.
We recommend installing the drivers before connecting the hardware to your Windows 11 PC. Sometimes, especially if you restart your computer, a generic driver will be installed in its place, which can cause connectivity issues. Follow these steps to install the drivers correctly.
- Uninstall the current driver and disconnect your external hardware device.
- Download and install the latest driver (and firmware, if applicable) from the manufacturer’s website.
- Follow the on-screen installation instructions, as you may need to perform additional steps.
- Restart your computer, then connect the device.
Internal components
Audio glitches and latency can be caused by an internal component such as your graphics card, integrated USB port driver, or even a motherboard or BIOS firmware. For example, if your wireless digital mixer isn’t connecting to your computer’s network, it could be because of an out-of-date or corrupt network card driver.
Updating your internal component’s driver may be a bit more involved, so make sure to follow the manufacturer’s installation instructions to the letter — especially with your motherboard and BIOS, as incorrect installation can lead to system-wide issues and, in worst-case scenarios, an unrecoverable computer.
- Click the Windows icon, type “Device”, then select Device Manager.
- Click the arrow next to Display Adapters for graphics drivers, Universal Serial Bus for USB chipset drivers, or Network Adapters for networks drivers.
- Right-click and choose Update Driver, followed by Search automatically for updated driver software. If no driver is found, update the driver manually using the steps below:
- Double-click to view its properties.
- In the General tab, you can see the model and the manufacturer. In the Driver tab, you can find the driver version and the date.
- Go to the computer manufacturer’s website to find the latest driver for your controller.
Where can I find detailed driver information?
Sometimes the Generaland Drivertabs in Device Manager may not provide the driver information necessary to update the correct driver version. For internal components like your network card or integrated USB ports, you can view it within the System Informationtab. To do this, click the Windows icon, type “System info”, and then click System Information. From here, you can view details about every hardware component that is currently installed on your PC.
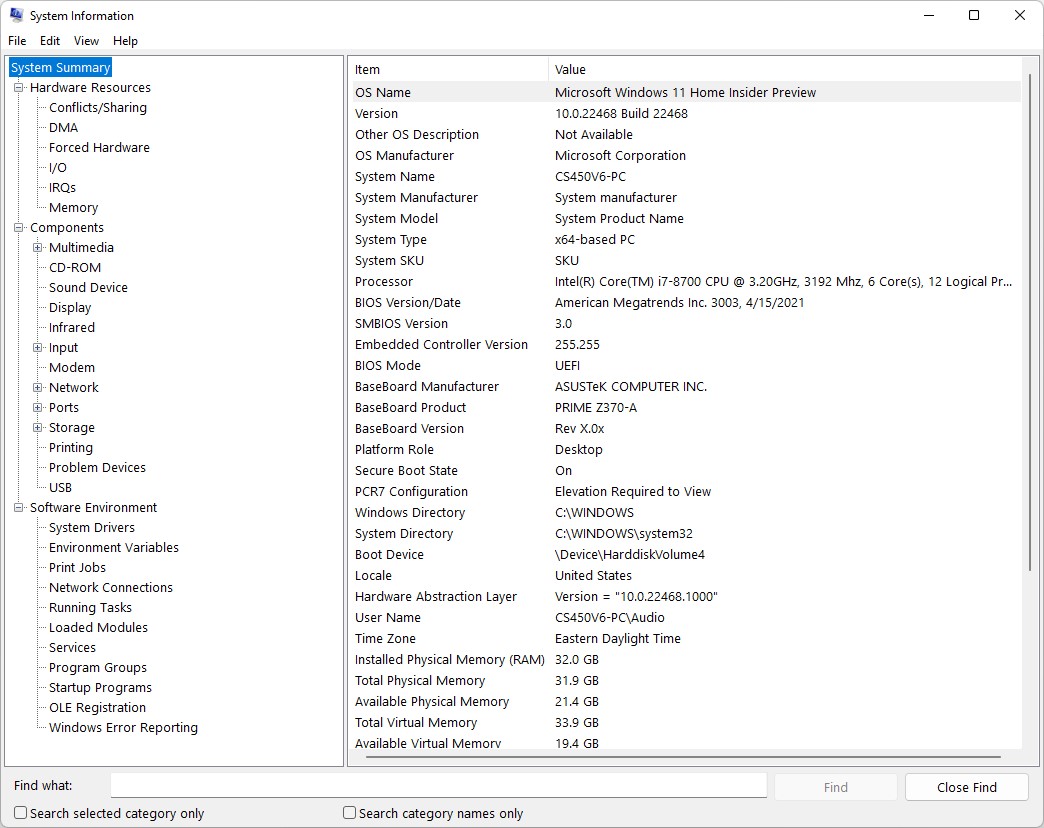
System information
NVIDIA graphics cards
If you have an NVIDIA graphics card and are having display issues in your DAW (such as Pro Tools), this could be due to an out-of-date or corrupt driver. If you’re not sure which NVIDIA graphics card driver you have, you can use NVIDIA’s Smart Scan Tool to detect the currently installed driver automatically. Alternatively, download and install NVIDIA GeForce Experience. This software will not only show you which driver is currently installed, but you’ll also receive driver update notifications.
- When installing NVIDIA drivers, Select Custom (Advanced), and then uncheck everything, especially HD Audio Driver if you’re using an audio interface.
Power plan settings and Windows 11 disk optimizations
Some other optimizations that you should perform involve updating the power plan settings (laptops) and various hard disk tasks. You want to get every bit of performance you can out of your Windows 11 PC, so these will increase your performance even further.
Power plan settings
TIP: High-performance power plan settings will drain your laptop battery faster, so make sure it’s plugged into a power source, if at all possible. If you’re a traveling musician, we recommend investing in a power bank. These can be a lifesaver, especially if you’re traveling and don’t have access to an AC power outlet.
Desktop users don’t need to worry too much about power plan settings. While you may see some changes, there will only be a small difference. If you’re using a laptop, though, your power plan can play a significant role in the performance of your computer, especially when you’re working inside your DAW, photo, or video editing software. For example, if it’s set to “Power saver” mode, you’re much more likely to run into glitches, dropouts, and overall poor performance. While there are other factors, such as the age of your laptop or a weak or failing laptop battery, these power settings can do you a world of good.
- Launch Control Panel and click Power Options.
- Select High performance, and then choose Change plan settings.
- If “High performance” isn’t listed, click Show additional plans.
- Set the sleep time to Never.
- Next, click on Change advanced power setting and update the following settings:
- Hard disk > Turn off hard disk > Setting (Minutes): 0
- Sleep > Sleep after > Setting (Minutes): 0
- Sleep > Hibernate after > Setting (Minutes): 0
- USB settings > USB selective suspend setting > Setting: Disabled
- Processor power management > Minimum processor state > Setting: 100%
- Processor power management > Maximum processor state > Setting: 100%
- After you’ve updated those settings, click Apply, then click OK.
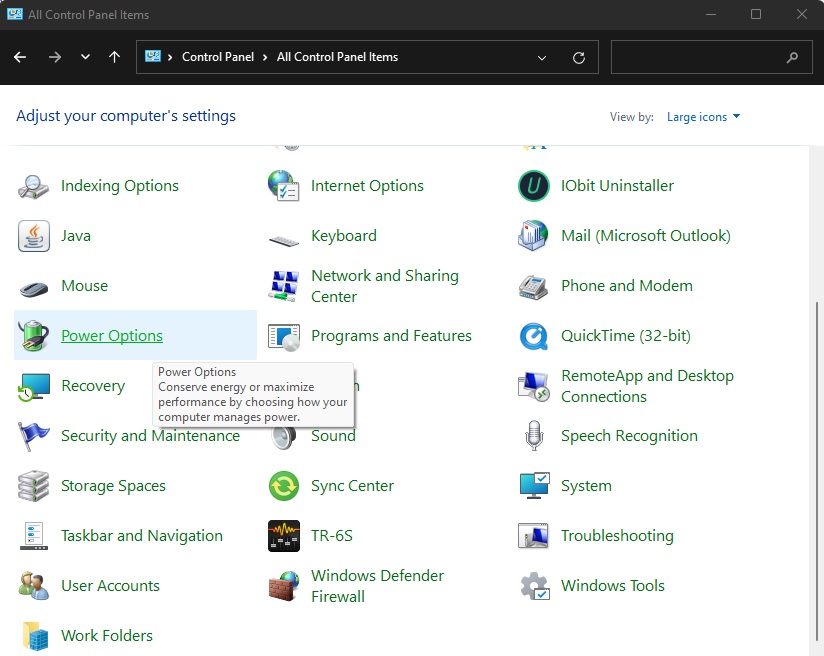
Power Plan in Control Panel

Power Plan settings
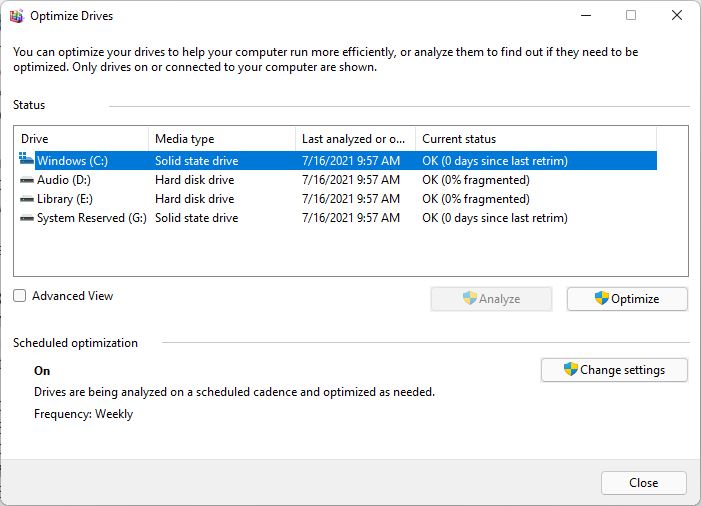
Windows 11 hard disk optimizations
As we mentioned earlier in this article, deleting unnecessary files will help optimize your hard drive. Performing some other hard drive optimizations will improve the disk performance even further. These optimizations are beneficial for 5,400 and 7,200 rpm spinning disk drives and SSDs to a lesser degree.
Disk Defrag
When a hard drive is fragmented, files and folder sectors may get scattered across the disk, so using the Disk Defrag tool will rearrange the sectors so everything is “rebuilt” into a single sector, which results in better disk performance. There is no need to defrag an SSD.
- Click the Windows icon, type Defrag, and click Defragment and optimize drives.
- Wait until the process completes, then click Close.
- If you have multiple drives, start with the smallest hard disk (HDD) and go up to the largest.
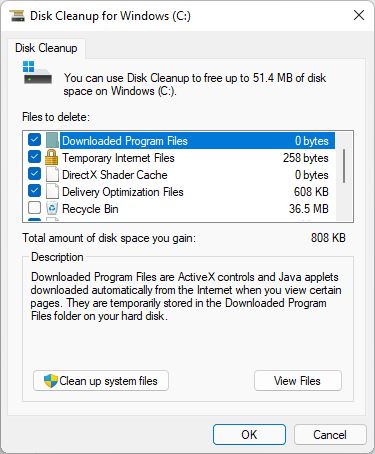
Disk Cleanup
IMPORTANT: When cleaning up the system files, there is an option for Previous Windows installation(s). If this is checked and you upgraded to Windows 11, the Windows 10 installation is deleted, and you will not be able to roll back to Windows 10.
The Disk Cleanup option allows you to not only remove files/folders from the Recycle Bin but also remove temporary files and files or folders that are no longer of use. This can save you gigabytes’ worth of space! The cleanup operation can take anywhere from a few minutes to up to an hour depending on how much needs to be deleted.
- Click the Windows icon, then type and select Disk Cleanup.
- Select your C: drive, check everything, and then click OK.
- Go back to Disk Cleanup, select the C: drive again, then click Clean up system files.
- Select everything, then click OK. This process may take a while, especially if you’ve never done this before, so don’t shut down or reboot your computer during the cleanup operation.
- The window will disappear once it’s finished.
Defrag and Optimize window
Disk Cleanup window
Windows 11, DAW, and audio/MIDI connections
After you’ve optimized your PC, you’ll want to configure your external devices and audio recording software. While some external audio and MIDI equipment is class-compliant (plug and play), many usually require product-specific drivers and additional hardware and software configuration. Once configured, you’ll then need to set it up in your DAW for use.
Windows 11 hardware compatibility
As time progresses, more and more legacy (old) products stop being supported, which means consistent performance can’t be guaranteed. For example, your go-to interface that you’ve used since 2008 could work perfectly fine one day, then stop working altogether with the next Windows update. This can be a bit frustrating, particularly if you’re in the middle of a big project. So, before you upgrade to Windows 11, check out our Windows 11 Compatibility Guide for the most up-to-date information for your hardware.
DAW software settings
Just as with other software, your computer must meet the DAW’s minimum system requirements for it to run correctly. Installing a DAW that isn’t compatible may result in crashes or errors, or it may not even launch. So, if you’ve just purchased a new Windows 11 PC or are upgrading from Windows 10, then you need to visit the DAW manufacturer’s website to verify that your machine meets the specifications required.
Select the correct audio device
TIP: Disable any playback and recording device that is not in use (e.g., your computer monitor or motherboard sound card), as this causes conflicts between your interface and DAW. To disable, right-click the device in question and select Disable.
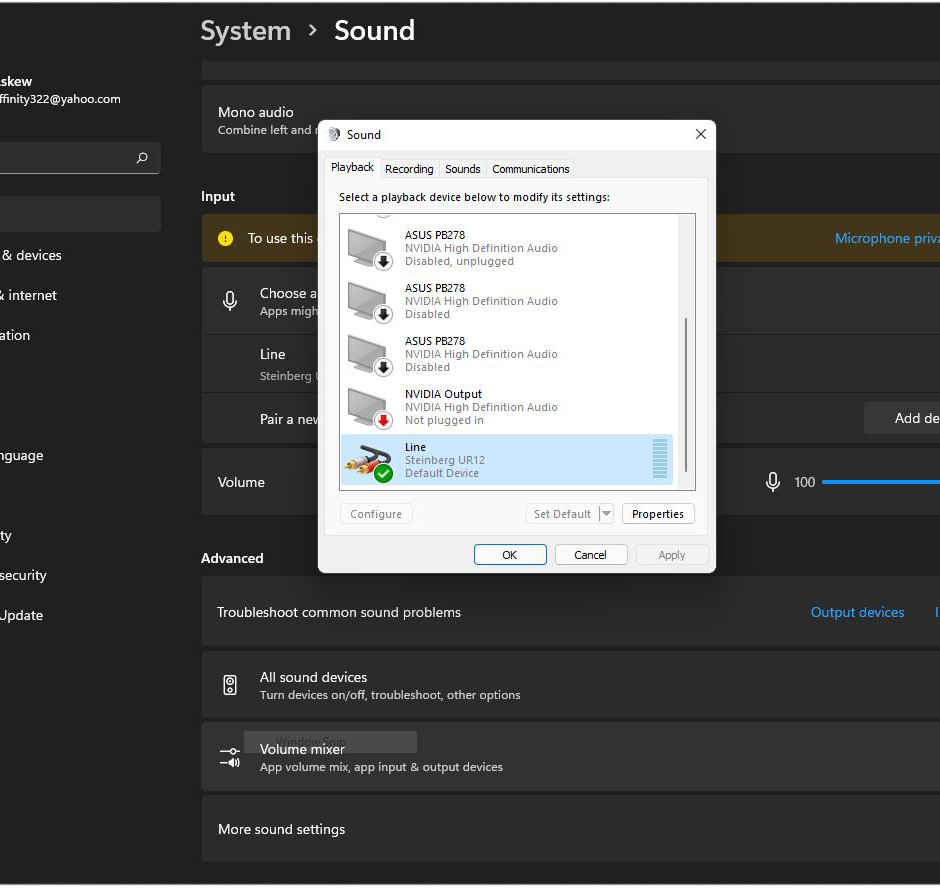
Sometimes your DAW can default to a completely different audio driver, such as the generic Windows Audio driver, especially if you’re using an audio interface for the first time. If you’re not getting any sound from your DAW project, this could likely be the issue. Before you start recording, go to your DAW audio settings and make sure that your current audio interface is set as the default playback device.
- Right-click the speaker icon and select Sound settings.
- Scroll to the bottom of the window and click More sound settings.
- Click the Playback tab, locate and right-click the audio device you are using.
- Select Set as Default Device.
- You can also select your primary playback device by clicking the Speaker icon, then clicking the speaker icon located next to the Volume slider. A menu displaying all current output devices will then appear. Just click the one you wish to set as the default.
Sound settings window
Match Windows 11 playback settings with the DAW
Windows 11 has its own playback settings, which need to match those of the DAW. If it isn’t set correctly, you may experience playback issues, audio glitches, and sometimes failure to launch at all. For example, if your DAW sample rate is set to 48kHz, then you need to set your Windows 11 system audio sample rate to 48kHz, as well.
- Click the Speaker icon on the bottom of the taskbar, then click the speaker icon located to the right of the volume slider.
- Click your primary playback device.
- Click More volume settings, select your output device, then use the dropdown box to select the sample rate and bit depth.
- Scroll down to the bottom of the window, then click More Sound Settings.
- Click the Playback tab, then locate and right-click the audio interface that is being used.
- Select Properties, and then click the Advanced tab to disable Exclusive Mode for further optimization.
- We recommend disabling Exclusive Mode for bout the Playback and Recording device.
Related Articles
When you need help, Sweetwater has the answers!
Our knowledge base contains over 28,000 expertly written tech articles that will give you answers and help you get the most out of your gear. Our pro musicians and gear experts update content daily to keep you informed and on your way. Best of all, it’s totally FREE, and it’s just another reason that you get more at Sweetwater.com.


Offer applies only to single-receipt qualifying purchases. Select manufacturers may require that only the manufacturer’s products qualify towards the minimum purchase amount needed to be eligible for promotional financing. Otherwise, an invoice that meets the minimum purchase amount and contains at least one qualifying manufacturer product is eligible for promotional financing. No interest will be charged on promo purchase balance, and equal monthly payments are required on promo purchase until it is paid in full. The payments equal the amount financed divided by the number of months in the promo period, rounded up to the next whole dollar. These payments may be higher than the payments that would be required if this purchase was a non-promo purchase. During the last month(s) of the promo period the required monthly payment may be reduced due to the prior months’ rounding. Regular account terms apply to non-promo purchases. New Accounts as of 07/31/2025: Purchase APR is 34.99%. Penalty APR is 39.99%. Min Interest Charge is $2. Existing cardholders: See your credit card agreement terms. Subject to credit approval.
Offer applies only to single-receipt qualifying purchases. No interest will be charged on the promo balance if you pay it off, in full, within the promo period. If you do not, interest will be charged on the promo balance from the purchase date. The required minimum monthly payments may or may not pay off the promo balance before the end of the promo period, depending on purchase amount, promo length and payment allocation. Regular account terms apply to non-promo purchases and, after promo period ends, to the promo balance. New Accounts as of 07/31/2025: Purchase APR is 34.99%. Penalty APR is 39.99%. Min Interest Charge is $2. Existing cardholders: See your credit card agreement terms. Subject to credit approval.
The estimated required monthly payment shown which excludes taxes and delivery equals the amount financed divided by the number of months in the promo period, rounded up to the next cent. During the last month(s) of the promo period the required monthly payment may be reduced due to this rounding. These payments apply only with the financing offer shown. If you make these payments by the due date each month, you should pay off this amount financed within the promo period, if it is the only balance you are paying off. If you have other balances on your account, this payment will be added to any other minimum monthly payments.
Applies only to select items from this manufacturer. Ask your Sweetwater Sales Engineer for more details.