
You’ve heard the advice a thousand times — don’t over-compress your tracks. But you absolutely need to maintain control over the dynamic range of your recordings if you want a professional sound. How do you do this without crushing the life out of them? You’ll need to be able to approach your compressors with a goal-oriented mind-set. What are you trying to achieve? Do you need to smooth out the volume variations of a vocalist? Do you want to add sustain and weight to a bass guitar? Are you trying to tame excessive signal spikes on a hi-hat? Understanding the controls on your compressor will help you achieve your goals faster, and that’s what this article is all about.
What Does This Knob Do?
Note: Not all compressors label their controls the same, and some may have more controls than others. The tips below apply to a majority of compressors, both hardware and software.
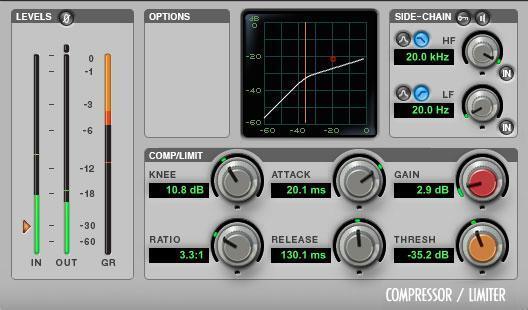
Threshold
This sets the signal level at which the compressor begins compressing your audio. Compression does not occur until the signal level reaches the threshold, and compression will cease once the incoming signal level drops below the threshold.
Ratio
Your ratio control lets you decide how much compression is applied once the signal crosses that threshold — the actual ratio being referred to is the input level compared with the output level. At a ratio of 2:1, for example, every 2dB of signal level over the threshold will be compressed to deliver only 1dB of signal level increase at the output stage.
Attack
The attack control on a compressor determines how long it takes for the compressor circuit to reach (nearly) full compression — these are often very short values time-wise, sometimes down into the microsecond range. A good way to look at the attack control is that it determines how much of a sound’s initial attack will be compressed — longer attack times allow more of the initial attack to slip through before compression begins.
Release
Similar to attack, the release control determines how long it takes compression to stop once the incoming signal level falls below the threshold. Setting this control too short can cause the compressor to “pump” or “breathe” — setting the release too long can cause equally unnatural sound effects.
Makeup Gain/Output Level
Because compression essentially lowers the volume of your audio in a dynamic, intelligent way, you may need to apply some makeup gain to bring the signal level back up after compression occurs. Use the output level or gain control on your compressor in conjunction with its bypass button to quickly compare and match the level of your compressed audio to the incoming signal.
Input Level/Output Level/Gain Reduction Meters
While you should learn to hear the subtleties of how compressors affect audio, these level meters will provide valuable visual feedback about what’s going on. Especially if you can’t really hear whether compression is occurring, the gain reduction meter will tell you exactly how hard the compressor is working (or not). Some compressors are more transparent than others, so checking the gain reduction and output level meters is a smart move when it comes to managing signal levels.
So Where Do I Start?
Regardless of what you’re compressing and why, it will be helpful to have a go-to starting point with any compressor. With the controls set as explained below, you’ll be in a good position to tackle any compression task.

Threshold
Start with this turned all the way up (typically fully clockwise), or at least higher than the signal level you’re sending it. By doing this, you’ll be able to gradually introduce compression by lowering the threshold, which will better help you hear the effect it’s having on your audio.
Attack/Release
There’s a lot of nuance in these controls; a good place to start would be 50% for both of them (or halfway between their fastest and slowest values). Or even better, engage your compressor’s “Auto” attack/release control if it offers one. This allows the compressor to evaluate the incoming signal’s dynamics and automatically set the attack and release times accordingly.
Ratio
Start with a moderate setting of 3:1 or 4:1. You can always increase or decrease this after you’ve gotten the threshold and timing controls dialed in.
Makeup Gain/Output Level
Start with this at unity gain (no boost or cut).
The settings above will give you a good starting point to achieve the following goals with practically any compressor.
What Can You Do with Compression?

Smooth out overall volume level
A common compressor application is to clamp down on unwanted signal peaks, without compressing the overall signal. Lower the threshold control and watch your gain reduction meter — set the threshold at a point where loud peaks cause gain reduction, while most of the audio passes through without gain reduction. At this point, you can increase the ratio to clamp down on peaks more, or lower the ratio to reduce the amount of gain reduction occurring. Faster attack and release settings will help focus the compression on the peaks without affecting the audio before and after each peak.
Add girth and sustain to an instrument
Lower the compressor’s threshold just until you start to see gain reduction happening on every note, but not so low that it’s occurring nonstop. Increase the ratio to around 6:1, 8:1, or even 10:1. At this point, you should hear a significant difference between the input signal and the output signal (use the bypass function to compare the two). The instrument should sound fuller and stronger, with more sustain. If you feel like the track has lost some punch and impact, slow down the compressor’s attack time to allow more transients to come through uncompressed.
Prevent signal spikes
At extreme ratio settings (10:1 or higher), a compressor is effectively the same as a limiter, preventing signal levels from spiking beyond a certain point. This is especially useful in live sound applications where you want absolute certainty that a signal won’t exceed a determined value. Begin by lowering the threshold just until the very loudest signal peaks are being compressed (check your gain reduction meter). At this point, crank up the ratio as high as it will go — 20:1 creates an effective sonic barrier, and higher settings offer even more peace of mind. Most of the audio will pass completely unaffected, but if a mic gets bumped or the drummer hits too hard, the compressor will catch the signal spike. Fast attack and release times are called for in this application — make them as fast as you can without introducing unwanted audio effects.
Before or After EQ?
We’re asked this often here at Sweetwater — is it better to compress before equalizing, or after? It’s not a right or wrong scenario, and you may sometimes find yourself doing both. The key thing to remember is that a compressor responds to signal level, and an equalizer adjusts the signal level of various parts of the frequency spectrum — that means an equalizer placed before a compressor can have a big impact on how the compressor behaves. If you’re using an EQ for boosting certain frequencies to polish a track, you’ll probably want to place it after the compressor to prevent the boosted frequencies from triggering unwanted compression. Conversely, if you find the compressor is being triggered too often due to excessive bass or sibilants, try reducing those problem frequencies with an EQ placed before the compressor.
Train Your Ears
One of the most important things you can do when learning to mix audio is to train yourself to hear the subtleties of compression. As you’re turning that threshold down to allow the compressor to start grabbing your audio, really listen for what it’s doing to your track. Once you can hear how the compression sounds, listen as you turn the ratio up and down. Listen as you make the attack and release faster or slower. Your level meters will be a huge help in understanding what’s going on, but as with all things audio-related, how it sounds is the most important thing. There’s a lot of nuance in artfully controlling dynamic range, and spending some time practicing with a compressor is one of the most valuable things you can do to grow your mixing skills.
Sweetwater has a host of compressor options, from hardware units to the modeling plug-ins and the latest software iterations. Check with your Sweetwater Sales Engineer to find the compressor that’s right for you. Give us a call at (800) 222-4700.