
Understanding Digital Clocking for Audio
In this guide, you’ll learn what clocking is and how to set it up when configuring interfaces, preamps, and other external audio devices. We’ve also included a glossary so you can get familiar with the connections and how they work. Follow the sections below to get started.
- How does digital clocking work?
- How to set up and synchronize audio devices
- Digital connections glossary
How does digital clocking work?
When audio is sent into hardware, like an interface or digital mixer, it goes through A/D (analog to digital) conversion then D/A conversion (digital to analog). Analog audio waveforms are converted to 1’s and 0’s during the A/D conversion, then back to analog waveforms during the D/A conversion.
A/D conversion only takes a split second and must be sampled at very specific and regularly repeating intervals. Still, interconnected devices might get out of sync with each other and cause problems within that short span. This is where the job of clocking comes in. The clock provides the timing information and lets the digital signal be converted back into analog at the exact time it needs to be.
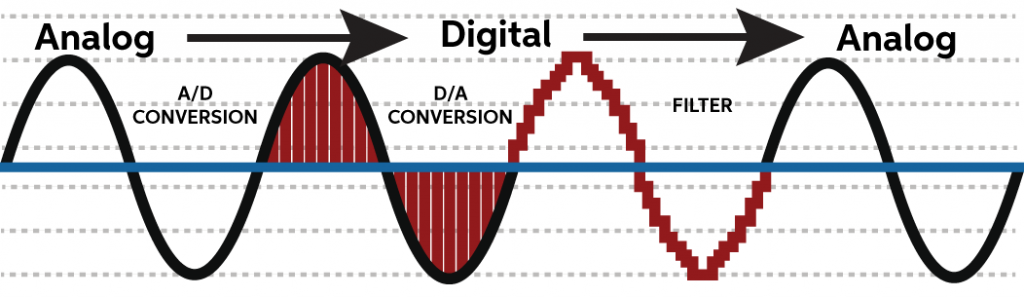
A/D D/A conversion ‘signal flow’
The process of converting sounds into digital information is a lot like how a video camera takes pictures very quickly and plays them back in succession, resulting in a movie. For the result to be a smooth, flawless reproduction of the original source when using two or more digital devices, you must sync them together so that they can capture the source material at the same time and speed.
Every piece of audio equipment has internal clocking, but if you want to use multiple devices, you need digital cables such as BNC, ADAT, or S/PDIF to synchronize them together.
What is word clock?
Word clock works by sending an electrical pulse to let each device know when a sample occurs during A/D and D/A conversion. For example, if the sample rate is 48kHz, a pulse is sent 48,000 times per second to let each device know when the samples occur.
- Clock information only travels one way: Master (host) to Slave (expansion).
- Word clock is a square wave that only contains timing information, not audio.
- If synced improperly, the devices may cause pops and clicks or may not even connect.
- Use a master clock to prevent the occurrence of jitter in multiple daisy-chained devices.
How to set up and synchronize audio devices
THERE’S A LIMIT: Some digital connections do have channel and sample rate limitations so check out our glossary below for more details.
Connecting audio devices together digitally is a two-step process. Once the interconnect cables are connected, you need to address syncing them together. Some devices have sample rate and sync source buttons. However, you may need to launch the interface’s control software (e.g., Universal Control, Focusrite Control) to change the sync source (clock source) and sample rate to the appropriate settings.
When setting the clock source, connect the Digital OUT of the Master device to the Digital IN of the Slave device. Also, make sure that the Masterdevice is set to INTERNAL and the Slavedevice is set to EXTERNAL, sourced by whichever clock connection you’re using (ADAT, S/PDIF, WORD CLOCK). Refer to the user guide of your interface for specific setup instructions.
Example 1: Adding additional inputs to an interface (ADAT)
If you have a mic preamp, like a Focusrite OctoPre, you can connect it to your interface via ADAT to expand your I/O(if your interface supports expansion).
This example shows how to connect a preamp to an interface to add additional inputs. The setup is a bit different than others because you must set the preamp as the Master device. If you want to add additional outputs, see Example 2 below to create an ADAT loop.
- Connect a TOSlink cable from the ADAT/Optical OUTPUT of the preamp to the ADAT/Optical INPUT of the interface.
- Set the preamp as the Master (Internal) and the interface as the Slave (ADAT).
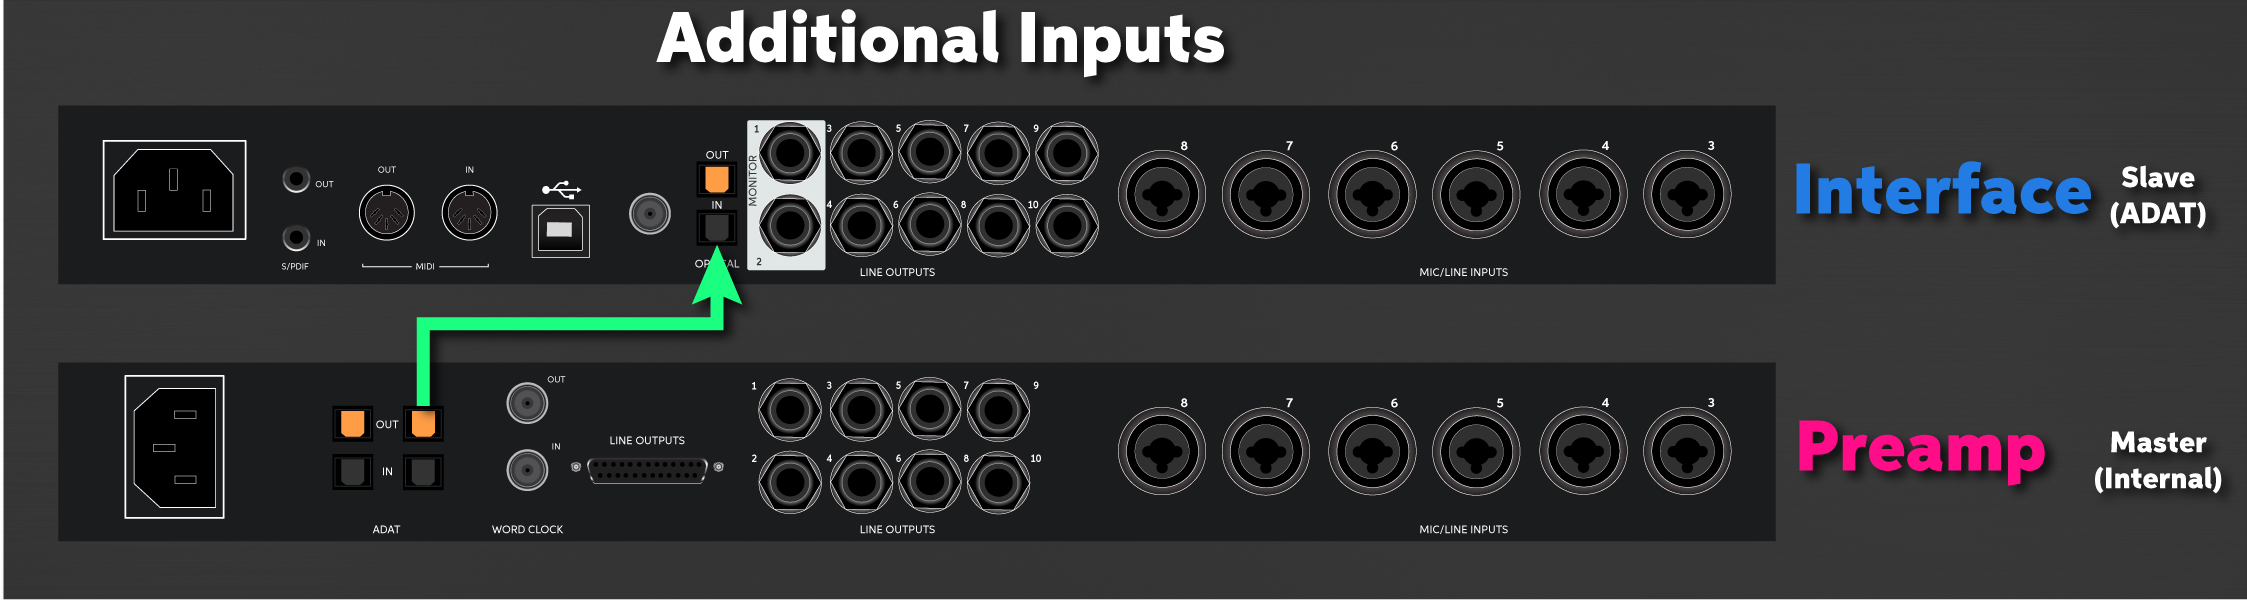
Add additional inputs via ADAT. Click to enlarge.
Example 2: Adding additional inputs and outputs to an interface (ADAT)
This example shows how to add additional inputs and outputs by creating an ADAT loop. Unlike the previous connection, you can set either the preamp or interface as the Master, but it’s recommended to choose the device with the better clocking technology. As long as one device is configured to ADAT and the other is configured as Internal, you won’t run into any issues because they’re synchronized.
- Connect a TOSlink cable from the ADAT/Optical OUTPUT of the preamp to the ADAT/Optical INPUT of the interface.
- Connect a TOSlink cable from the ADAT/Optical OUTPUT of the interface to the ADAT/Optical INPUT of the preamp.
- Select either the interface or the preamp as the Master (Internal) and the other as the Slave (ADAT).

Create an ADAT loop to add additional inputs and outputs. Click to enlarge.
Example 4: Syncing using an external master clock generator (Star configuration or chain configuration)
If you have multiple devices you need to sync via word clock, you can use an external master clock generator. These are extremely useful, especially when clocking three or more devices or when video equipment is involved.
Star configuration
- Connect a BNC cable from the OUTPUT of the external master clock to the INPUT of the Slave devices.
- Set the external master clock to Master (Internal) and all other units to Slave (Word Clock).
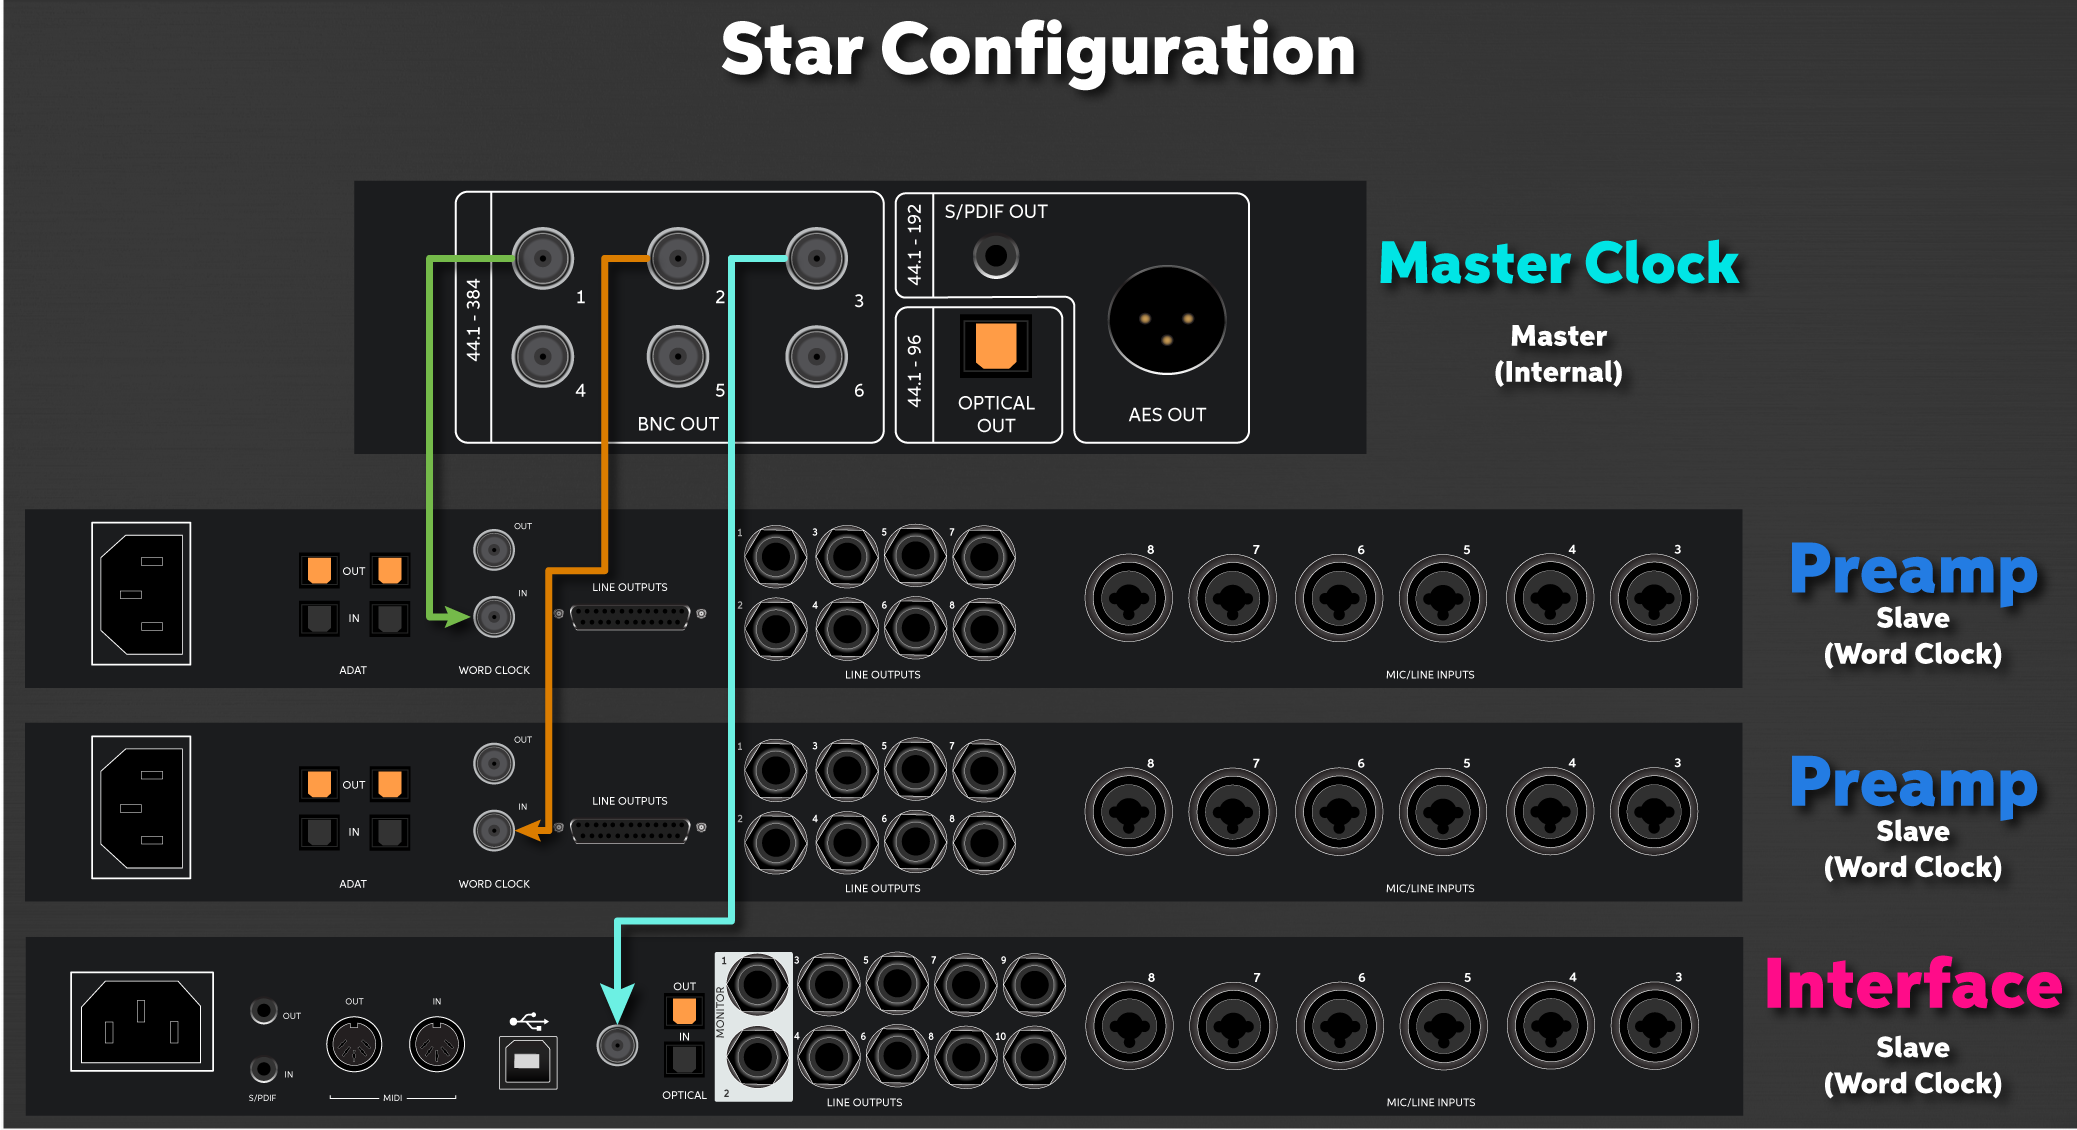
Use a Master Clock to connect multiple devices in a “Star” configuration. Click to enlarge.
Chain configuration
- Connect a BNC cable from the OUTPUT of the external master clock to one end of a BNC T-adapter.
- Connect the BNC T-adapter to the Word Clock IN of the next device.
- Connect a BNC cable from the other end of the T-adapter to the end of the next T-adapter in the chain.
- Once your chain is completed, us a 75 Ohm BNC terminator on the very last T-adapter.
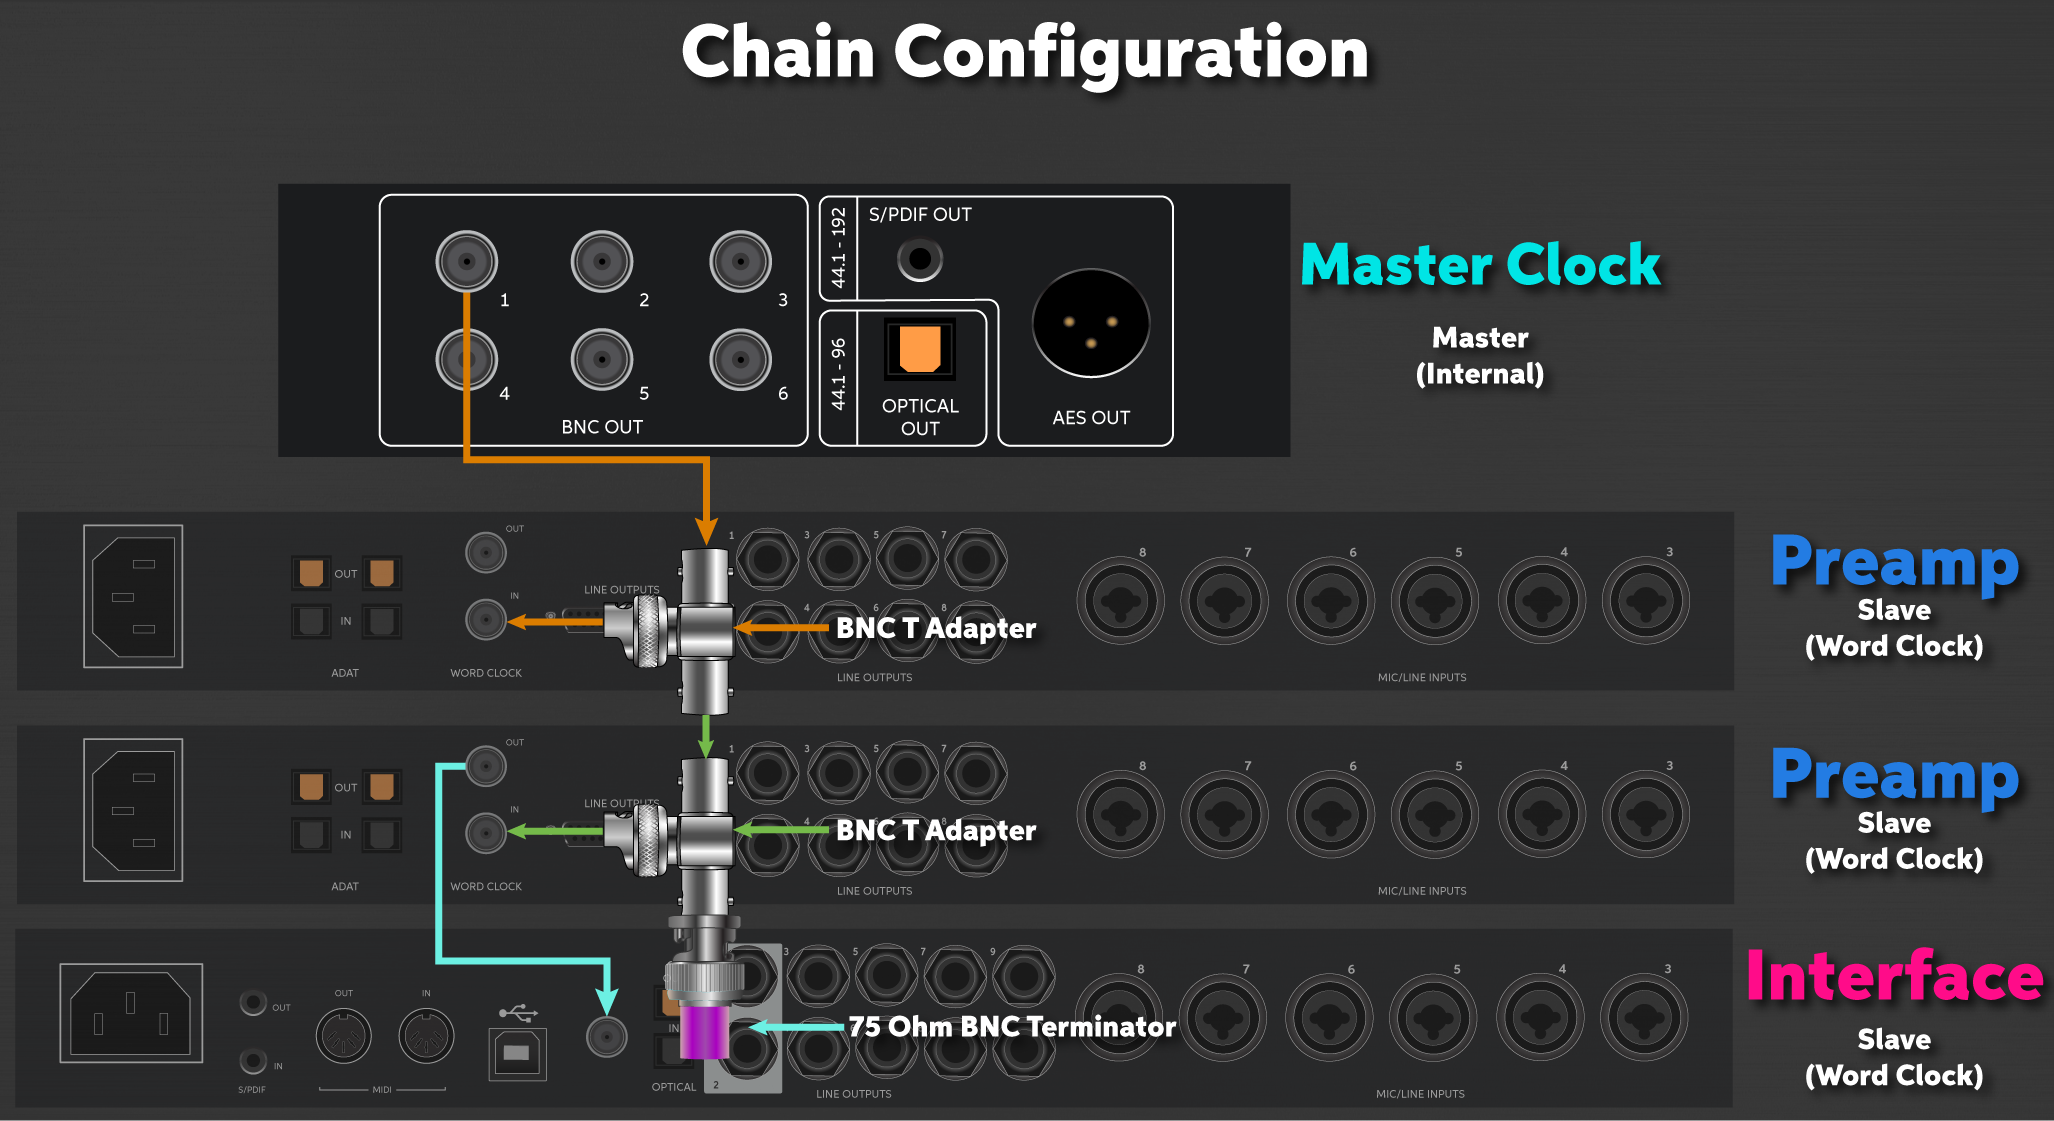
Use a Master Clock to connect multiple devices in a “Chain” configuration. Click to enlarge.
Digital connections glossary
Now that you know the basics of what clocking is and how it works, here is a glossary of the most common connection types. We’ve also provided a few tips for each connection to ensure that you get the best performance out of your devices.
ADAT
ADAT (Alesis Digital Audio Tape) connections are used to expand the number of inputs and outputs of your external devices. They use an optical TOSlink (lightpipe) cable and add up to eight additional 24-bit 48kHz audio channels, depending on the sample rate.
- Most TOSlink cables have a protective plastic cap on the tip. Be sure to remove it before making your connections.
- ADAT outputs are commonly used to connect to external devices like headphone distribution systems and D/A converters.
- The sample rate used will determine the number of channels in which audio is transmitted.
- 44.1kHz or 48kHz: Eight channels
- 88.2kHz or 96kHz: Four channels
- 176.4kHz or 192kHz: Two channels
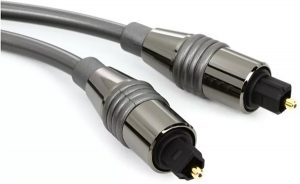
ADAT cable
S/PDIF
S/PDIF (Sony/Philips Digital Interface Format) was created to be a consumer-level alternative to AES/EBU. These use coaxial connectors and are another way to send and receive audio from one source to another, like a CD recorder. These are often confused for RCA jacks, which look similar.
- S/PDIF sends a stereo digital signal, while regular RCA cables (such as you would use with your stereo system, that have red and white connectors) send two channels of mono analog. While some RCA cables may work, we recommend using only S/PDIF cables for S/PDIF connections.
- S/PDIF carries two channels of uncompressed PCM audio or two channels of compressed surround sound DTS audio.
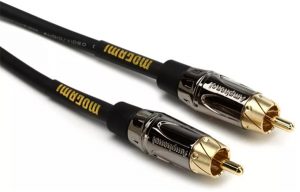
S/PDIF cable
AES/EBU
AES/EBU (Audio Engineering Society/European Broadcasting Union) connections are commonly used in professional environments such as live events and broadcasting, especially if there is a large amount of outboard gear and the cable runs are over 30 feet. They use XLR-to-XLR or DB-25 cables to send the digital signal.
- Standard XLR (microphone) cables have an impedance of 75 ohms, lower than an AES/EBU cable, which has an impedance of 110 ohms.
- While you can use standard XLR mic cables in a pinch, you risk noise and interference issues if the cable length is more than approximately 5 feet.
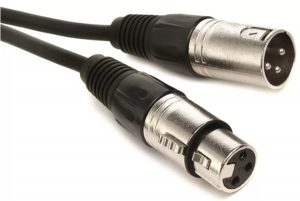
AES/EBU cable
BNC
BNC connections are another way of sending the digital clock signal. One advantage of BNC over other digital connections is that it’s easier to sync multiple devices using a dedicated master clock.
- If connecting more than two devices via BNC, be sure to use a T-adapter throughout your chain.
- You must use a 75-ohm coaxial cable. Consumer-level coaxial cables (commonly used for cable TVs) are only 50 ohms and will not provide the amount of signal required to clock.
- Terminate the last device in your clocking chain, especially with larger setups. Doing this stops the clock signal from bouncing back, which causes connection dropouts.
- Some devices have termination switches, but you may need to invest in a terminator to attach the T-adapter.
BNC cable
MADI
MADI (Multi-channel Audio Digital Interface) is a form of digital connection similar to ADAT. The sample rate dictates how many channels you can use through a single connection. You can also route each channel independently, making it easier to send the signal to multiple sources. This connection is commonly used in large-production environments such as concerts and broadcasting.
- The sample rate used will determine the number of channels in which audio transmits.
- 24-bit 48kHz: 64 input & output channels
- 24-bit 96kHz: 32 input & output channels
- 24-bit 192kHz: 16 input & output channels
- The maximum cable length depends on which type of MADI cable is used.
- MADI optical cable: 2,000 meters
- MADI coaxial cable (75 ohms, BNC connection): 100 meters

MADI cable
Related Articles
When you need help, Sweetwater has the answers!
Our knowledge base contains over 28,000 expertly written tech articles that will give you answers and help you get the most out of your gear. Our pro musicians and gear experts update content daily to keep you informed and on your way. Best of all, it’s totally FREE, and it’s just another reason that you get more at Sweetwater.com.


Offer applies only to single-receipt qualifying purchases. Select manufacturers may require that only the manufacturer’s products qualify towards the minimum purchase amount needed to be eligible for promotional financing. Otherwise, an invoice that meets the minimum purchase amount and contains at least one qualifying manufacturer product is eligible for promotional financing. No interest will be charged on promo purchase balance, and equal monthly payments are required on promo purchase until it is paid in full. The payments equal the amount financed divided by the number of months in the promo period, rounded up to the next whole dollar. These payments may be higher than the payments that would be required if this purchase was a non-promo purchase. During the last month(s) of the promo period the required monthly payment may be reduced due to the prior months’ rounding. Regular account terms apply to non-promo purchases. New Accounts as of 07/31/2025: Purchase APR is 34.99%. Penalty APR is 39.99%. Min Interest Charge is $2. Existing cardholders: See your credit card agreement terms. Subject to credit approval.
Offer applies only to single-receipt qualifying purchases. No interest will be charged on the promo balance if you pay it off, in full, within the promo period. If you do not, interest will be charged on the promo balance from the purchase date. The required minimum monthly payments may or may not pay off the promo balance before the end of the promo period, depending on purchase amount, promo length and payment allocation. Regular account terms apply to non-promo purchases and, after promo period ends, to the promo balance. New Accounts as of 07/31/2025: Purchase APR is 34.99%. Penalty APR is 39.99%. Min Interest Charge is $2. Existing cardholders: See your credit card agreement terms. Subject to credit approval.
The estimated required monthly payment shown which excludes taxes and delivery equals the amount financed divided by the number of months in the promo period, rounded up to the next cent. During the last month(s) of the promo period the required monthly payment may be reduced due to this rounding. These payments apply only with the financing offer shown. If you make these payments by the due date each month, you should pay off this amount financed within the promo period, if it is the only balance you are paying off. If you have other balances on your account, this payment will be added to any other minimum monthly payments.
Applies only to select items from this manufacturer. Ask your Sweetwater Sales Engineer for more details.