
Behringer Synth Setup Guide

Behringer tabletop synths are a great, modern way to capture the old analog sound, so in this guide, we will show you how to set it up, connect it, and use it for the first time. This guide is an overview of all Behringer synths, so check out your synth model’s Owner’s Manual for more information. Follow the sections below to get started!
Getting Started
Before you start using your Behringer synth, the first thing you must do is register the device with Behringer. Upon registration, you’ll receive a free 3-year extended warranty. The registration is only valid for the first 90 days after purchase, so make sure to register it as soon as possible!
Warming Up and Calibration
Some Behringer synths have analog circuits, which can be temperature sensitive. To get the best performance out of your Behringer synth, turn it on, then wait approximately 5 minutes. This will allow the internal circuitry to warm up. If the synth has been in a colder environment, you should wait about 10-15 minutes.
In addition, we recommend calibrating the unit Analog circuitry can ‘drift’ depending on the temperature, time, and age of your Behringer synth. So, to keep the synth performing flawlessly, it’s critical to check and perform calibration periodically. The process may differ as some may have a menu button, whereas others may require you to open the device, so check out your synth model’s Owner’s Manual to learn more about the calibration procedure.
Setup and Connections
Your Behringer synth has a few different connections: 5-pin MIDI, patch (for CV, also known as control voltage, and sync, also referred to as synchronization), and standard headphone and output jacks. Some also have an additional jack that is used for footswitches.
Connection Types
Almost all Behringer synths have three connections in common. USB, Patch, and MIDI. Connection types may differ, so be sure to refer to your Owner’s Manual for more information.
MIDI
The 5-pin MIDI connections on your Behringer synth are used to connect to other MIDI devices like synths and keyboards. The Behringer synths often share three MIDI connections: MIDI IN, MIDI THRU, and MIDI OUT. Some Behringer synths will have a “combo” MIDI THRU/MIDI OUT jack.
Patch
Most Behringer synthesizers will have 3.5mm (1/8-inch) jacks for syncing and CV control, as well as headphone and audio outputs. When using the CV and sync jacks, you must use Eurorack TS patch cables. When using the audio output jack, you will use 1/8-inch to 1/8-inch TRS cables.
Control Voltage Vs. MIDI – Daniel Fisher
Control Voltage (CV): What it is and How it Works – Daniel Fisher
USB
Unlike their analog counterparts, the Behringer synths have an additional USB port, which is used to connect to your computer. When connected, you can transfer MIDI and SysEx (System Exclusive) data to your computer. It also allows you to utilize the Behringer SYNTHTRIBE application to make various changes and update the firmware. Check out our guide below to learn more about what SysEx is and how to work with it on PC and Mac!
Setup Procedure
Now that you know the connection types, here is the setup procedure.
- Turn everything down.
- Connect the synth’s output to the input of a device like a mixer, keyboard amp, or powered speaker and let it warm up.
- Make sure you know the input device’s type of signal, as using the incorrect output jack may result in pops or may damage your equipment.
- If using a MIDI controller, connect it to the MIDI IN port. If you’re using it within a synth chain, connect it via the MIDI THRU.
- Set the MIDI channel you’ll be playing on using the dip switches on the back. See the diagram below for the MIDI channel dip switch positions.
- Once everything is connected, turn everything up and start playing!
DIP Switch positions
Some Behringer synths have DIP switches that you use to switch MIDI channels. Below is a chart that shows the Behringer DIP switch position for each MIDI channel.
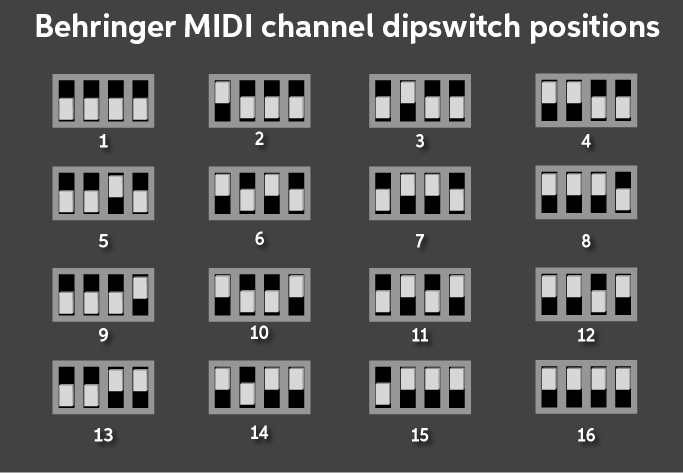
MIDI channel dipswitch positions
Behringer SYNTHTRIBE
Your Behringer synth uses a companion app to update the firmware, edit and back up patches, and adjust various settings. Depending on your synth, some features may or may not be available. Check out our guide below to learn more about how to use the Behringer SYNTHTRIBE software!
Additional Resources
Now that you know the basics, here are some great Sweetwater and Behringer resources that will get you up and running!
MIDI without USB – Classic MIDI Connections Explained
Seamlessly Integrate Your Hardware Synth Into a Digital Setup
What is MIDI CC? – Daniel Fisher
Synth Clips Playlist
Related Articles
When you need help, Sweetwater has the answers!
Our knowledge base contains over 28,000 expertly written tech articles that will give you answers and help you get the most out of your gear. Our pro musicians and gear experts update content daily to keep you informed and on your way. Best of all, it’s totally FREE, and it’s just another reason that you get more at Sweetwater.com.


Offer applies only to single-receipt qualifying purchases. Select manufacturers may require that only the manufacturer’s products qualify towards the minimum purchase amount needed to be eligible for promotional financing. Otherwise, an invoice that meets the minimum purchase amount and contains at least one qualifying manufacturer product is eligible for promotional financing. No interest will be charged on promo purchase balance, and equal monthly payments are required on promo purchase until it is paid in full. The payments equal the amount financed divided by the number of months in the promo period, rounded up to the next whole dollar. These payments may be higher than the payments that would be required if this purchase was a non-promo purchase. During the last month(s) of the promo period the required monthly payment may be reduced due to the prior months’ rounding. Regular account terms apply to non-promo purchases. New Accounts as of 07/31/2025: Purchase APR is 34.99%. Penalty APR is 39.99%. Min Interest Charge is $2. Existing cardholders: See your credit card agreement terms. Subject to credit approval.
Offer applies only to single-receipt qualifying purchases. No interest will be charged on the promo balance if you pay it off, in full, within the promo period. If you do not, interest will be charged on the promo balance from the purchase date. The required minimum monthly payments may or may not pay off the promo balance before the end of the promo period, depending on purchase amount, promo length and payment allocation. Regular account terms apply to non-promo purchases and, after promo period ends, to the promo balance. New Accounts as of 07/31/2025: Purchase APR is 34.99%. Penalty APR is 39.99%. Min Interest Charge is $2. Existing cardholders: See your credit card agreement terms. Subject to credit approval.
The estimated required monthly payment shown which excludes taxes and delivery equals the amount financed divided by the number of months in the promo period, rounded up to the next cent. During the last month(s) of the promo period the required monthly payment may be reduced due to this rounding. These payments apply only with the financing offer shown. If you make these payments by the due date each month, you should pay off this amount financed within the promo period, if it is the only balance you are paying off. If you have other balances on your account, this payment will be added to any other minimum monthly payments.
Applies only to select items from this manufacturer. Ask your Sweetwater Sales Engineer for more details.