
Getting Started with Behringer SYNTHTRIBE
For virtually all Behringer synthesizers, there’s a free editor app for Mac and Windows that is also used to update the firmware. It’s called SYNTHTRIBE. Here’s our guide to getting started.
Download and install SYNTHTRIBE
On your computer, go to the Behringer Products page. Under “Synthesizers and Keyboards,” select your model, and go to its individual product page.
Click Downloads, and see if there are links for the Windows and Mac versions of the Synthtribe app.
If you don’t see it, at the time of this writing you can find Synthtribe on the Behringer JN-80 product page.
Select the most recent version. Download and install it.
How to use Behringer SYNTHTRIBE
The available options in the app depend on the features in your particular Behringer synth. For example, some models may have a built-in sequencer, while others don’t. Consult the owner’s manual for your product.
To begin with, connect your synth to your Mac or Windows PC using a USB data cable. Then launch the Synthtribe app, which will recognize that your synth is connected.
General
The General tab is where you’ll change global settings within your synth. This includes options like the default MIDI channel, the semitones of the Pitch Bend, and Key Priority. The factory reset option is self-explanatory, but the others play a more significant role in how the synth behaves.
MIDI Channel
When the option is enabled, your synth’s MIDI channel will be determined by the unit’s dip switches. When disabled, it will override the dip switch settings, and you can change the MIDI channel through your computer.
Pitch Bend
The pitch bend option is for adjusting the range of the pitch bend. When set to Fixed, the pitch bend range is 12 semitones. When set to Settable, you can then select the semitone manually. The larger the change, the larger the pitch bend range will be. However, the smaller the change, the smaller the range will be.
Key Priority
For monophonic synths, you may wish to change the Key Priority:
- Low Note Priority: The lowest-played note takes priority over notes held above.
- High Note Priority: The highest-played note takes priority over notes held below.
- Last Note Priority: The last note played takes priority over notes held above and below it.
MIDI Transpose
When you update the MIDI Transpose setting, you’ll be updating the “pitch” MIDI IN channel. This means you’ll be shifting the position of the note range by one semitone at a time. For example, if it’s set to 0, then the note range will be from C to C. If the MIDI IN transpose is set to 3, then the note range will be D to D.
Multi Trigger
Turning the Multi Trigger Off means that only one note will trigger at a time. So if you try and play a chord, just one note will play. If you set it to On, you’ll be able to trigger multiple MIDI notes at once.
MIDI Note Zero Volts
Before MIDI was used, synthesizers utilized control voltage (CV) to trigger notes. When you’re updating this, you’re changing the root note when connecting a controller via the CV jacks. For more information, check out our article about playing an analog synth without MIDI!

Learn more about what control voltage (CV) and how it works!
Modulation Curve
The Modulation Curve option is similar to the Pitch Bend option. The setting this is set at will determine how substantial the change is. This is only if your controller has a modulation wheel.
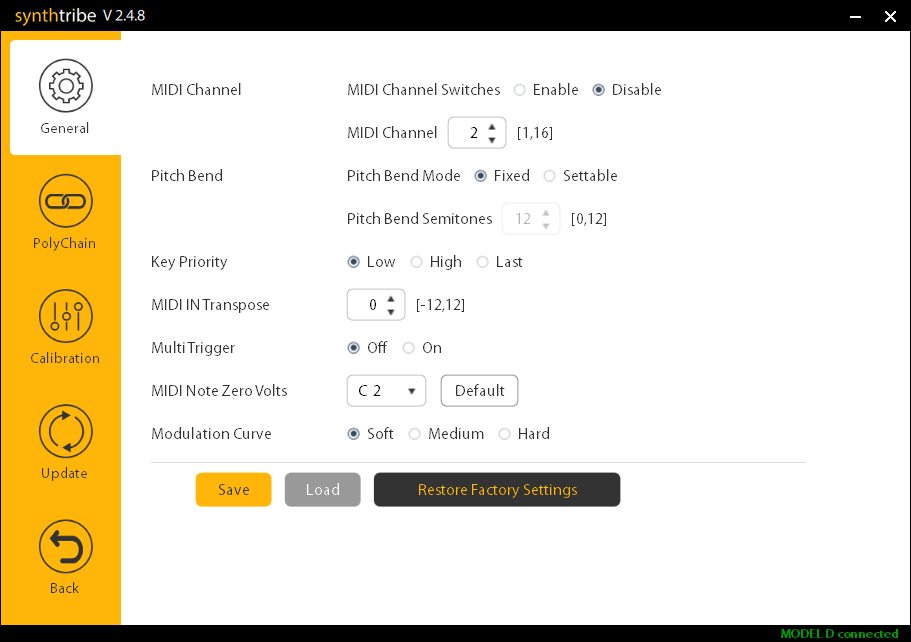
SYNTHTRIBE General window
Poly Chain
While in Poly Chain mode, you’ll change how your synths behave if you have them daisy-chained for additional polyphony. You can choose the number of devices that are connected and also the voice mode.
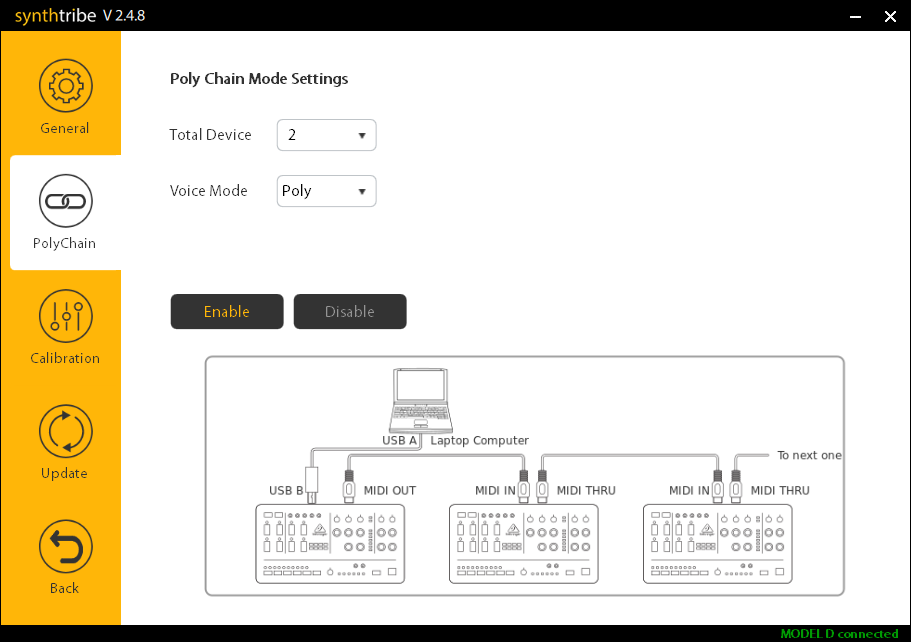
SYNTHTRIBE Poly Chain window
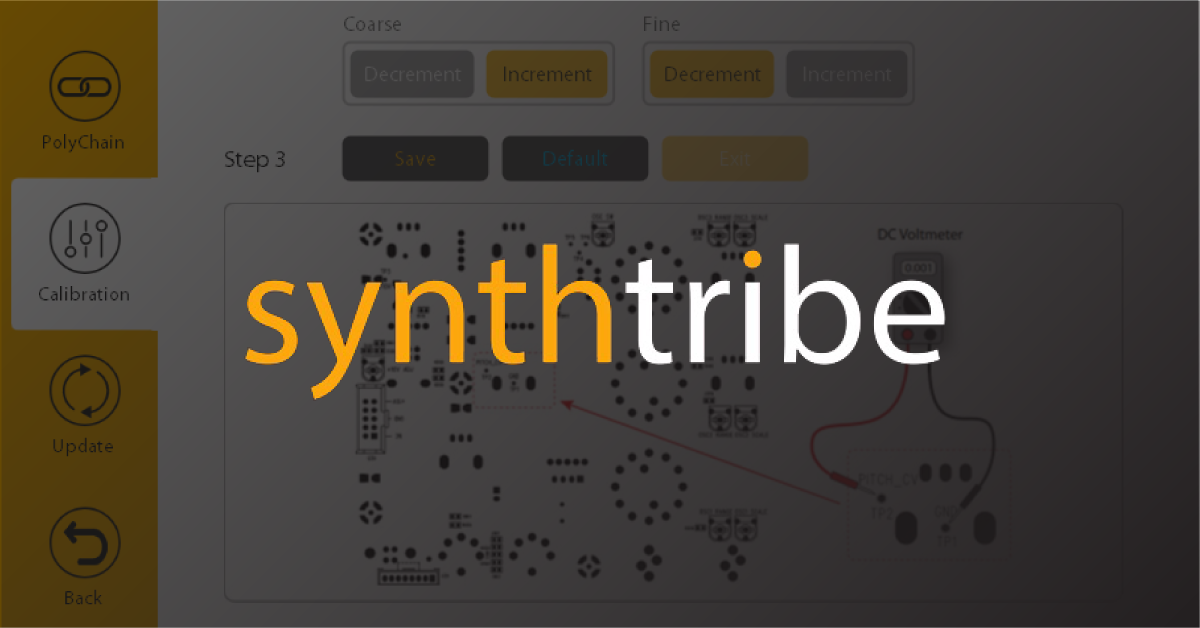
Calibration
IMPORTANT: Be sure you disconnect your synth from the power supply, and that you’re grounded while calibrating your Behringer synth.
Some Behringer analog synths can benefit from being calibrated for tuning stability within the SYNTHTRIBE app. This is for advanced users. You’ll need a DC voltmeter and a little bit of know-how to calibrate it correctly this way.
We recommend calibrating it with either a guitar tuner or the built-in A440 tone generator if you’re new to analog synthesis. You’ll need a few tools, though. You’ll also need to let your synth warm-up for approximately a half-hour for the internal circuits to stabilize.
- Standard Phillips head screwdriver to open the faceplate.
- Small flathead or Phillips head screwdriver to adjust the pots.
- A MIDI keyboard connected via MIDI cables or audio interface with MIDI ports connected to your computer.
Sequencer
Depending on the synth connected, one excellent feature of SYNTHTRIBE is the Sequencer. You can create sequences, change the notes and their lengths, change velocities, and more. You can even upload them to your current synth or save them to use at a later date.
Sequencer – Editor & Secret Settings on your Synth
Update the Firmware
Behringer will release firmware updates for your synth from time to time to update the internal hardware or address any issues that may have been present in the previous firmware version. If there’s a firmware update available, a window will display when you first launch SYNTHTRIBE.
If you do see the firmware update window, click OK to close out of the window. Next, click the Update tab, then click Update. After the update is complete, wait a few moments for the unit to reset. If it doesn’t reset, you can turn the unit off then back on again.
- The update will take a few moments. Do not disconnect or power off the synth while it’s updating!
Are you getting a firmware update error?
If you are receiving any errors while performing a firmware update, you can try a few things:
- Make sure you’re connecting it directly to your computer and not a USB hub. This ensures the most reliable connection possible.
- Disconnect any cables (MIDI, patch, headphone) from your synth. This is especially true when you have a MIDI cable connected to the MIDI IN port.
- Disconnect and reconnect the synth from your computer and try a different USB port.
- If you’re still receiving the error, contact Behringer support for further service.
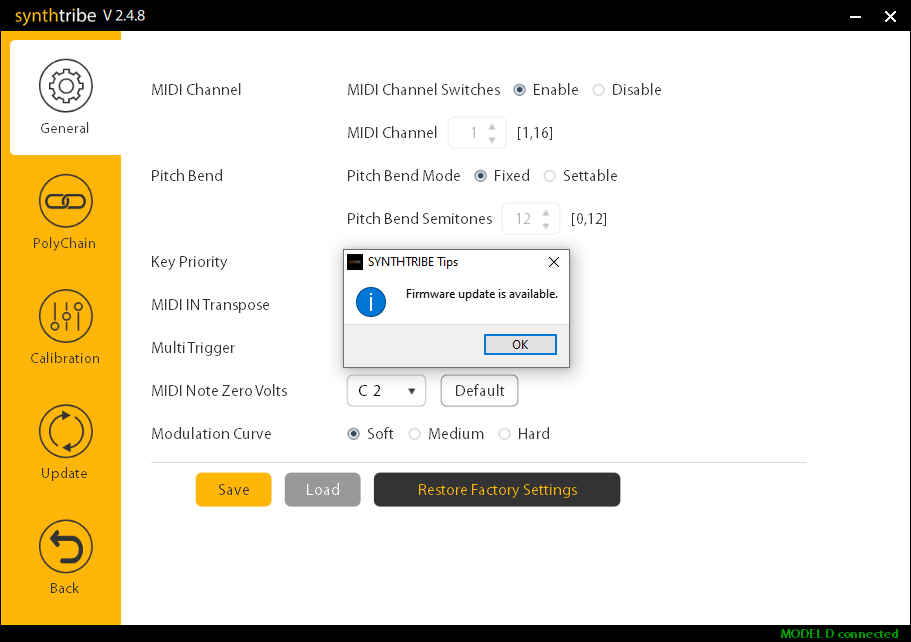
Click OK, then click Update to perform a firmware update.
Related content
Synth Clips by Daniel Fisher Playlist
Additional resources
Creating Synth Soundscapes
MIDI Without USB: Classic MIDI Connections Explained
When you need help, Sweetwater has the answers!
Our knowledge base contains over 28,000 expertly written tech articles that will give you answers and help you get the most out of your gear. Our pro musicians and gear experts update content daily to keep you informed and on your way. Best of all, it’s totally FREE, and it’s just another reason that you get more at Sweetwater.com.


Offer applies only to single-receipt qualifying purchases. Select manufacturers may require that only the manufacturer’s products qualify towards the minimum purchase amount needed to be eligible for promotional financing. Otherwise, an invoice that meets the minimum purchase amount and contains at least one qualifying manufacturer product is eligible for promotional financing. No interest will be charged on promo purchase balance, and equal monthly payments are required on promo purchase until it is paid in full. The payments equal the amount financed divided by the number of months in the promo period, rounded up to the next whole dollar. These payments may be higher than the payments that would be required if this purchase was a non-promo purchase. During the last month(s) of the promo period the required monthly payment may be reduced due to the prior months’ rounding. Regular account terms apply to non-promo purchases. New Accounts as of 07/31/2025: Purchase APR is 34.99%. Penalty APR is 39.99%. Min Interest Charge is $2. Existing cardholders: See your credit card agreement terms. Subject to credit approval.
Offer applies only to single-receipt qualifying purchases. No interest will be charged on the promo balance if you pay it off, in full, within the promo period. If you do not, interest will be charged on the promo balance from the purchase date. The required minimum monthly payments may or may not pay off the promo balance before the end of the promo period, depending on purchase amount, promo length and payment allocation. Regular account terms apply to non-promo purchases and, after promo period ends, to the promo balance. New Accounts as of 07/31/2025: Purchase APR is 34.99%. Penalty APR is 39.99%. Min Interest Charge is $2. Existing cardholders: See your credit card agreement terms. Subject to credit approval.
The estimated required monthly payment shown which excludes taxes and delivery equals the amount financed divided by the number of months in the promo period, rounded up to the next cent. During the last month(s) of the promo period the required monthly payment may be reduced due to this rounding. These payments apply only with the financing offer shown. If you make these payments by the due date each month, you should pay off this amount financed within the promo period, if it is the only balance you are paying off. If you have other balances on your account, this payment will be added to any other minimum monthly payments.
Applies only to select items from this manufacturer. Ask your Sweetwater Sales Engineer for more details.