
Moog Messenger Quickstart Guide

Whether you are a pro stage performer looking for traditional sonic textures with innovative new features or a beginner wanting to learn analog synthesis, the Moog Messenger is an affordable monophonic keyboard with a lot to offer. Straightforward access to real-time control over expressive parameters makes this instrument practical and fun. Let’s get started.
- Register Your Purchase
- Update the Firmware
- Moog Messenger Connections
- Playing and Saving Presets
- Moog Messenger Modules and Sound Structure
- Sequencer and Arpeggiator
- Settings and Program Buttons
- Factory Reset
- Moog Messenger Preset Editor App
- Moog Messenger Tutorial Videos
- Learn Synthesis with Sweetwater
Register Your Purchase
When you open the box and remove the Messenger, find the unit’s power supply. It’s housed in a compartment in the piece of packing foam on the left side of the instrument. It’s marked by a small, yellow tab.
You’ll also find the sheet listing the banks of preset sounds and the folded Quick Start brochure. You’ll need to refer to these.
We know you want to get started playing these amazing sounds, but please take a minute to register your purchase with inMusic Brands, the parent company of Moog, to obtain your warranty.
Create a profile and log in here.
On the My Accounts page, under My registered products, click Register new product. Follow the prompts and supply all the information required, including your unit’s serial number.
You will need to download the User’s Manual to find your way around all the unit’s features. Go to the Moog Music Downloads page, look up “Messenger,” and download the User’s Manual.
Update the Firmware
Out of the box, you need to install the newest firmware on your Messenger to fix bugs and enable new features. Moog makes this easy with a firmware updater app that you run on your Mac or Windows PC. Here’s our instructions.
After you’ve update the firmware, come back here and continue.
Moog Messenger Connections
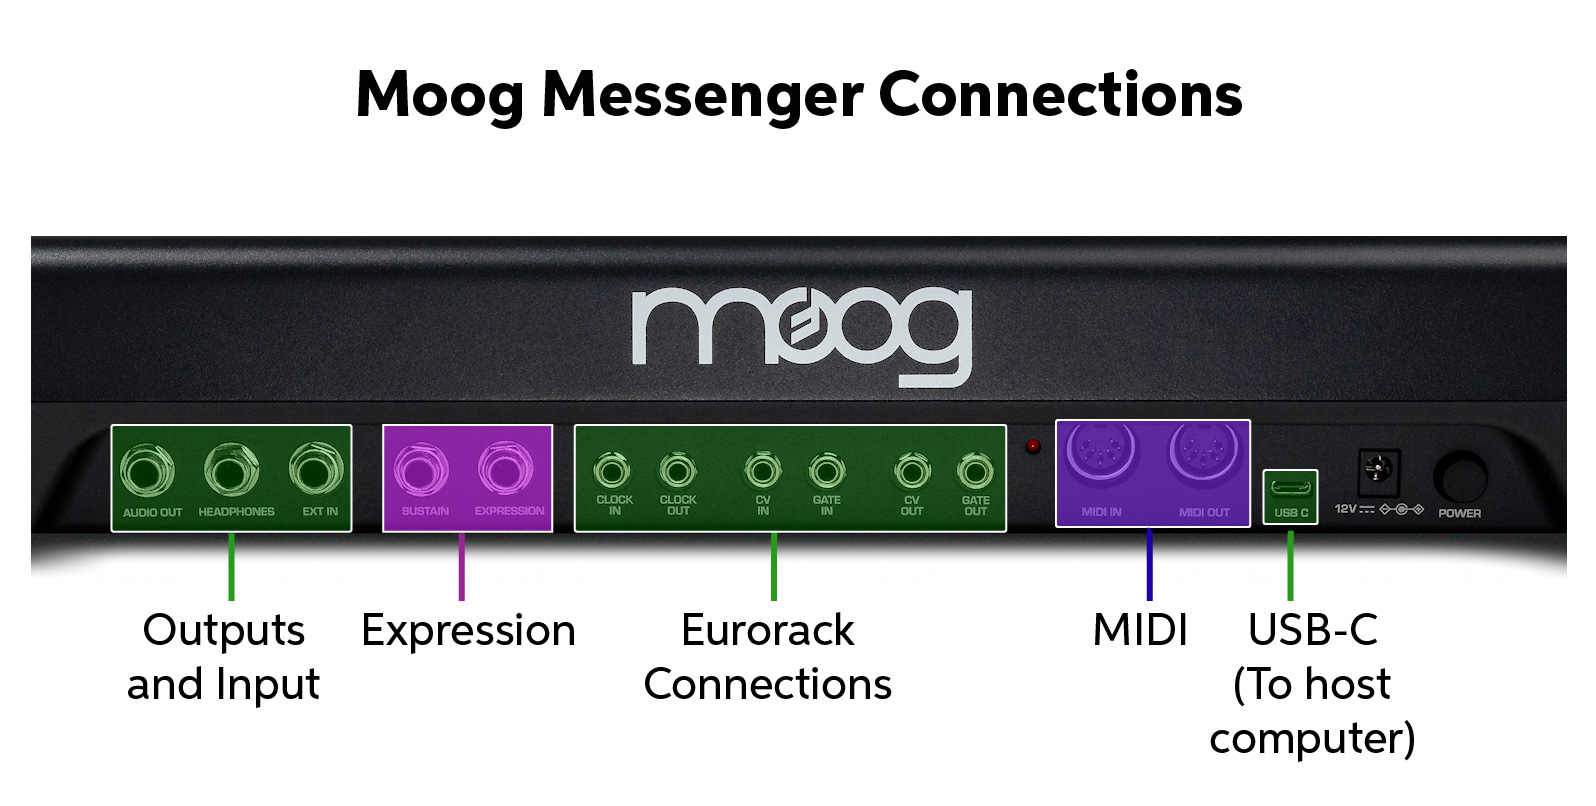
Moog Messenger back panel
Before you connect cables to the Messenger, make sure that the unit is shut down and that the master Output Volume on the front panel is turned all the way down.
Power
Power the unit using the included 12V power supply.
Audio Out
Connect a 1/4-inch TS jack to send the mono output from the Messenger to external effects, an amplifier, speakers, a mixer, or an audio interface.
Headphones
Connect headphones to the 1/4-inch TRS jack.
Ext In
You can use the 1/4-inch TS External Input jack to process an audio signal from an instrument, such as a guitar, and run it through the Messenger’s filter section. Control the input level in the Filter module using the FB/Ext In knob.
Expression
Connect a sustain pedal (not included) to the 1/4-inch TS Sustain jack. Depressing the sustain pedal will hold the envelopes at their Sustain stage.
Connect an expression pedal (not included), such as the Moog EP-3, to the 1/4-inch TRS Expression jack. For each preset on the Messenger, you can select a parameter on the panel that is modulated by the expression pedal. Learn more in the Moog Messenger User’s Manual > Messenger Controls > Programmer/Navigation > 14. Expression.
Eurorack Connections
Connect 1/8-inch (3.5mm) TS patch cables to these ports to interface the Messenger with synthesizers and equipment that use analog control voltage (CV/Gate). The ports are Clock In, Clock Out, Control Voltage In, Gate In, Control Voltage Out, and Gate Out.
Learn more in the Moog Messenger User’s Manual > Messenger Controls > Rear Panel and Connections.
MIDI
Connect external gear through standard 5-pin DIN MIDI cables.
The MIDI implementation chart is found in the Moog Messenger User’s Manual > Appendix A: MIDI.
USB-C
The USB-C connection can be used to connect to a host computer for sending and receiving MIDI over USB through a DAW. You also use this connection to update the firmware.
You can back up preset data to a computer using MIDI System Exclusive (SysEx) messages over USB or the 5-pin MIDI ports. Learn more in our SweetCare guide “How Do I Send and Receive SysEx on PC or Mac?”.
Transmitting presets is initiated in the Config menu using the Send Current Preset command, according to the instructions in the Moog Messenger User’s Manual > Settings.
Note that the Messenger does not send audio over USB. To record sound from the Messenger, connect its Audio Out to an audio interface.
Playing and Saving Presets
The Messenger has 16 banks of 16 presets each and comes with 240 factory presets. Bank 16 is the User bank; save your first patches there.
Press the Bank button, then one of program buttons 1–16 to select a bank. The Patch button will illuminate. Selecting one of the buttons from 1–16 will load one of the presets within that bank.
After you have customized a sound using the panel knobs, save it by pressing Save. The button representing the current preset location will flash. You can switch to another Bank and choose another preset location within the bank. Press the flashing Save button to store your patch in that slot.
Holding down the button for a preset location will temporarily load the patch so you can preview the patch you are overwriting.
Preset Bank Categories
| 01 Messenger 02 Classic Bass 03 Modern Bass 04 Sub Bass 05 Hard Lead 06 Soft Lead 07 Arpeggiations 08 Orchestral | 09 Keys 10 Pads 11 Mallets and Metal 12 Sweeps 13 Drones 14 Percussion 15 Effects 16 User |
When you load a new preset, it loads specific parameter values for each function represented by a knob on the front panel. These values aren’t the same as the current positions of each knob. When you begin to turn the knobs, you change the values, and this immediately affects the sound.
When you press the Panel button, however, it overrides the preset, and each parameter is set to the current physical position of each knob. You can toggle this setting on and off.
Here’s Moog’s Preset Tour video, released at product launch.
Moog Messenger Preset Tour by Lisa Bella Donna
Moog Messenger Modules and Sound Structure

Moog Messenger front panel
The Messenger is based on the traditional building blocks of subtractive synthesis that go back to the Minimoog in 1970.
Start building a sound with the initialized patch. Hold the Panel button for one second. This loads a basic sound with Oscillator 1 set to a sawtooth waveform.
In the Oscillators module, play around with the Waveshape and the Octave.
Moving to the Mixer, bring up the volume on Oscillator 2, and then select a Waveshape to blend with Oscillator 1.
The signal then moves to the Filter module, where you shape the sound by removing frequencies. Select from among different filter designs using the Mode button.
Next comes the Envelopes module, where you can set Attack, Decay, Sustain, and Release for the Filter Envelope.
Separately, you can shape the Amplitude Envelope. This labeled “Amplifier Envelope” on the front panel.
Go back to the Filter module and play with the Resonance knob, which feeds the filter back on itself. The Messenger has a new mode whereby you can preserve the bass frequencies as the Resonance is increased. Toggle this with the Res Bass button.
There are quite a few more parameters for shaping the sound expressively, starting with LFO 1 (Low-frequency Oscillator) and modulation routings.
Learn more in the Moog Messenger User’s Manual > Synthesizing with Messenger.
Here’s Sweetwater’s Daniel Fisher walking through the features.
Moog Messenger Deep Dive Demo
Sequencer and Arpeggiator
The Messenger provides an innovative Sequencer and an Arpeggiator with new and original tools for programming and playing patterns. These are deep subjects; learn more in the Moog Messenger User’s Manual > Messenger Controls > Seq/Arp.
Settings and Program Buttons
Below the knobs of the sound modules in the Messenger, you’ll see the row of 16 Program buttons. Button number 16 is also labeled Config. To the right are the function buttons labeled Settings, Bank, Patch, Save, Seq, and Arp. To the left are the rocker switches and LEDs labeled Direction and Page.
While this is the same set of controls used for programming patterns with the Sequencer and the Arpeggiator, these controls also provide access to deeper levels of features. These include modulation using velocity and aftertouch, further modulation routings, global settings, MIDI configuration, and more.
You access these various modes by using the Config button to enter the Config menu, which leads to layers of controls called Pages. Settings are accessed through the 16 Program buttons.
In the specific case of setting a modulation destination, when you turn a parameter’s control knob, the 16 Program buttons will illuminate to indicate the depth of modulation.
Because there’s no display screen to show you the Pages and their parameters, you’ll need to consult the Moog Messenger User’s Manual > Settings for the tables of commands and the sequence of button presses that you need to access them.
Factory Reset
There are two reset commands in the Config menu:
- 4.15 Restore Global Settings (without restoring presets)
- 4.16 Restore All Factory Settings (including restoring the factory presets)
Follow the instructions in the Moog Messenger User’s Manual > Settings > 16. Config.
Moog Messenger Preset Editor App

The Moog Messenger Preset Editor App home screen
On November 26, 2025, Moog released Messenger Firmware version 1.0.13, which provides a new Duophonic mode that lets you play two notes at once paraphonically.
Moog also released the free Messenger Preset Editor app for macOS and Windows, which is a huge help in programming the Messenger and in examining and understanding the structure of presets.
First, update the firmware to the newest version.
Download the Messenger Preset Editor from the Moog Messenger Downloads page. The Messenger Preset Editor will only work with a Messenger that has been updated to firmware version 1.0.13 or higher.
Here’s Moog’s tutorial video explaining the features of the Messenger Editor:
Moog Music: Messenger Preset Editor
Moog Messenger Tutorial Videos

Moog Messenger Demo Library on YouTube
Moog provides the Messenger Demo Library playlist on YouTube, with short tutorials on loading and saving patches, assigning modulation, and more.
Learn Synthesis with Sweetwater
If you are new to synthesis, then you’ve got a great learning platform in the classic subtractive synth architecture of the Moog Messenger. Sweetwater has you covered with our synthesizer fundamentals articles and our Synth Clips video series. Check them out.

Sweetwater Daniel Fisher Synth Clips Playlist
inSync: How Synthesizers Work
inSync: Synthesizer Basics Explained
Related Articles
When you need help, Sweetwater has the answers!
Our knowledge base contains over 28,000 expertly written tech articles that will give you answers and help you get the most out of your gear. Our pro musicians and gear experts update content daily to keep you informed and on your way. Best of all, it’s totally FREE, and it’s just another reason that you get more at Sweetwater.com.


Offer applies only to single-receipt qualifying purchases. Select manufacturers may require that only the manufacturer’s products qualify towards the minimum purchase amount needed to be eligible for promotional financing. Otherwise, an invoice that meets the minimum purchase amount and contains at least one qualifying manufacturer product is eligible for promotional financing. No interest will be charged on promo purchase balance, and equal monthly payments are required on promo purchase until it is paid in full. The payments equal the amount financed divided by the number of months in the promo period, rounded up to the next whole dollar. These payments may be higher than the payments that would be required if this purchase was a non-promo purchase. During the last month(s) of the promo period the required monthly payment may be reduced due to the prior months’ rounding. Regular account terms apply to non-promo purchases. New Accounts as of 07/31/2025: Purchase APR is 34.99%. Penalty APR is 39.99%. Min Interest Charge is $2. Existing cardholders: See your credit card agreement terms. Subject to credit approval.
Offer applies only to single-receipt qualifying purchases. No interest will be charged on the promo balance if you pay it off, in full, within the promo period. If you do not, interest will be charged on the promo balance from the purchase date. The required minimum monthly payments may or may not pay off the promo balance before the end of the promo period, depending on purchase amount, promo length and payment allocation. Regular account terms apply to non-promo purchases and, after promo period ends, to the promo balance. New Accounts as of 07/31/2025: Purchase APR is 34.99%. Penalty APR is 39.99%. Min Interest Charge is $2. Existing cardholders: See your credit card agreement terms. Subject to credit approval.
The estimated required monthly payment shown which excludes taxes and delivery equals the amount financed divided by the number of months in the promo period, rounded up to the next cent. During the last month(s) of the promo period the required monthly payment may be reduced due to this rounding. These payments apply only with the financing offer shown. If you make these payments by the due date each month, you should pay off this amount financed within the promo period, if it is the only balance you are paying off. If you have other balances on your account, this payment will be added to any other minimum monthly payments.
Applies only to select items from this manufacturer. Ask your Sweetwater Sales Engineer for more details.