
Getting Started with Analog Outboard Gear
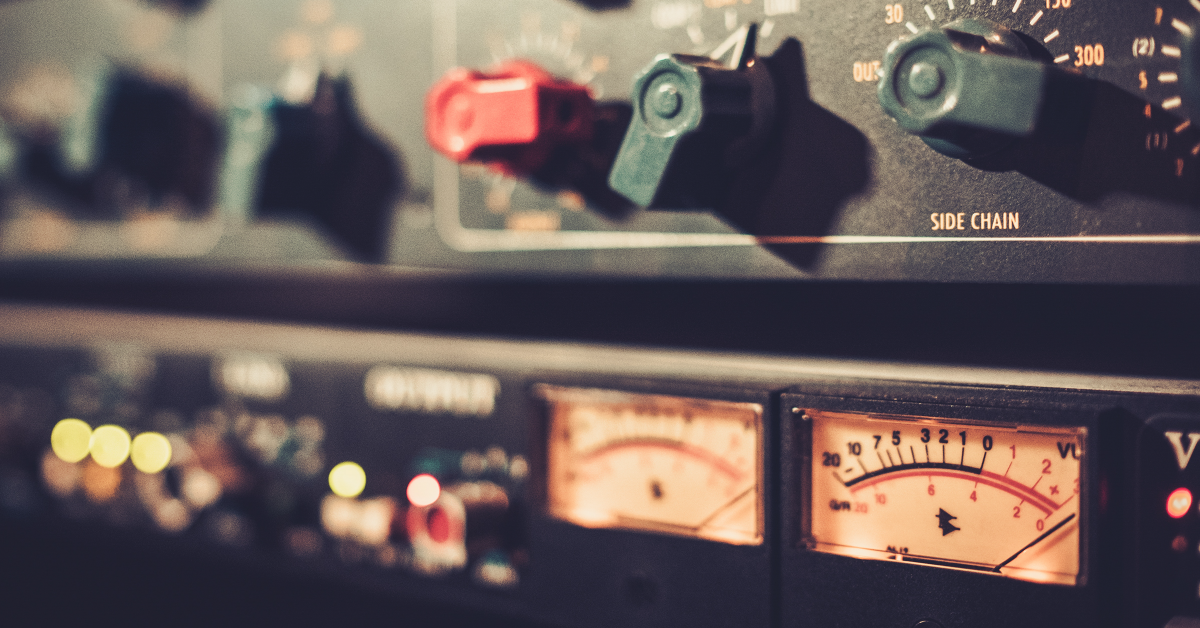
If you’re new to the world of analog outboard gear, you’re in the right place. In this guide, we’ll explain how it works, how to connect everything, and also provide you with some tips and tricks so you can get the most out of your gear. Follow the sections below to get started, but feel free to use the page buttons to move from one section to another.
What is outboard gear?
Back in the days, before computers and plug-ins, audio engineers used outboard gear (external hardware effects) to shape their tone and add effects. There are a few different types of outboard gear; preamplifiers, dynamic processors (like compressors), EQ’s, and effects (delay, reverb, etc.). There are a variety of ways that you can route your audio through outboard gear. For example: Mic/Instrument > Preamp > Dynamic processor > EQ > Time-based effects. One of the great things with outboard gear is that you can get creative with patching to find a unique sound.
Connecting outboard gear
The way to set up and connect outboard gear depends on the application. For example, preamplifiers bring microphone or instrument levels up to professional line level (commonly known as +4), so they are most often used as the first step in the tracking signal chain. Compressors and equalizers can be used either during tracking or afterward as a DAW hardware insert.
Alternating between tracking and hardware inserts typically means reconfiguring the connections with your audio interface. While this is just a minor inconvenience for home studio setups, larger studio configurations offer a less cumbersome process for rerouting so many connections. Patchbays connect to all your gear, allowing microphones, DAW signals, and outboard gear to be patched from one another via the patch panel. Depending on your setup, you should have at least one extra pair of available outputs and inputs on your audio interface to send and monitor the signal from your outboard gear.
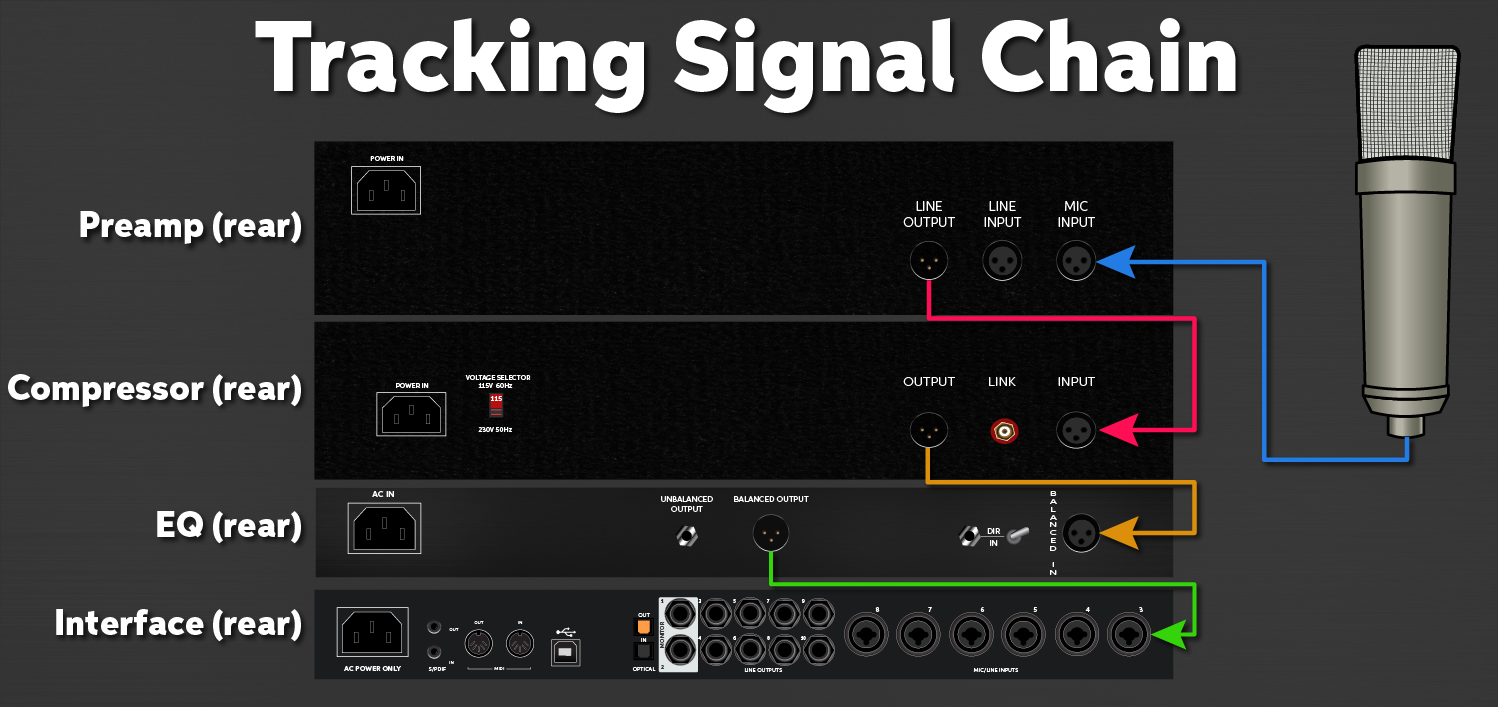
Tracking signal chain
Using outboard gear on the front end of the recording process is a great way to process signals in the analog domain. This type of setup is typically referred to as a channel strip, that offers a preamplifier, compression, and equalization in one unit. The idea is to process the signal before digital conversion (A/D). Doing so can improve transient clarity and create unique harmonic content that’s present in the finished product. You always have the option to use hardware inserts or apply plug-in processing once the audio is recorded.
Gain Staging
When tracking with outboard gear, remember proper gain staging and record with the appropriate levels at each gear ‘checkpoint.’ That means mics and guitars need to be pre-amplified to line level before processing with a connected compressor or EQ (which expects line level). A common mistake is connecting a line-level signal into a preamp input on your interface, which can drive the preamp input into distortion.
- Connect the microphone or instrument to a preamplifier.
- Connect the LINE OUT(s) from the preamp to the LINE IN of the next module.
- Connect the output of the last module to a LINE IN on your mixer or interface.
Hardware insert
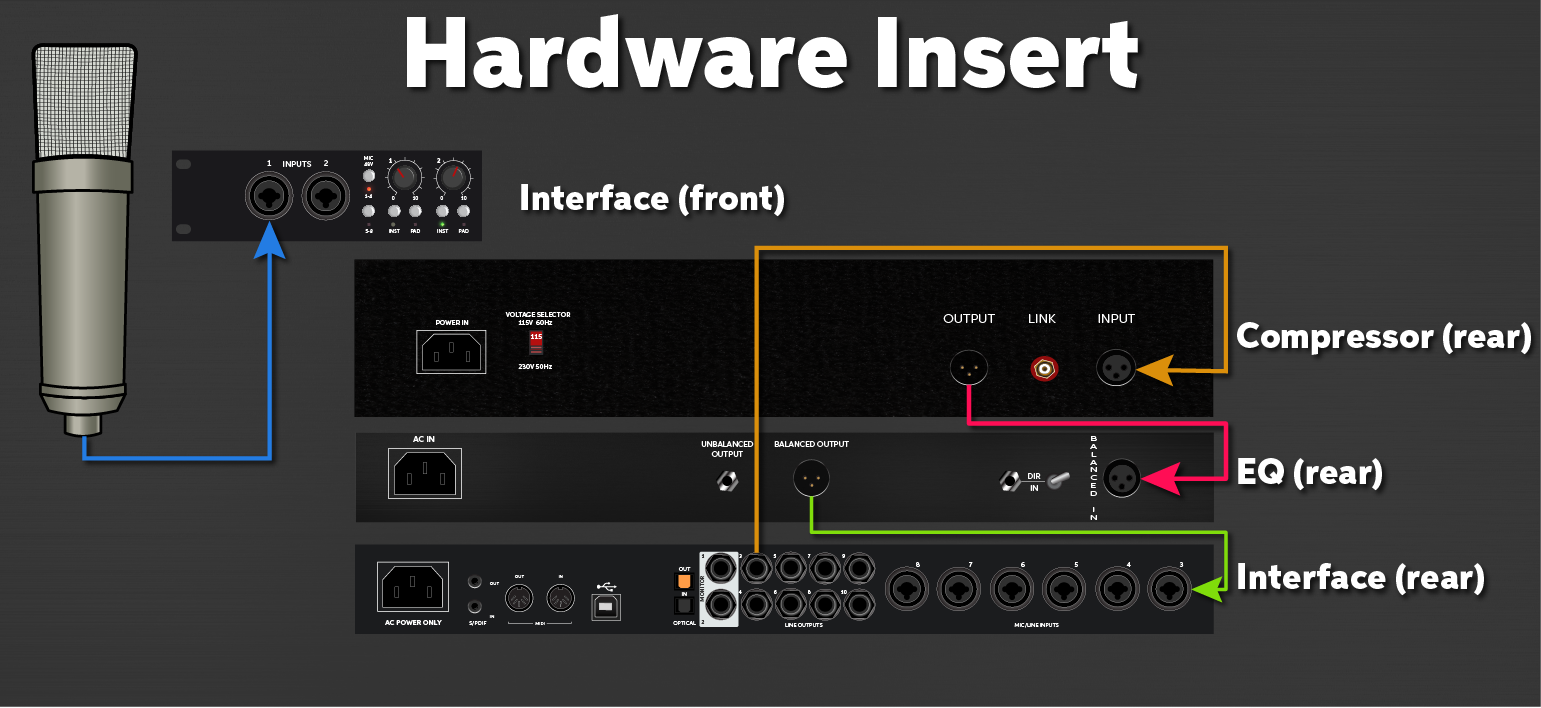
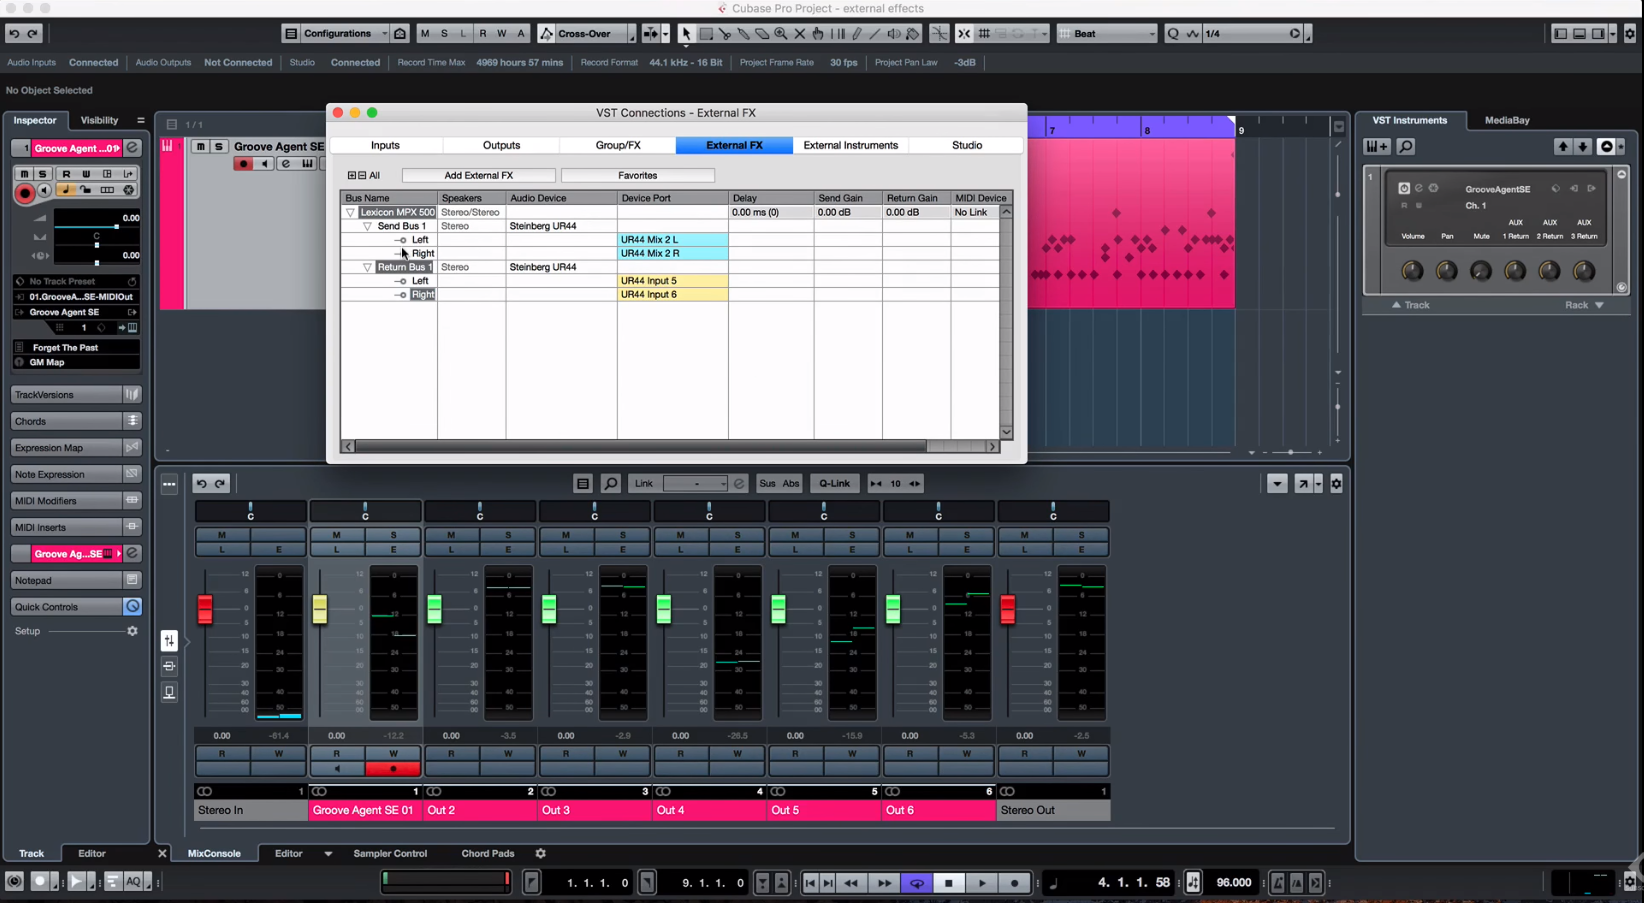
A great way to use outboard gear on audio from your DAW, you’ll need to route it using a hardware insert. A hardware insert is essentially a plug-in that routes the dry audio out through your outboard gear and then back in. This type of setup is commonly used during the mixing process. It allows you to compare the unprocessed and processed signals (A/B) without permanently altering the original track. Since there’s no standard term for this, each DAW defines this differently. For example, Cubase lists it as an External Effect, Logic Pro calls it an Audio I/O plug-in, and Studio One uses a plug-in called Pipeline.
Hardware delay
When using outboard gear on a hardware insert, remember to compensate for any audio delay. Since the signal has to be converted twice (D/A then A/D), there will be a short delay which can create latency and phasing issues. Some DAW’s will automatically compensate for this delay. However, you may need to send a “ping” or manually s et the delay compensation to align the original and processed audio. Refer to your DAW’s user guide for specific instructions.
- Connect an output on the interface to the LINE IN of the signal processor.
- Connect the LINE OUT of the signal processor to a LINE IN on the audio interface.
- Create a hardware insert channel or effects bus in your DAW and route the I/O. For specific instructions on how to create hardware inserts and FX busses, refer to the DAW’s user manual.
Printing processed audio
Since mono hardware units can only be used on one track at a time, you may want to record (commonly called “printing”) the processed audio to another track. This lets you keep separate a copy of the dry (original) and wet (processed) audio. Unless you print the effect, hardware inserts will only work during playback and are not permanent — unless you actually record them into the session. Use a send (or a track insert) to get the original signal to the outboard gear, and then use another track to record the signal returning from the outboard gear.
Patchbay connections
Patchbays are typically found in recording studios and make connections to and from your audio interface, outboard gear, and microphones much more convenient. They work by connecting all of your equipment to one hub. You then physically patch the signal path into an external processor. The patchbay’s most significant impact is saving you time rerouting connections when you want to change inputs or switch back and forth.
Phantom power and patchbays
When connecting to patchbays, remember that phantom power connections should not be broken as they can damage your equipment. Don’t supply phantom power until everything is patched and connected, and don’t disconnect anything until phantom power is turned off.
Using Outboard Gear
Once your outboard gear is set up, it’s time to start using it. The tips below will help you get started, but each piece of equipment is unique, so spend time learning how to best use it for any given application. For example, a preamplifier is used for boosting microphone or instrument signals during tracking. You can compensate for low level in your DAW, but what happens to the sonic characteristics with a high vs. low gain setting? What happens when you use different thresholds or ratios on a compressor? Consider these questions and more as you work with your equipment and develop your ears.
Preamplifiers
Preamps are typically first in the tracking signal chain because they amplify low mic and instrument levels up to line level. The amplified signal can then be processed by other gear and digitally converted by your interface for the DAW environment. Most preamps output line-level signal. The exception is in-line preamps (gain boosters) which also require phantom power.
Dynamic processors
Dynamic processors alter the dynamic range of the audio signal and are split into two groups; compressors/limiters and expanders/gates. Compressors and limiters both “squash” the sound, leveling out the dynamic range. Simply put, they make louder parts softer. An expander, on the other hand, works in reverse. Instead of reducing the dynamic range, it will increase the dynamic range by making louder parts louder. Gates eliminate the sound beneath a certain threshold, which is useful in noise reduction.
Most dynamic processors will allow you to change the following settings; Threshold, Ratio, Attack, and Release. The threshold is the level where the dynamic processor begins working. The ratio is how much change applies to the input. For example, a 2:1 ratio means that an increase of 2dB in input level will result in a 1dB in output. Attack controls allow how quickly the compressor starts working after the initial attack comes through, and Release is how fast the signal returns back to normal.
- Sidechain compression compresses the input signal of one audio track dependent on the dynamics of the signal coming from another track. For example, you can compress a bass guitar using the kick drum as the input to the compressor’s sidechain. This will duck the bass and allow the bass drum to come through more. It’s also beneficial for ducking background music behind a voice when doing voice-over work.
- Use a gentle 2:1 to 4:1 ratio for smooth leveling and a higher 10:1 to 20:1 ratio for controlling peaks or getting a squashed sound.
- Stereo-linking compressors link their detector circuits and allow you to apply the same level of compression to both the left and right signals.
EQ (Equalization)
EQ’s work by boosting or cutting a frequency or a range of frequencies in the audio signal. The most common types of EQ’s available are Parametric, Semi-parametric, and Graphic. Parametric and semi-parametric EQ’s allow you to adjust three parameters; Frequency, Gain, and Q (shape of the EQ curve). You can choose four basic frequency shapes with parametric EQ’s, as well, including bells, shelves, high-pass, and low-pass filters. Most graphic EQ’s will only allow you to boost/cut frequency range level.
- Parametric EQ’s are preferred during the mixing process for more accurate control over the frequency spectrum.
- Experiment with the “sweeping technique” to find troublesome frequencies buried in the mix. To do this, increase the Q on a frequency band and create a narrow peak. Slowly sweep back and forth through the frequency spectrum to listen to any frequencies that sound out of place and cut them as needed.
- Use the Sweetwater EQ Frequency Cheatsheet to help you identify where each instrument falls in the frequency spectrum!
Reverb and Time-based effects
Time-based effects like reverb and delay are commonly used to add more space and give character to a mix. While plates, springs, and tapes are still used today, digital multi-effects processors can do the job just as well. These are typically placed at the end of the signal chain. While you can get some unique sounds putting it first, you run the risk of muddying up the rest of the signal as you apply other processing.
- Increase the delay (often called pre-delay) on your reverb before adjusting the decay for more clarity and a sense of more room.
- Experiment using a delay instead of reverb. You can get a similar sound without the mix sounding too washed out.
- Add compression to a delay on vocals. This will duck the effect making the track sound much cleaner.
Analog summing mixers
Summing, in its purest form, is consolidating multiple tracks down to one stereo mix. For example, sending six drum tracks down to one stereo bus. When using an analog summing mixer, you send these stereo tracks out to your mixer, adjust the parameters, then send it through A/D conversion back into your DAW for printing. Check out these videos from our friends at Dangerous Music to learn more about analog summing!
Related Articles
When you need help, Sweetwater has the answers!
Our knowledge base contains over 28,000 expertly written tech articles that will give you answers and help you get the most out of your gear. Our pro musicians and gear experts update content daily to keep you informed and on your way. Best of all, it’s totally FREE, and it’s just another reason that you get more at Sweetwater.com.

