
Behringer WING Setup, Routing, and Connections
Getting started
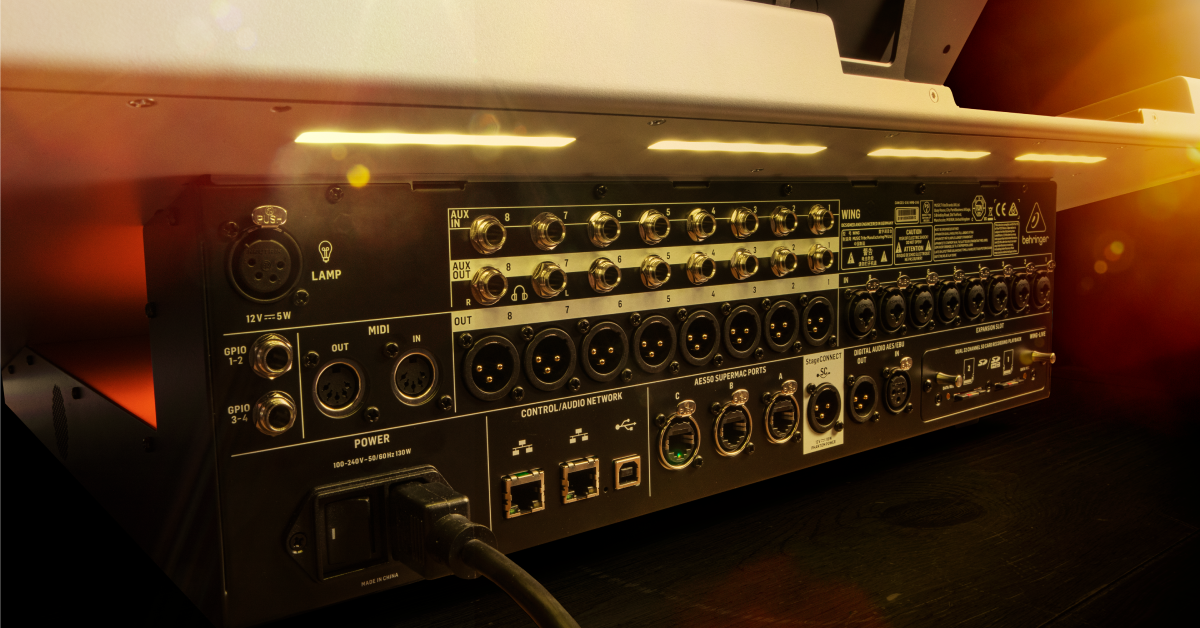
In this guide, we will show you how to set up and connect peripherals to a Behringer WING digital mixer. This information also applies to the WING Black, WING Compact, and WING Rack. You will learn how to connect input and output (I/O) devices like stage boxes, USB drives, or a computer. Follow each of the sections below to get started. Once your devices are set up, continue to our WING Source and Channel Setup to configure signal sources and channels.
- Register your WING to Get the Full Warranty
- Save and Load Routing Presets
- Connect to Stage Boxes and Personal Mixers
- Connect to a Computer via USB
- WLive SD Card Recording
- Connect a USB flash drive
- User Signal routing and tap points
- Behringer WING Rack and WING Compact Tutorial Videos
Register your WING to Get the Full Warranty
By default, Behringer gives you a 1-year warranty. However, if you register your item on the website within 90 days of purchase, Behringer gives you a 3-year warranty. It’s free.
TIP: Everything you purchase from Sweetwater comes with our 2-year Total Confidence Coverage (TCC) warranty. However, three years is even better than two, so please register with Behringer today.
Save and Load Routing Presets
WING settings are saved as Snapshots. Accessed from the Library menu, Snapshots are settings that can be recalled to configure the entire console or just certain sections, like channels, sources, etc.. That makes it easy to save and recall unique settings for each performance. Saving your settings has always been a good thing to do, but WING makes it easy to recall whatever you need whenever you might need it. Once you’ve made all your connections, save your setup!
- Connect and configure each I/O peripherals with the Routing menu.
- Press the Library menu button.
- Name and save your Snapshot/Routing settings.
Connect to Stage Boxes and Personal Mixers
Since you can connect a range of compatible devices, like stage boxes or DP48/WING/X32 mixers, the three AES50 ports can accommodate a lot of different configurations. Each AES50 port supports up to 48 input and 48 output signals (96 total audio streams).
For stage boxes, each input and output will occupy the AES50 streams respective to its position in the network chain. That means the first stage box will occupy its respective AES50 input and output channels first, followed by the second stage box and then the third. Any I/O streams that exceed each port’s respective 48 input or output streams will not pass.
- AES50 is supported on CAT5 or CAT5E cables up to 100 meters long.
- Use an AES50 to USB 2.0 Converter to convert an AES50 connection into a USB recording/playback interface.
- MIDAS DL251, DL15x, DL231 stage boxes are supported with firmware 1.05+
AES50 input configuration
- Press the Routing menu button and select the inputs icon (right of the SD icons).
- Press the Source Group drop-down menu and select an AES50 port (A, B, or C) to see its available sources.
- Select an AES50 source to set it up:
- Press Customize to name it and select an icon.
- Press Tags to add IDs for recallability and mute grouping.
- Choose a Mono, Stereo, or Mid/Side configuration.
- Adjust the Gain and 48V phantom power as necessary.
- Configure all your sources and start mixing.
AES50 output configuration
- Press the Routing menu button and select the outputs icon (right of the SD icons).
- Press the Source Group drop-down menu and select an AES50 port (A, B, or C) to configure its outputs channels.
- Press the Unlock icon and then select the output sources:
- Press Source Group to browse sources.
- Press the None icon to clear a source.
- Press the Lock icon to complete configuration.
Ultranet and P16 Mixers
WING does not have an Ultranet connection, but the last 16 streams of each AES50 port (33-48) are automatically converted to Ultranet and distributed by SD stage boxes and X32 mixers. So, if you want to route signals to your P16 mixers, assign the desired sources on WING to outputs 33-48 of the connected AES50 port. Those channels will automatically be routed to the peripheral’s Ultranet outputs. If sending Ultranet over AES50 to an X32 mixer, you must also select that X32’s incoming AES50 33-40 and 41-48 input channels as the 16 Ultranet outputs.
Learn more in our Behringer Powerplay P16 guide.
P24 Mixers and StageConnect
You can connect your WING to Behringer P24 personal monitor mixers by connecting an AES50 port on the WING to the AES50 input on a P24HUB. The P24HUB then connects to multiple P24 mixers over StageConnect.
It’s also possible to daisy-chain P24 mixers to the StageConnect port on the WING without going through AES50 and without using a P24HUB, though this is less convenient and less flexible.
Learn more in our Behringer P24 StageConnect guide.
Connect to a Computer via USB
You can connect WING directly to your computer via the USB-B port on the back of the mixer (preferably direct, not to a USB hub). Once connected you can stream up to 48 channels of USB audio, both to and from your computer. This is useful if you want to record the WING audio directly to your computer or play audio from a DAW session to WING (or both at the same time!).
WING supports up to 48 channels of USB audio input and output streaming, but you can also reconfigure it to stream either 2, 8, 16, 32 channels from the Setup menu. The sample rate can only be set to 44.1kHz or 48kHz, so make sure your DAW settings are configured the same.
USB computer playback
- Press the Routing menu button and select the inputs icon (right of the SD icons).
- Press the Source Group drop-down menu and select USB Audio to see its available sources.
- Select a USB source to set it up:
- Press Customize to name it and select an icon.
- Press Tags to add tags to your source (IDs) for recallability and mute grouping.
- Choose a Mono, Stereo, or Mid/Side configuration.
- Configure all your sources and start mixing.
USB computer recording
- Press the Routing menu button and select the outputs icon (right of the SD icons).
- Press the Source Group drop-down menu and select USB Audio to see the 48 output channels.
- Press the Unlock icon and then select the output sources:
- Press Source Group to browse sources.
- Press the None icon to clear a source.
- Press the Lock icon to complete configuration.
WLive SD Card Recording
WING’s W-Live card (included) is used to record and/or play back audio to/from SD cards. That makes it easy to record your signal sources directly to the SD card or playback audio for virtual soundchecks. The two SD slots can be used at the same time and independently, allowing flexibility to write and record at the same time.
- SD cards used with WING should be class 10, no greater than 32GB, and formatted to FAT32.
- Each SD slot reads/writes multi-channel .WAV audio files.
- SD slots can be used independently or together for 64 mono streams.
- Insert the SD cards into the W-Live SD slots and power on WING.
- Press the SD menu button and select the SD card settings icon.
- Select to format your SD card(s).
SD Card playback
- Press the Routing menu button and select the inputs icon (right of the SD icons).
- Press the Source Group drop-down menu and select USB Audio to see its available sources.
- Select a USB source to set it up:
- Press Customize to name it and select an icon.
- Press Tags to add tags to your source (IDs) for recallability and mute grouping.
- Choose a Mono, Stereo, or Mid/Side configuration.
- Configure all your sources and start mixing.
SD Card recording
- Press the Routing menu button and select the outputs icon (right of the SD icons).
- Press the Source Group drop-down menu and select USB Audio to see the 48 output channels.
- Press the Unlock icon and then select the output sources:
- Press Source Group to browse sources.
- Press the None icon to clear a source.
- Press the Lock icon to complete configuration.
Connect a USB flash drive
You can even connect a USB flash drive to record or play audio. USB flash drives connect to the USB AUDIO/DATA port and can stream up to 4 mono audio channels (2 stereo tracks) at a time. This could be useful for both playing stereo background music and recording a stereo mix at the same time.
- USB flash drives used with WING should be no greater than 32GB and formatted to FAT32.
- Record or play 24-bit Stereo .WAV audio files.
USB flash drive playback
- Press the Routing menu button and select the inputs icon (right of the SD icons).
- Press the Source Group drop-down menu and select USB Player to see its four playback sources.
- Select a USB source to set it up:
- Press Customize to name it and select an icon.
- Press Tags to add tags to your source (IDs) for recallability and mute grouping.
- Choose a Mono, Stereo, or Mid/Side configuration.
- Configure your sources and start mixing.
USB flash drive recording
- Press the Routing menu button and select the outputs icon (right of the SD icons).
- Press the Source Group drop-down menu and select Recorder to see the four recording channels.
- Press the Unlock icon and then select the output sources:
- Press Source Group to browse sources.
- Press the None icon to clear a source.
- Press the Lock icon to complete configuration.
User Signal routing and tap points
You can use the 24 User Signal paths to create custom channels from unique tap points. Routing to User Signal ‘virtual channels’ is generally used to reroute channels or busses post-fader, rather than their default pre-fader tap point. That allows you to route channels with their WING processing. Without the User Signal routing, you would not be able to record any of each channel’s signal processing.
User signal inputs configuration
- Press the Routing menu button and select the inputs icon (right of the SD icons).
- Press the Source Group drop-down menu and select an AES50 port (A, B, or C) to see its available sources.
- Select an AES50 source to set it up:
- Press Customize to name it and select an icon.
- Press Tags to add IDs for recallability and mute grouping.
- Choose a Mono, Stereo, or Mid/Side configuration.
- Adjust the Gain and 48V phantom power as necessary.
- Configure all your sources and start mixing.
User signal output configuration
- Press the Routing menu button and select the outputs icon (right of the SD icons).
- Press the Source Group drop-down menu and select an AES50 port (A, B, or C) to configure its outputs channels.
- Press the Unlock icon and then select the output sources:
- Press Source Group to browse sources.
- Press the None icon to clear a source.
- Press the Lock icon to complete configuration.
Behringer WING Rack and WING Compact Tutorial Videos
Behringer provides these videos that cover the Behringer WING ecosystem.
Related Articles
When you need help, Sweetwater has the answers!
Our knowledge base contains over 28,000 expertly written tech articles that will give you answers and help you get the most out of your gear. Our pro musicians and gear experts update content daily to keep you informed and on your way. Best of all, it’s totally FREE, and it’s just another reason that you get more at Sweetwater.com.

