
Wireless Microphone Setup Guide

In this article, we will get you up and running with a wireless microphone system and also give you some tips and tricks along the way to get the best sound possible. Follow the sections below to get started.
What is a wireless microphone system?
Before we start setting up the wireless system, let’s quickly discuss what these systems are and how they work. A wireless system is essentially a miniature radio station that replaces either a microphone cable or an instrument cable. The transmitter sends radio frequency (RF) to a receiver, receiving the signal and then sending the audio over to your mixer. Wireless systems are very common in places such as houses of worship, fitness centers, sporting events, and concerts because they give performers more freedom. They also save time and space by eliminating the need to use and hook up many cables.
Parts of a wireless microphone system
Although wireless setups can differ, all are comprised of the same components: transmitters and receivers. The terminology can be confusing, so let’s describe the parts and what they do.
Transmitter
The transmitter converts audio (AF) from an input device, like a handheld or headset microphone, into radio frequency (RF), then sent to the receiver. If you are using a microphone or instrument connected to a belt pack with an external antenna, make sure that the antenna isn’t wadded up or bent while wearing it. Not only is this bad for the antenna, but it severely impairs its transmission.
Receiver
The receiver is the box with antennas that you connect to your mixer. It receives the radio signal, changes it back into an audio signal, then sends it to the input of your mixing board using either an XLR or instrument cable.
Choosing and using batteries
Signal strength and operating range will drop as the transmitter (or, in the case of in-ear monitors, the receiver) batteries run low, so changing them regularly will significantly reduce performance issues. We highly recommend using brand-name alkaline batteries (either rechargeable or non-rechargeable), as they are more reliable and provide longer life than generic batteries.
Parts of a basic wireless system.
Wireless microphone system setup
Now that you know what a wireless system is and how it works let’s talk about setting it up and using it. There are three main steps involved in setup:
Install receiver and antenna
Installing the receiver and antenna should be the first step when setting up your wireless system. It’s usually convenient to keep the receiver close to the mixer, but the “right” location is wherever the transmitter will have a direct path to the receiver without any blockage from people, computers, racks of gear, or anything else. Follow these instructions to install your receiver and antenna.
- Place the receiver where the performer(s) will have a consistent, direct line of sight to the receiver at least 10 feet away from wireless consumer devices such as wireless computer routers and cell phones, as this will reduce dropouts and audio artifacts like static and feedback.
- Install the antenna, and point it toward the ceiling. If your receiver has more than one antenna, angle them to form a V shape.
- Connect the output of your receiver to an available input channel on your mixing board, then power the receiver on.
Antenna and receiver placement tips
- Make sure the antennas are pointed at the ceiling and not out toward the stage. An antenna’s polar pattern looks like a doughnut, so if it is pointed straight out, very little radio frequency will reach the transmitter.
- Make sure metallic objects, such as rack rails or metal cages, aren’t blocking antenna(s), as this stops the radio waves from being sent out correctly.
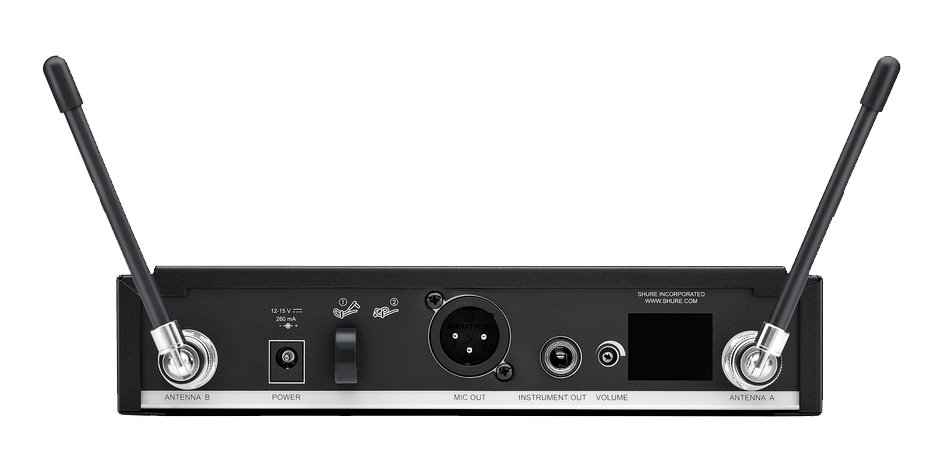
Make sure the antenna is pointing in a V-shape.
Pair transmitter and adjust the frequency
Before you begin the pairing process, make sure the frequency range of your wireless system is compatible in your area. If you aren’t sure of the correct frequency range, use a wireless system frequency finder to verify compatibility.
Auto-scan: Some wireless microphone systems have an auto-scan feature. This will scan all frequencies, groups, and channels to find the best available frequency. To perform an auto-scan, visit the owner’s manual for instruction.
- The next step is to pair the transmitter and receiver. The pairing procedure is different for every wireless model, so check the owner’s manual to learn your system’s pairing procedure. Here are the two most common ways wireless systems pair:
- Group and Channel will pair to the range of frequencies in that particular band.
- Frequency is tied to the exact wireless frequency.
- Confirm that the transmitter and receiver have been paired by looking at your receiver’s RF meter or LED. If the RF signal meter or LED is flashing or low, consider trying a different frequency.
Make sure you’re on the right frequency!
- When using more than one wireless system, use different frequencies for each one. Multiple systems on the same frequency can cause distortion, dropouts, or multiple mics on the same channel as your mixer.
- Check your frequencies before each performance. Even if your system always stays the same, interference from radio and TV stations can change on a regular basis.
Set the levels
The last step with your wireless setup is to set the levels for the receiver, transmitter, and mixer. Unlike a wired setup, it’s a 3-step process, so follow these instructions to set your levels.
- Start by adjusting the transmitter and receiver level. Start with the levels all the way down for the transmitter, receiver, and channels on your mixer.
- Sing or play into your input device at the maximum performance level with proper technique while slowly turning the transmitter and receiver level up. Once you see the AF meter reach the maximum level, turn it down until it no longer clips.
- Turn up the channel’s gain knob until the clip/overload/peak light appears. Once the light appears, turn the gain knob down until the clipping light no longer appears. Lastly, move the channel’s fader as needed.
- Turn the transmitter volume down if you notice the receiver’s AF (audio) meter clip and your signal sounds distorted.
- If the transmitter is quiet, double-check that both the transmitter and the receiver volumes are turned up, go through your gain staging, and change the batteries.
Related Articles
When you need help, Sweetwater has the answers!
Our knowledge base contains over 28,000 expertly written tech articles that will give you answers and help you get the most out of your gear. Our pro musicians and gear experts update content daily to keep you informed and on your way. Best of all, it’s totally FREE, and it’s just another reason that you get more at Sweetwater.com.


Offer applies only to single-receipt qualifying purchases. Select manufacturers may require that only the manufacturer’s products qualify towards the minimum purchase amount needed to be eligible for promotional financing. Otherwise, an invoice that meets the minimum purchase amount and contains at least one qualifying manufacturer product is eligible for promotional financing. No interest will be charged on promo purchase balance, and equal monthly payments are required on promo purchase until it is paid in full. The payments equal the amount financed divided by the number of months in the promo period, rounded up to the next whole dollar. These payments may be higher than the payments that would be required if this purchase was a non-promo purchase. During the last month(s) of the promo period the required monthly payment may be reduced due to the prior months’ rounding. Regular account terms apply to non-promo purchases. New Accounts as of 07/31/2025: Purchase APR is 34.99%. Penalty APR is 39.99%. Min Interest Charge is $2. Existing cardholders: See your credit card agreement terms. Subject to credit approval.
Offer applies only to single-receipt qualifying purchases. No interest will be charged on the promo balance if you pay it off, in full, within the promo period. If you do not, interest will be charged on the promo balance from the purchase date. The required minimum monthly payments may or may not pay off the promo balance before the end of the promo period, depending on purchase amount, promo length and payment allocation. Regular account terms apply to non-promo purchases and, after promo period ends, to the promo balance. New Accounts as of 07/31/2025: Purchase APR is 34.99%. Penalty APR is 39.99%. Min Interest Charge is $2. Existing cardholders: See your credit card agreement terms. Subject to credit approval.
The estimated required monthly payment shown which excludes taxes and delivery equals the amount financed divided by the number of months in the promo period, rounded up to the next cent. During the last month(s) of the promo period the required monthly payment may be reduced due to this rounding. These payments apply only with the financing offer shown. If you make these payments by the due date each month, you should pay off this amount financed within the promo period, if it is the only balance you are paying off. If you have other balances on your account, this payment will be added to any other minimum monthly payments.
Applies only to select items from this manufacturer. Ask your Sweetwater Sales Engineer for more details.