
Wireless frequencies are becoming a more and more valuable — and rare — commodity! With the reallocation of the 700MHz frequencies in 2010, the amount of spectrum available to operate wireless microphones was cut by roughly a third. Now, the 600MHz band will have to be vacated no later than July of 2020 and is already out of service in many markets. This means we have about one-third of the total space available to allocate wireless microphones — and on top of that, the demand for wireless spectrum is increasing. Coordinating wireless frequencies in crowded air spaces and when multiple wireless mics and transmitters are in use — as is the case on many stages — can be a real challenge. Fortunately, with a bit of know-how and the help of a free app, you can navigate the spectrum and use your wireless systems with confidence.
The Challenges
There are two primary challenges to setting up wireless microphones. The first is external competition, such as TV stations. Think of these as icebergs that you have to navigate around. You may not be able to see them, but they take up lots of space in the spectrum. The second is intermodulation artifacts, or “IMs” if you want to pick up some jargon. When two wireless transmitters are turned on, they create additional sideband frequencies that can interfere with other wireless systems in the room. Third-order IMs are the most dangerous, because they are very close in frequency to the microphones that are creating them. They also multiply exponentially, so while two wireless mics create two sidebands, six wireless mics create 90 sideband frequencies! This can make them a bigger challenge than the TV stations we are trying to steer around.
Luckily, the math for calculating these frequencies is consistent across all brands of wireless, so there are software tools to help us calculate frequencies that don’t interfere with each other. Audio-Technica offers an online calculator to confirm that your frequencies aren’t conflicting, though it won’t suggest correct frequencies for you.
Products such as Professional Wireless IAS are powerful, but they can be expensive. Sennheiser’s WSM software is a free tool but requires some knowledge if you are using non-Sennheiser wireless products. Shure’s Wireless Workbench is a powerful, free tool, and it also features presets for many other companies’ wireless products. This makes it an excellent choice to use to troubleshoot your wireless install, even if it is a mix of Sennheiser and Shure systems or some other combination of equipment. Let’s take a closer look at how Wireless Workbench can help us out.
Setting Up Workbench
Our first task is to map out where the icebergs are. You could make your way to the FCC’s website and do a bunch of research, but there is a much easier way. When you open up Workbench and choose the Coordination tab, you’ll see a screen like this:

Under the Spectrum tab, you’ll see several gear icons. Click on the one that is next to the TV Channels tab on the lower right, and it will open a search window. Enter your zip code, hit the Search button, and hit Save. This will import the current TV channels within 50 miles of your location from the FCC’s database and block those frequency ranges out.

In the Spectrum display, you’ll now see vertical red bars that represent those TV channels. If I had a networked piece of Shure wireless hooked up to the computer or another way to scan the facility, I could also import that scan file and make those frequencies off-limits as well. For now, let’s assume you don’t have the ability to do that and move on to our next step.
Let’s All Get Along
Our next step is to add the wireless systems that we are using to this project within Wireless Workbench. On the right-hand side of the interface, select the button that says Add Frequencies. In my example, I have added eight channels of Shure SLX in the G4 band and six channels of Sennheiser 300IEM systems in the G range. Manufacturers are fairly arbitrary in their naming conventions, but these two ranges are on the far edges of the currently legal bandwidth, making it easier for them to work together.
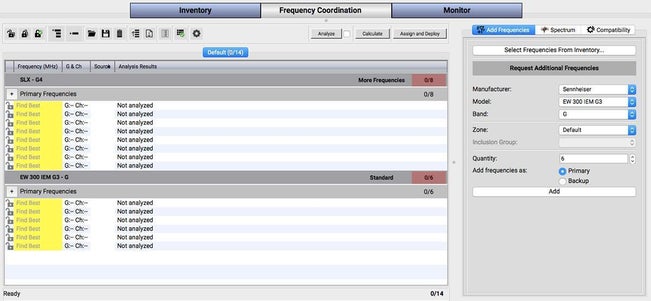
Now the magic happens. Press the Calculate button (not the Analyze button), and Workbench will generate a range of specific frequencies that will not conflict with one another and a range of back-up frequencies. You’ll see the list of generated frequencies displayed. In the spectrum display above, Workbench will put flags in place for each of the frequencies. If you click on a flag or a number in the list, then it will highlight both to make it easy to see a particular frequency.

You can manually program these frequencies into your wireless equipment, or if you have Shure units that are networked to your computer, you can click the Assign and Deploy button, and it will automatically set the frequencies on your equipment. You will have to manually set non-Shure gear up — in our example, the Sennheiser equipment — but these will all be intermod free. (If you use Sennheiser’s WSM software, you’d have the opposite situation, and you would manually program the frequencies into the Shure units.)
Keep in mind that if there are other units that are in close proximity (say, in the next room), or powerful units that are within a couple of hundred feet, you should add these frequencies to the Additional Exclusions section under the Spectrum tab. Just enter the frequency in the box here, and it will work around the frequency and the sidebands that are created with it. If you have control of these units, you could also include them within your calculation process and change their frequencies. Keep in mind that if you’re in a building with steel construction, wireless does not do a good job penetrating walls, but wood and sheetrock are not much of a hindrance.
It’s reasonable to assume that you can get eight channels of wireless operating in a single TV channel’s bandwidth (6MHz in the US), but adding a ninth channel increases the complexity a great deal. This makes Workbench a very valuable tool to use when deciding what frequency range to buy when you add additional wireless gear to your current system. Don’t assume that you can just keep adding channels in the same frequency band and get good results. A little bit of work on the front-end could save you hours of frustration and expense on the back end.
Final Steps
While these steps don’t completely replace a professional integrator or systems tech setting up the system, they will ensure that you’re avoiding 90% of the issues that are going to impact your system.
If you have confirmed that your wirelesses are all set to compatible frequencies but you’re still having issues, try physically placing your systems so that the transmitters have clear line of sight to the receivers’ antennas. In other words, if you’re holding a wireless mic and can’t see the receiving antennas, you may have issues. Keep in mind that the antennas that attach to the back of the receiver aren’t designed to hang on the end of a cable. They are ground-plane antennas and need a physical connection to a back plane to work correctly. You may have to upgrade your antennas to be able to mount them remotely.
If you’ve gone through these steps and you’re still having dropouts or bursts of static, it’s likely that you have issues with cabling or antenna placement, and it may be time to bring in a professional to evaluate your system. As always, your Sweetwater Sales Engineer and Sweetwater Tech Support are here to help!