
Positive Grid Spark 2 Quickstart Guide
NOTE: This guide covers the Spark 2, which was released in 2024. If you have an original Positive Grid Spark, also referred to as the Spark 40, check out our Positive Grid Spark Quickstart Guide.
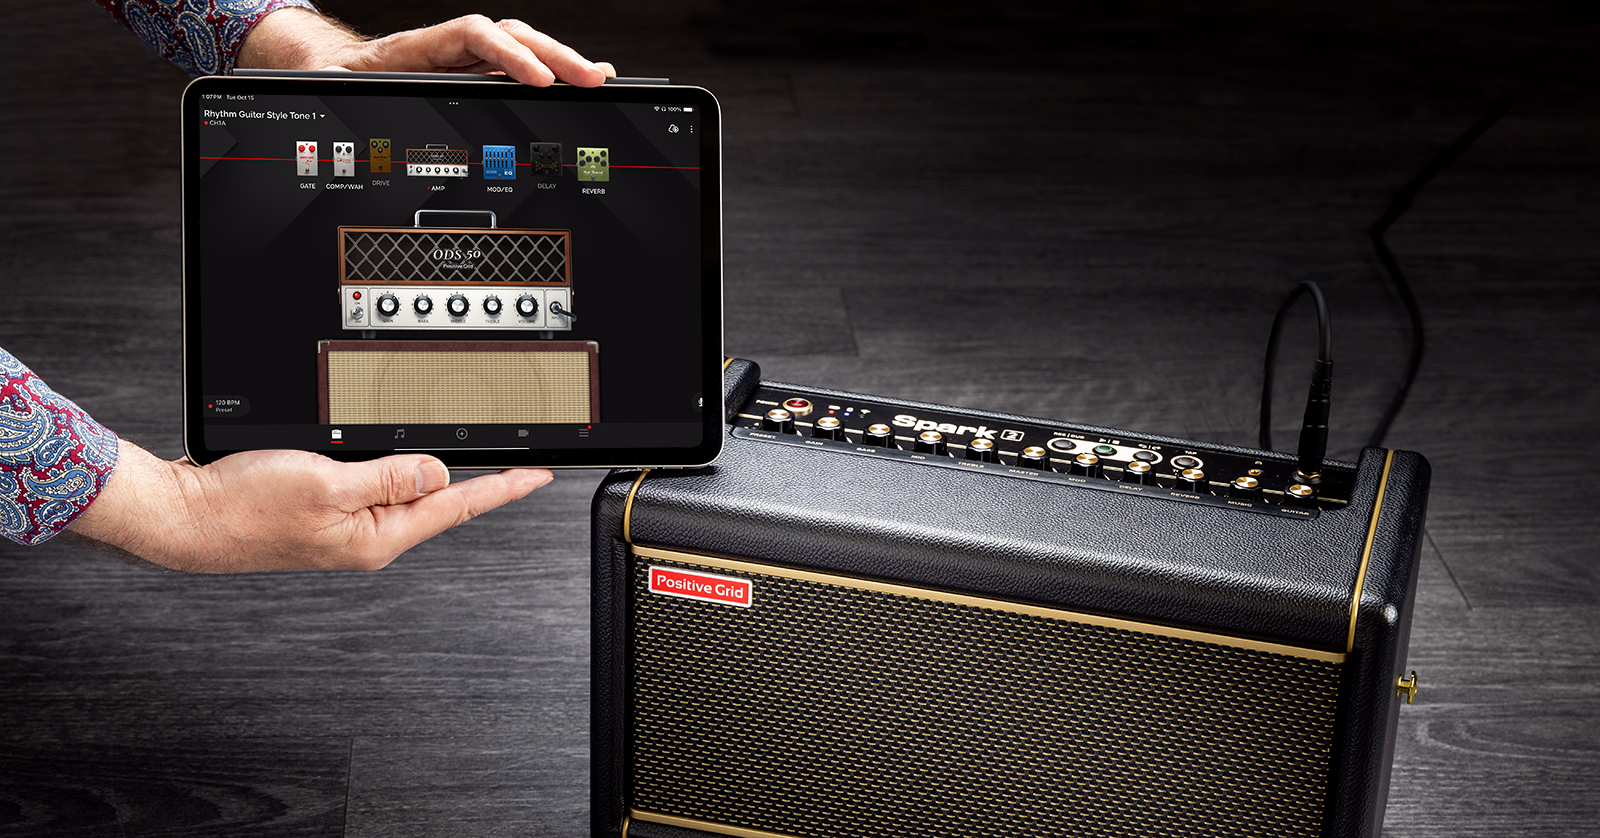
The Positive Grid Spark 2 is a next-generation practice amp for your desk — or anywhere in the house, as it can be battery powered. We’ll show you how to register, set up, and use the amp.
Use the free Spark app for iOS, iPadOS, and Android to open endless possibilities for effects and amp modeling, generating practice tracks with drum and bass accompaniment, jamming to tracks on your Apple Music or Spotify playlists, and more.
Connect a USB cable to your computer, and the Spark 2 becomes an audio interface for your DAW.
Let’s get started on your discovery.
- Download the Spark App for Your Phone or Tablet
- Bluetooth Pairing with the Spark 2
- Updating the Spark 2 Firmware
- The Spark 2 User Manual, Help Center, and Videos
- Spark 2 Controls and Connections
- Using the Spark App
- Using the Spark 2 as an Audio Interface and Recording to Your DAW
- Positive Grid Spark Battery and Spark Control X Footswitch
- Sweetwater Positive Grid Spark 2 Demo Video
Download the Spark App for Your Phone or Tablet
The Spark 2 looks like a conventional guitar practice amp, and it has plenty of knobs. You can use it stand-alone. However, with the Spark line of amps, it’s all about using the Spark app on your phone or tablet to unlock tons of features you can’t access from the amp’s panel controls.
The red card in the box has a QR code on the back. Take a picture with your phone or your tablet and download the Spark app. The app works with all Positive Grid Spark–family products.
Here are links:
On your iPhone or iPad, download the Spark app from the Apple App Store.
On your Android device, download the Spark app from the Google Play Store.
Bluetooth Pairing with the Spark 2
To use the Spark 2, you pair it with two Bluetooth connections, one for audio and one for app control.
If you need to know how to enable Bluetooth on iOS or Android, here are Sweetwater’s guides:
- Power up the Spark 2.
- Enable Bluetooth on your device.
- On the Spark 2, tap the Bluetooth pairing button on the back. The Bluetooth indicator on the top panel will flash.
- In your device’s Bluetooth settings, you should see Spark 2 Audio. Tap this to connect.
- Open the Spark app on your device. Select the Spark 2 as your device.
- Tap Connect. This connects the app to the Spark 2 BLE Bluetooth connection.
Now you can use all the functions of the Spark app, including programming sounds on the Spark 2 and playing backing tracks from within the app. You can also play tracks from any other app on your device using the Spark 2 as a Bluetooth speaker.
Updating the Spark 2 Firmware
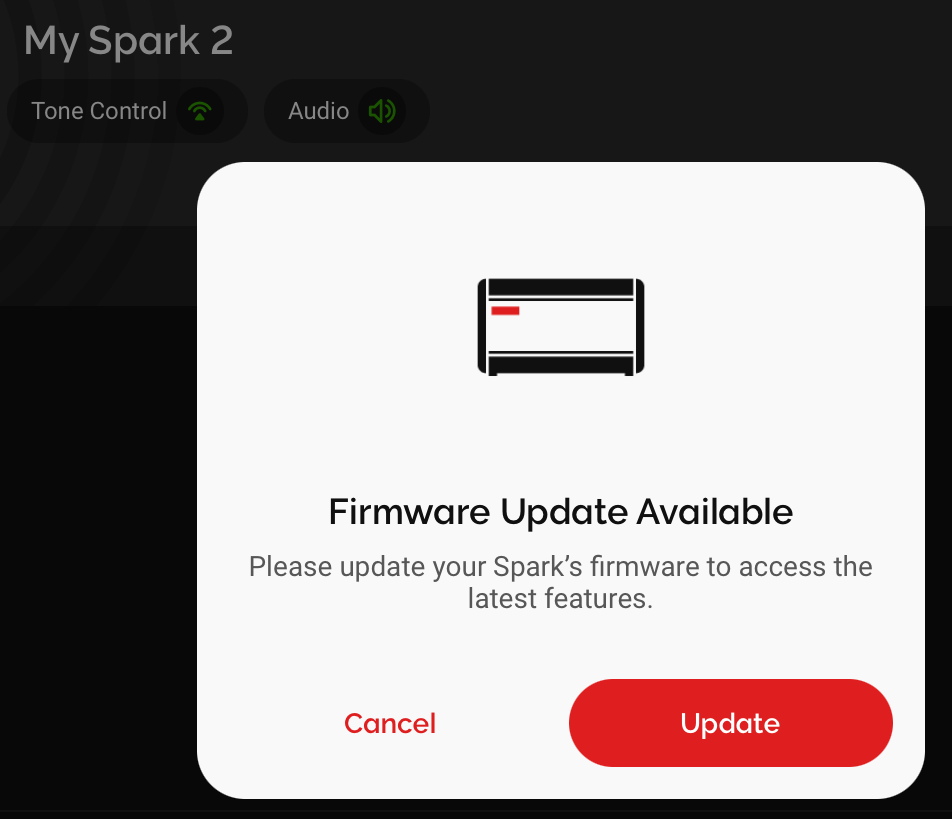
The Spark app indicates that a firmware update needs to be installed on the Spark 2.
There are two methods for updating the firmware:
- Over-the-air wirelessly with the Spark app, which is the preferred method
- Through a USB cable connection between your Spark and a Mac or a Windows PC
Register your purchase
The app will prompt you to register your purchase. Log in with your email address and password for your existing Positive Grid account (or create a new one in the app). The app will automatically record the serial number of your Spark 2 to your account.
Don’t skip this: this step will not only unlock all the features of the app and the amp, but also register the unit for warranty coverage.
Over-the-air firmware update
The Spark app will prompt you if a firmware update is available. Install it for compatibility with the newest version of the app. It will also fix bugs and may add new features to your Spark 2. Always update the firmware when prompted.
Connect your Spark 2 to its power adapter. (Don’t attempt the firmware update with battery power.)
The app will prompt you to connect to Wi-Fi.
Detailed instructions and a tutorial video are at this link:
Positive Grid Help Center > Spark 2 Firmware Update (OTA)
Updating the firmware over USB connection to your computer
If you can’t get the wireless firmware update to take, you have the option of connecting your Spark 2 to your Mac or your Windows PC with a USB data cable and downloading Positive Grid’s firmware update app to run on your computer. Note that for Windows, you’ll need to install the Windows driver first.
Positive Grid provides instructions at this link:
Positive Grid Help Center > Spark 2 Firmware Update (USB)
The Spark 2 User Manual, Help Center, and Videos
You’ll need to refer to the Spark 2 user manual to understand all its features. Download it here.
Positive Grid provides additional resources on their website:
Positive Grid Help Center > Spark 2
Here’s a link to Positive Grid’s YouTube tutorial videos for the Spark 2.

Positive Grid: Spark 2 Help Series
Spark 2 Controls and Connections
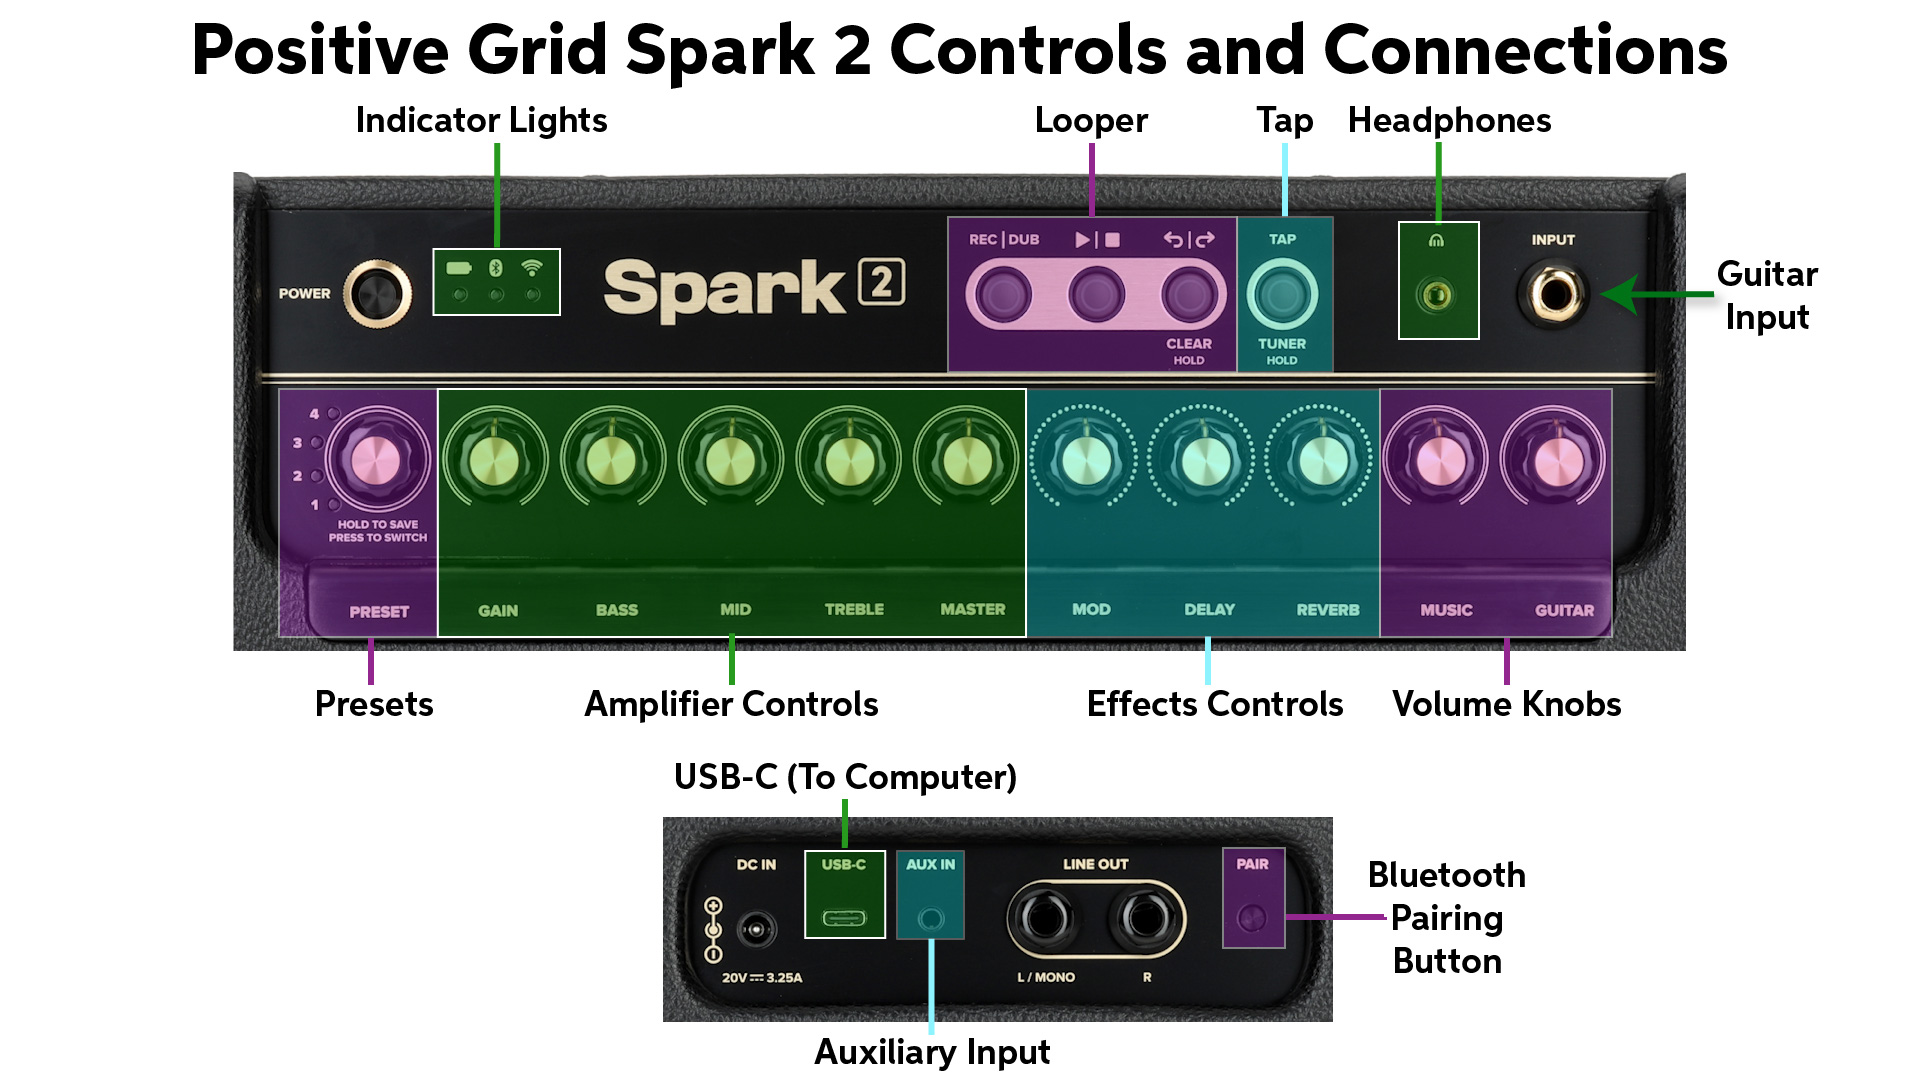
Positive Grid Spark 2 Controls and Connections
Turn off the power to your Spark 2. Turn the Master, Music, and Guitar knobs all the way down before you connect any cables.
Front Panel
Power Button
Input
Plug in a 1/4-inch TS instrument cable from your guitar.
Headphones
Connect headphones with a 1/8-inch TRS plug.
Volume Knobs
The Music knob controls the levels of auxiliary input signals for practice or backing tracks, whether wirelessly via Bluetooth from the Spark app on your device, through the Aux In audio jack, or using the USB cable connection from your computer or device. This controls the volume of the backing tracks to the internal speakers and the headphone output.
The Guitar knob independently controls the volume of the guitar signal output from the Spark 2 with its amp, cab, and effects. Likewise, this controls the volume of the guitar signal to the internal speakers and the headphone output.
Indicator Lights
These three lights indicate battery strength (if you have installed the Spark Battery, purchased separately), the status of Bluetooth pairing, and the status of the Wi-Fi connection through the Spark app on your device.
Presets
The Spark 2 has eight customizable presets: four each in two banks, red and green. Press the knob to toggle between the two banks. You can access a great deal more presets, and program their parameters in detail, using the Spark app.
Amplifier Controls
Gain, Bass, Mid, Treble, and Master are used to adjust the settings for the model of amplifier that goes with the current preset. Save your settings to the preset by pressing and holding the Preset knob.
Effects Controls
Each preset provides separate effects slots for Modulation (chorus, flanger, etc.), Delay, and Reverb. Turn each of these knobs to raise or lower the intensity of each effect. Using the Spark 2 app, you can customize your sound by choosing among many effects and adjusting numerous parameters for each.
Tap and Tuner Button
Set a tap tempo for the Delay effect and for the Looper. Hold the button in to activate the Tuner.
Looper Controls
These three buttons control functions for the Spark 2’s built-in Looper. You can also control the Looper with footswitches on the Spark Control X wireless unit (sold separately).
Back Panel
DC In
Only power the Spark 2 with the power supply that comes in the box. The power supply also charges the Spark Battery, if you have it installed.
Bluetooth Pairing Button
Tap this button to enter Bluetooth pairing mode to connect to your iPhone, iPad, or Android device for use with the Spark app. Hold the button to pair with the Spark Control X footswitch unit.
Aux In
Connect a 1/8-inch TRS cable to an analog stereo audio source as a means of playing backing tracks through your Spark 2. Of course, the Spark 2 can also receive auxiliary input over Bluetooth and via the USB connection.
USB-C
Connect the included USB-C data cable (with an adapter, if needed) directly to your Mac or your Windows PC for use as an audio interface for recording to your DAW. If you are on Windows, you must first install the Windows driver from the Spark 2 Download page.
Line Out
Connect two 1/4-inch TS cables for stereo output to an external device such as a PA system, a mixer, or an audio interface. If you only need a mono connection, use the L/Mono jack.
Using the Spark App
The Spark app on iPad
The Spark app enables you to select from a range of amp models and effects and to access all their parameters. You can also download presets from other Spark users through Positive Grid’s ToneCloud.
Use the Spark app to access all the features of the Spark 2’s Looper, including selecting from a library of drum tracks.
The new Spark AI feature lets you enter a prompt to describe the kind of guitar tone you want, and the Spark app then constructs presets for you.
Beyond that, the app provides a truly vast range of features for practicing:
- Smart Jam listens to your playing, picks up the chord progression, and creates an accompaniment.
- Quick Jam gives you predetermined chord progressions and backing tracks.
- Choose a recording from your Apple Music or Spotify account, and the Spark app will analyze the chord progression and give you a chart to practice from as you play along with the track.
- Use the app to record a video of your playing.
The second half of the Spark 2 user manual is dedicated to using the Spark app.
Here’s Spark’s overview of using the Spark 2 with the Spark app.
Positive Grid: Spark 2 Help Series: Getting Started with the Spark App
Using the Spark 2 as an Audio Interface and Recording to Your DAW
You can use your Spark 2 as an audio interface to your computer over the USB connection. The Spark 2 provides a stereo pair of output and input channels over USB. This means you can also use the Spark 2 as a monitor for the output from your DAW and to play back audio from any other app on your computer over USB.
If you are on Windows, you must first install the Windows driver from the Spark 2 Download page.
Here’s Positive Grid’s tutorial:
Positive Grid Spark 2 Help Series: Recording with Spark 2
Positive Grid Spark Battery and Spark Control X Footswitch
These optional accessories are sold separately.
Positive Grid Spark Battery

Positive Grid Spark battery
You can power your Spark 2 with the Positive Grid Spark battery. To install it:
- Make sure the Spark 2 is turned off and that the power cord is unplugged.
- On the underside, remove the battery compartment cover by pushing in and sliding down.
- Insert the battery.
The battery charges when the Spark 2 is plugged into electrical power.
Learn more in the Spark 2 User Manual > Installing Battery.
Here’s Positive Grid’s tutorial video:
Positive Grid: Spark 2 Help Series: Spark Battery
Positive Grid Spark Control X Footswitch
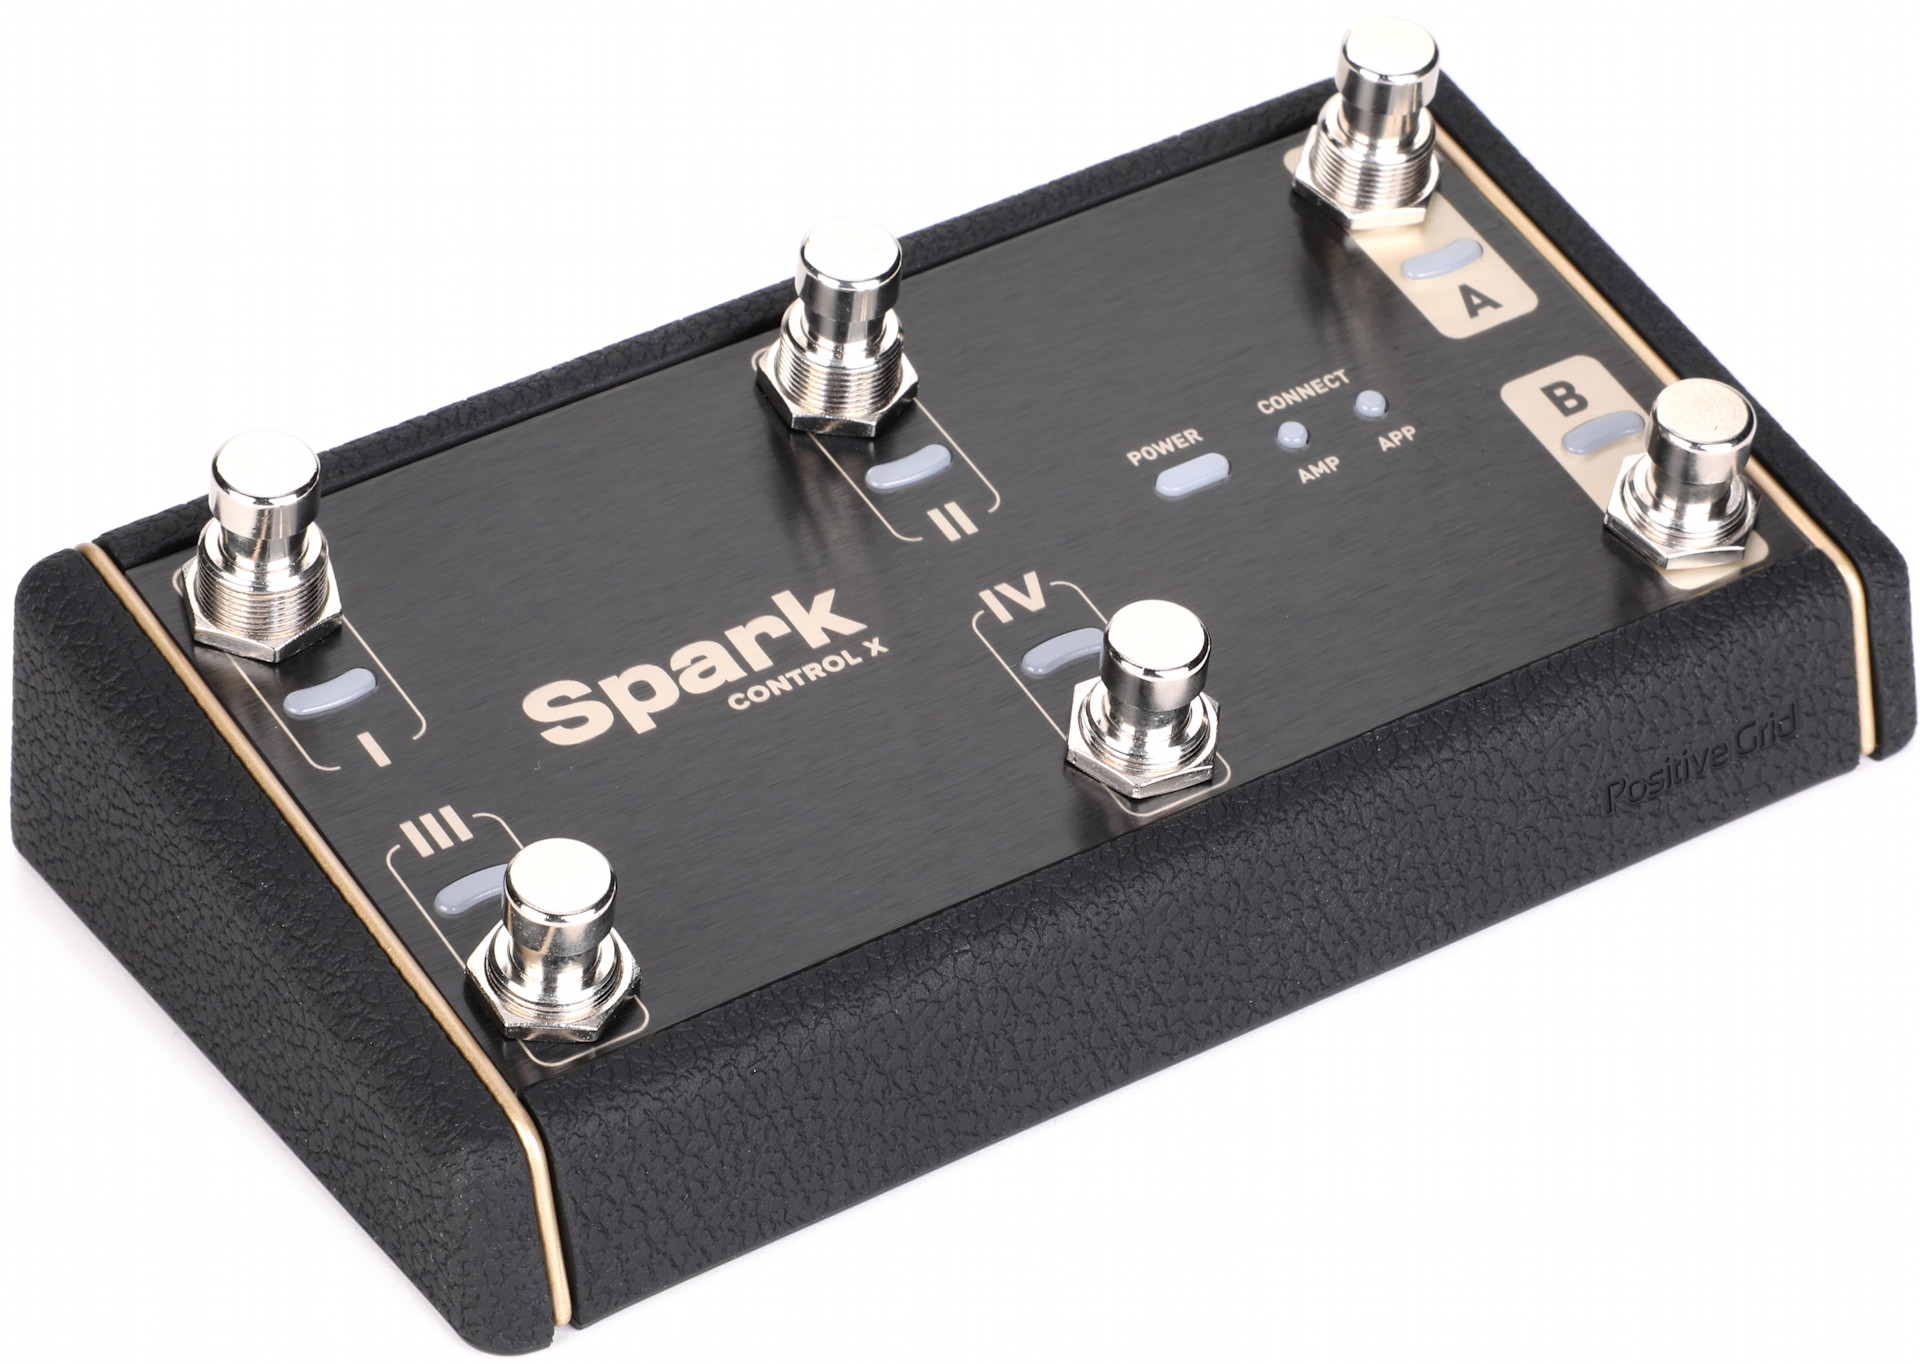
Positive Grid Spark Control X Bluetooth footswitch unit
Positive Grid also provides the Spark Control X footswitch. This unit connects wirelessly via Bluetooth, is battery powered, provides six footswitches, and can be further expanded with one or two external expression pedals.
You can use the Control X to change presets and toggle effects in live performances. It can also be used to control the Looper and to start and stop backing tracks streamed from the app on your phone.
You can customize the functions of the footswitches and their assignments in the Spark app.
Learn more in the Spark 2 User Manual > Pairing Spark Control X.
Here’s Positive Grid’s video overview:
Positive Grid: Spark Control X Quick Start Guide
Sweetwater Positive Grid Spark 2 Demo Video
Here’s Sweetwater’s Nick Bowcott.
Sweetwater Soundcheck: Positive Grid Spark 2 Combo Amp Demo
When you need help, Sweetwater has the answers!
Our knowledge base contains over 28,000 expertly written tech articles that will give you answers and help you get the most out of your gear. Our pro musicians and gear experts update content daily to keep you informed and on your way. Best of all, it’s totally FREE, and it’s just another reason that you get more at Sweetwater.com.


Offer applies only to single-receipt qualifying purchases. Select manufacturers may require that only the manufacturer’s products qualify towards the minimum purchase amount needed to be eligible for promotional financing. Otherwise, an invoice that meets the minimum purchase amount and contains at least one qualifying manufacturer product is eligible for promotional financing. No interest will be charged on promo purchase balance, and equal monthly payments are required on promo purchase until it is paid in full. The payments equal the amount financed divided by the number of months in the promo period, rounded up to the next whole dollar. These payments may be higher than the payments that would be required if this purchase was a non-promo purchase. During the last month(s) of the promo period the required monthly payment may be reduced due to the prior months’ rounding. Regular account terms apply to non-promo purchases. New Accounts as of 07/31/2025: Purchase APR is 34.99%. Penalty APR is 39.99%. Min Interest Charge is $2. Existing cardholders: See your credit card agreement terms. Subject to credit approval.
Offer applies only to single-receipt qualifying purchases. No interest will be charged on the promo balance if you pay it off, in full, within the promo period. If you do not, interest will be charged on the promo balance from the purchase date. The required minimum monthly payments may or may not pay off the promo balance before the end of the promo period, depending on purchase amount, promo length and payment allocation. Regular account terms apply to non-promo purchases and, after promo period ends, to the promo balance. New Accounts as of 07/31/2025: Purchase APR is 34.99%. Penalty APR is 39.99%. Min Interest Charge is $2. Existing cardholders: See your credit card agreement terms. Subject to credit approval.
The estimated required monthly payment shown which excludes taxes and delivery equals the amount financed divided by the number of months in the promo period, rounded up to the next cent. During the last month(s) of the promo period the required monthly payment may be reduced due to this rounding. These payments apply only with the financing offer shown. If you make these payments by the due date each month, you should pay off this amount financed within the promo period, if it is the only balance you are paying off. If you have other balances on your account, this payment will be added to any other minimum monthly payments.
Applies only to select items from this manufacturer. Ask your Sweetwater Sales Engineer for more details.