
Positive Grid Spark LIVE Quickstart Guide
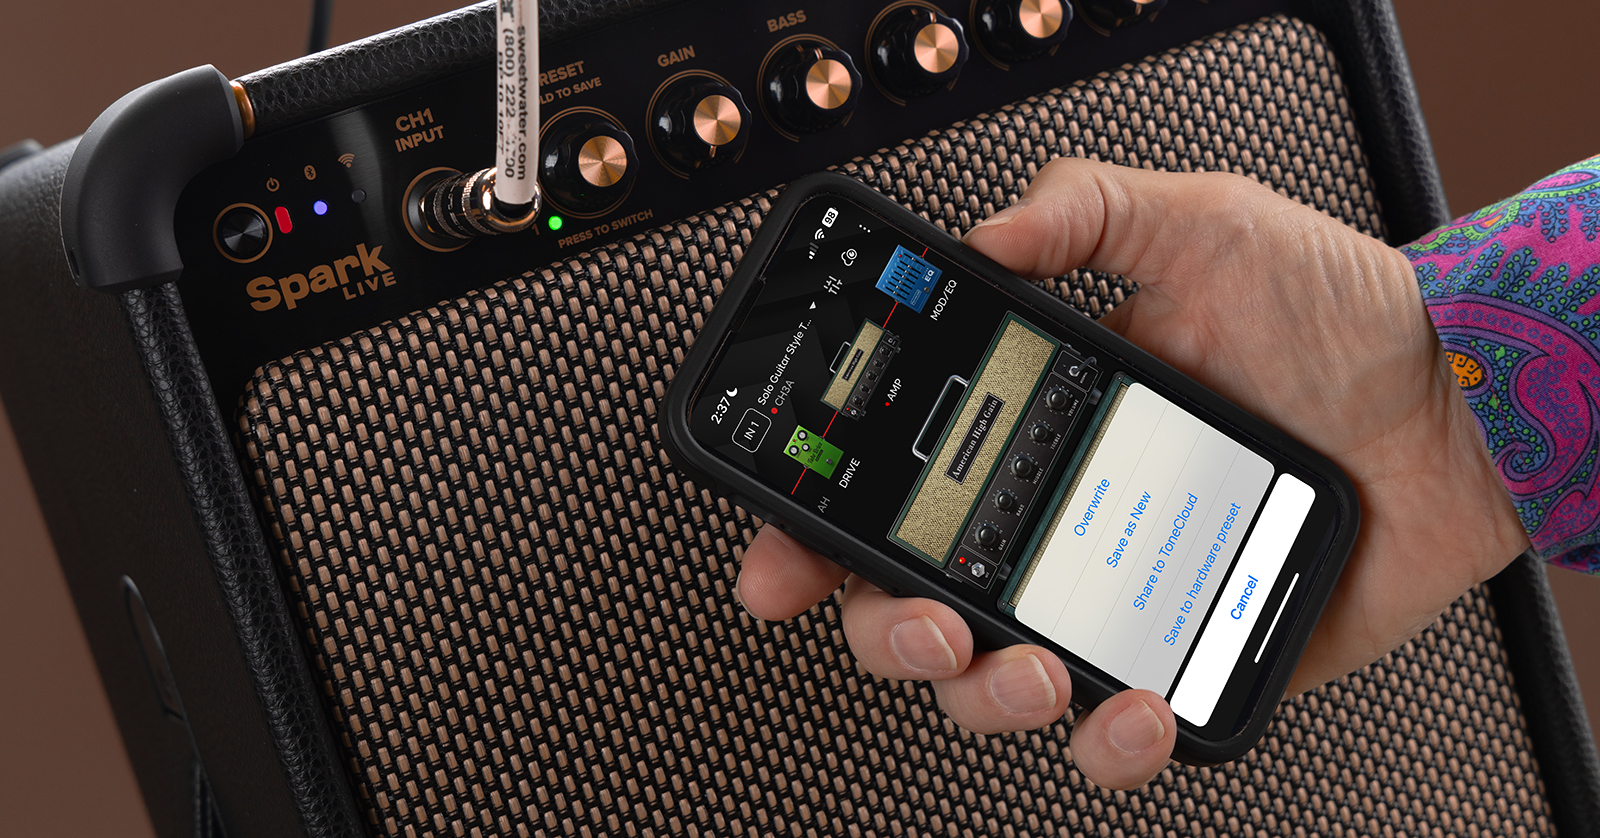
The Positive Grid Spark LIVE is a 4-channel amp and PA system in one enclosure, with an optional battery. With its traditional-looking knobs, the Spark LIVE may appear to be an old-school portable PA. However, it’s designed to be controlled from your iPhone, iPad, or Android device using the Spark app, which opens a world of flexibility with effects, amp models, and other features. Let’s get started.
- Update the Spark LIVE Firmware
- Register Your Purchase and Create an Account
- Download the User Manual
- Download the Spark App
- Spark LIVE Controls and Connections
- Spark LIVE Mono and Stereo Modes
- Positive Grid Spark Battery and Spark Control X Footswitch
- Positive Grid Spark LIVE Resources
Update the Spark LIVE Firmware
Positive Grid provides firmware updates that fix bugs and may add new features.
When you set up your new Spark LIVE, Positive Grid recommends that you update the firmware first. To do this you need to connect your Spark LIVE to your computer and download the Spark LIVE firmware updater app.
Head over to our Positive Grid Spark LIVE Firmware Update guide and follow the procedure.
Now that you have updated the firmware, let’s keep going.
Register Your Purchase and Create an Account
Take a moment to register your purchase with Positive Grid.
- Go to the Positive Grid home page and click on the person icon in the upper-right corner.
- Create a new account with an email address and a password, or log in to your existing account.
- Once you log in and go to your account page, click on Register Now in the pane on the left under My Product > Hardware Device.
- Select Spark LIVE, and fill out the requested information.
- Enter the serial number. This is on a sticker on the outside of the box and is also found in extremely tiny print beneath the unit’s power input jack.
- Upload a copy or picture of your invoice.
- Click the Next button and follow the prompts to complete registration.
Download the User Manual
You will want a copy of the full user manual for reference.
- Go to the Positive Grid Spark LIVE support page. Under How to (User manual), click on Spark LIVE User Manual.
- On the manual page, select the newest version and download it.
Download the Spark App
Before you hook up any instruments to the Spark LIVE, set up the Spark app on your iPhone, iPad, or Android device and connect it to the Spark LIVE via Bluetooth. The app provides a great deal of essential features that you can’t access from the knobs on the Spark LIVE.

The Spark app on iPhone
Connect the Spark app to the Spark LIVE
- On your phone, enable Bluetooth. Power on the Spark LIVE.
- Download the Positive Grid Spark app on the Apple App Store or the Google Play store.
- Open the app and follow the prompts.
- Tap the Bluetooth pairing button on the back of the Spark LIVE.
There is a second Bluetooth pairing procedure to enable the Spark app to stream audio to the Spark LIVE.
- Tap the Bluetooth pairing button on the back panel of the Spark LIVE.
- In your device’s Bluetooth settings, pair with the device named “Spark LIVE Audio.”
Here’s the Positive Grid tutorial, Getting Connected with Spark LIVE.
Getting Connected with Spark LIVE
Log in to your Positive Grid account
In the app, tap the Menu icon in the lower-right corner. Tap Log In, and enter your Positive Grid email address and password. This will enable you to access Positive Grid’s online library of presets and practice tracks.
You can also log in to your Apple Music or Spotify accounts so that you can play backing tracks through the Spark app to play along with on the Spark LIVE.
Using the Spark app with the Spark LIVE
The Spark app enables you to select from different amp models and effects chains for Channel 1 and Channel 2 on your Spark LIVE and adjust the parameters. It also gives you a handy mixer view for setting levels.
Here’s Positive Grid’s tutorial on the Spark app with Spark LIVE.
Spark LIVE – New Spark App Features
If you are familiar with other amps in the Spark line, then you know that the Spark app gives you an array of guitar-oriented features.
You can access Positive Grid’s ToneCloud online library and select from hundreds of presets with different amps and effects organized into styles.
If you log in to your Apple Music or Spotify account, then you can access your playlists and load a song into the app for audio playback through the Spark LIVE. The Spark app will attempt to analyze the audio track and transcribe the chord progression. It will display a chord chart for you to follow during playback. The Spark app will also go to YouTube and play the music video for the song you selected while the track plays.
The Smart Jam and Quick Jam functions generate custom practice tracks with a chord progression and bass and drum accompaniment. You can also access playlists of hit songs with a chord chart. Playlists of practice backing tracks are available in many genres.
You can use the Spark app to record a video of your performance. You can save the video to your device and upload it to social media.
Here’s Positive Grid’s overview of guitar practice features in the Spark app.
Getting Started with the Spark App
Learn more about all these functions in the Spark LIVE User Manual. The Spark App User Guide begins on page 20.
Spark LIVE Controls and Connections
Make sure your Spark LIVE is shut down and that the Master Volume knob on the back panel is turned all the way down before you connect any cables.
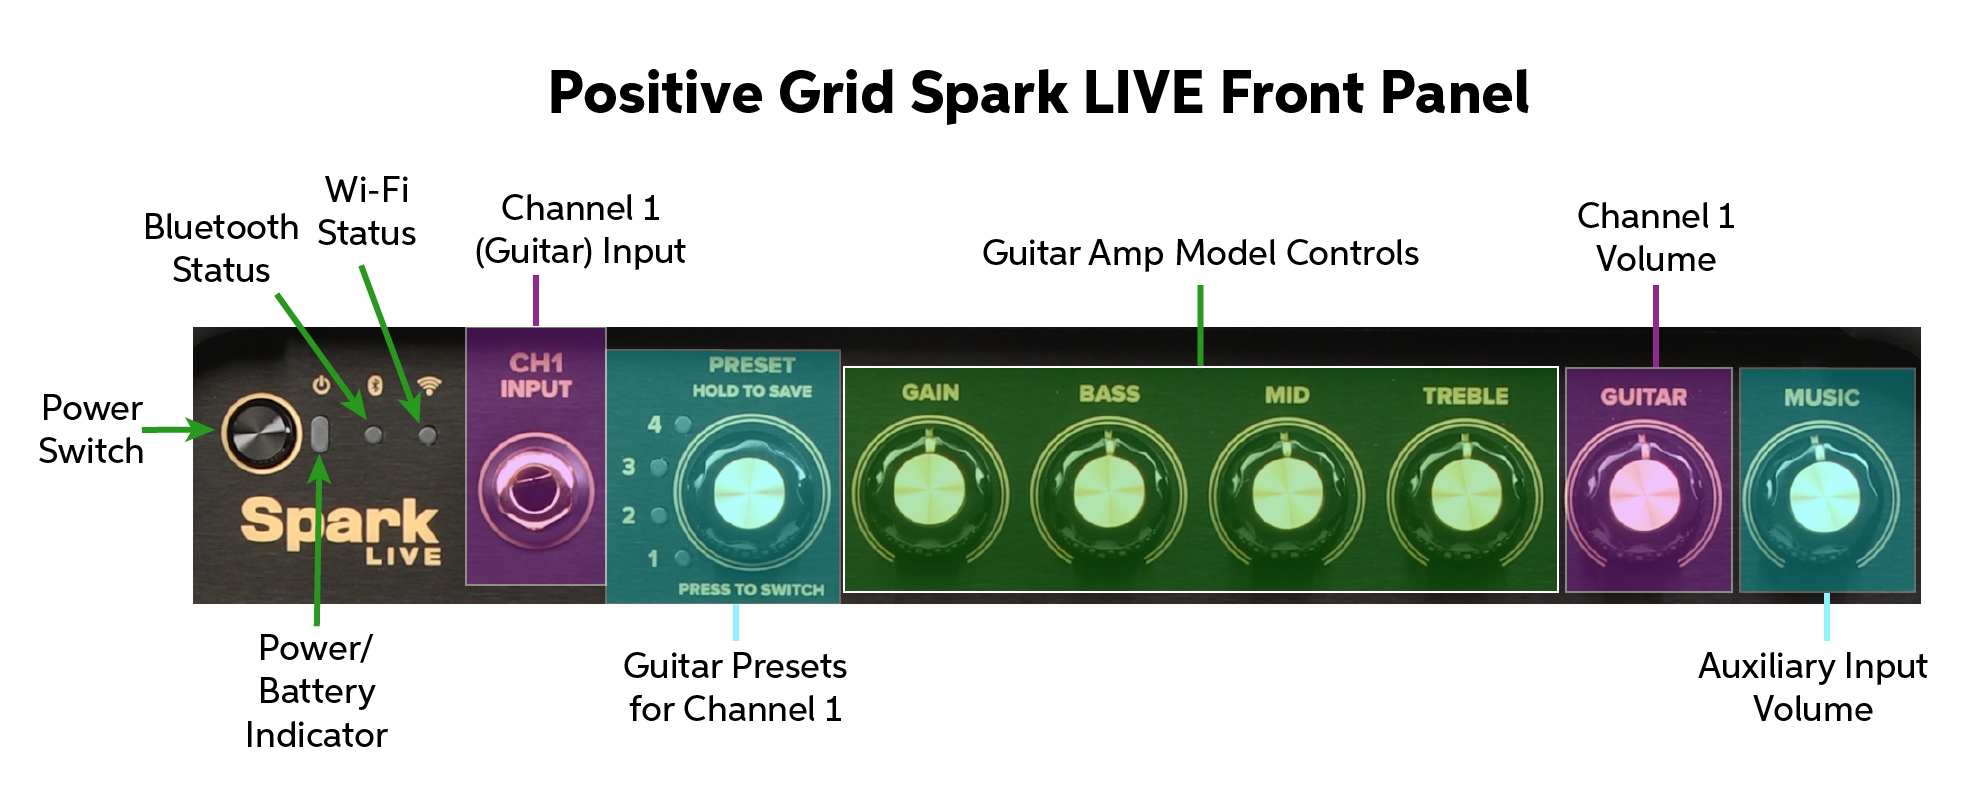
Positive Grid Spark LIVE front panel
Power Switch
Hold down the power switch to boot up the Spark LIVE. Hold again to shut it down.
Power/Battery Indicator
If you have not installed the optional Spark Battery, this light glows red to indicate that power is on.
With a Spark Battery:
- Green indicates a battery charge of 50% to 100%
- Yellow is 10% to 50%
- Orange is under 10%
- Flashing green/yellow/orange indicates that the battery is charging
Bluetooth Status and Wi-Fi Status
Each of these indicators glows solid to indicate that it is connected. The Bluetooth indicator flashes to indicate that it is in pairing mode.
Channel 1 Input
Connect a cable with a 1/4-inch TS connector. This channel provides presets for electric guitar, acoustic guitar, or bass guitar. Use the Spark app to set one of three modes:
- Standard, for regular guitar output
- Hi-Z, for guitars with high-gain output or a preamp
- Line In, for instruments that output a line-level signal, such as a keyboard or DI box or a line output from an effects unit
Preset Selector for Channel 1
Using the Spark app, you can create and save eight presets for Channel 1, which can be recalled from this knob. Press in to toggle between two banks of four presets. Each preset is a complete signal chain with electric guitar amp and speaker cab simulation and effects.
Double tap the Preset knob to enter tuner mode to tune your instrument.
Guitar Amp Model Control Knobs
The Gain, Bass, Mid, and Treble knobs enable you to directly change parameters on the amp model in a preset. Turning these knobs on the Spark LIVE changes the values within the Spark app.
TIP: The Spark app also provides a Volume setting for the amp model, which is not represented as a hardware knob on the Spark LIVE. Adjust the amp model’s volume in the app to fine-tune your amp tone.
The Spark LIVE does not provide hardware knobs for adjusting effects like delay and reverb within the preset; you can do that in the Spark app with the optional Spark Control X footswitch (discussed below) or with an external MIDI controller.
Channel 1 Volume
The knob labeled Guitar is the volume control for Channel 1.
Auxiliary Input Volume
The Music knob controls the volume of a separate stereo channel for auxiliary input over Bluetooth or USB for playing music tracks. Note that you also need to adjust the output level on the device or computer from which you are streaming the tracks.

Positive Grid Spark LIVE back panel
Master Controls
Use these four knobs to adjust the equalization and Master Volume for the output of all the channels.
Channel 2 Input
Use the combi jack to connect a balanced XLR cable or a 1/4-inch TS line input. On this channel, the Spark app provides effects chains designed for vocals, bass guitar, and acoustic guitar. This channel supports the same three input modes as Channel 1, plus the Microphone mode for a dynamic microphone. The Spark LIVE does not provide 48-volt phantom power for a condenser microphone.
Preset Selector for Channel 2
Using the Spark app, you can create and save eight additional presets for Channel 2, which can be recalled from this knob.
Channel 2 Volume
Adjust the volume of Channel 2.
Channels 3 and 4 Input and Volume
Connect a pair of 1/4-inch TS cables for a stereo signal or two mono signals. The Spark LIVE does not provide effects for these two channels, so use these for sources that already have effects, such as from a pedalboard or keyboard instrument. These channels support the same three input modes as Channel 1.
The Volume knob adjusts the level of both Channels 3 and 4 together; they cannot be adjusted separately.
MIDI
Connect standard 5-pin DIN cables to control built-in effects from a hardware MIDI controller.
Output
Connect a pair of 1/4-inch TS cables to an external PA system or audio interface for stereo line output, or use the L/Mono jack for mono output.
Bluetooth Pairing Button
Press this button to enter Bluetooth pairing mode when connecting a new device.
Headphone Jack
Connect stereo headphones via a 1/8-inch TRS connection. Make sure the Master Volume knob is turned all the way down first.
USB-C Audio/Data
Connect a USB-C cable to your Mac or Windows PC to use the Spark LIVE as a 2-channel audio interface for recording to your DAW and for playing backing tracks. If you are on Mac, no driver is needed.
If you are on Windows, you must first download and install the Spark LIVE USB Audio Driver for Windows.
Charge Out
Charge or power a mobile device with a USB-C charging cable.
Spark LIVE Mono and Stereo Modes
A clever feature of the Spark LIVE is that when you sit it vertically, it’s in Focus Mode and outputs monaural sound. When you turn it horizontally on its side, it reconfigures itself in Wide Mode for stereo sound. The unit senses the orientation with what Positive Grid calls the G-Sensor.
Pull out the built-in tilt stand to position the Spark LIVE at different angles.
The Spark LIVE has a standard 35mm receptacle on the side for mounting the unit on a speaker stand in Wide Mode.
Here’s Positive Grid’s video on using the tilt stand.
Spark Live – Focus Mode vs. Wide Mode
Positive Grid Spark Battery and Spark Control X Footswitch
Here are two optional accessories that are sold separately.
Positive Grid Spark Battery for Spark LIVE
You can power your Spark LIVE with the Positive Grid Spark Battery. To install it:
- Make sure the Spark LIVE is turned off and the power cord is unplugged.
- On the back panel, unscrew the cover on the battery compartment and insert the battery.
The battery charges when the Spark LIVE is plugged into electrical power.
Learn more in the Spark LIVE User Manual > Installing Battery.
Here’s Positive Grid’s tutorial video:
Using Spark Battery with Spark LIVE
Positive Grid Spark Control X Footswitch
Positive Grid also provides the Spark Control X footswitch (sold separately). You can use this to change presets and toggle effects in live performance. It can also be used to start and stop backing tracks streamed from the app on your phone. This unit connects wirelessly via Bluetooth, is battery powered, provides six footswitches, and can be further expanded with one or two external expression pedals. Learn more in the Spark LIVE User Manual > Pairing With A Spark Control X.
Spark Control X Quick Start Guide
Positive Grid Spark LIVE Resources
Positive Grid provides a FAQ list on the Spark LIVE in their Help Center.
Check out Positive Grid’s Spark LIVE video tutorial playlist.
When you need help, Sweetwater has the answers!
Our knowledge base contains over 28,000 expertly written tech articles that will give you answers and help you get the most out of your gear. Our pro musicians and gear experts update content daily to keep you informed and on your way. Best of all, it’s totally FREE, and it’s just another reason that you get more at Sweetwater.com.

