
iPad Recording Setup Guide

NOTE: This article was updated to cover iPadOS 26, released on September 15, 2025. Other examples are from iPadOS 18, released in September 2024. Many of the features and principles discussed here apply to earlier versions of iPadOS as well.
- Device Compatibility with iPadOS
- iPad Bluetooth Setup
- Recording Audio and MIDI
- iPadOS Privacy & Security in Settings
- Starting a Recording Session
- Transfer Projects and Files from iPadOS
- iPadOS 26 Audio and Recording Features
In this guide, we will show you how to set up an iPad to connect with audio and MIDI devices. We will show you how to enable Bluetooth and how to record and transfer your projects and files.
Device Compatibility with iPadOS
You need to be aware that app developers and hardware device manufacturers publish system requirements and compatibility information. For example, a device designed for iOS 10 (which is what they called the OS for the iPad in 2016) might not function correctly on an iPad running iPadOS 18 (in 2024). If your device isn’t connecting or functioning correctly, it’s best to reach out to the support department of the device’s manufacturer and ask them about compatibility.
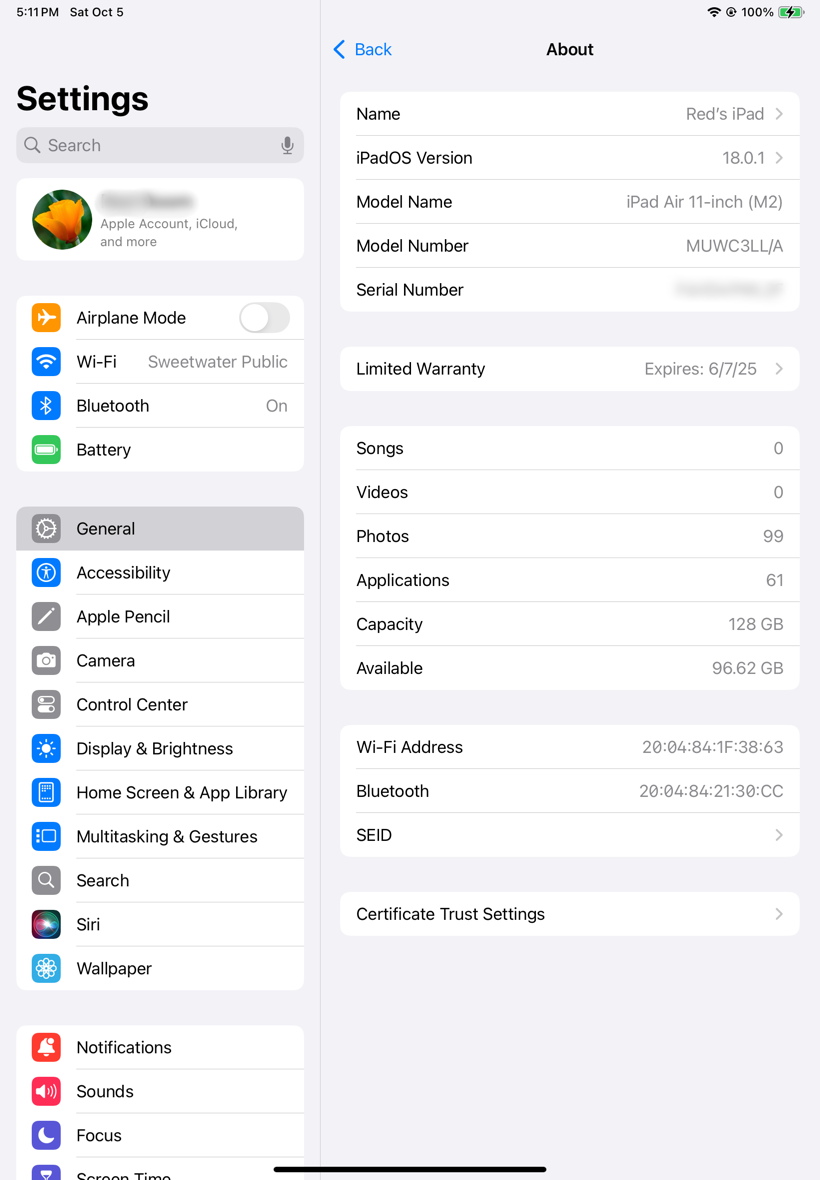
Settings > General > About showing an iPad running iPadOS Version 18.0.1
If you don’t know the version of iPadOS you are running, go to Settings > General > About to find your iPadOS Version, Model Name, Model Number, and other information.
iPad Bluetooth Setup
To connect a device that sends and receives audio or MIDI data over Bluetooth, you must turn on Bluetooth on the iPad. You can do this under Settings > Bluetooth or by using the Control Center.
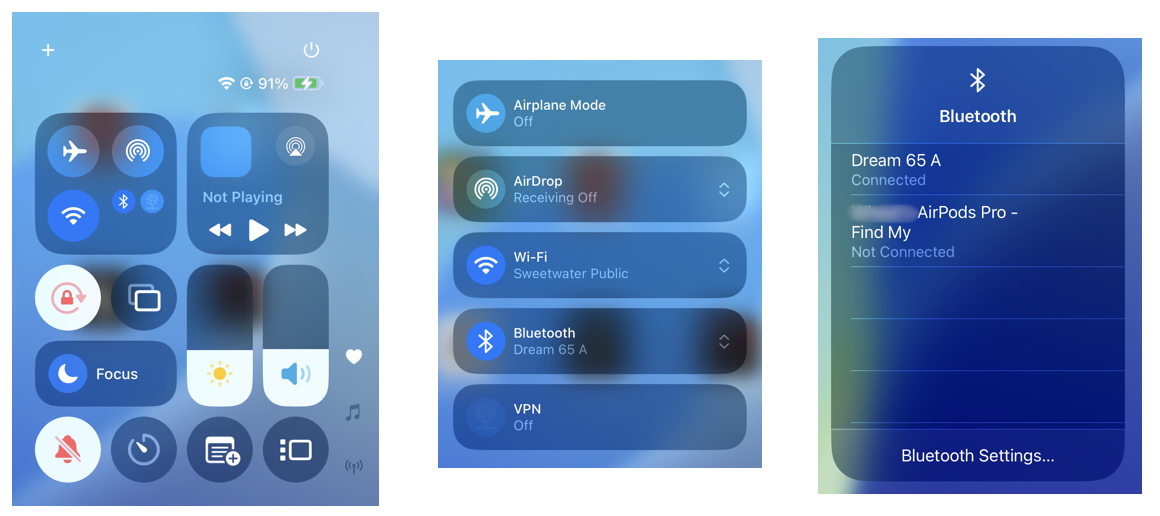
Accessing Bluetooth settings in Control Center
You can call up Control Center from the home screen or within any app: simply swipe with two fingers from the upper-right corner of the screen to bring up Control Center. In the upper-left quadrant is a small Bluetooth icon. Tap it to turn it on. On the next screen, tap the Bluetooth icon to see all devices nearby that you have already paired with. You can use this to quickly change the connection among different devices.
To pair a new device from Control Center, tap Bluetooth Settings. There, you can see all available devices.
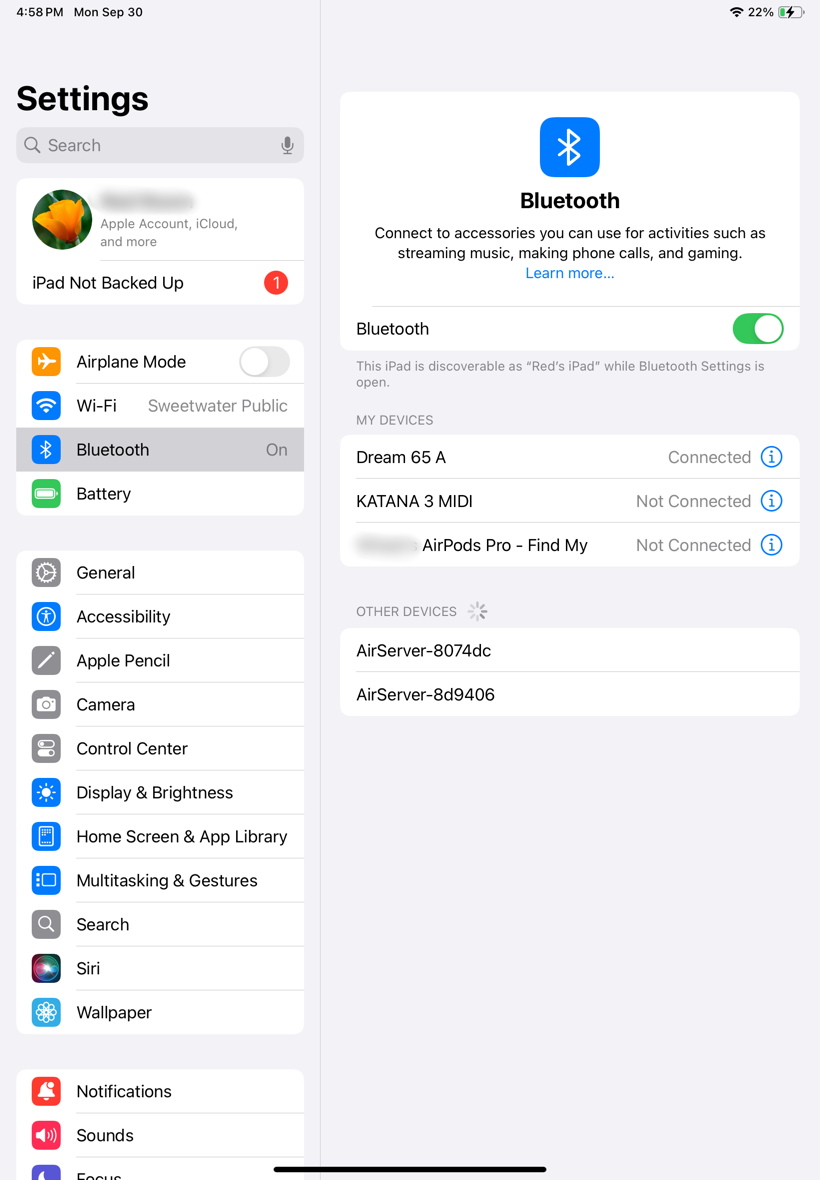
Settings > Bluetooth
Recording Audio and MIDI
On an iPad, audio will record through the built-in microphone and play back from the built-in speaker until you connect a compatible audio interface or connect to speakers or headphones for playback. Depending on the app you are using, it could be that all you have to do is to connect your audio or MIDI device. iPad-compatible devices will be enabled automatically in Settings and will appear as selectable sources within the settings of supported apps.
Connecting Your Devices
To record audio or to work with a MIDI device, all you need to do is connect the hardware, launch the app, and start recording.
Typically, USB microphones, audio interfaces, and MIDI controllers will connect with a USB cable. You’ll need to be aware of the type of USB connection on the device you are connecting and the type of cables and adapters you need to connect to the iPad. Your device may have come with more than one cable for use in connecting to different kinds of ports, so consult the documentation that came with your device.
Learn more in our SweetCare guide What is USB? and its section What Are the Common USB Cables?
If you have a recent iPad with the USB-C connector, that’s the most convenient kind of connection to make, with the appropriate cables. Some high-end iPads have a Thunderbolt port, which also uses the USB-C connector jack. You can connect a device that uses USB to this port, just as you can to a Mac, because Thunderbolt is backward-compatible with USB.
On the other hand, if you have an iPad with an Apple Lightning connector and your device didn’t come with a custom cable for that, then you may need one of Apple’s camera adapters to connect your device’s USB connection to the iPad’s Lightning port. Consult the documentation that came with the device you are connecting.
Some devices require an additional power connection, rather than being powered from the iPad. Use compatible cables and power supplies according to the specifications in your device’s documentation.
iPadOS Privacy & Security in Settings

Settings > Privacy & Security > Bluetooth
and Settings > Privacy & Security > Microphone
In iPadOS, for security reasons, you must allow or grant permission for each app that requests access to certain resources. For example, when you launch any app that can record audio, the first time it launches, iPadOS will prompt you with a message that says the app requests permission to use the microphone. This does not just apply to the built-in microphone on the iPad; it also applies to any external microphones or line-level audio sources. If you don’t grant permission in the dialog that appears, then your app is prevented from recording any external audio signal.
This also applies to other resources such as Bluetooth and your phone’s camera; you will be prompted to allow access in each case.
In Settings > Privacy & Security, in sections including Bluetooth, Camera, and Microphone, you can see a list of all apps to which permission has been granted, and you can turn them on and off as desired.
Starting a Recording Session
- Connect your device to your iPad.
- If your device has a companion app to configure the device, download it and follow the on-screen instructions.
- Launch your DAW or your recording app, create a new project, and start recording. You may need to create and configure a track on which to record your audio or your MIDI data.
- If the connected device doesn’t appear to respond, double-check that it is selected in the app’s audio and MIDI settings.
- Make music!
Transfer Projects and Files from iPadOS
You can transfer projects and files from your iPad to another iPad, to a Mac or Windows computer, or, on some models of iPad, to external hard drives. There are several methods for doing this.
Transfer files with AirDrop
AirDrop is a wireless method of file transfer between your iPad and nearby Apple devices over Bluetooth or Wi-Fi.
Learn more in the Apple support article Use AirDrop on iPad to send items to nearby Apple devices.
Transfer files with iCloud
If you have iCloud set up on your iPad and your app is configured to use iCloud, then a copy of your file is already in your iCloud account. Access iCloud on your Mac, your iPhone, your other Apple device, or through a web browser on any computer or device by logging in to your account at icloud.com.
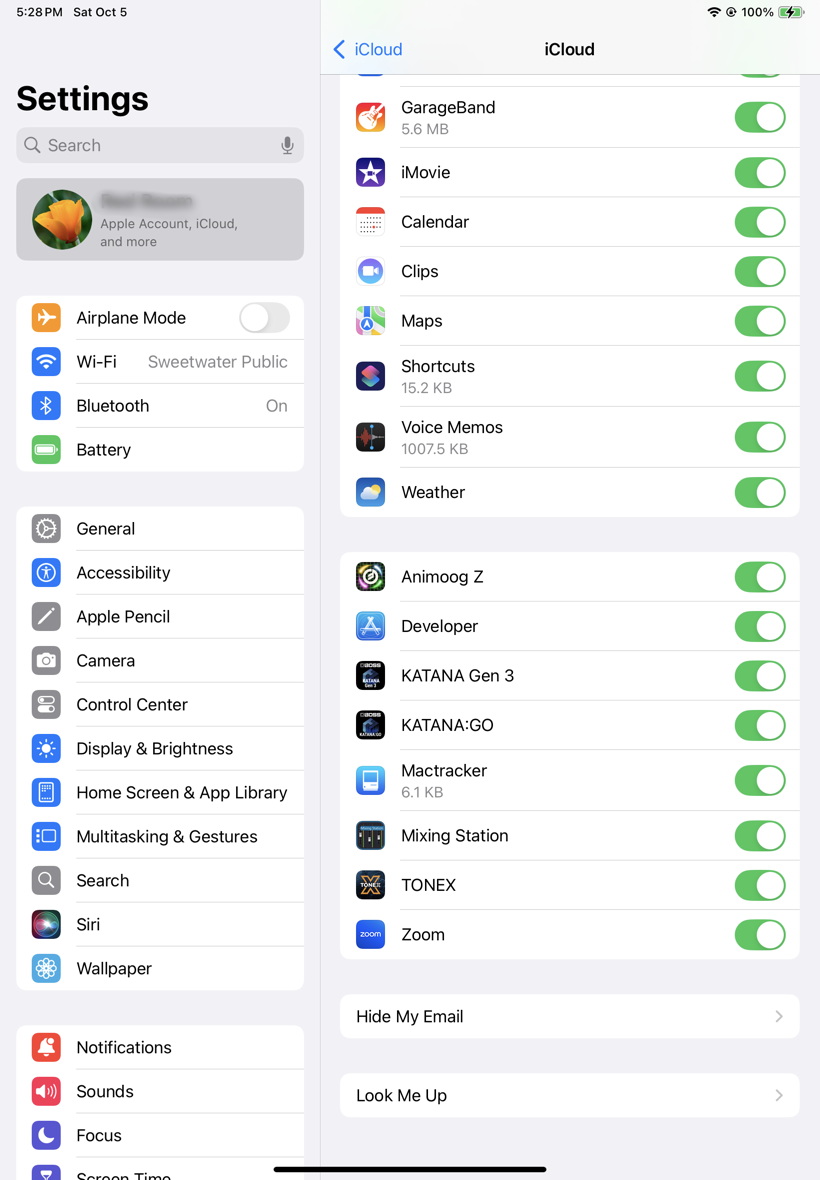
Settings shows apps configured to use iCloud.
To see what apps on your iPad are configured to save documents to iCloud, go to Settings and tap your Apple ID name. Then tap iCloud. In the pane on the right, across from Saved to iCloud, tap See All >. Scroll down to see a list of all apps on your iPad that are configured to use iCloud.
Learn more in the Apple support article Automatically keep your files up to date on your iPad and computer with iCloud.
Transfer files by other means

Using the Share feature on iPad
Use the Files app to find your files, and use the Share feature to send a copy to another device.
In Files, tap and hold on a file, and in the contextual menu, tap Share.
In the next dialog, you can decide how to send a copy. If it’s a small file, you can attach it to an email or to a message. If you have set up cloud-based sharing apps such as DropBox, you can send a copy of the file to that service. Swipe to the left and tap More to see a list of installed apps you can use.
It’s also possible to transfer to an external hard drive or to a storage device, or even to a file server on your network.
Learn more in the Apple support article Transfer files from iPad to a storage device, a server, or the cloud.
iPadOS 26 Audio and Recording Features
With iPadOS 18, Apple added new features which are further expanded in iPadOS 26 on supported models of iPad.
Select an audio input source
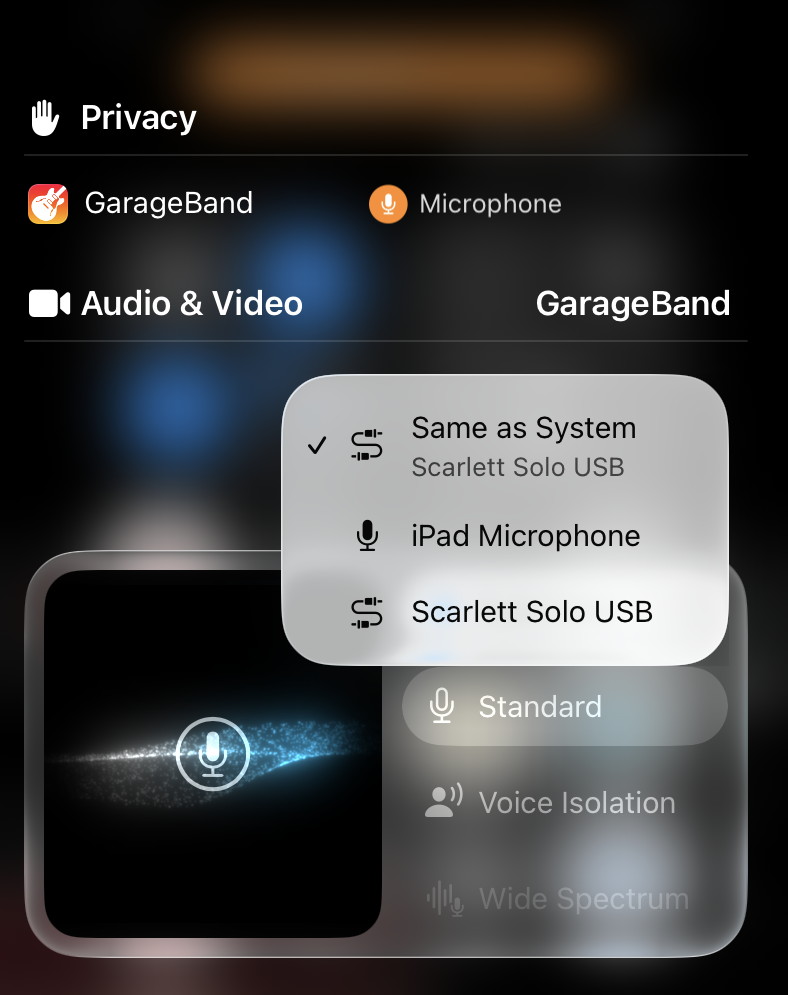
Selecting an audio input source for GarageBand in iPadOS 26
With iPadOS 26, you can have more than one audio interface or microphone connected by USB-C, and choose which one to use while you are in an app. You can also select the built-in microphone.
- Open the app you want to use, or the website you want to record from.
- Swipe from the upper right to open Control Center. You’ll see a small orange bar with the name of the app at the top. Tap it.
- You’ll see a bar with a microphone icon labeled Input. Tap it.
- A pop-up menu will display connected audio sources. Select the one you want.
Now close the Control Center and return to your app.
Voice Isolation and Mic Settings
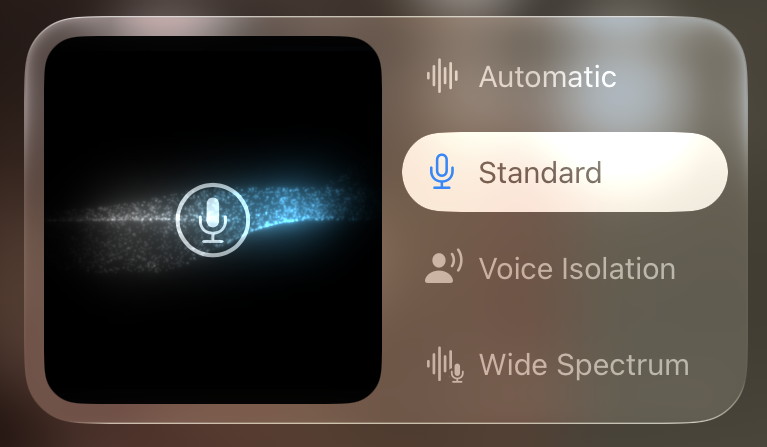
Selecting Mic Settings
With iPadOS 26 on certain recent-model iPads, Apple provides different audio modes that are system-wide and affect recording with the iPad’s internal microphone, an external USB microphone, or a line or mic signal from an audio interface.
In any app, open the Control Center and tap the orange bar with the name of the app. Below the Input bar, you will also see these mic settings.
- Voice Isolation uses noise cancellation and filtering to remove everything but the voice of the person using the iPad. It’s designed for videoconferencing with human speech.
- Standard is “standard voice processing” which includes some filtering if used with the internal microphone, but should be “flat” when using an audio interface or USB microphone.
- Automatic will automatically select between Standard and Voice Isolation based on context.
- Wide Spectrum is only available in certain apps such as FaceTime with the internal iPad microphone. This is a “flat” setting with no filters.
If you are recording musical instruments or anything other than one human voice through an audio interface or external microphone, make sure you select “Standard.” If your input is set to “Voice Isolation” by accident, the noise cancellation and filtering will completely eliminate the sounds of the instruments you are trying to record.
Learn more in the Apple Support article Use Voice Isolation, Wide Spectrum, or Automatic Mic Mode on your iPhone and iPad
Use AirPods to record audio and control a video app
With supported models of AirPods or AirPods Pro wireless earbuds, you can use them as a microphone with a video or camera app on iPadOS 26.
With supported apps, you can also configure your AirPods for use as a remote control to start and stop recording, by pressing the stem on one of your AirPods.
Follow the instructions in Apple’s AirPods User Guide > Use AirPods with supported camera apps on iPhone or iPad.
Local Capture
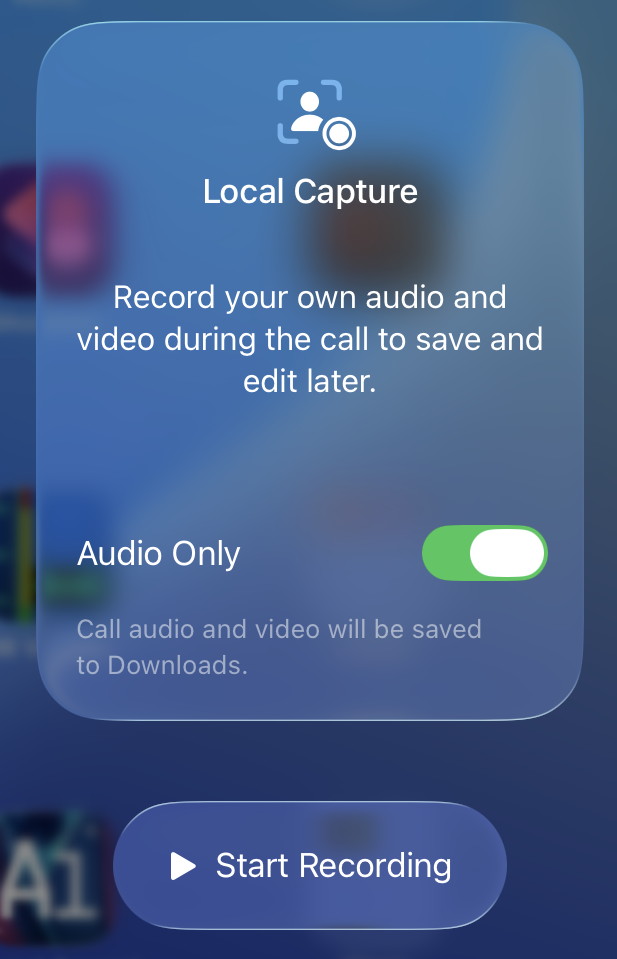
iPadOS 26 Local Capture
With iPadOS 26 on a supported model of iPad, when using a videoconferencing app, you can make your own high-resolution local recording of your side of the call, with only the video recorded by your iPad’s camera, and only your audio track.
When Local Capture is in use, Voice Isolation will be bypassed, so your local audio will be recorded unfiltered.
When you session is over the recording is saved to your Downloads folder in the Files app. You can then share the recording, sending it to the person doing post-production on the session.
To enable Local Capture, add its icon to the Control Center.
- Open Control Center.
- Tap the Plus button at the top left.
- Tap the bottom-most button, then tap Add a Control to open the controls gallery.
- In the search bar, type “Local Capture.” Add this to your Control Center.
- Swipe up from the bottom of the screen to close Control Center.
To make a Local Capture recording
- Open the videoconferencing app you want to record from.
- Open Control Center
- Touch and hold the Local Capture icon.
- Tap Start Recording. You have the option to choose Audio Only if you don’t need a video recording.
Learn more in Apple’s iPad User Guide for iPadOS 26: Record audio and video on iPad.
Related Articles
When you need help, Sweetwater has the answers!
Our knowledge base contains over 28,000 expertly written tech articles that will give you answers and help you get the most out of your gear. Our pro musicians and gear experts update content daily to keep you informed and on your way. Best of all, it’s totally FREE, and it’s just another reason that you get more at Sweetwater.com.


Offer applies only to single-receipt qualifying purchases. Select manufacturers may require that only the manufacturer’s products qualify towards the minimum purchase amount needed to be eligible for promotional financing. Otherwise, an invoice that meets the minimum purchase amount and contains at least one qualifying manufacturer product is eligible for promotional financing. No interest will be charged on promo purchase balance, and equal monthly payments are required on promo purchase until it is paid in full. The payments equal the amount financed divided by the number of months in the promo period, rounded up to the next whole dollar. These payments may be higher than the payments that would be required if this purchase was a non-promo purchase. During the last month(s) of the promo period the required monthly payment may be reduced due to the prior months’ rounding. Regular account terms apply to non-promo purchases. New Accounts as of 07/31/2025: Purchase APR is 34.99%. Penalty APR is 39.99%. Min Interest Charge is $2. Existing cardholders: See your credit card agreement terms. Subject to credit approval.
Offer applies only to single-receipt qualifying purchases. No interest will be charged on the promo balance if you pay it off, in full, within the promo period. If you do not, interest will be charged on the promo balance from the purchase date. The required minimum monthly payments may or may not pay off the promo balance before the end of the promo period, depending on purchase amount, promo length and payment allocation. Regular account terms apply to non-promo purchases and, after promo period ends, to the promo balance. New Accounts as of 07/31/2025: Purchase APR is 34.99%. Penalty APR is 39.99%. Min Interest Charge is $2. Existing cardholders: See your credit card agreement terms. Subject to credit approval.
The estimated required monthly payment shown which excludes taxes and delivery equals the amount financed divided by the number of months in the promo period, rounded up to the next cent. During the last month(s) of the promo period the required monthly payment may be reduced due to this rounding. These payments apply only with the financing offer shown. If you make these payments by the due date each month, you should pay off this amount financed within the promo period, if it is the only balance you are paying off. If you have other balances on your account, this payment will be added to any other minimum monthly payments.
Applies only to select items from this manufacturer. Ask your Sweetwater Sales Engineer for more details.