
Getting Started with the Moog Subsequent 25

Congratulations on purchasing a synthesizer that combines the genuine Moog sound and its hands-on control with the convenient workflow of a modern sound-design instrument.
You can take full advantage of the Subsequent 25 by using its Editor/Librarian app for Mac and Windows PC, which allows editing and stores hundreds of presets. The Editor provides an easy-to-use, on-screen display of parameters that are otherwise difficult to access from the Subsequent 25’s front panel. The Editor also provides a plug-in for your DAW that enables you to automate Subsequent 25 parameters for expressive performance.
This Sweetwater Quickstart Guide is designed to help you in your first days as you discover this classic synth’s formidable sonic power. Let’s get started.
- Find the Moog Reference Guide
- Register Your Purchase with Moog
- Inputs, Outputs, and Connections
- Let’s Play!
- Shift Mode and Hidden Parameters
- Using the Subsequent 25 with your DAW
- New to Synthesis?
Find the Moog Quick Reference Guide
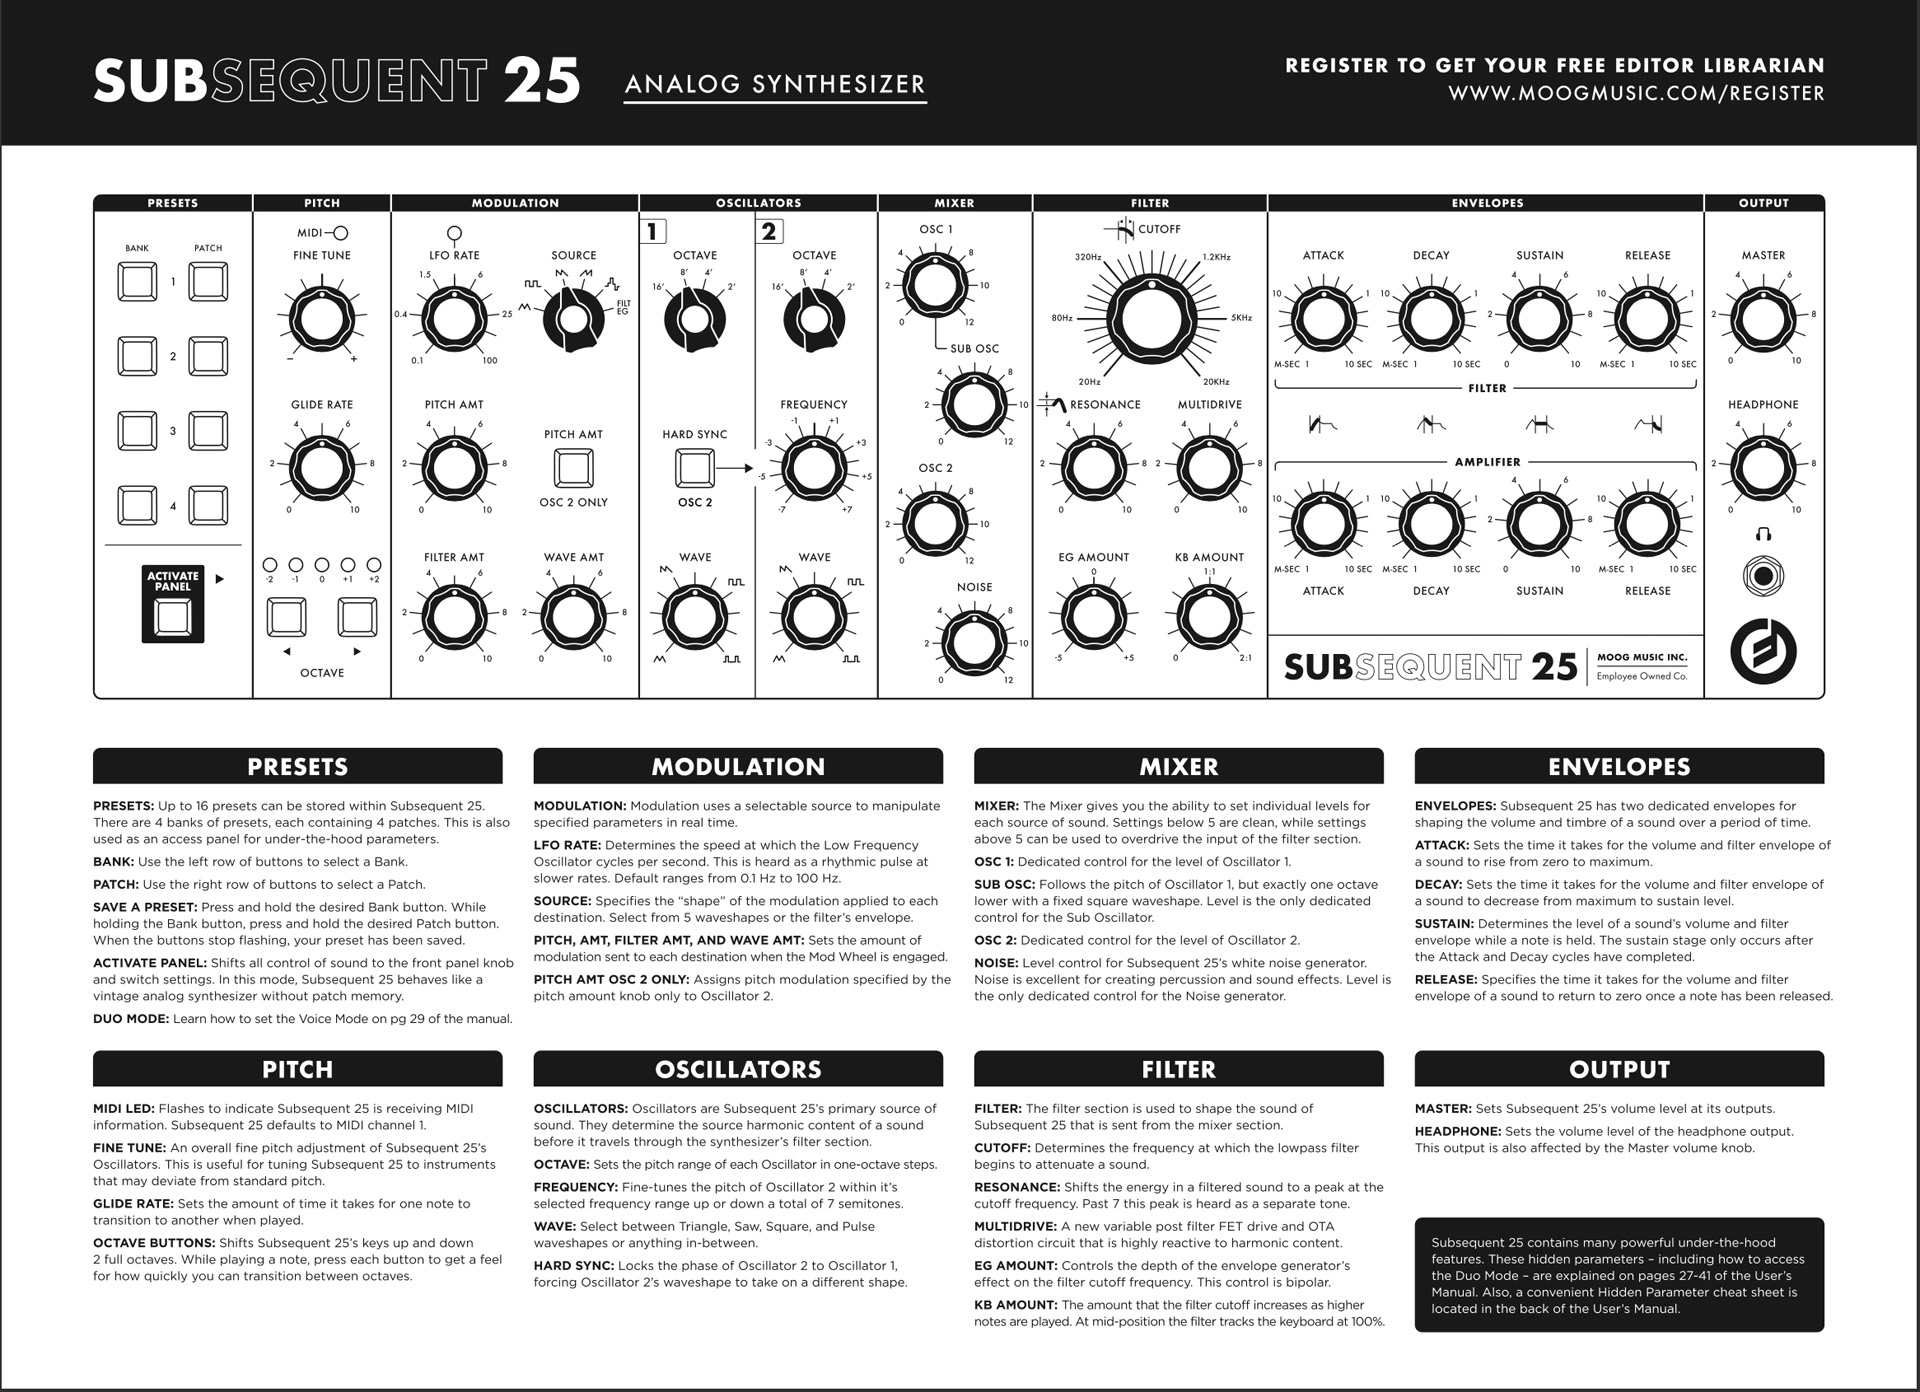
When you open the box, there will be a large piece of kraft paper with the Moog logo covering the instrument. On the back side is a reference guide. Keep it handy. You can also download this guide as a PDF at this link.
Register Your Purchase with Moog
Register by creating an account at www.moogmusic.com/register.
After you have registered your instrument, the Editor/Librarian app will become available for download on your account page.
Inputs, Outputs, and Connections
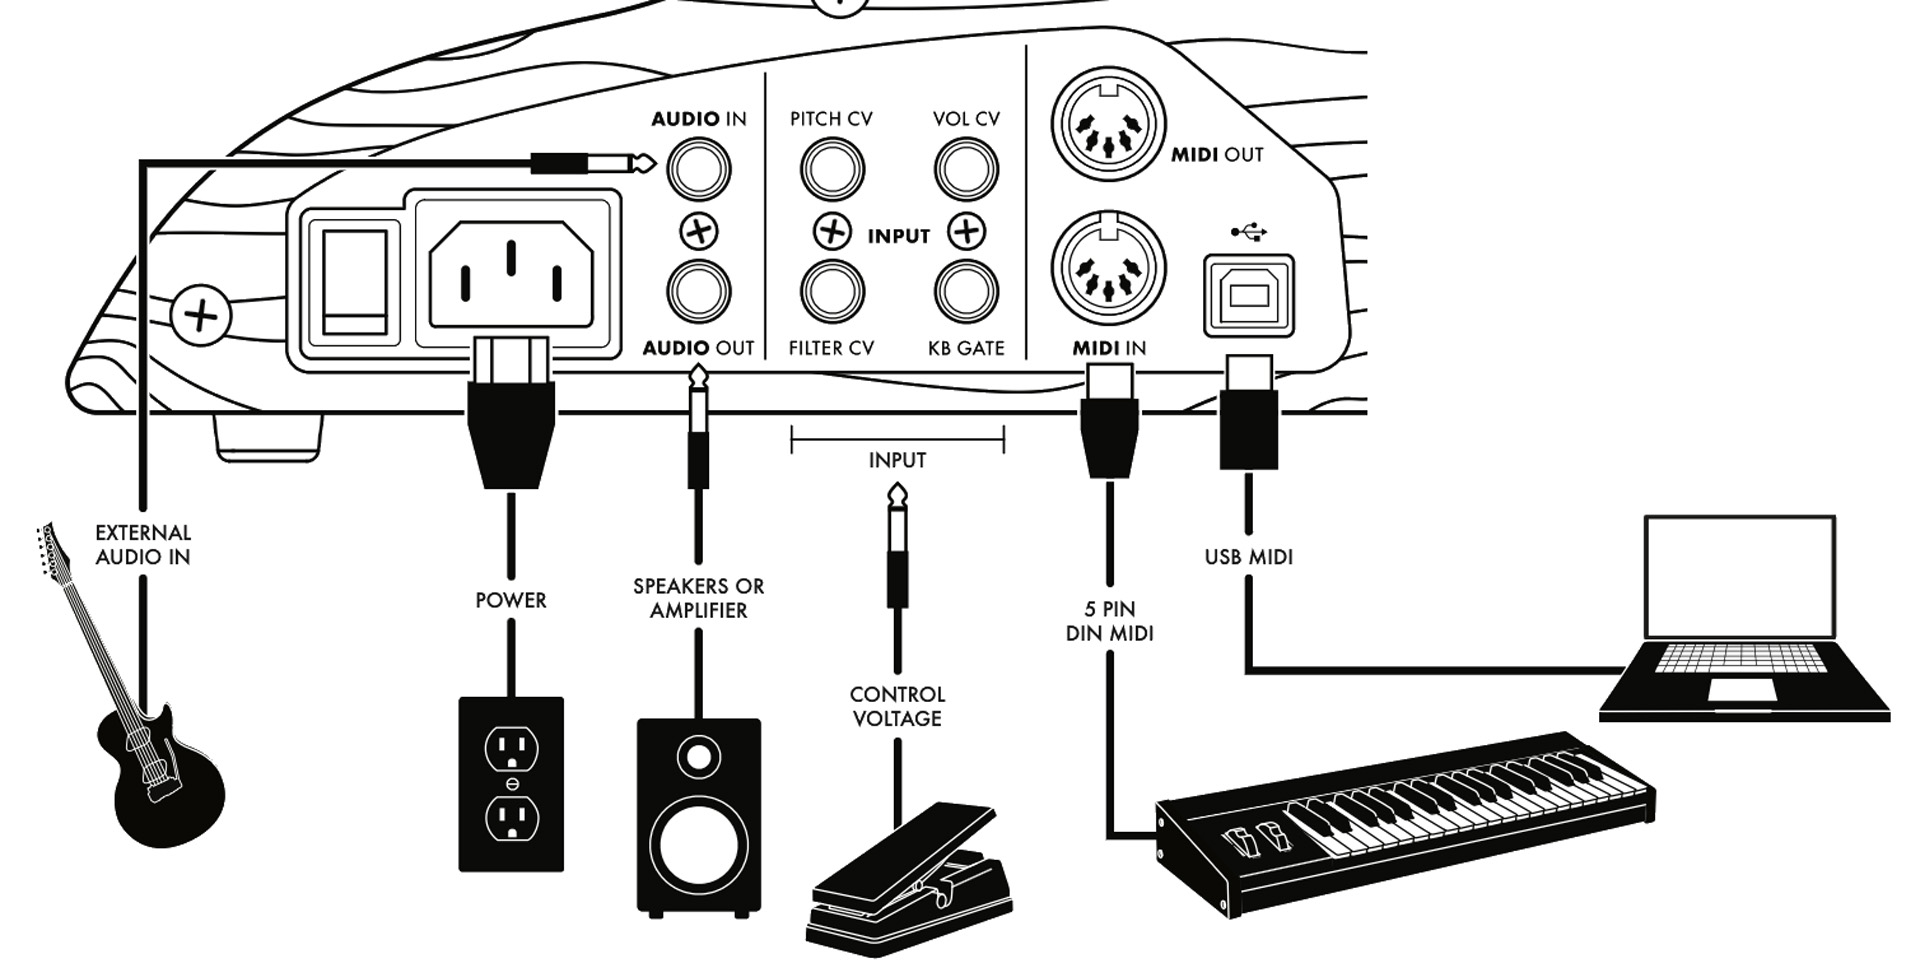
Audio Out
On the side panel, use an unbalanced, TS ¼-inch instrument cable to connect the Audio Out to a speaker, a mixer, or an audio interface.
USB connection
Connect a USB cable to your Mac or Windows PC to send MIDI data to and from the Subsequent 25 Editor/Librarian app, discussed below. The Subsequent 25 does not transmit audio over USB.
MIDI OUT and MIDI IN
You can also connect standard 5-pin MIDI cables to other MIDI devices.
Advanced Features
The Subsequent 25 provides optional advanced features for real-time expression.
Control voltage expression pedals
You can connect one or more Moog EP-3 universal polarity expression pedals (not included) or other control voltage expression pedals to the Pitch CV, Vol CV, or Filter CV input jacks.
KB GATE
The KB GATE input accepts a +5-volt signal which triggers the Subsequent 25’s envelopes, as on a modular synthesizer.
Audio In
The Audio In jack can accept an external audio input, such as a guitar or another synthesizer, for filtering and processing.
Let’s Play!
TIP: Let it warm up. The tuning may not be stable until the unit has been powered on for a couple minutes.
With the Master Volume on the Subsequent 25 turned all the way down, power on your mixer, speakers, or audio interface. Then power on the Subsequent 25 and gradually turn up the volume.
Headphones
You can connect headphones to the jack on the lower right corner of the front panel. First, turn the Headphones Volume to zero, then plug in the headphones. The Headphones Volume is governed by the setting of the Output Volume. Gradually turn up the Headphones Volume.
Presets and programming
Have a look at the reference guide.

The Subsequent 25 has four banks of four presets for a total of 16 sounds. You can start playing right away by selecting a BANK button and then a PATCH button.
Spend some time playing with each preset. Turn some knobs in the different sections of the synthesizer to get a feel for how each parameter alters the sound.
Preset and Panel modes
Pressing the ACTIVATE PANEL button puts the Subsequent 25 in Panel mode. Pressing it again returns the Subsequent 25 to Preset mode.
In Panel mode, the front-panel settings determine the sound rather than a stored preset. The current position of each knob and the status of each button determine the nature of the sound. Creating sounds in Panel mode is like dialing up sounds in a synth without preset memory, but when you’re finished creating your settings, you can save your work.
Saving a preset
To save a preset, press and hold two buttons simultaneously: the BANK button and the PATCH button corresponding to the location where you want to store your new preset. Hold both buttons for at least one second, then release them. Both buttons will flash and then go solid again to indicate that the preset has been stored. Saving a preset to a particular location will overwrite the previous preset.
Creating a new sound
You can start with a blank slate with the Patch Initialization procedure:
- Press the ACTIVATE PANEL button.
- In the FILTER section, turn the CUTOFF knob all the way up, the EG AMOUNT to the center position, and the remaining knobs all the way down.
- In the ENVELOPES section, turn the SUSTAIN knobs all the way up and the remaining knobs all the way down.
- Set the OCTAVE knobs for both Oscillators to 16′ and center the OSCILLATOR section’s remaining knobs. The HARD SYNC OSC 2 and PITCH AMT OSC 2 ONLY buttons should be turned off.
- In the MODULATION section, turn the LFO RATE to 8 and the remaining knobs all the way down. Turn the MOD wheel all the way down.
- Turn all MIXER knobs fully counterclockwise.
Having initialized the front panel, you won’t hear anything when you play the keys. You can now start to build a sound from scratch, starting with the OSC 1 knob in the MIXER section. Follow the instructions in the User’s Manual starting on page 15.
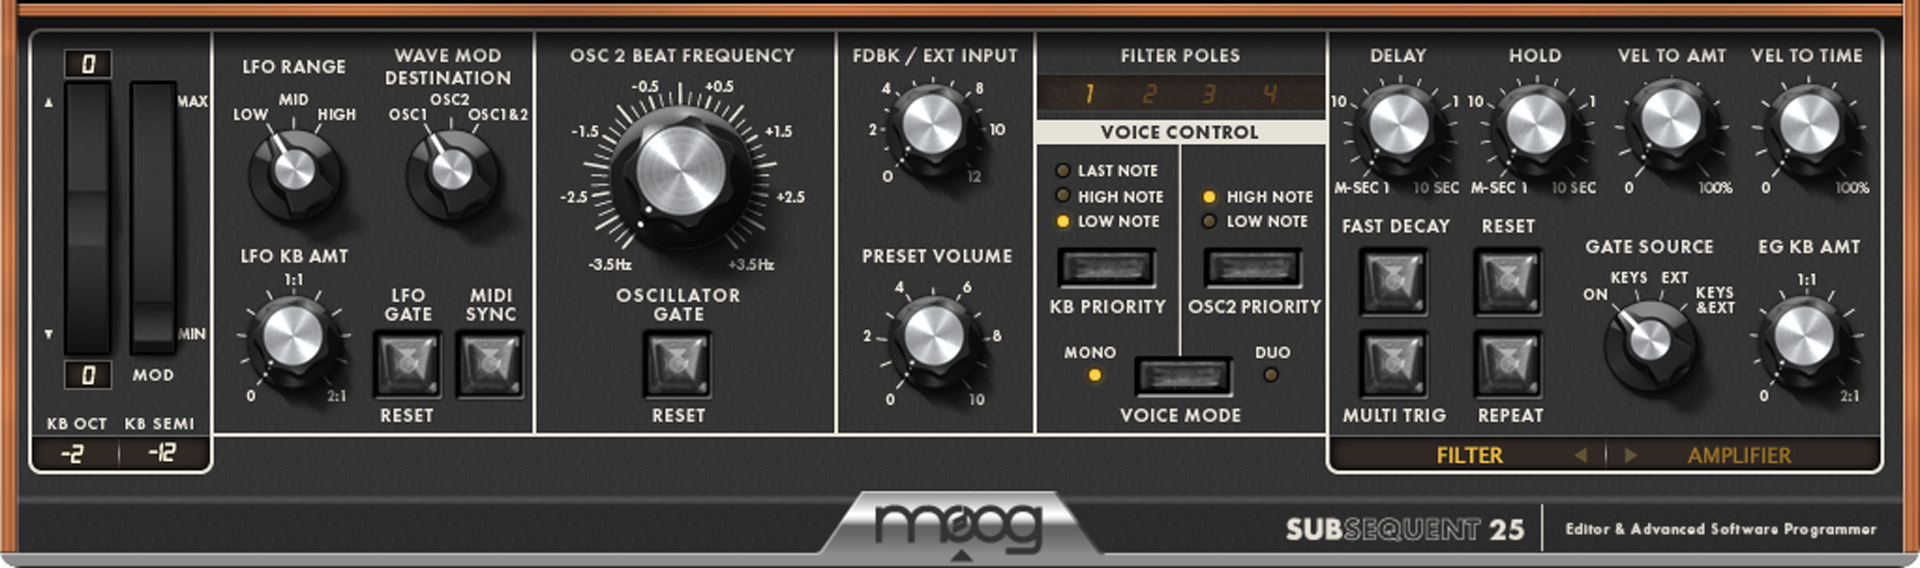
Shift Mode and Hidden Parameters
The Subsequent 25 has many parameters and settings that are not assigned to dedicated front panel knobs and buttons. Moog provides two modes to access these features: Shift Mode and Hidden Parameters.
Shift Mode reassigns certain knobs and buttons to perform secondary functions. These include parameters for Filter Envelope, Velocity to Filter, Amplifier Envelope, Oscillator, and LFO. These are explained in the User’s Manual on page 24.
Hidden Mode functions are set by pressing different combinations of the PRESETS buttons together with specific keys on the keyboard. These parameters include settings for Duo Mode, Pitch Bend, Legato Glide, Note Priority, Filter/Modulation, and global settings and system commands. Moog provides instructions for these in the User’s Manual on page 27. They also provide a reference sheet you can download: Hidden Parameter Editing.
Alternately, Moog provides an easier method. You can view and edit these Shift Mode and Hidden Parameters on your Mac or PC using the Subsequent 25 Editor/Librarian app.
Using the Subsequent 25 with Your DAW
With a MIDI over USB connection to a DAW on your Mac or Windows PC, you can leverage the full potential of the Subsequent 25.
If you are on Windows, you need to install the Moog Sub 25 USB MIDI Driver that comes with the Editor installer package for your PC to recognize the Subsequent 25’s USB connection. If you are on Mac, no driver is required.
Subsequent 25 Editor/Librarian App
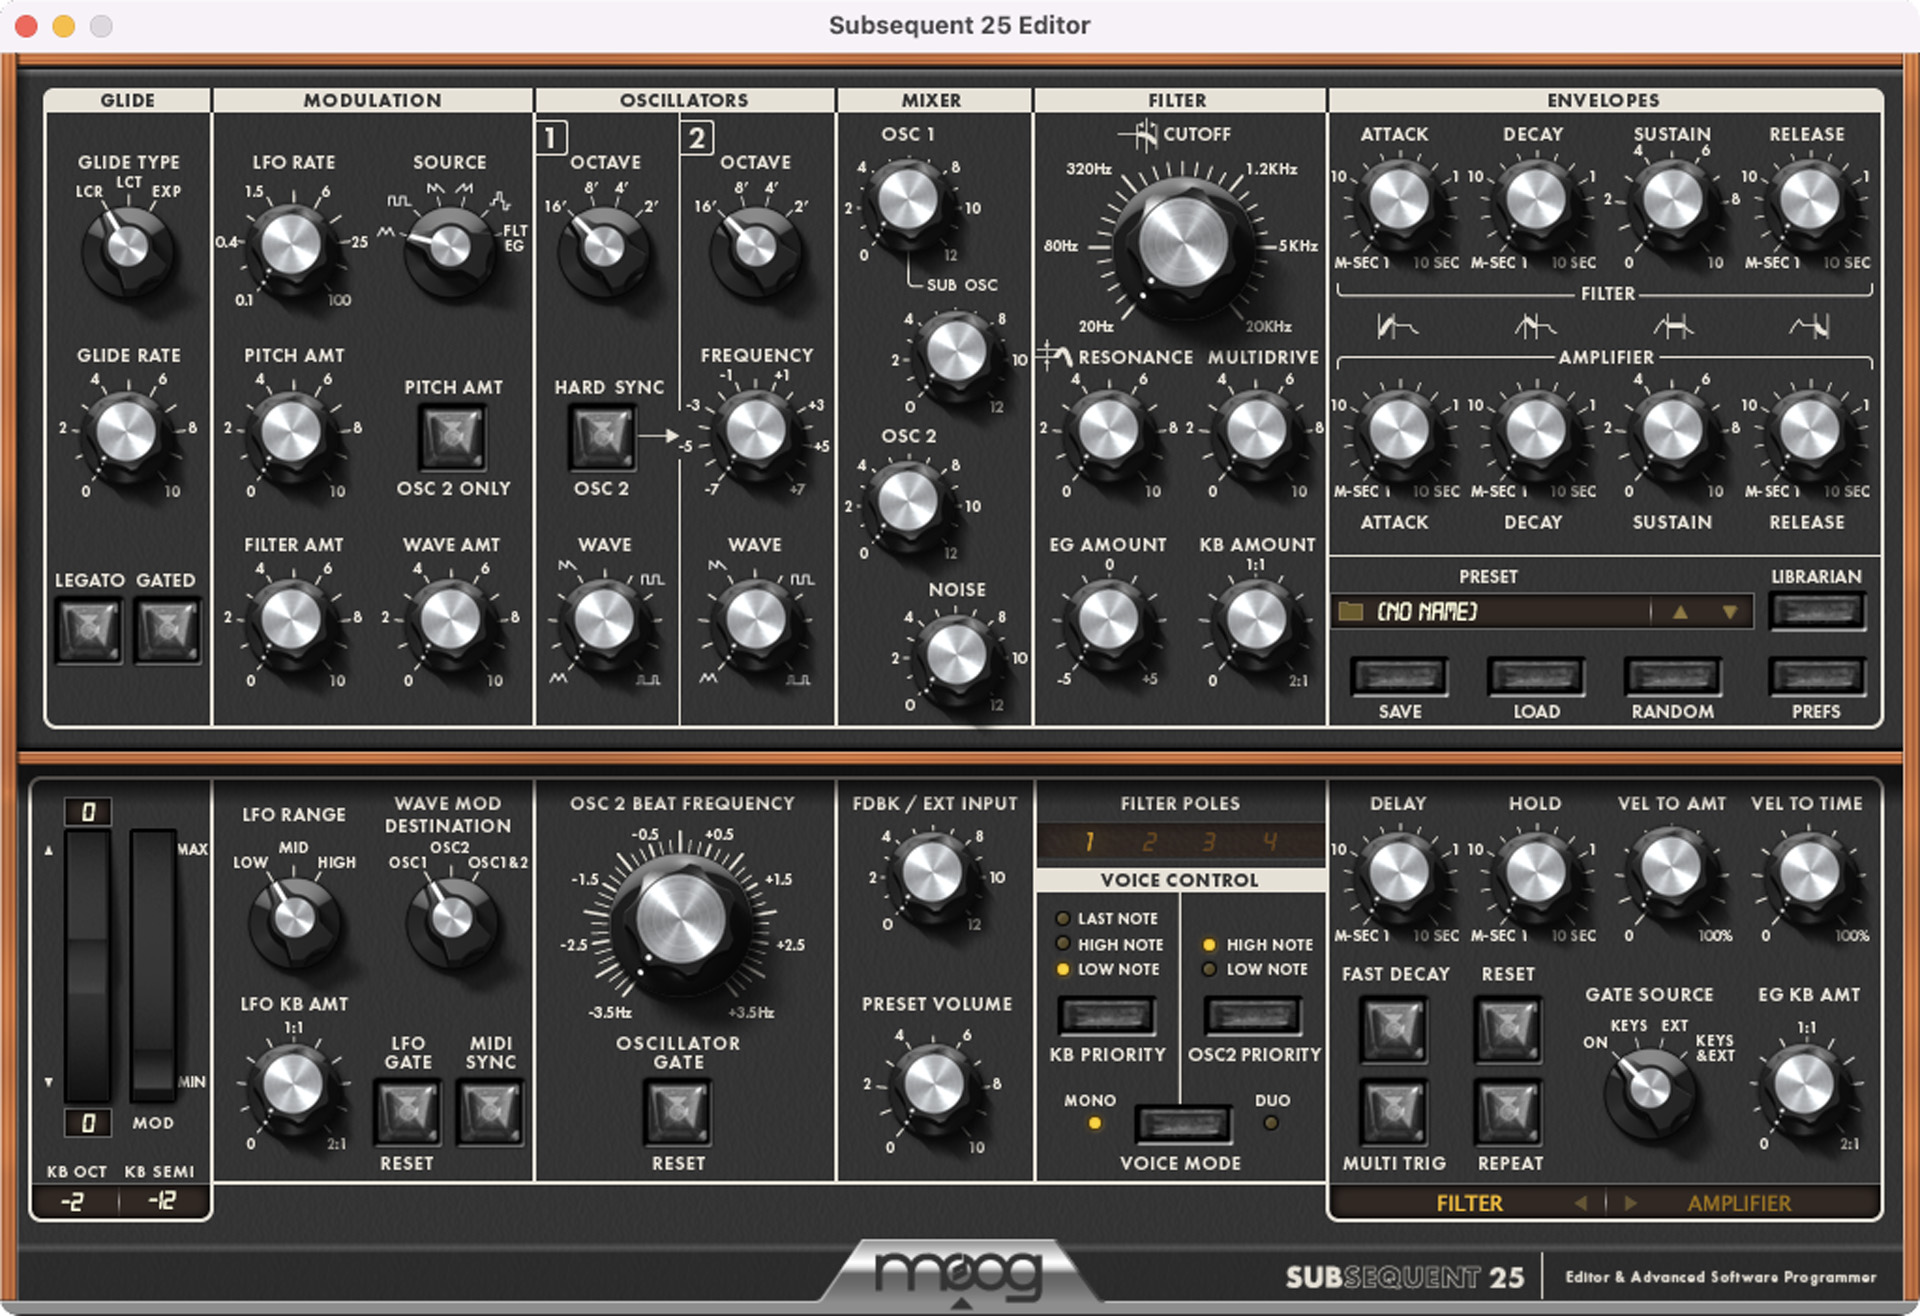
The Subsequent 25 Editor/Librarian app for Mac and Windows comes in two versions: the stand-alone app and the plug-in.
The stand-alone app is ideal for sound design and saving and loading banks of presets. Your Subsequent 25 only stores 16 presets at a time. When you connect it to the Editor/Librarian, you can access hundreds of presets provided by Moog and organized into banks and categories with names you can read.
The plug-in works within your DAW and enables automating Subsequent 25 knob parameters, so you can sequence and track expressive performances. You can play back MIDI automation of the knobs’ parameters while you play the keyboard in live performance. Alternatively, you can program musical sequences in your DAW’s piano roll or software sequencer and play them back via MIDI while manipulating parameters in real time.
The Editor only sends and receives MIDI over USB, as the Subsequent 25 does not transmit audio over USB. To record sound in your DAW, you must connect the Subsequent 25’s audio output to your audio interface.
See the Subsequent 25 Editor User’s Manual for more information.
New to Synthesis?
If you are new to synthesis, you’ve already got a great learning platform in the classic subtractive synth architecture of the Moog Subsequent 25. Sweetwater has you covered with our Synthesizer Fundamentals and Synth Clips video series. Check them out.
Related Content
When you need help, Sweetwater has the answers!
Our knowledge base contains over 28,000 expertly written tech articles that will give you answers and help you get the most out of your gear. Our pro musicians and gear experts update content daily to keep you informed and on your way. Best of all, it’s totally FREE, and it’s just another reason that you get more at Sweetwater.com.


Offer applies only to single-receipt qualifying purchases. Select manufacturers may require that only the manufacturer’s products qualify towards the minimum purchase amount needed to be eligible for promotional financing. Otherwise, an invoice that meets the minimum purchase amount and contains at least one qualifying manufacturer product is eligible for promotional financing. No interest will be charged on promo purchase balance, and equal monthly payments are required on promo purchase until it is paid in full. The payments equal the amount financed divided by the number of months in the promo period, rounded up to the next whole dollar. These payments may be higher than the payments that would be required if this purchase was a non-promo purchase. During the last month(s) of the promo period the required monthly payment may be reduced due to the prior months’ rounding. Regular account terms apply to non-promo purchases. New Accounts as of 07/31/2025: Purchase APR is 34.99%. Penalty APR is 39.99%. Min Interest Charge is $2. Existing cardholders: See your credit card agreement terms. Subject to credit approval.
Offer applies only to single-receipt qualifying purchases. No interest will be charged on the promo balance if you pay it off, in full, within the promo period. If you do not, interest will be charged on the promo balance from the purchase date. The required minimum monthly payments may or may not pay off the promo balance before the end of the promo period, depending on purchase amount, promo length and payment allocation. Regular account terms apply to non-promo purchases and, after promo period ends, to the promo balance. New Accounts as of 07/31/2025: Purchase APR is 34.99%. Penalty APR is 39.99%. Min Interest Charge is $2. Existing cardholders: See your credit card agreement terms. Subject to credit approval.
The estimated required monthly payment shown which excludes taxes and delivery equals the amount financed divided by the number of months in the promo period, rounded up to the next cent. During the last month(s) of the promo period the required monthly payment may be reduced due to this rounding. These payments apply only with the financing offer shown. If you make these payments by the due date each month, you should pay off this amount financed within the promo period, if it is the only balance you are paying off. If you have other balances on your account, this payment will be added to any other minimum monthly payments.
Applies only to select items from this manufacturer. Ask your Sweetwater Sales Engineer for more details.