
Korg modwave Setup Guide
This guide will show you how to register, explain the fundamentals of, and create a sound on the Korg modwave for the first time. Follow the sections below to get started.
Register the modwave
Before we dive into using the modwave, the first thing to do is register the synth with Korg. If you register the device within the first 90 days of purchase, Korg will extend your warranty for an extra year, and you will also receive free bundled software.
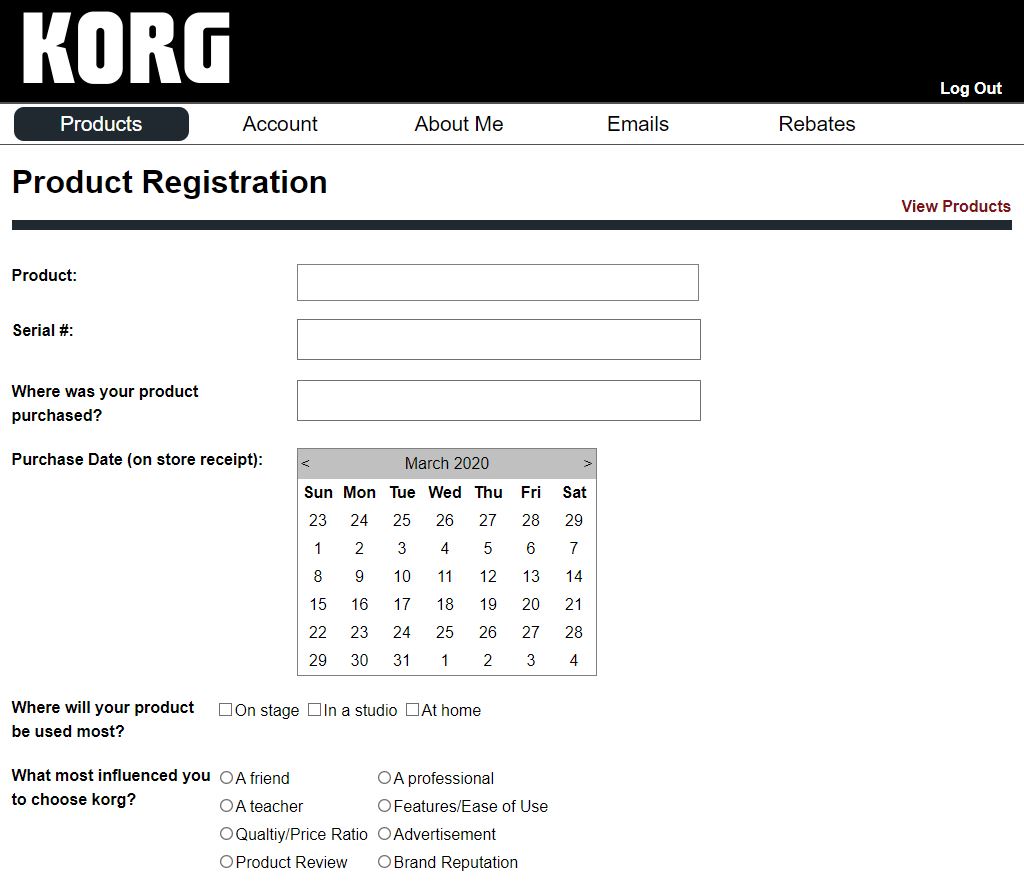
- Go to the Korg product registration page and create or log in to your Korg account.
- Click Register a Product, fill out the required information on your account page, then click Save.
- Keep your Sweetwater invoice handy as you’ll need to enter the purchase date.
Register the software bundle
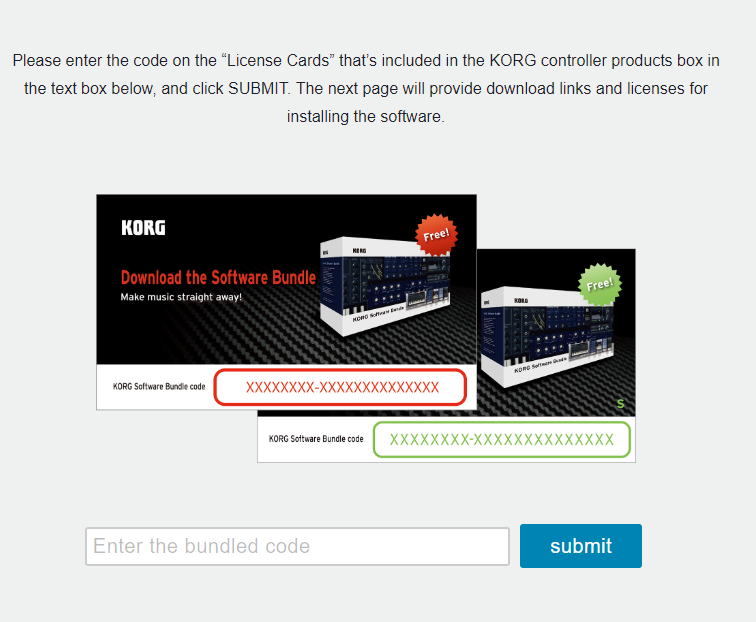
When you purchase the Korg modwave, you’ll gain access to a large sound bundle, including virtual instruments, DAWs, effects plug-ins, and more! All you need to do is go to the Korg License Center page, enter the bundle code number on the card included in the box, and click Submit. Once complete, you’ll receive licenses and activation instructions for each piece of software.
Click here to register your modwave.
Click here to register your software bundle.
Setup and connections
Before you start playing, you’ll first need to get everything set up and connected. It’s straightforward, but here are a few things to take note of when connecting your gear to the modwave:
- Always connect your speakers (or headphones) before turning the unit on.
- Always turn off the modwave before turning the unit off.
- When connecting the modwave to your computer, be sure to connect it directly to your computer. This is particularly important when updating your firmware. While you can plug it into a USB hub, there may be connectivity issues.
Modwave terminology
Before we show you how to create a Performance (patch), you want to learn the terminology to know how each piece fits the puzzle.
- Voice: The voice is the heart of a performance. This includes the oscillators, pitch, LFOs, ADSR, filter, amp, and the mod matrix (Kaoss Physics, mod knobs, mod processors). Learn more about voice assignments here.
- Programs: Programs “house” the voices and include the Pre FX and voice assignment. Learn more about program setup.
- Layers: The Layers contain each program, the arpeggiator, and other settings like the MIDI key and channel, velocity zones, and volume. Check out the manual to learn more about how to set up Layers.
- You can have up to two Layers per Performance and can edit one Layer at a time.
- Performance: The Performance is the final patch. Only one Performance can be played at a time but can have two Layers. Check out page 13 of the manual to learn how to set up Performances.
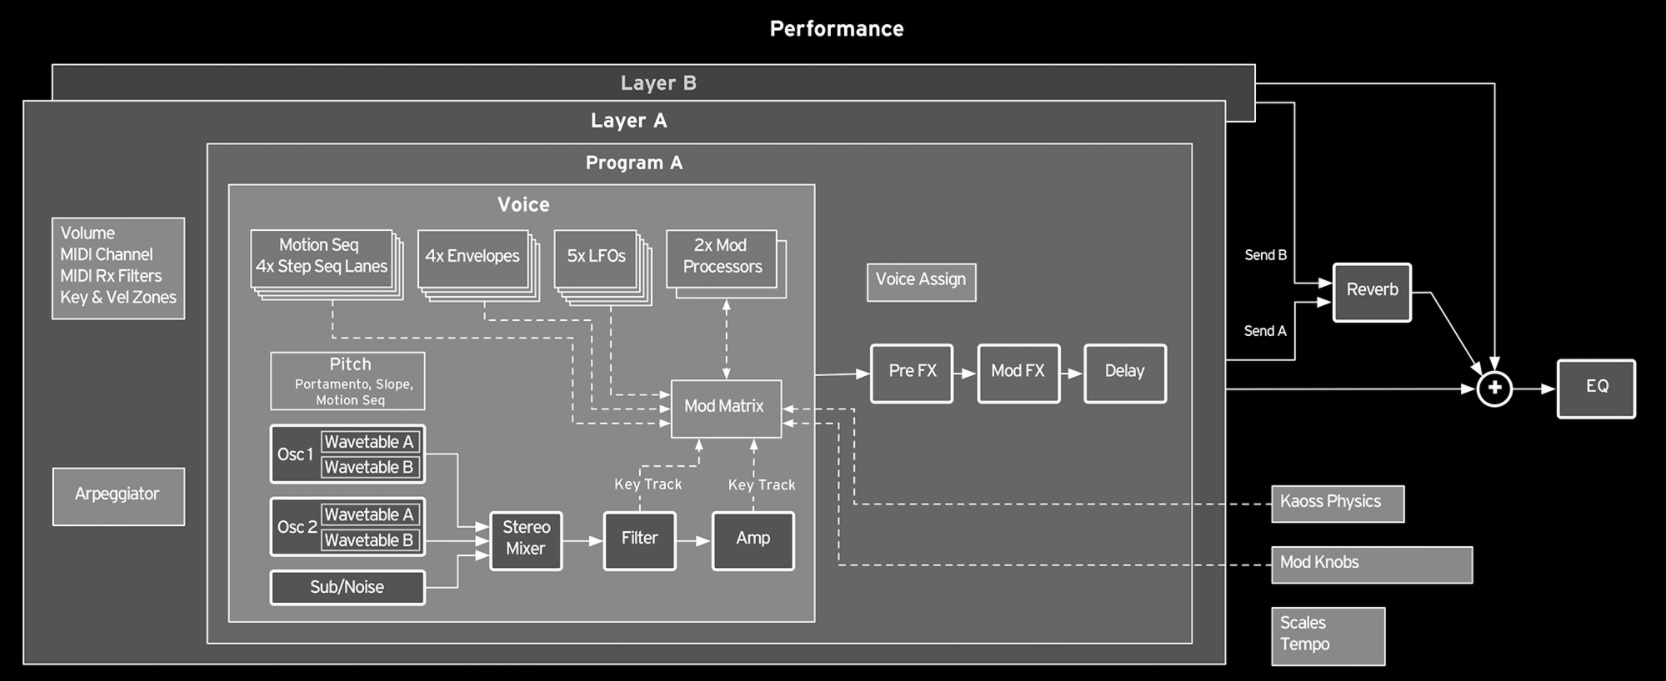
modwave Performance structure
Lanes
Lanes allow you to assign different parameters at different lengths individually. You can create seven types of Lanes: Timing, Sample, Pitch, Master, Shape, Gate, and Step Sequencing. Each Lane will control a specific parameter on each step of the Layer, and each bank can have up to 64 steps (16 steps in four banks) in each Lane. To put it in simple terms, think of Lanes as individual tracks in your recording software.
Here’s how each type of Lane works:
- Timing: Adjusts each step’s speed, length, and crossfade controls. Use this in conjunction with the Sample Lane to create smooth crossfades and unique rhythmic patterns.
- Sample: This changes the sample of the selected Layer. If you want to change the sound of a single step, hold the ENTER button and press the step you want to change.
- Pitch: In its simplest form, you can change the pitch, semitone, and transposition of individual steps. It’s different from the arpeggiator in that it is note-based and starts at every step, rather than notes that are time-synced.
- Shape: The Shape lets you change the shape of the waveform of the currently selected step. It can also affect the Pitch and Step Sequencing lanes if it’s turned on in those lanes.
- Gate: The Gate will adjust how long the note is held for each step.
- Step Seq: This lane works hand in hand with modulation. You can adjust the value of a particular type of modulation on a per-step basis.
- Master: Restarts all of the lanes mentioned above after a specified time/beat. To turn it on, hold SHIFT and press the MASTER button.

modwave lane structure
How to create a Performance
Now that you’ve learned the building blocks of a modwave Performance, let’s create one from scratch. With the number of options and controls you have available, the possibilities are endless! When you’re on the home screen, you will see the Performance that is currently loaded, the Layers that the Performance is composed of, what the Mod knobs are set to, and the Koass Physics display.
- Press the Enter (home)button and use the Value knob to scroll through sounds. In this case, you will want to select Init Performance.
- Press the Wave Select button in the OSC 1 section, then press the Osc/Mode button to select A, A/B, or Sample.
- A = one wavetable, A/B = 2 wavetables, Sample = Multisample
- Use the Value knob to select the wavetable you wish to have. Follow the same procedure if you want to use OSC 2.
- Go through and edit any other parameters you’d like.
- If you want to add a second layer, double-tap the B button in the Layers section (next to the Volume knob) to select it, then follow the steps outlined above.
- Once complete, press the Write button, update the Performance’s name, press Write to overwrite the current Performance, or press SHIFT + Write to save it as a new user preset.
- Press Enter to confirm.
Kaoss Physics
What sets the modwave apart from other synths is the built-in Kaoss Physics engine controlled by the touchpad. Think of it as a bouncy ball rolling around the floor.
You can hold your finger on the pad while moving it for fine control, or you can flick it and watch the “ball” bounce across the display, like a pinball machine. You can also “launch” it automatically when using a custom trigger source. What’s more, you can edit the behavior of the four “walls” (edges of the display). You can customize the speed at which the ball will bounce, and you can even remove them!
To enable the Kaoss Physics, press the SHIFT + Kaoss buttons and turn Physics on. When Physics is turned off, the pad will act like a standard X-Y pad.
There are plenty of presets and functions you can control, so be sure to check out the Kaoss section of the modwave owner’s manual to learn more!
Additional Korg resources
This article only scratches the surface, so check out the modwave owner’s manual for more information.
Related Articles
When you need help, Sweetwater has the answers!
Our knowledge base contains over 28,000 expertly written tech articles that will give you answers and help you get the most out of your gear. Our pro musicians and gear experts update content daily to keep you informed and on your way. Best of all, it’s totally FREE, and it’s just another reason that you get more at Sweetwater.com.


Offer applies only to single-receipt qualifying purchases. Select manufacturers may require that only the manufacturer’s products qualify towards the minimum purchase amount needed to be eligible for promotional financing. Otherwise, an invoice that meets the minimum purchase amount and contains at least one qualifying manufacturer product is eligible for promotional financing. No interest will be charged on promo purchase balance, and equal monthly payments are required on promo purchase until it is paid in full. The payments equal the amount financed divided by the number of months in the promo period, rounded up to the next whole dollar. These payments may be higher than the payments that would be required if this purchase was a non-promo purchase. During the last month(s) of the promo period the required monthly payment may be reduced due to the prior months’ rounding. Regular account terms apply to non-promo purchases. New Accounts as of 07/31/2025: Purchase APR is 34.99%. Penalty APR is 39.99%. Min Interest Charge is $2. Existing cardholders: See your credit card agreement terms. Subject to credit approval.
Offer applies only to single-receipt qualifying purchases. No interest will be charged on the promo balance if you pay it off, in full, within the promo period. If you do not, interest will be charged on the promo balance from the purchase date. The required minimum monthly payments may or may not pay off the promo balance before the end of the promo period, depending on purchase amount, promo length and payment allocation. Regular account terms apply to non-promo purchases and, after promo period ends, to the promo balance. New Accounts as of 07/31/2025: Purchase APR is 34.99%. Penalty APR is 39.99%. Min Interest Charge is $2. Existing cardholders: See your credit card agreement terms. Subject to credit approval.
The estimated required monthly payment shown which excludes taxes and delivery equals the amount financed divided by the number of months in the promo period, rounded up to the next cent. During the last month(s) of the promo period the required monthly payment may be reduced due to this rounding. These payments apply only with the financing offer shown. If you make these payments by the due date each month, you should pay off this amount financed within the promo period, if it is the only balance you are paying off. If you have other balances on your account, this payment will be added to any other minimum monthly payments.
Applies only to select items from this manufacturer. Ask your Sweetwater Sales Engineer for more details.