
Intro to Pro Tools: Creating and Recording a Track
Before recording audio, you need to create a track. Here’s how:
- Create a new session, or open an existing session.
- Choose Track>New.
- When the new tracks dialogue opens, make your selections based on what you want to do. For example, if you want to record a single track using one microphone, select 1 Mono Audio Track. You can create as many mono tracks as you have sources to record. If you want to record something in stereo, select Stereo from the second drop down menu within the new tracks dialogue. You can also select MIDI tracks from this drop down menu.
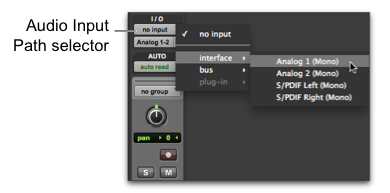
- Next, navigate to the Mix window. If it is not open, you can open it by choosing Window>Mix. Find your new track(s). In the middle of the channel strip, you’ll see two drop down menus under I/O. The top one sets your input and the bottom one sets your output for that channel. Set the inputs according to how you have your sources plugged in to your interface.
- Once you have your inputs set, press the Record Enable button for your track(s).
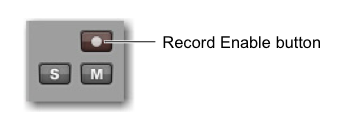 This is the red button with the circle located on the channel strip. With the track record-enabled, raise the input gain on your audio interface while singing/playing into your microphone. Watch the meter on the channel strip in Pro Tools. You’ll want to set the level so the meter shows green most of the time and yellow during louder passages. If the meter shows red, the input gain is too high.
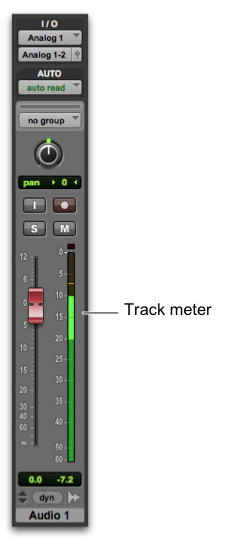
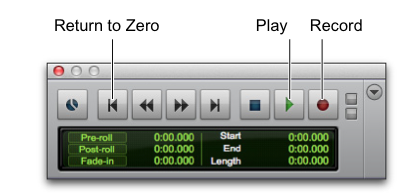
- Now that you’ve set your level, you’re ready to record. Go to the Transport Window. If it isn’t open, choose Window>Transport. If the Edit window is not open, you’ll want to open that as well by choosing Window>Edit. With the Edit window open, you can watch what happens when you record.
- Within the Transport window, click the Record button. It will start flashing. This indicates that Pro Tools is ready to record. To begin recording, press the Play button or hit the spacebar. When you are done record, press the spacebar again or click Stop in the Transport Window.
- To listen back to your recording, you need to take your track(s) out of record mode. The Record Enable button will stop flashing.
- To Start playback, click the Play button or press the spacebar. To stop, click the Stop button or press the spacebar.
- From here, you can create new tracks to layer more parts, or if you didn’t like that take, you can simply start at the beginning and record again. Note that this will erase your previous recording and replace it with the new recording.
- Make sure to save your sessions often!
When you need help, Sweetwater has the answers!
Our knowledge base contains over 28,000 expertly written tech articles that will give you answers and help you get the most out of your gear. Our pro musicians and gear experts update content daily to keep you informed and on your way. Best of all, it’s totally FREE, and it’s just another reason that you get more at Sweetwater.com.

