
How Does an Audio Interface Work?
Perhaps the most important component of any computer-based recording setup is the one right at the beginning: the digital audio interface. It’s the piece of hardware that converts your analog microphone and instrument signals into digital format and transmits the signals to your computer, where you can record and edit them in your DAW. The DAW then outputs the processed digital audio back to the audio interface, which converts digital into analog so you can monitor the sound through headphones or speakers.
Understanding how an audio interface functions will help you record with good, clean, strong signals, yielding professional results.
- But doesn’t my computer already do that?
- Analog-to-digital, digital-to-analog
- Looking at your audio interface
- Follow the signal
- Audio interface drivers
- Advanced features of an audio interface
- Audio interface optimization
But doesn’t my computer already do that?
Out of the box, a computer or device such as a phone or tablet has connections, wired or wireless, for a microphone, headphones, or speakers. There is already circuitry on board your device for converting input and output signals. There are also expansion “sound cards.” But neither provide professional-quality audio. Furthermore, your computer’s on-board audio may be liable to electromagnetic interference that can cause unwanted noises in your recording.
Some consumer microphones have a built-in USB audio interface, but you can only reliably connect one of those to a computer at a time.
If you need to record multiple microphones and channels of audio at once, such as if you are recording a band or a drum kit, an audio interface is required.
An audio interface provides all the connections you need, processes multiple channels, and greatly improves the audio quality for recording and playback. It’s crucial and essential.
Analog-to-digital, digital-to-analog
At its most basic, a digital audio interface has two components: on input, the Analog-to-digital Converter (ADC), and on output, the Digital-to-analog Converter (DAC).
Most audio interfaces also integrate an analog signal path, sending microphone signals through a preamplifier to bring up the signal level within a proper range to enable the best analog-to-digital conversion with the strongest, clearest signal and the least noise.
Analog-to-digital conversion
A microphone picks up acoustic sound waves and converts them into an analog electrical signal. (Engineers refer to a device converting one form of energy into another form as a transducer.) An electric guitar picks up the vibrations of the guitar’s strings and converts them into an analog electrical signal as well. You feed these signals into the audio interface, which carries out analog-to-digital conversion, or ADC for short. The audio interface receives the analog waveforms coming from the preamp and samples them, converting them into digital ones and zeroes. The digital signals are then transmitted through a USB or Thunderbolt cable to the computer or device.
Digital-to-analog conversion
As you record and mix, the output from your DAW is sent back to your audio interface to be converted from digital back to analog so you can hear it in high fidelity. That’s the digital-to-analog conversion, or DAC. The digital signal is sent to the audio interface’s headphone amplifier, the line output for speakers, or both. If your audio interface has multiple outputs, you can configure multiple returns.
If you want to delve into the technical details of how analog audio is converted to the digital domain, check out this Sweetwater inSync article:
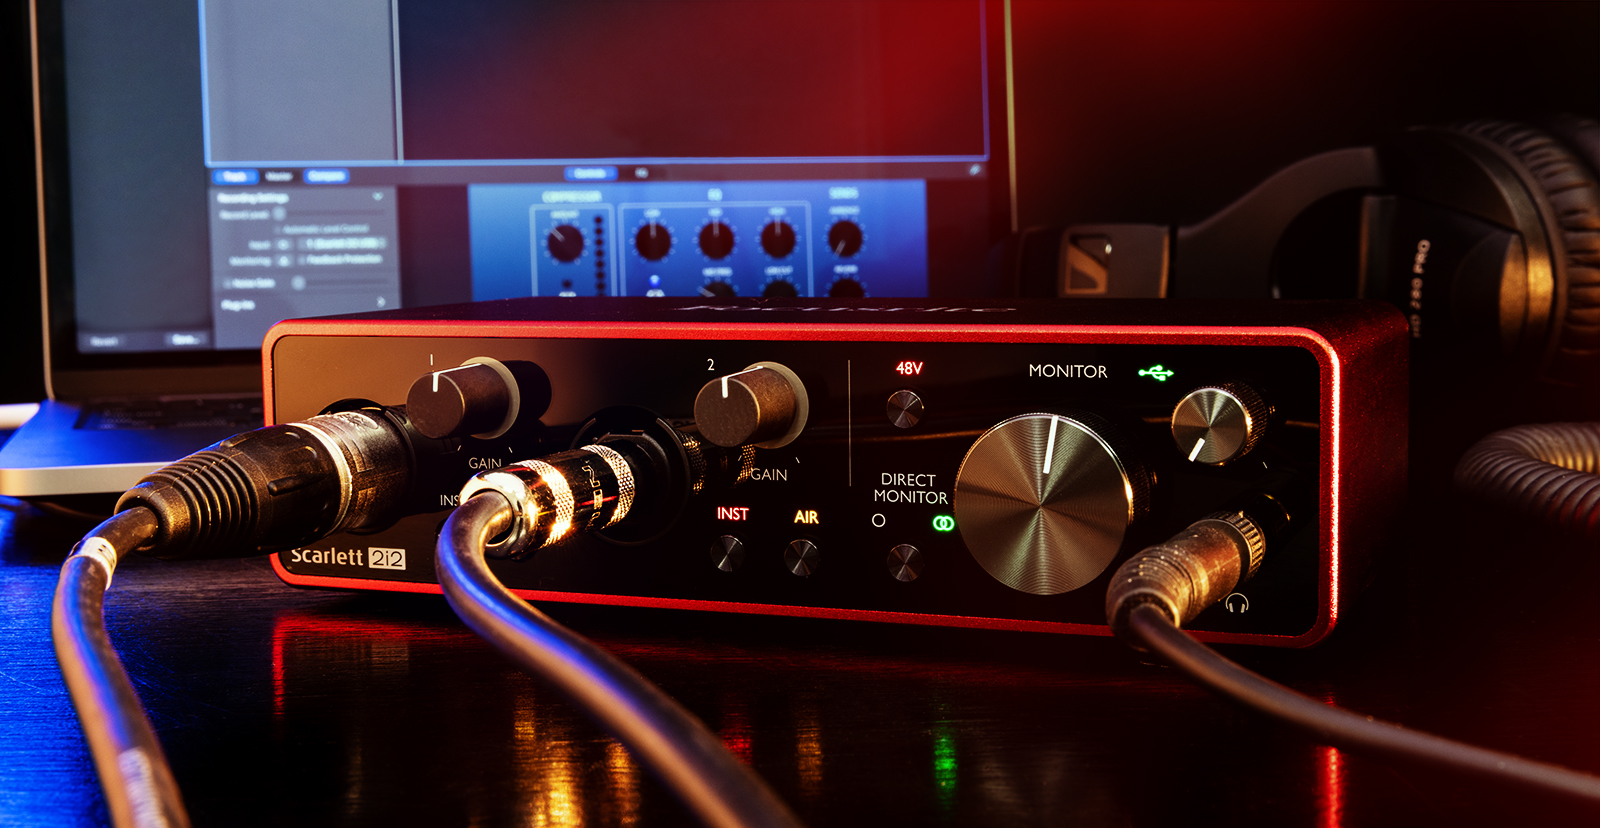
Looking at your audio interface
Let’s have a look at the inputs, the controls, and the outputs.
Audio Interface Inputs and Outputs
Audio interfaces have inputs for microphones and line-level signals. You will see a combination of XLR, 1/4″ phone plug, and in some cases 1/8″ mini-plug, RCA, or optical input connections as well. Some audio interfaces provide two input channels, while some provide many more.
Most audio interfaces contain a headphone amplifier so you can monitor your recording and mixes in high fidelity. Some models may provide multiple headphone outputs.
Depending on the make and model, audio interfaces may provide one stereo pair of line outputs for monitor speakers or may provide many outputs for multiple headphones, pairs of monitors, or for surround-sound mixing, external summing, re-amping, and outboard effects processing.
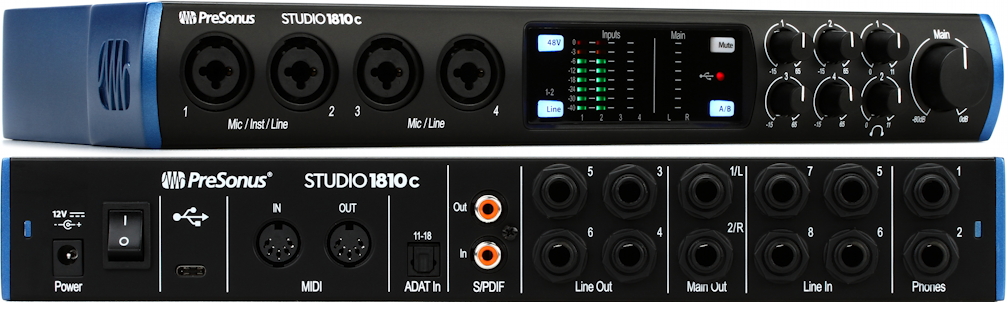
Front and rear panels of the PreSonus Studio 1810c multi-channel audio interface showing inputs, outputs and controls
Audio Interface Controls and Software
Most audio interfaces have knobs and buttons dedicated to different parameters. Some audio interfaces are designed with one master knob that performs multiple functions depending on the selection of toggle buttons. Controls on the front panel will let you make adjustments for each channel, including selecting microphone or line-level input, enabling 48V phantom power, and, most importantly, adjusting input gain. You may see a knob for adjusting the balance of input monitoring and playback monitoring and for adjusting the main output level and the headphone output level.
Next to each input gain knob, most audio interfaces will have at least an LED that will light up red to indicate clipping (distortion) of the input signal. Some interfaces will have a light that changes color from green to yellow to red, indicating signal strength, and some will have a multi-stage VU meter. This is to help you set the optimum level for recording each source.
Most audio interfaces also provide a proprietary control app that runs on your computer or device and provides additional settings and controls. An app may provide a more detailed VU meter display for each channel and a control for adjusting input monitoring. For audio interfaces with multiple outputs, the control app is used to set up different signal routing configurations within the audio interface and independently of your DAW.
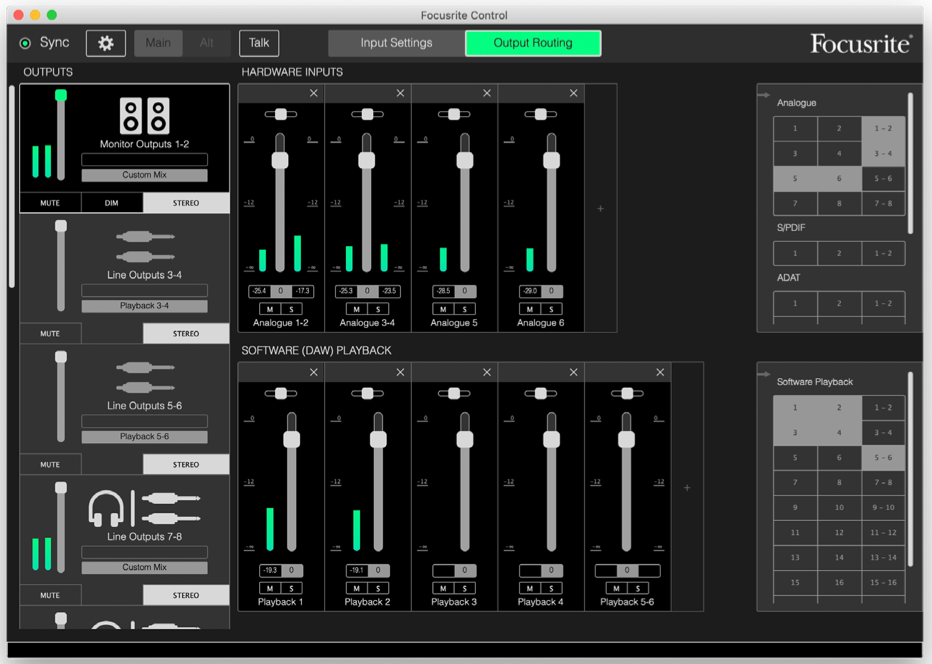
The Focusrite Control app showing an example of signal routing for an audio interface with 18 inputs and 20 outputs
Wired Connection and Cables
It’s worth pointing out that a professional audio interface will transmit digital audio to the host computer or device over a wired connection, because wires are necessary for the highest audio quality and minimal latency. Some audio interfaces for a computer can use a control app running on a phone or tablet using Bluetooth or Wi-Fi, but this is only for adjusting the controls on the audio interface, and not for transmitting the audio itself.
On the other hand, audio interfaces designed for recording on a phone or tablet may come with proprietary cables for plugging into the device using a USB-C or Apple Lightning connector.
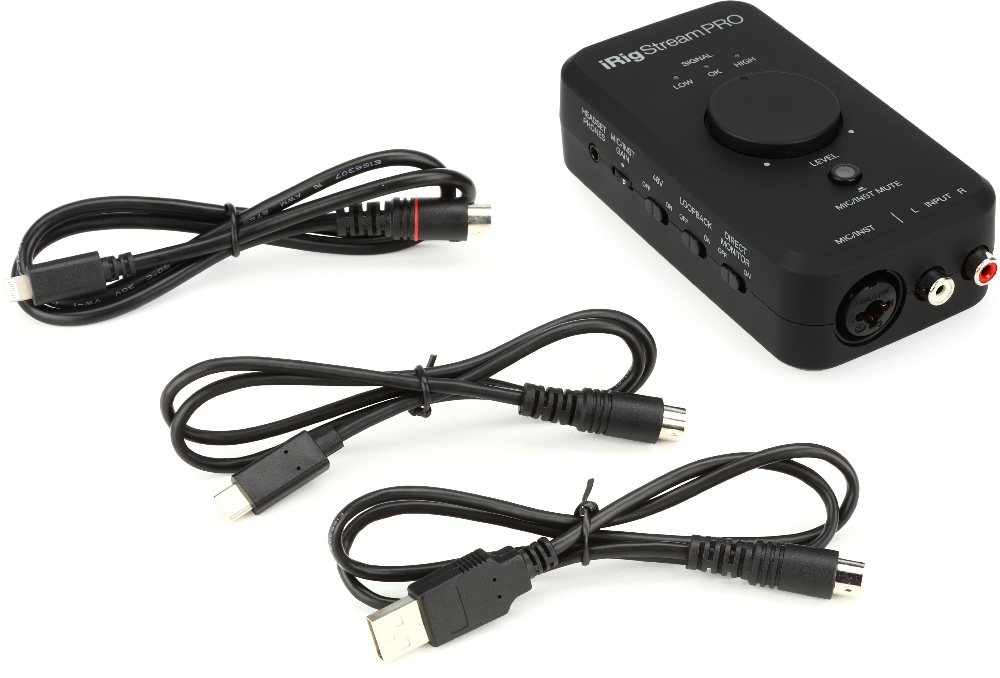
The IK Multimedia iRig Stream Pro provides cables for connecting to hosts using USB-A, USB-C and Apple Lightning, for use on Mac or PC, iPhone, iPad or Android. The iRig can be battery powered.
Power
Smaller audio interfaces will get their electrical power over the USB or Thunderbolt cable (bus-powered), while larger ones come with an external power supply. Some small audio interfaces for phones and tablets can even be battery-powered.
Word Clock
When digital audio signals are sent between devices, the groups of digital bits, called words, need to be precisely synchronized. This is done by means of word clock. One device is configured to provide a master clock signal that other devices follow. An audio interface can either provide the clock signal or receive it from an external source. With most audio interfaces, the interface and the host computer automatically negotiate and set up this master clock. For more elaborate signal chains, some audio interfaces can set up a word clock connection with an outboard device over ADAT, S/PDIF, AES/EBU, MADI, or BNC cables.
Follow the signal
Let’s connect a microphone to your audio interface’s Channel 1 input and a pair of headphones to the headphone output and follow the signal.
You can connect a professional microphone to your audio interface by an XLR cable. If it’s a condenser microphone, you will need to enable 48V phantom power on that channel, usually via a front-panel switch. The microphone input goes to an analog preamplifier within the audio interface. You can adjust the input gain so the preamp produces a clear, strong high-fidelity signal.
With your headphones or speakers, you can monitor the analog audio signal after it passes the preamp but before it goes to the computer. This is called input monitoring. You can also monitor the digital signal coming back through your computer and DAW, which will enable you to hear the signal processing and effects and listen to the entire mix. This is called playback monitoring. Depending on your computer’s processing of the signal chain, playback monitoring will introduce some latency, or lag time between the input and the sound coming back through the system. Most audio interfaces will let you set a blend between the input and the playback, so you can hear what you are playing or singing clearly and accurately.
Audio interface drivers
To connect to a computer, an audio interface requires a piece of software called a driver. Depending on the make and model of audio interface and the host operating system (such as macOS or Windows), it may only require a generic driver built into the operating system (we call such a device “class-compliant”) or it may require a custom driver provided by the audio interface’s manufacturer.
If the manufacturer provides a control app for configuring and routing signals in the audio interface, the app will usually also install the correct driver. The app will also be used to upgrade the firmware of your audio interface when the manufacturer makes a new version available.
On your computer, you configure your operating system and your DAW to use the correct driver to communicate with the audio interface.
Advanced features of an audio interface
Some audio interfaces provide advanced features. Here are common examples.
DSP plug-ins
Some audio interfaces also provide digital signal processing, or DSP, which can run proprietary plug-ins not on the host computer, but rather on the audio interface itself. This gives you additional processing power. You can call up these plug-ins within your DAW just like regular plug-ins, but the advantage is that because the audio interface’s CPU is doing the heavy lifting, these proprietary plug-ins don’t tax your computer’s resources.
Loopback
These days podcasters, gamers, and streamers need to route audio to and from multiple apps at the same time. For example, you may need to blend your mic and other input signals with the audio output from an app on your computer and then send the blended signal back to the DAW. This is called loopback. Many new audio interfaces have loopback functions built into the unit’s routing capabilities.
MIDI
Some audio interfaces also provide a MIDI-to-USB interface, enabling you to connect synthesizers and other gear over 5-pin DIN cables. The MIDI data is sent through the USB or Thunderbolt cable together with the channels of digital audio.
Expandability
An audio interface, as we’ve explained above, has digital-to-analog converters but also line inputs and microphone inputs with preamp. Some audio interfaces give you an option for expansion. For example, an audio interface that has four built-in audio inputs and mic preamps might have an optical digital ADAT or S/PDIF input to which you can connect a second outboard audio interface that provides eight additional analog mic preamps on their own channels. The digital signal from the second audio interface is synchronized with the primary audio interface and passed along to the computer, giving you more channels.
Audio interface optimization
Getting an audio interface to perform well with a host computer requires making modifications to your computer operating system’s preferences and configuration. We call this optimization. Sweetwater has Optimization Guides for specific versions of macOS and Windows. Follow the instructions and you will optimize your computer for maximum audio performance.
Related Articles
When you need help, Sweetwater has the answers!
Our knowledge base contains over 28,000 expertly written tech articles that will give you answers and help you get the most out of your gear. Our pro musicians and gear experts update content daily to keep you informed and on your way. Best of all, it’s totally FREE, and it’s just another reason that you get more at Sweetwater.com.

