
Bass Clarinet Quickstart Guide
TIP: In all things regarding your new bass clarinet, ask your private teacher or school band director. As they teach you how to play the instrument, they will be able to answer your questions and give you advice about care and maintenance.
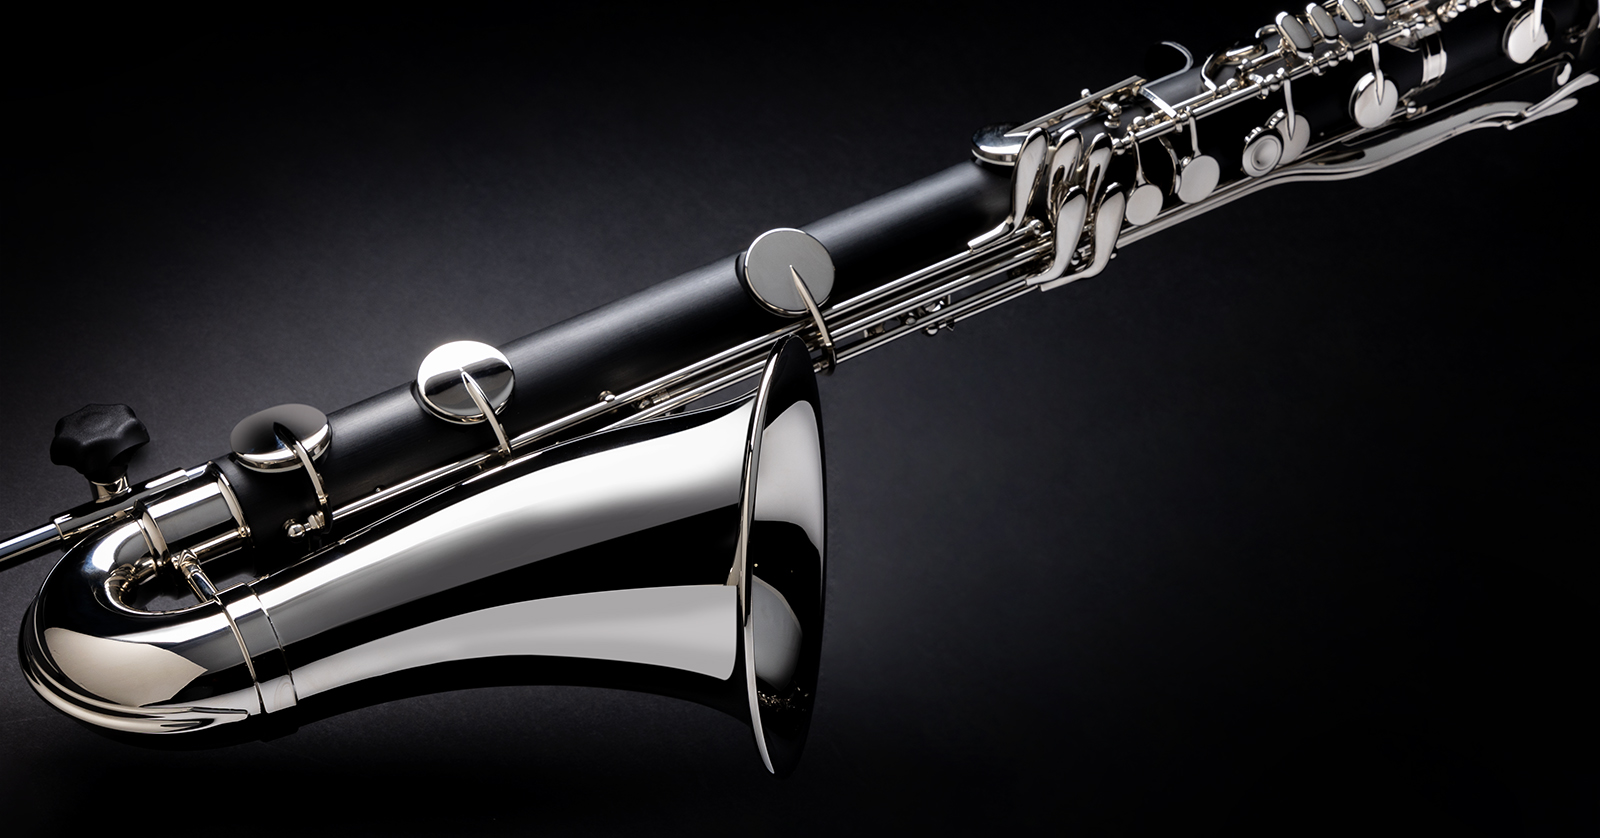
Congratulations on your new bass clarinet from Sweetwater. The instrument’s warm, deep sound lends a unique tone color to orchestras, wind bands, marching bands, and jazz. Let’s get started.
- Parts of a Bass Clarinet
- If Your Bass Clarinet is Made of Wood
- How to Assemble a Bass Clarinet
- Proper Playing Technique for Bass Clarinet
- How to Tune Your Bass Clarinet
- How to Disassemble and Clean Your Bass Clarinet
- Bass Clarinet Care and Maintenance
Parts of a Bass Clarinet
The bass clarinet is a reed instrument in the woodwind family. You produce sound by blowing air along the reed and controlling the vibration of the column of air.
Traditionally, a bass clarinet’s body is made of a dense, hard wood called grenadilla, or African blackwood. Beginner-level instruments are often made of ABS resin, a durable synthetic material.
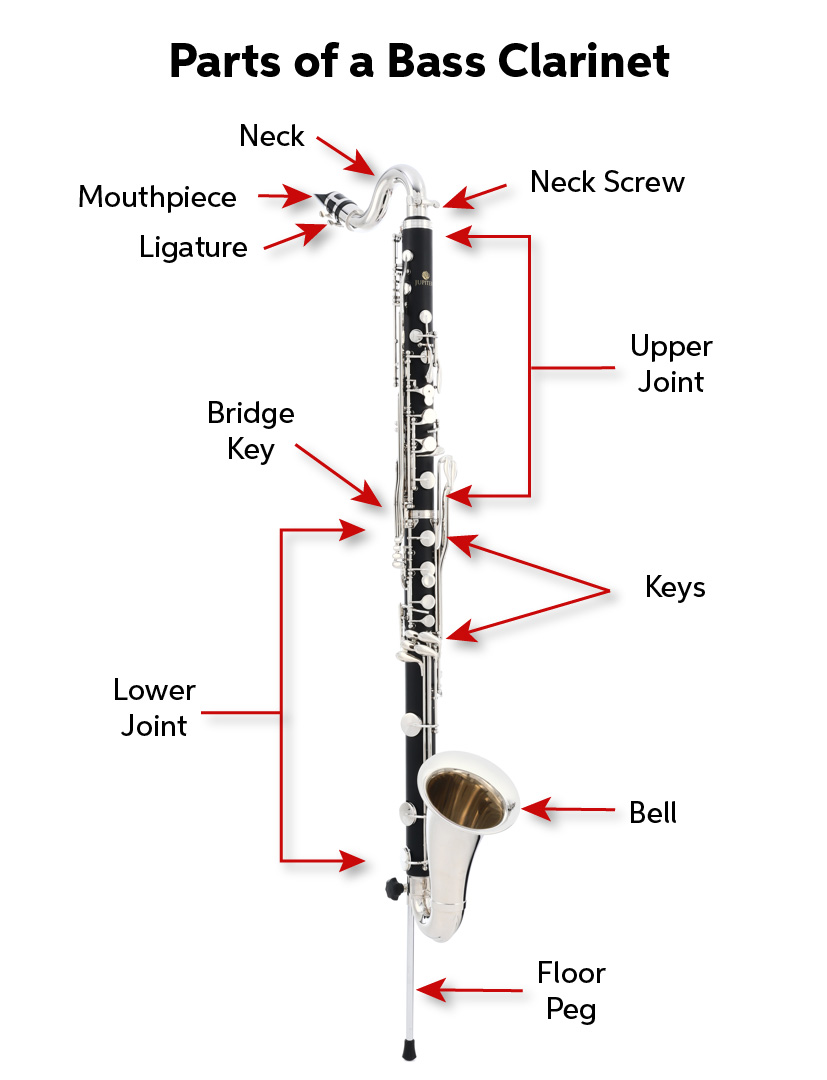
Parts of a Bass Clarinet
Two Kinds of Bass Clarinet Designs
Your instrument may have a one-piece body, or a two-piece body with an upper joint and a lower joint that you assemble before you play.
Apart from the design of the body, the standard model of the bass clarinet goes down to the lowest note of E♭. However, some bass clarinets go down a bit lower to C.
Mouthpiece, Reed and Ligature
TIP: Ask your teacher about what kind of replacements reeds you will need. You should carry extra reeds in your case. A good rule of thumb is to always have three reeds with you.
The mouthpiece is where you create the sound. It is made of hard rubber or plastic. It holds the reed, secured by a ligature.
The reed is a carved and shaped piece of cane. Reeds need to be moistened and carefully maintained. They wear out with use and need to be replaced frequently. Optionally, there are synthetic reeds, which are longer-lasting. Most musicians and teachers prefer cane reeds.
Neck
The curved metal neck connects the mouthpiece to the rest of the bass clarinet. It’s secured in place with the neck screw.
Upper and Lower Joints
Your bass clarinet may have a one-piece body, or the body may be in two pieces, the upper joint and lower joint.
If your bass clarinet has an upper joint and a lower joint, you connect them to each other by fitting the upper joint’s tenon into the lower joint. The tenons are lined with cork for an airtight fit. With this design, when you connect the upper joint to the lower, you must carefully align the bridge key mechanism that connects levers across the two joints.
On both the one-piece body design and the two-piece design, there’s a tenon lined with cork at the bottom where you join the body and the bell.
On the back of the body is the register key, which you control with your left-hand thumb. This enables playing the higher register of notes. Down below is the thumb rest, where you put your right-hand thumb to hold the instrument.
Keys and tone holes
The keys and tone holes in the body are connected to levers that you manipulate to enable you to close the holes in different combinations. This changes the vibrating frequency of the column of air. That’s how you play different notes.
Bell
The bell is upward-curving, flared piece of metal at the end of the air column. It amplifies the sound.
Floor Peg
When you play sitting down, the ever-important floor peg enables you to rest the instrument on the ground. By adjusting the floor peg, you raise or lower the whole bass clarinet so that the mouthpiece is at the same height as your mouth.
If Your Bass Clarinet is Made of Wood
IMPORTANT: If you have a bass clarinet with a body made of wood, you need to take special care of it and protect it from rapid changes in temperature and humidity.
Ask your teacher about caring for your wooden bass clarinet.
If you just received a new bass clarinet made of wood, bring the box inside and wait a full day to permit the bass clarinet to acclimate to the temperature and humidity in your house before you take it out and assemble it.
A new wooden bass clarinet needs to be broken in slowly. Start out playing it for only ten to fifteen minutes a day.
All through the year you need to be aware of temperature and humidity and their effects on your instrument. Learn more in Sweetwater’s Bass Clarinet Care and Maintenance Guide.
How to Assemble a Bass Clarinet

A bass clarinet in its case
Sit on your chair while you assemble the bass clarinet.
Set your bass clarinet case on the floor. Make sure it’s right-side-up, with the manufacturer’s logo on the lid. Lift the latches or unzip the case and lift the lid.
Moisten Your Reed
Fill a glass with two to three inches of water. Place the reed into it, tip down. Let it soak for no more than three minutes. You can also place the tip of the reed in your mouth and let your saliva moisten it. Don’t let your teeth contact the reed, and don’t suck on it.
Grease the Corks

Applying cork grease to the cork on one of the tenons
Before you attach the bell to the lower joint, let’s have a look at the tenons lined with cork.
Your bass clarinet comes with a stick of cork grease. On each tenon, apply a small amount of grease to the cork and use your finger to spread it all the way around.
If your bass clarinet is brand-new, the first few times you assemble it, apply a little grease to each cork. After that you only need to apply grease if the joints are sticking and not coming together easily. The proper amount of grease not only creates a tight seal, but also preserves the cork and reduces the need for repairs.
It’s important to note, however, that the neck of the bass clarinet, in most models, does not have a cork tenon. If there’s no cork, do not apply grease to the metal.
Attach the Bell to the Lower Joint

Attaching the bell to the lower joint
Hold the lower joint with your dominant hand and cup the bell in your non-dominant hand. Fit the bell onto the lower joint with slight twists back and forth.

Inserting the floor peg
Insert the floor peg into its bracket on the lower joint. Tighten the set screw just a bit; you’ll adjust it later.
Assemble the upper and lower joints
TIP: Before you try this yourself, ask your teacher to show you how to connect the upper joint and the lower joint and align the bridge key mechanism correctly.
With a bass clarinet with upper and lower joints, there’s a mechanism that connects the keywork across the joints. This is called the bridge key.
Take the upper joint in your left hand and hold down the ring key, which lifts up the bridge key.
Take the lower joint in your right hand, holding it near the bottom.

Attaching the upper joint to the lower joint, taking care to align the bridge key mechanism
Align the two parts of the bridge key mechanism. Push the two joints together with a slight twisting motion. The bridge key on the upper joint must align with the corresponding piece on the lower joint in order for the lower pads to seal properly.

The properly connected joints permit the key mechanism to operate correctly.
Attach the Mouthpiece to the Neck
Hold the body of the bass clarinet upright between your legs so that your hands are free.
Next, hold the neck in one hand. You will attach the mouthpiece to the neck, align the reed on the mouthpiece, and fasten it in place with the ligature. Only then will you attach the neck to the upper joint.

Attaching the mouthpiece to the neck
Note that your mouthpiece may arrive with a small soft rubber pad attached to the top. This is called a mouthpiece patch. It makes the instrument more comfortable to play, and protects the mouthpiece from bite marks.
Attach the mouthpiece onto the neck by inserting the tenon and giving a gentle twist. The table side of the mouthpiece (where the reed will be positioned) will be facing down.
Mount the Reed onto the Mouthpiece

Aligning the reed on the mouthpiece
In one hand, hold the mouthpiece attached to the neck. With your other hand, remove the reed from the cup where it has been soaking.
Take the reed by the thicker end, the heel. Position the flat side of the reed against the table of the mouthpiece. Line up the tip of the reed with the tip of the mouthpiece. Don’t touch the tip of the reed.
Fit the loosened ligature around the reed and the mouthpiece.
If your mouthpiece has a line engraved on it, this is to help you line up the ligature. Position the ligature slightly below the line.
Check the alignment of the reed and gently tighten the screw on the ligature to hold the reed firmly in place.

The mouthpiece, reed, and ligature assembled on the neck
Attach the Neck to the Body

Attaching the neck to the body
With the body of the clarinet held upright between your legs, attach the neck to the upper joint with a gentle twist. Secure it by gently tightening the neck screw.
Your bass clarinet is now assembled and ready to play.
Proper Playing Technique for Bass Clarinet
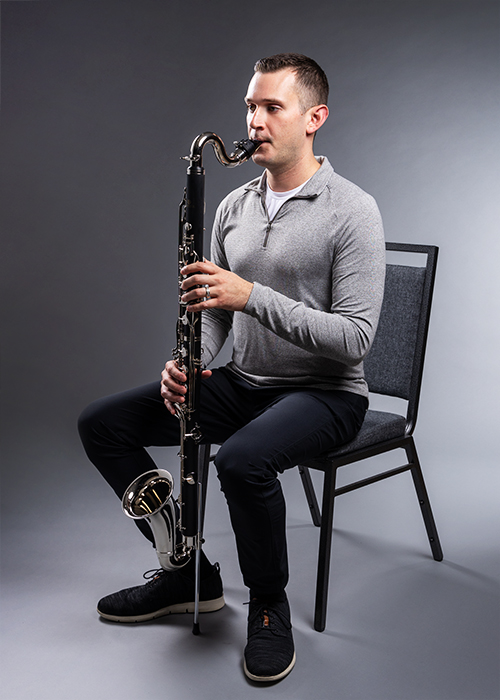
Proper bass clarinet playing position.
Adjusting the bass clarinet’s height using the floor peg
Sit up straight in a chair with your feet flat on the floor. Keep your head erect and your shoulders relaxed. Hold the bass clarinet by putting your right thumb on the thumb rest on the back of the lower joint.
Adjust the floor peg to raise or lower the instrument until the mouthpiece is at the right height for your mouth when you sit up straight. Don’t lean down to reach the mouthpiece; bring the mouthpiece to you.
Loosen the tension screw on the floor peg and extend or retract the floor peg until you find the right position. Tighten the tension screw just a bit to keep the floor peg in place.
Embouchure

Bass clarinet embouchure
It’s all about the embouchure, which means the way that you hold your mouth against the mouthpiece when you blow into it.
Basically, you curl your lower lip back over your teeth. Place about 1/4 of an inch of the mouthpiece in your mouth so that the reed rests on your lower lip. Firmly place your teeth against the top of the mouthpiece, but don’t bite down. Wrap your lips around the mouthpiece, making a tight seal.
Use your left thumb to close the tone hole just below the register key.
Blow some air into the bass clarinet and make a tone. Your first notes may sound high and shrill; if so, put a bit less of the mouthpiece in your mouth. Work on blowing a fast, steady air stream.
Your teacher will spend a lot of time working with you on learning to form the right embouchure and to control your breath.
How to Tune Your Bass Clarinet
On the bass clarinet, whether the notes you play are in tune depends mostly on your embouchure. This will take practice.
The bass clarinet is a transposing instrument in B♭. When your teacher and your method book show you the note “C” on the bass clarinet, that note is referred to as “B♭” in concert pitch, which is what the piano uses. When you play the note C on the bass clarinet, an electronic tuner will display the note B♭.
How to Disassemble and Clean Your Bass Clarinet
Each time you are finished playing the bass clarinet, you need to disassemble all the parts, swab them out to remove all moisture, and return the parts to the case.
Remove the Reed, Mouthpiece and Neck
Remove and store the reed first. Put it away carefully so you can use it again.
Loosen the ligature screw and slide the reed out from the mouthpiece. Don’t touch the tip of the reed. Carefully slot the reed into its protective case.
Remove the ligature from the mouthpiece.
Where the neck meets the upper joint, loosen the neck screw (if present). With a gentle twist, remove the neck from the upper joint.
Now hold the neck and the mouthpiece and, with a gentle twist, remove the mouthpiece from the neck. Set the neck aside for a moment while you clean out the mouthpiece.

Swabbing out the mouthpiece
Your bass clarinet comes with a special cleaning swab attached to a weighted string.
Spread out the cloth of the swab and make sure it isn’t bunched up.
Drop the string through the opening in the bottom of the mouthpiece and draw it through the empty space where the reed is normally mounted. You can do this more than once to remove all the moisture.
Replace the loose ligature around the mouthpiece and cover it with its protective cap. Store the mouthpiece in the case.

Swabbing out the neck
Now swab out the neck by threading the swab through it, in the same fashion that you did the mouthpiece.
Store the neck in the case.
Remove the Upper Joint from the Lower

Removing the upper joint
Grip the upper joint with your right hand, and the lower joint with your left. With your right hand, you need to take care to raise the bridge key, so the mechanisms don’t touch.
Gently twist to remove the upper joint.
Set the upper joint in the case; you’ll take it out in a moment to swab it out.
Remove the Bell from the Lower Joint
On the lower joint, loosen the set screw and remove the floor peg. Store it in the case.

Removing the bell
Grip the lower joint in one hand. Take hold of the lower curve of the bell in your other hand and twist it gently to remove it. Place the bell in the case.
Place the lower joint in the case.
Swab Out the Upper and Lower Joints
Next, you need to swab out the upper joint.
Take the upper joint back out of the case. Hold it right-side-up, with the cork tenon on the bottom.

Dropping the swab’s weighted string into the upper joint
As you did with the mouthpiece and neck, drop the weighted end of the swab’s string into the upper joint. Let the weight fall through the bottom. Grasp the string and draw it through.

Caption: Pulling the swab through the joint
You may need to run the swab through more than once to make sure you remove all the moisture.
Store the upper joint in the case.
The final step is to swab out the lower joint.
Take the lower joint out of the case. In the same fashion as you did with the upper joint, use the swab to clean out the lower joint. Replace the lower joint in the case.
With everything back in place, you can close the case.
Bass Clarinet Care and Maintenance
We still need to explain a few more things about cleaning and caring for your bass clarinet. Click on the link below and read our Sweetwater Clarinet Care and Maintenance Guide. There are steps you need to take to prevent damage and costly repairs. We at Sweetwater trust you will enjoy playing your bass clarinet for years to come.
When you need help, Sweetwater has the answers!
Our knowledge base contains over 28,000 expertly written tech articles that will give you answers and help you get the most out of your gear. Our pro musicians and gear experts update content daily to keep you informed and on your way. Best of all, it’s totally FREE, and it’s just another reason that you get more at Sweetwater.com.

