
Behringer RD-8 Setup Guide
Getting started with the Behringer RD-8
In this guide, we will show you how to get up and running with the Behringer RD-8. You’ll learn how to register the device and also the different setup and connections so you can get sound out. Follow each of the sections below to get started.
Register the RD-8
IMPORTANT: You must register your Behringer RD-8 within the first 90 days of purchase to receive the three-year extended warranty.
Before we dive in, the first thing you will need to do is register the RD-8 with Behringer. When you register the device, you will get a free three-year extended warranty. Keep your Sweetwater invoice handy, as you will need to upload the PDF copy as proof of purchase.
RD-8 setup and connections
IMPORTANT: You must use an 18V DC (CENTER POSITIVE barrel) power supply for the RD-8. If you use the incorrect power supply, there will be no signal at the MONO or Headphone output.
The RD-8 TRS audio outputs can easily connect to your live sound mixer or studio recording interface. You can transmit MIDI data over the USB connection or MIDI ports. This makes it easy to synchronize with other devices or record a MIDI performance. Other hardware synthesizers and sequencers can also be synchronized with MIDI or analog clock.
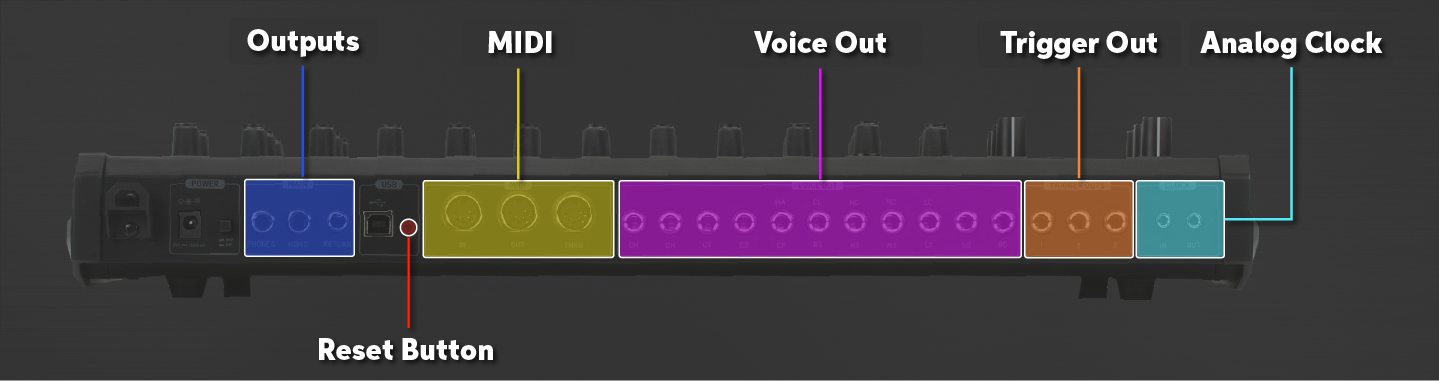
Diagram of the RD-8 connections.
Audio
There are three main audio jacks, all of which are Mono. There is the Mono (main) Out, Headphone Out, and the Return. Both the Mono Out and Headphones use balanced ¼” TRS cables, while the Return uses an unbalanced 1⁄4” TS cable.
IMPORTANT: The Wave Designer and Analog Filter sections completely bypass the headphone output, which means you will not hear any of those effects through your headphones.
External hardware
You can synchronize your devices such as sequencers and synthesizers with the RD-8. The 3.5mm TRS Sync jacks can be used to connect to external hardware via analog clock. Another option is MIDI, which can also connect to a MIDI interface for DAW synchronization.
Clock In and Out
TIP: TRS cables will provide both clock and start/stop signals. TS cables can only provide a clock signal.
The Sync connections (analog clock) work by sending pulses per quarter note (PPQN), which is a unit of time used for sequencing and automation. For the RD-8 to control your external gear via analog clock, you will need to connect a 3.5mm TRS cable from the Sync OUT jack on the RD-8 to the Sync/Clock IN of the other synthesizer. Alternatively, connect the cable from the Sync OUT jack on the external synth to the Sync/Clock IN of the RD-8 if you want the external synth to be the master. When synchronizing the RD-8 to another device’s clock (slave device), press the Sync button to switch from INT to CLK.
How to change the PPQ setting
By default, the RD-8 is set to send 24 PPQN. If you’re experiencing pitch, pattern, or time issues on the external synth, you will need to adjust the PPQ setting on the RD-8, so they sync correctly.
- Press the Settings button, press the Clock step key, and then press the flashing Tap/Tempo button to select Analog Clk Mode.
- Use the data knob to select 1, 2, 4, 24, or 48 PPQ and press Play to begin playback.
MIDI
Another way to connect to external sequencers is via 5-pin MIDI cables. For the RD-8 to control the external gear, connect a MIDI cable from the MIDI OUT port on the RD-8 to the MIDI IN port on the external device. If synchronizing the RD-8 to another device’s MIDI clock (slave device), press the Sync button to switch from INT to MIDI.
Unlike analog clock, which only sends clock, start, and stop signals, MIDI syncing will also send MIDI note changes, as well. By default, the RD-8 is set to MIDI channel 1. That means if your external synth is also set to MIDI channel 1, any button you press on the RD-8 will also affect the function of the external synth. To get around this, you will need to change the MIDI channel on the RD-8. Follow these steps to change the MIDI channel.
- Press the Settings button, press the MIDI step key, and then press the flashing Tap/Hold button once to select MIDI OUT.
- Use the DATA knob to change the MIDI channel of the RD-8.
- Press Settings to confirm and return to the Settings menu.
Trigger Out
The three Trigger Out jacks allows you to connect the RD-8 to external synths or drum modules via unbalanced TS cables. Once connected, you can create a pattern on the RD-8 and have the external module trigger it. Each trigger output is assigned to a specific channel on the RD-8.
- Trigger Out 1 is assigned to Accent.
- Trigger Out 2 is assigned to Hand Clap.
- Trigger Out 3 is assigned to Cowbell.
Computer
The Behringer RD-8 MIDI output can also be recorded into your DAW by connecting a USB cable to your computer. The drum sequencer is class-compliant, which means no additional driver software to operate it is necessary. Connect a USB cable from the RD-8 to your computer, enable the RD-8 as a MIDI device, create a MIDI track, and press record in your DAW. If your RD-8 isn’t being recognized, check out our article on Resolving MIDI Device Issues on PC and Mac.
- By default, the RD-8 USB MIDI input is set to all MIDI channels. To change this, press the Settings button, press the USB step key, and use the DATA knob to change the MIDI channel.
- Turn Forward to MIDI on to send the USB output of the RD-8 to the MIDI output, as well.
Helpful links
Related Articles
When you need help, Sweetwater has the answers!
Our knowledge base contains over 28,000 expertly written tech articles that will give you answers and help you get the most out of your gear. Our pro musicians and gear experts update content daily to keep you informed and on your way. Best of all, it’s totally FREE, and it’s just another reason that you get more at Sweetwater.com.


Offer applies only to single-receipt qualifying purchases. Select manufacturers may require that only the manufacturer’s products qualify towards the minimum purchase amount needed to be eligible for promotional financing. Otherwise, an invoice that meets the minimum purchase amount and contains at least one qualifying manufacturer product is eligible for promotional financing. No interest will be charged on promo purchase balance, and equal monthly payments are required on promo purchase until it is paid in full. The payments equal the amount financed divided by the number of months in the promo period, rounded up to the next whole dollar. These payments may be higher than the payments that would be required if this purchase was a non-promo purchase. During the last month(s) of the promo period the required monthly payment may be reduced due to the prior months’ rounding. Regular account terms apply to non-promo purchases. New Accounts as of 07/31/2025: Purchase APR is 34.99%. Penalty APR is 39.99%. Min Interest Charge is $2. Existing cardholders: See your credit card agreement terms. Subject to credit approval.
Offer applies only to single-receipt qualifying purchases. No interest will be charged on the promo balance if you pay it off, in full, within the promo period. If you do not, interest will be charged on the promo balance from the purchase date. The required minimum monthly payments may or may not pay off the promo balance before the end of the promo period, depending on purchase amount, promo length and payment allocation. Regular account terms apply to non-promo purchases and, after promo period ends, to the promo balance. New Accounts as of 07/31/2025: Purchase APR is 34.99%. Penalty APR is 39.99%. Min Interest Charge is $2. Existing cardholders: See your credit card agreement terms. Subject to credit approval.
The estimated required monthly payment shown which excludes taxes and delivery equals the amount financed divided by the number of months in the promo period, rounded up to the next cent. During the last month(s) of the promo period the required monthly payment may be reduced due to this rounding. These payments apply only with the financing offer shown. If you make these payments by the due date each month, you should pay off this amount financed within the promo period, if it is the only balance you are paying off. If you have other balances on your account, this payment will be added to any other minimum monthly payments.
Applies only to select items from this manufacturer. Ask your Sweetwater Sales Engineer for more details.