
Behringer Powerplay P16-HQ and P16-M Personal Mixer Quickstart Guide
Behringer P16-M and P16-HQ personal monitor mixers are important components for working with Behringer and Midas mixers in the recording studio and onstage, as they enable each musician to create their own monitor mix. Here’s our guide to help you set up a system with P16s.
- Register Your P16 to Get the Full Warranty
- Download the Owner’s Manual
- P16-M or P16-HQ?
- Connect the Right Port (What Is Ultranet?)
- Making the Connection from the Mixer
- Configuring the Mixer for Use with P16s
- What Kind of Cable Do I Need for a P16?
- Hooking Up P16s
- P16 Connections
- P16 Basic Operation
- P16 Factory Reset
Register Your P16 to Get the Full Warranty
By default, Behringer gives you a one-year warranty. However, if you register your item on the website within 90 days of purchase, Behringer gives you a three-year warranty. It’s free. Take a minute to follow these instructions:
TIP: Everything you purchase from Sweetwater comes with our 2-year Total Confidence Coverage (TCC) warranty. However, three years is even better than two, so please register with Behringer today.
Download the Owner’s Manual
Download the owner’s manual on the Behringer P16-HQ product page. Click Downloads.
P16-M or P16-HQ?
The Behringer Powerplay P16-M is the personal monitor mixer people have used for over a decade. In late 2024, Behringer released the P16-HQ, which has improved specs. While the layout of the buttons and the knobs is slightly different, operating either model is very similar. There are numerous resources and tutorial videos that cover the P16-M, and that information applies to the P16-HQ as well.
Connect the Right Port (What Is Ultranet?)
The Behringer X32 has RJ45 ports labeled “Ethernet,” “Ultranet,” and “AES50.”
Make sure that your P16s are connected to your mixer or your stagebox using only the ports labeled “Ultranet.”
Ultranet is Behringer’s proprietary protocol for sending digital audio from a mixer in the Behringer X32 or Midas families to P16 personal monitor mixers. The ports labeled “Ultranet” have RJ45 connectors to which you connect Cat 5e cables.
Let’s clear up a misconception.
It’s important to understand that Ultranet is not the same thing as Ethernet. You will hear people refer to Ultranet ports as “Ethernet ports” using “Ethernet cables,” but that’s a misnomer.
While the Behringer Powerplay Ultranet port uses a Cat 5e cable (the same cable that can be used in an Ethernet computer network), the Ultranet port does not send Ethernet network signals over the cable. This means that Ultranet ports can’t connect with Ethernet computer networking hubs or switches. Rather, an Ultranet port can only connect to another Ultranet port.
Your mixer or stagebox may have other ports on the back labeled “Ethernet,” “AES50,” “Control/Audio Network,” or “Dante.” While these ports use the same RJ45 connections and cables, they are not Ultranet ports, so connecting your P16 to one of these won’t work.
Making the Connection from the Mixer
A mixer such as one from the Behringer X32, Behringer X Air, and Midas M32 series has an Ultranet port. You can connect a P16 directly to that port, for example, in a recording studio where the musicians are in close proximity to the mixer.
However, in live settings, when the X32 is front of house, it will typically be connected to a Behringer or Midas stagebox using the AES50 connection. The Behringer or Midas stagebox, in turn, will have one or more Ultranet Out ports, and that’s where you connect to your P16s.
See the entry below, P16 Connections, regarding providing power to the P16s.
Configuring the Mixer for Use with P16s
Using the P16 with Behringer X32 and Midas mixers
Behringer X32 mixers have a dedicated function for routing audio signals to P16s. Here’s a tutorial video from Behringer.
Consult your mixer’s owner’s manual for more information.
Can P16s Be Used with a Behringer WING?
Mixers in the Behringer WING family don’t have Ultranet ports. Nevertheless, it’s possible to use P16s with a WING. You can configure signal routing for monitor sends on the WING, which then go through the AES50 connection to a Midas or Behringer stagebox which has Ultranet Out ports. Here’s a tutorial for the WING that explains how to route signals to the P16-M.
Using the P16 with Other Brands of Mixer
If you need to hook up analog or digital audio outputs from any other brand of mixer (one that doesn’t have Ultranet capability) to be routed for use with P16s, it can be done. Behringer makes the P16-I input module which converts those signals to Ultranet. That’s a special use case that’s beyond the scope of this article.
What Kind of Cable Do I Need for a P16?
Behringer recommends that you use shielded Cat 5e networking cables. Make sure your cables are Cat 5e rather than Cat 6, another common standard.
Hooking Up P16s
You have two configuration options: daisy-chain and hub.
Daisy-chain Configuration
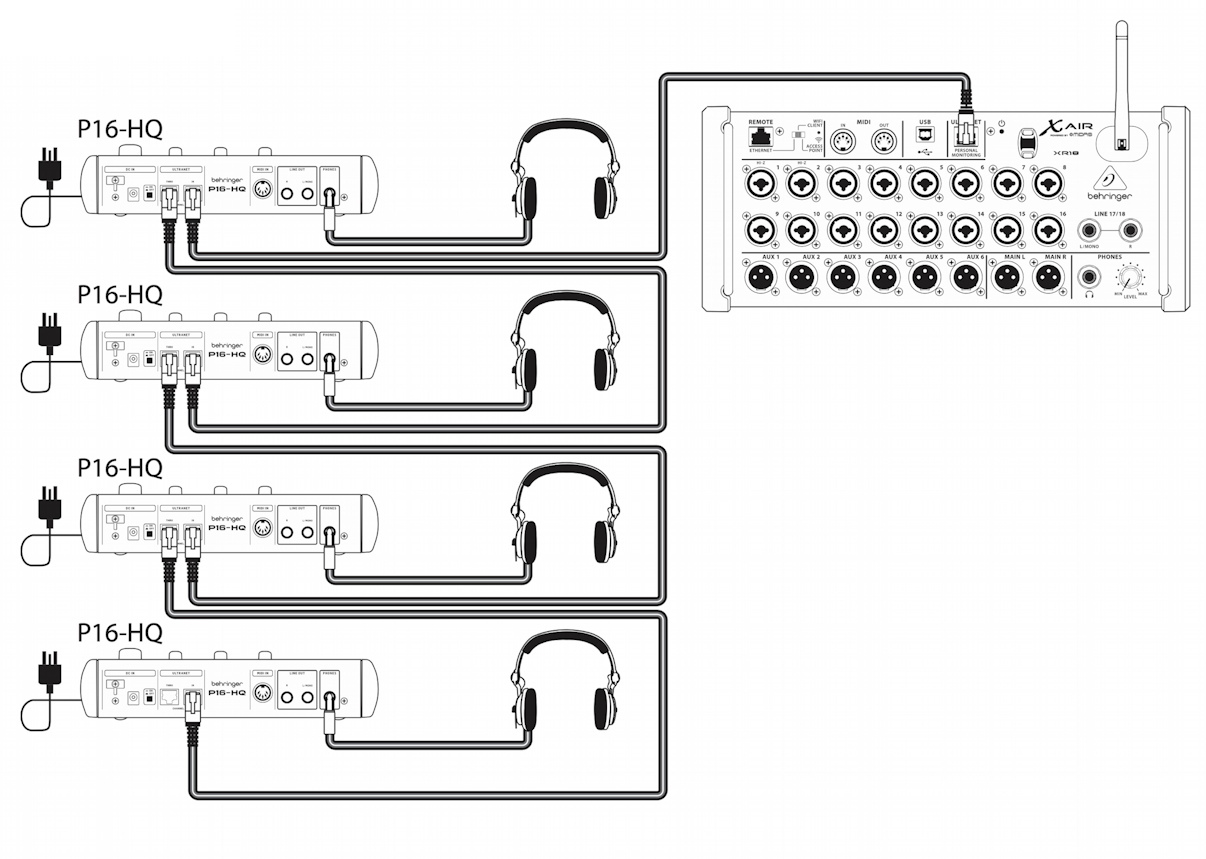
A diagram of P16-HQ units in a daisy-chain configuration
If you only need a small number of P16s, you can daisy-chain them. Connect one Cat 5e cable to the Ultranet port on your stagebox or mixer, and connect the other end to the Ultranet In port on the first P16. Then connect another Cat 5e cable to the Ultranet Out port on that unit, connect that to the Ultranet In port on the next P16, and so forth. In this configuration, each P16 requires its own power supply.
Hub Configuration: Using the Behringer P16-D Distribution Module
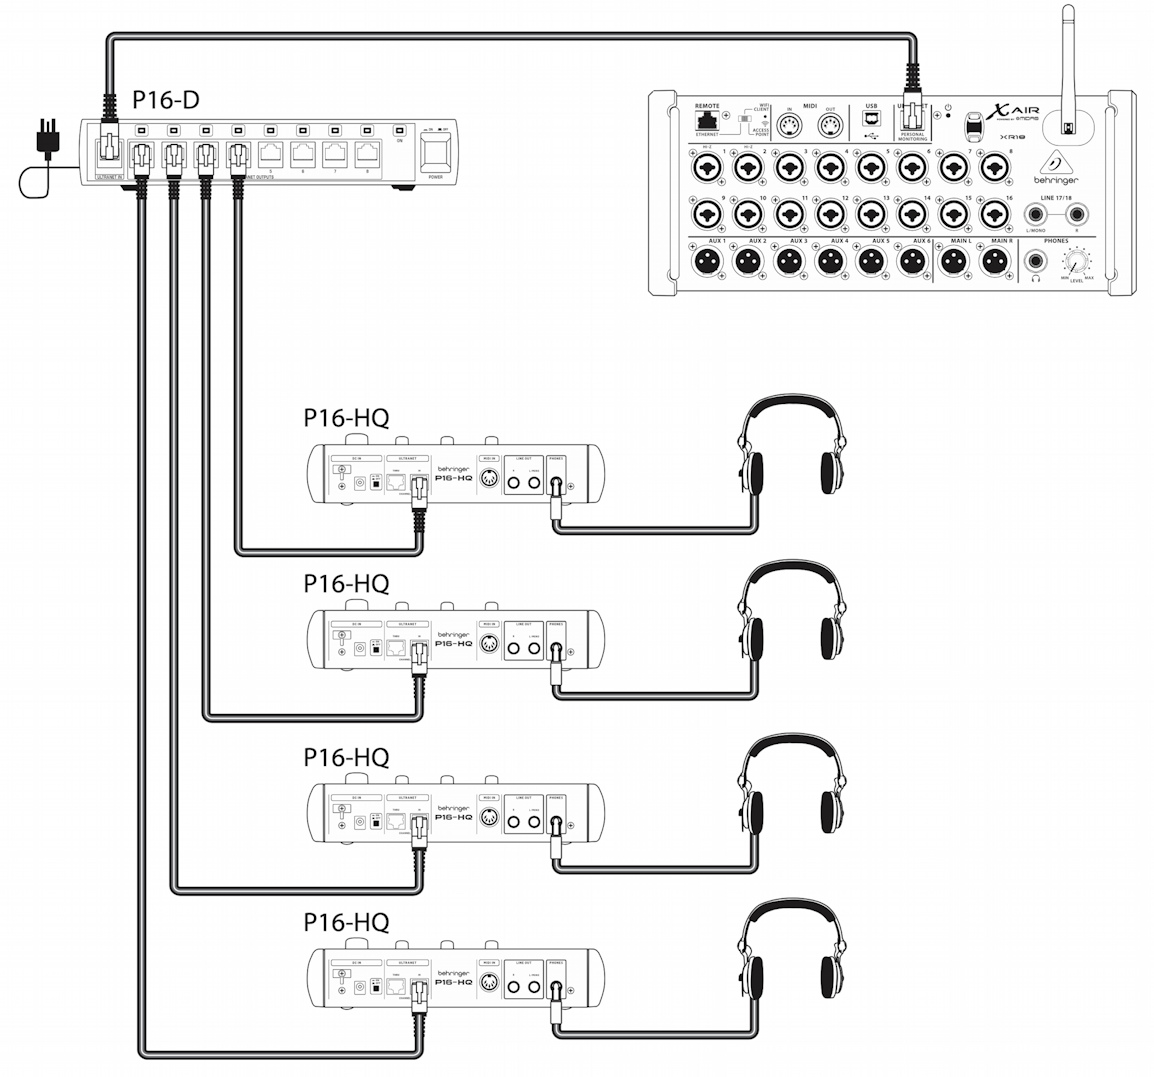
A diagram of P16-HQ units in a hub configuration
If you are working with larger numbers of P16s, consider using the Behringer Powerplay P16-D distribution module, purchased separately. You can connect it to power, hook up the Ultranet cable from your mixer, and connect up to eight P16 units directly to the eight Ultranet Out ports on the distributor in a hub configuration. The distributor also provides power to the eight P16 units over the Cat 5e cables, so the individual P16s do not require their own power supplies.
You can even cascade eight additional P16-D modules to the Ultranet Out ports on the main module, letting you connect up to sixty-four P16s to the one Ultranet signal. This means everyone in your orchestra can set their own mix, and it is preferable to daisy-chaining many units.
In a similar fashion, the Behringer SD16 stagebox provides a smaller hub with power for four P16s.
The Behringer SD8 can provide power for two P16s, and the Midas DL8 can do likewise.
Here’s Behringer’s overview of using the P16-D:
Learn more in the Behringer Powerplay P16-HQ Quick Start Guide > Powerplay P16-HQ Hook-up.
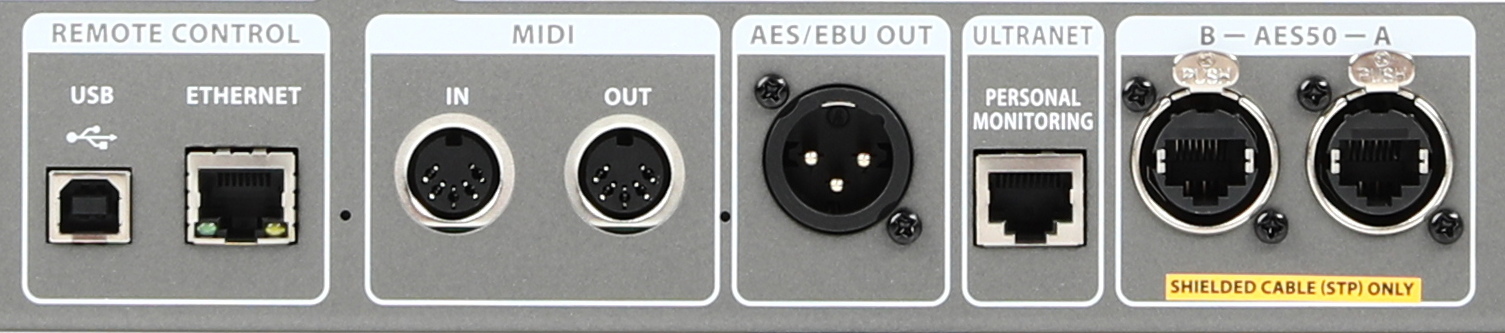
P16 Connections
Power down your P16 before you connect any cables. Turn the Output knob all the way down, and turn the Limiter knob all the way up. When you power on the unit, with signal coming in from the mixer, turn up the output and turn down the limiter gradually.
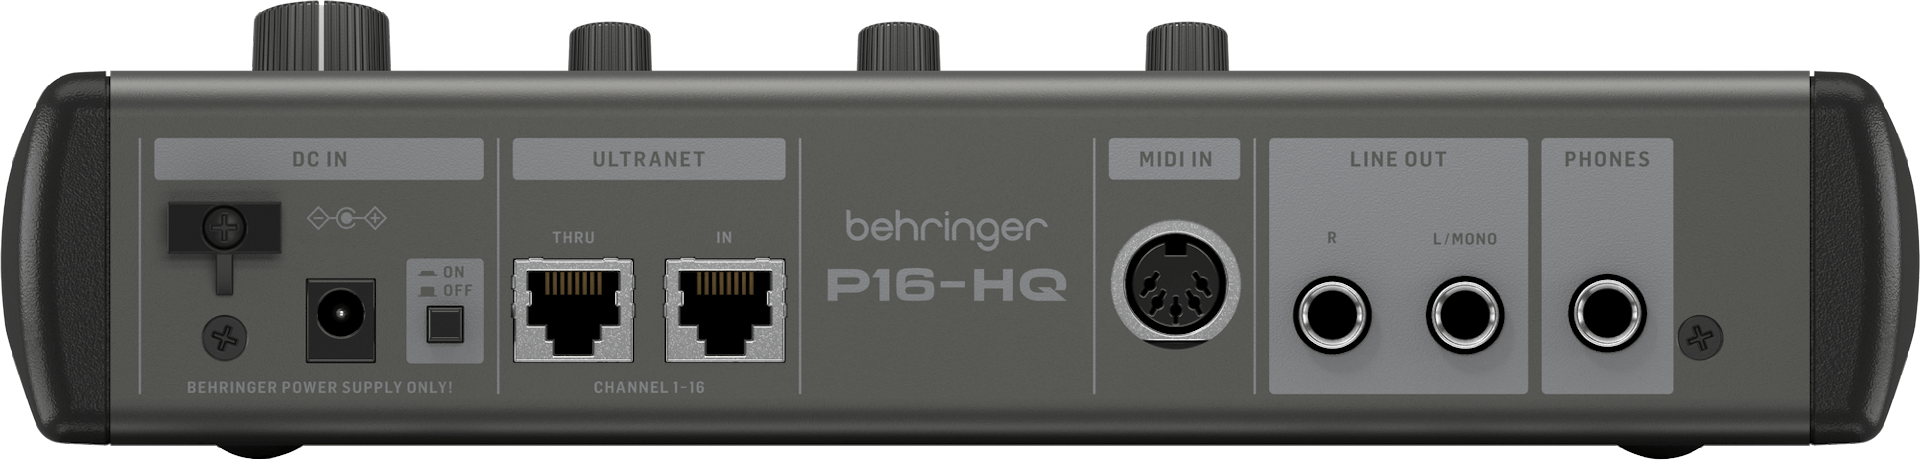
The P16-HQ back panel
Power Supply
Connect the included Behringer 300mA 12V DC power supply to each P16 if you are using a daisy-chain configuration. If you are using a hub configuration with the P16-D distribution module, or a stagebox such as the Behringer SD16, then each P16 receives its power over the Cat 5e cable to the Ultranet In port, and you do not need a power supply for each P16.
On/Off Switch
Ultranet In
Connect a Cat 5e cable from the Ultranet Out port on your mixer, your stagebox, or your P16-D distribution module.
Ultranet Thru
If you are setting up your P16s in a daisy-chain, use this port to connect to the Ultranet In port on the next P16 in the chain.
MIDI In
If you wish to use an external MIDI controller to send program change and control messages to your P16, connect it with a 5-pin DIN MIDI cable.
Line Out
This is where you hook up a monitor wedge or powered speakers. Connect a 1/4-inch TS cable to the L/Mono port for a mono signal; connect another cable to the R port for stereo.
Phones
Connect headphones, in-ear monitors, or a wireless monitor transmitter unit to this 1/4-inch TRS port.
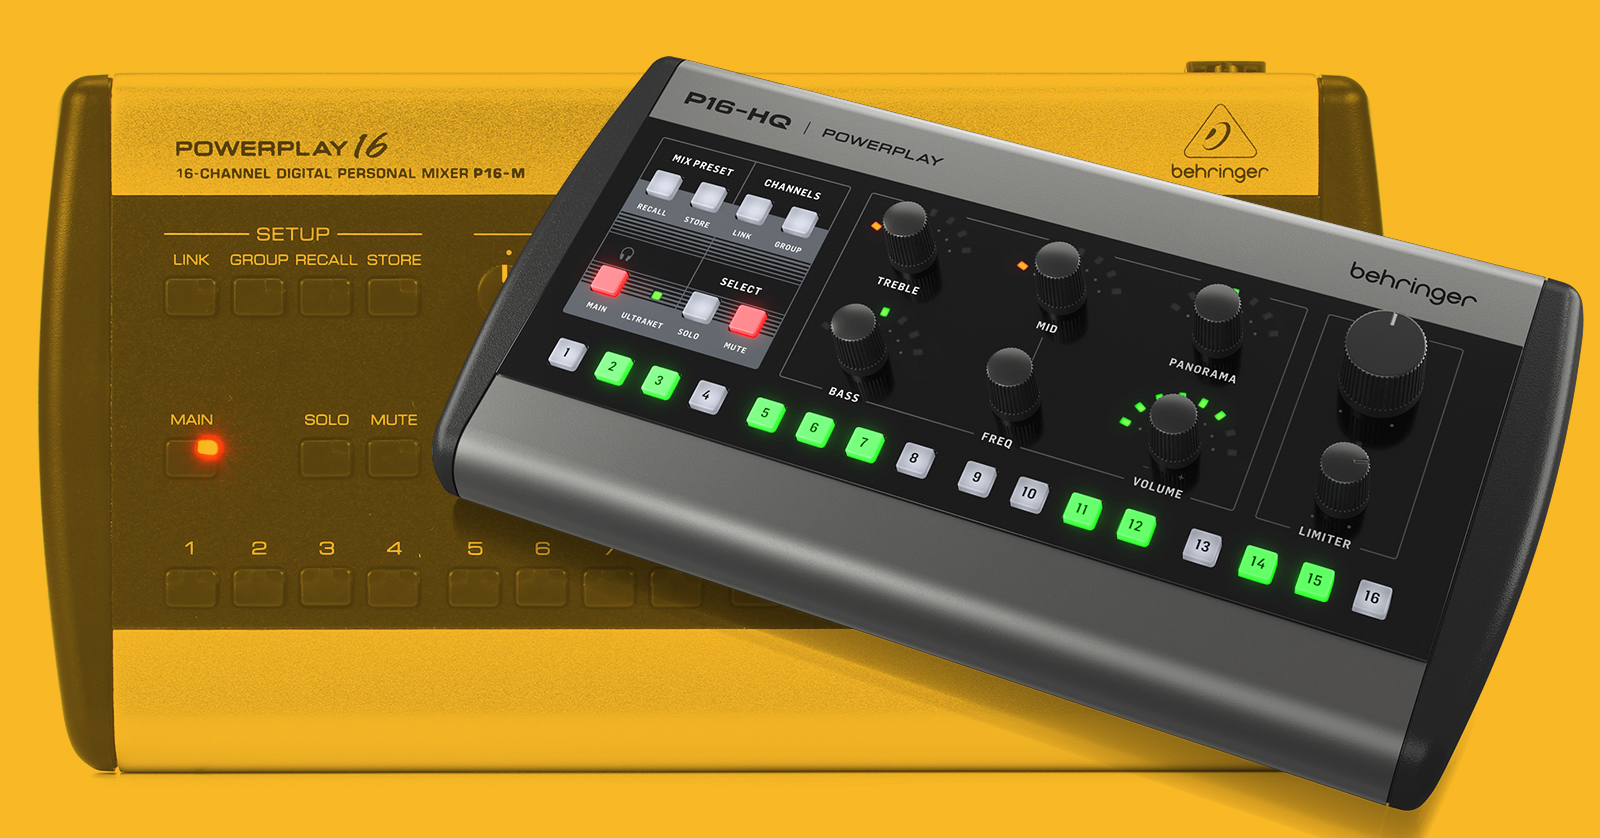
P16 Basic Operation
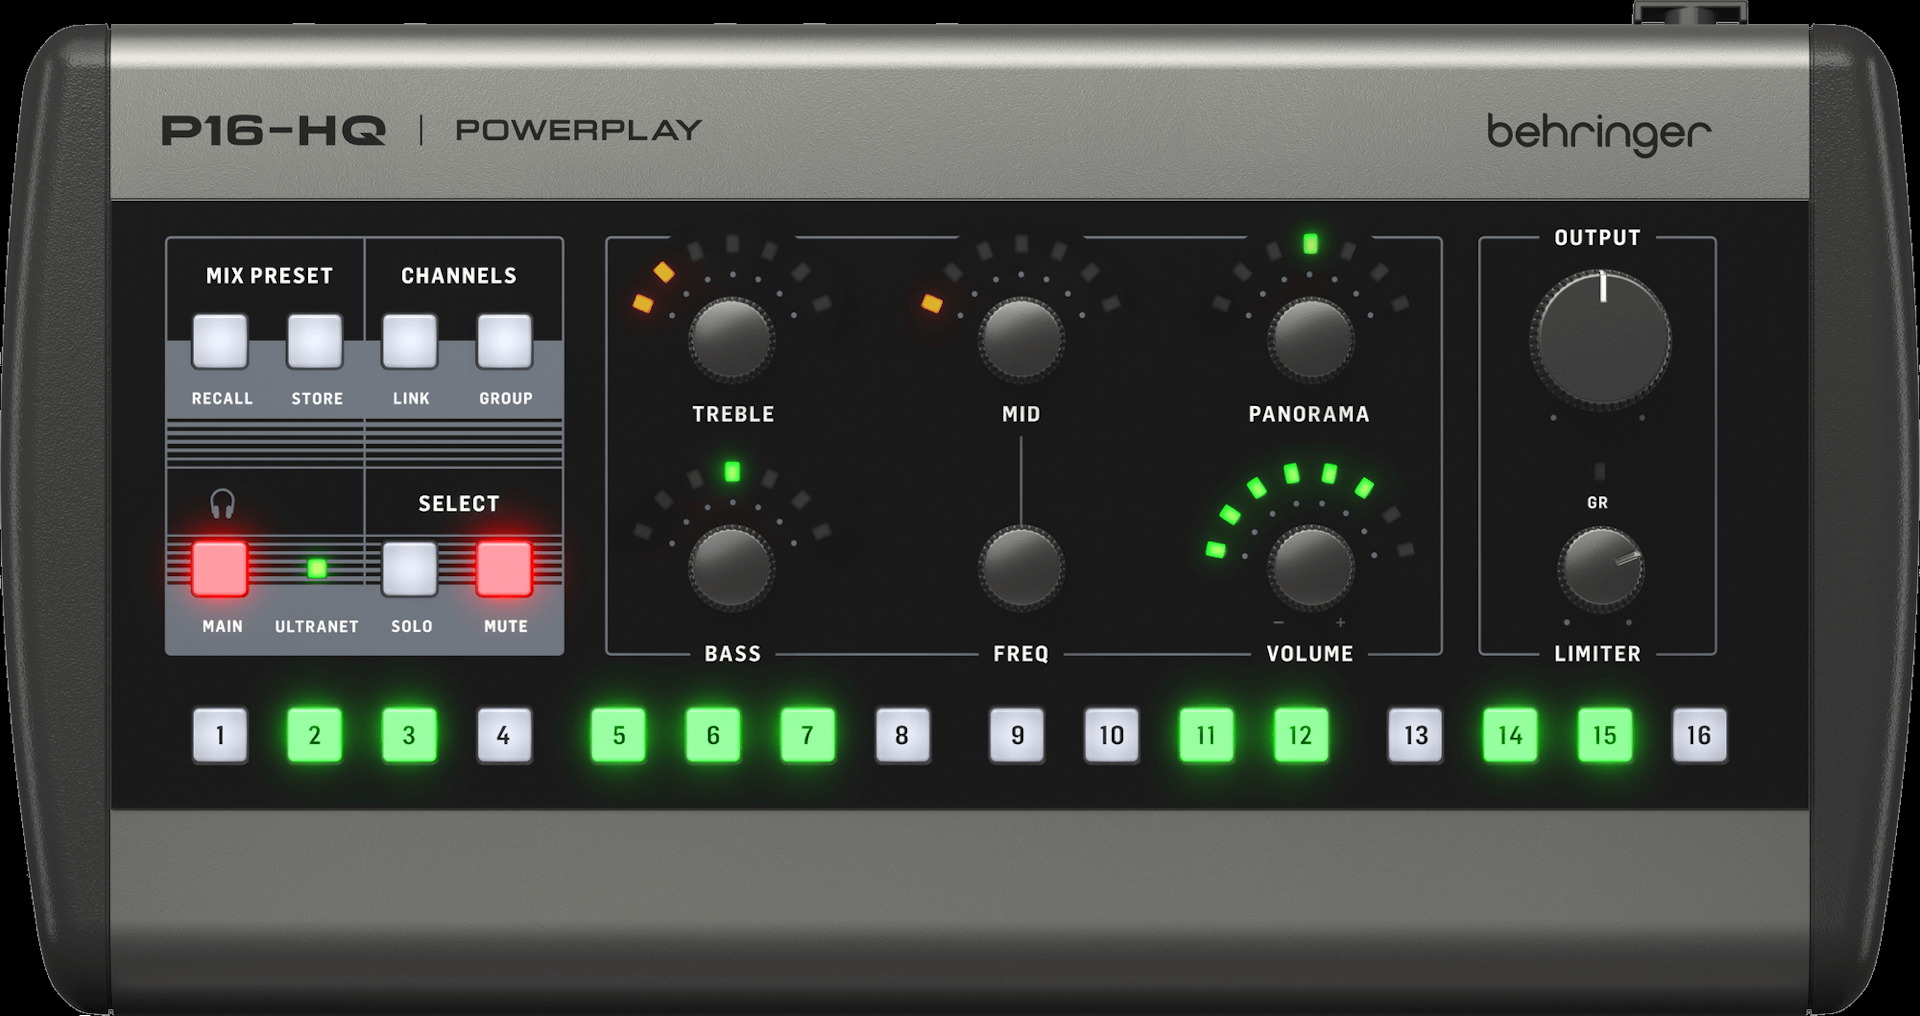
P16-HQ front panel
The P16 receives up to 16 channels of audio provided by the mix engineer. Each person with a P16 can set an independent volume, tone, and pan position for each of the 16 audio channels that are represented by the 16 buttons along the bottom.
You can select channels and assign them to stereo pairs. You can also group several channels together so that you can adjust the volume of every channel in that group together with one turn of the volume knob.
You can also select Solo or Mute for each channel.
That’s one mix. You can store 16 different mixes as presets, which you can recall.
The Main button lets you set the main volume, the balance, and the EQ for the whole mix.
The Output knob controls the signal going to your monitor wedges or your headphones. The Limiter knob can be adjusted to prevent transient loud sounds from overloading the outputs.
Here’s Behringer’s overview video for the P16-M:
POWERPLAY P16-M 16-Channel Digital Personal Mixer
Learn more in the Behringer Powerplay P16-HQ Quick Start Guide.
P16 Factory Reset
You can reset your P16-M or P16-HQ by following these steps:
How do I restore the default settings on my Behringer P16-M?
Related Articles
When you need help, Sweetwater has the answers!
Our knowledge base contains over 28,000 expertly written tech articles that will give you answers and help you get the most out of your gear. Our pro musicians and gear experts update content daily to keep you informed and on your way. Best of all, it’s totally FREE, and it’s just another reason that you get more at Sweetwater.com.

