
Zoom R Series Setup Guide
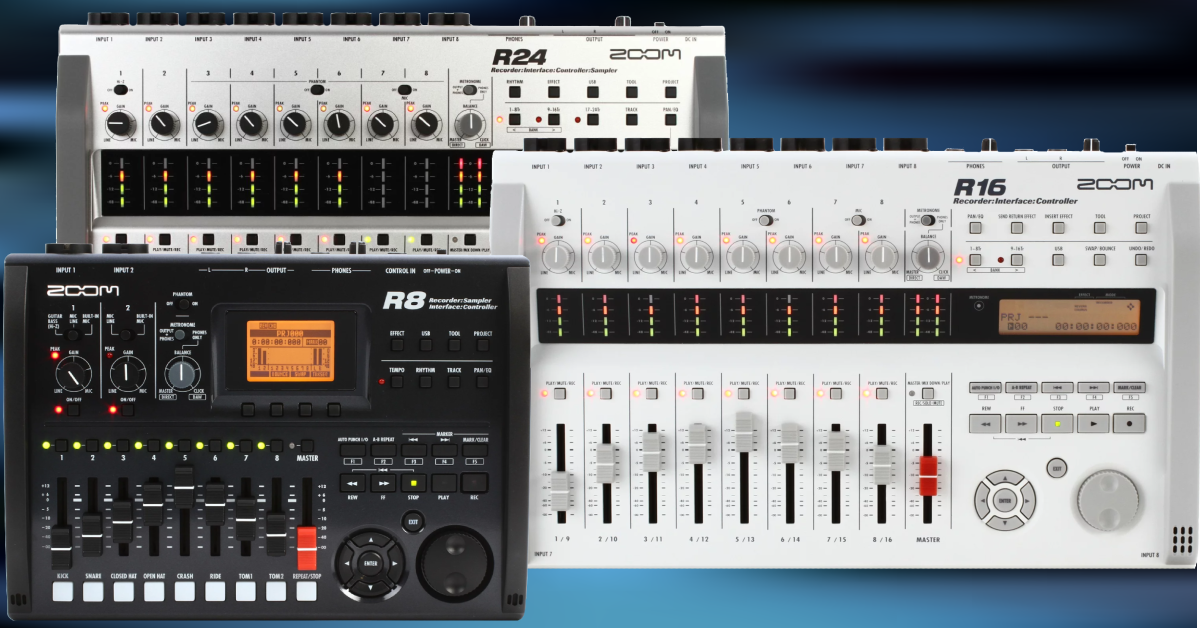
The Zoom R Series digital recorder is a great multi-use device that you can take anywhere! That’s why in this guide, we’ll show you how to get up and running so you can start recording in no time. Follow the instructions below to get started.
- Register the R Series with Zoom
- Setting up the R Series for the first time
- Create a project
- Using the R Series as an audio interface
Register the R Series with Zoom
The first thing you’ll want to do when you open the box is to register R Series with Zoom. To register the R Series with Zoom, you’ll need the serial number located on the bottom. Follow these steps below to register the Zoom R Series.
- Go to Zoom’s product registration page.
- Fill out the information, including the serial number which is located on the bottom of the unit, and then click Submit.
Setting up the Zoom R Series for the first time
While it might be tempting just to turn it on and start recording, there are a few things you’ll want to do first, especially if it’s going to rely on battery power. Don’t worry though, setting it up is straightforward.
Power options (selecting the battery type)
TIP: If you’re running on batteries, you can lengthen battery life by reducing the phantom power to 24v. Please note that most condenser mics will work perfectly fine on 24v, but some may require the full 48v to operate correctly. Double-check your microphone specs to be sure.
One great thing about the Zoom R Series recorders is that you have quite a few power options available: they can be powered by a computer (bus-powered), AA batteries, a standard USB AC power supply, and even a USB power bank! If you own a Zoom R16 or R24, you can also use the Zoom AD14 power supply. If you are using AA batteries, you will need to update the power settings so that the R Series can show that the battery charge level is accurate.
- Press TOOL, go to SYSTEM, then press ENTER.
- Select BATTERY, use the jog wheel to select the type of battery being used, then press ENTER.
- Rechargeable batteries can be used, but the R Series cannot recharge them.
Set the time and date
When you first power on the Zoom R Series, you should update the time and date. Setting this is especially helpful for managing your files and determining when the audio was recorded.
- Press the TOOL button, select SYSTEM, then press ENTER.
- Scroll down to DATE/TIME, then press ENTER.
- Use the jog wheel to update the date and time.
- Once complete, move the cursor to OK, then press ENTER.
Format the SD card
IMPORTANT: Formatting the SD card will erase any data that is currently stored there. Be sure that anything essential has been backed up to your computer before continuing.
The last thing you’ll want to do before you start recording is format the SD card on the Zoom R Series. While you can format SD cards on your computer, formatting them on the R Series will maximize its performance. The R Series accepts SDHC cards with a 32GB capacity. If the card isn’t recognized or you’re receiving errors, your card may not be compatible. Check out the Zoom R8, R16, and R24 compatibility lists.
- Press TOOL, select SD CARD, then press ENTER.Per
- Select FORMAT, press ENTER, select YES, then press ENTER.
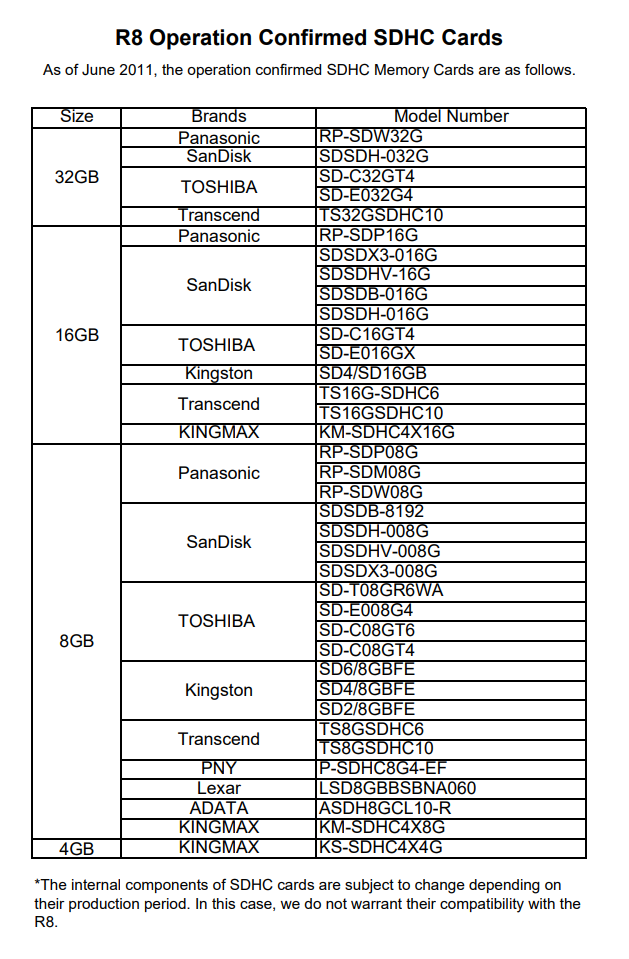
R8: Compatible SD Cards
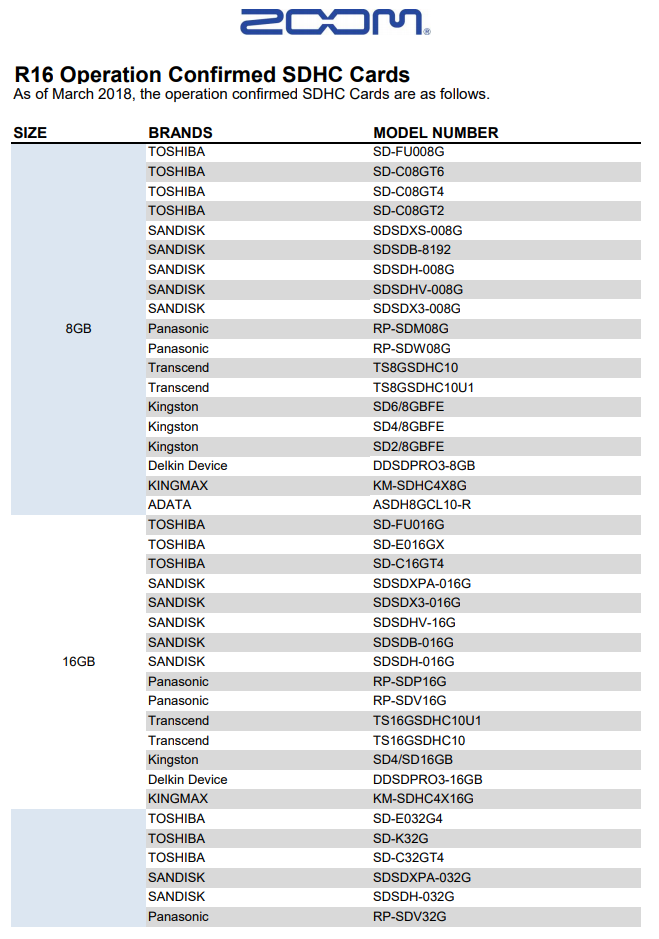
R16: Compatible SD Cards
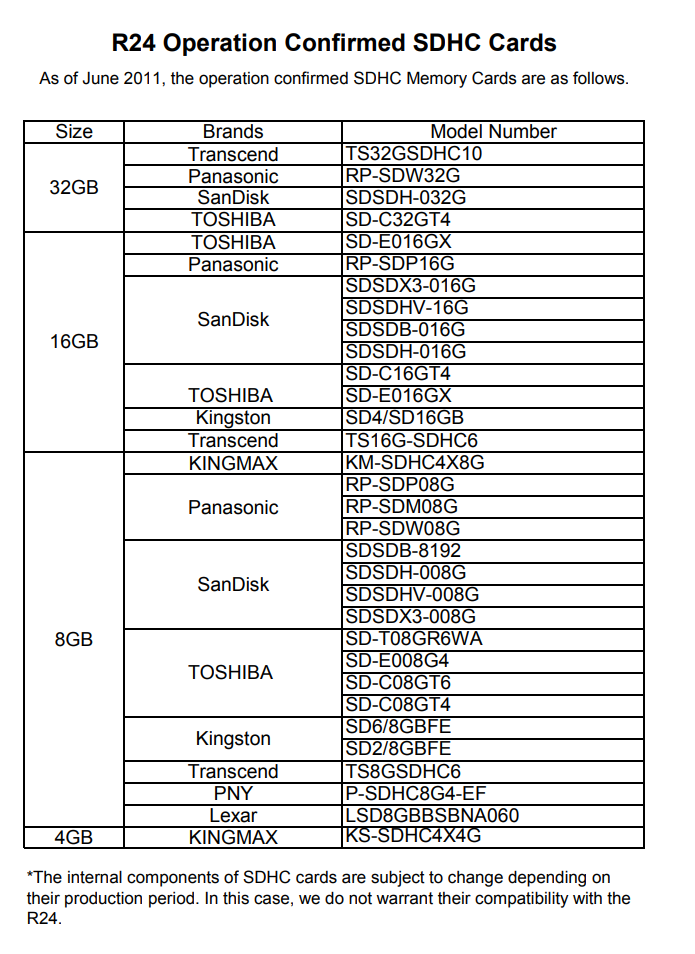
R24: Compatible SD Cards
Create a project
Now that everything is set up, it’s time to create your project and start recording! It’s just a matter of creating the project, connecting your gear, selecting the tracks, then pressing the record button.
NOTE: The file size is dependent on the sample rate and bit depth you select. The higher the quality, the larger the file will be. Check out the chart below for maximum recording time. Please note that these times are for mono tracks. The time is halved for stereo recordings.
- Press the PROJECT button, select NEW, then press ENTER.
- Select NAME, press ENTER, then use the jog wheel to update the name.
- Update the settings (bit length, insert effect, send-return effect, track status, bounce, track parameter, metronome) and sample rate, select EXECUTE, then press ENTER.

Record audio
Once your project is created, it’s time to record some audio. You’ll need to connect your instrument and microphone, switch to the correct input, adjust the input levels, and begin recording.
- Connect your instrument to one of the inputs of your device.
- Use the INPUT switch to select what is currently connected.
- If you’re connecting a stereo instrument, connect the L output to input 1, and the R to input 2.
- Press the INPUT ON/OFF button so the light illuminates, play the loudest you’ll be recording at and adjust the input gain to a point where the signal won’t clip.
- Select the track(s) you’ll be recording by pressing the track number pad located above its respective fader.
- Adjust the faders to adjust the monitoring volume to a point where it’s not clipping.
- Press REC to arm the track, then press PLAY to begin recording.
Using the R Series as an audio interface
Not only is the R Series a great portable recording solution, but it’s also a USB audio interface and DAW controller! If you’re a Mac user, it’s plug-and-play, meaning no additional driver software is needed.
- (PC users only) Download and install the driver for your R Series recorder from the Zoom website.
- Connect the device to your computer, press the USB button, select AUDIO I/F, select EXECUTE, then press ENTER.
- Go to your DAW’s audio settings and update the input and output to set the R Series as the recording and playback device.

Check out our DAW controller setup guides to learn how to set up your R Series as a control surface in your DAW!
Related content

Learn more about how to optimize your Windows 10 computer for audio recording.
Learn More
Learn more about optimizing your Mac computer for music production!
Learn More
Learn more about how to get up and running with Cubase!
Learn More
Additional resources
Zoom R Series: Importing Files to Computer
When you need help, Sweetwater has the answers!
Our knowledge base contains over 28,000 expertly written tech articles that will give you answers and help you get the most out of your gear. Our pro musicians and gear experts update content daily to keep you informed and on your way. Best of all, it’s totally FREE, and it’s just another reason that you get more at Sweetwater.com.


Offer applies only to single-receipt qualifying purchases. Select manufacturers may require that only the manufacturer’s products qualify towards the minimum purchase amount needed to be eligible for promotional financing. Otherwise, an invoice that meets the minimum purchase amount and contains at least one qualifying manufacturer product is eligible for promotional financing. No interest will be charged on promo purchase balance, and equal monthly payments are required on promo purchase until it is paid in full. The payments equal the amount financed divided by the number of months in the promo period, rounded up to the next whole dollar. These payments may be higher than the payments that would be required if this purchase was a non-promo purchase. During the last month(s) of the promo period the required monthly payment may be reduced due to the prior months’ rounding. Regular account terms apply to non-promo purchases. New Accounts as of 07/31/2025: Purchase APR is 34.99%. Penalty APR is 39.99%. Min Interest Charge is $2. Existing cardholders: See your credit card agreement terms. Subject to credit approval.
Offer applies only to single-receipt qualifying purchases. No interest will be charged on the promo balance if you pay it off, in full, within the promo period. If you do not, interest will be charged on the promo balance from the purchase date. The required minimum monthly payments may or may not pay off the promo balance before the end of the promo period, depending on purchase amount, promo length and payment allocation. Regular account terms apply to non-promo purchases and, after promo period ends, to the promo balance. New Accounts as of 07/31/2025: Purchase APR is 34.99%. Penalty APR is 39.99%. Min Interest Charge is $2. Existing cardholders: See your credit card agreement terms. Subject to credit approval.
The estimated required monthly payment shown which excludes taxes and delivery equals the amount financed divided by the number of months in the promo period, rounded up to the next cent. During the last month(s) of the promo period the required monthly payment may be reduced due to this rounding. These payments apply only with the financing offer shown. If you make these payments by the due date each month, you should pay off this amount financed within the promo period, if it is the only balance you are paying off. If you have other balances on your account, this payment will be added to any other minimum monthly payments.
Applies only to select items from this manufacturer. Ask your Sweetwater Sales Engineer for more details.