
Zoom Q2n-4K Setup Guide
In this guide, we will show you how to get up and running with the Zoom Q2n-4k for the first time. You’ll learn how to register the Q2n-4K Follow the sections below to get started.
First time setup
Setting up the Q2n-4K for the first time is straightforward. You just need to update the language, date and time settings, and the type of batteries currently being used.
- Turn on the Q2n-4K.
- Use the two middle buttons (arrows) to select the language, then press the record button.
- Use the middle buttons to update their respective time and date setting, then press the record button.
Power options
The Zoom Q2n-4K is very versatile when it comes to power. It can be powered by a computer, two AA batteries, a standard USB AC power supply, and even a USB power bank! One great feature is that when you do use a USB power bank, it will automatically switch to battery power once the power bank is drained.
If you do decide to use AA batteries with your Q2n-4K, you’ll need to update options depending on what type of AA batteries you’re using so it can display the correct battery life on the display’s battery indicator.
- Press the X (cog) button to enter the Settings menu.
- Press the AUTO-GAIN button three times, then use the VIDEO button to select the type of batteries you’re using: Alkaline, Ni-MH, or Lithium
Format the SD card
IMPORTANT: Formatting SD cards will erase any current data stored, so be sure to back your files up beforehand.
Before you start recording, you’ll need to format the SD card so the Zoom Q2n-4K can recognize it properly and maximize its performance. The Q2n-4K supports micro SD cards with a storage capacity up to 256GB. If your card isn’t recognized, you may have an incompatible card. Check out the Q2n-4K SD card compatibility list for more information.
- Press the X (cog) button to enter the settings menu.
- Use the AUDIO button to select SD Format.
- Press the RECORD button to format the SD card.
- Once the SD card is fully formatted, “DONE” will show up on the display.
- While it’s relatively quick, do not turn off the Q2K-4K during the formatting process.
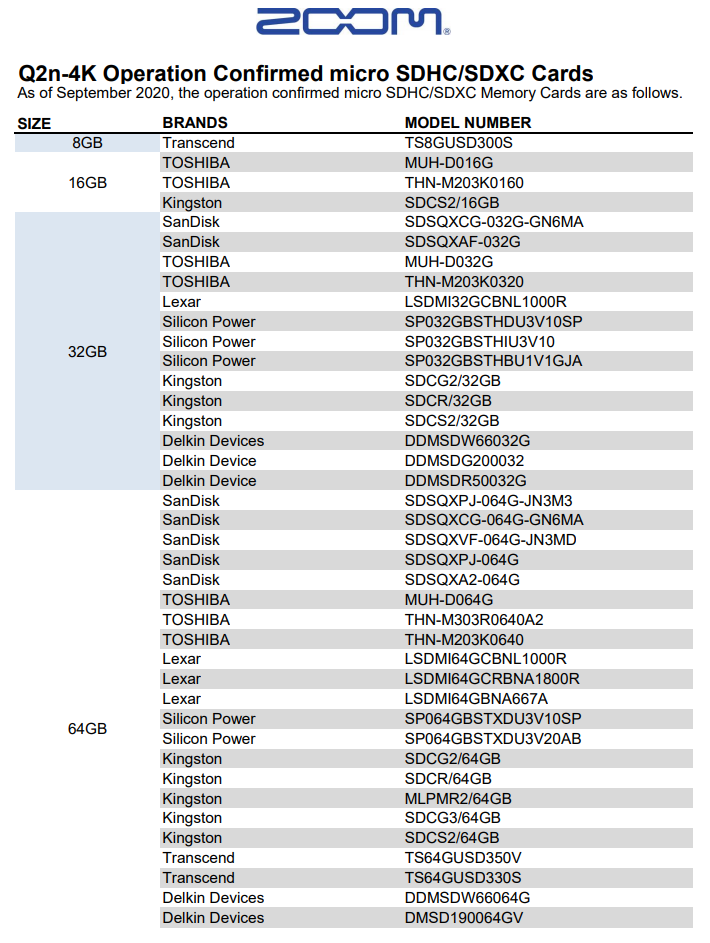
Click the image to view the compatible SD cards.
Recording video with the Zoom Q2n-4K
TIP: When setting audio levels, play at full performance volume and manually adjust the gain to where it peaks at -12dB. This will give you plenty of headroom and will decrease the risk of audio clipping.
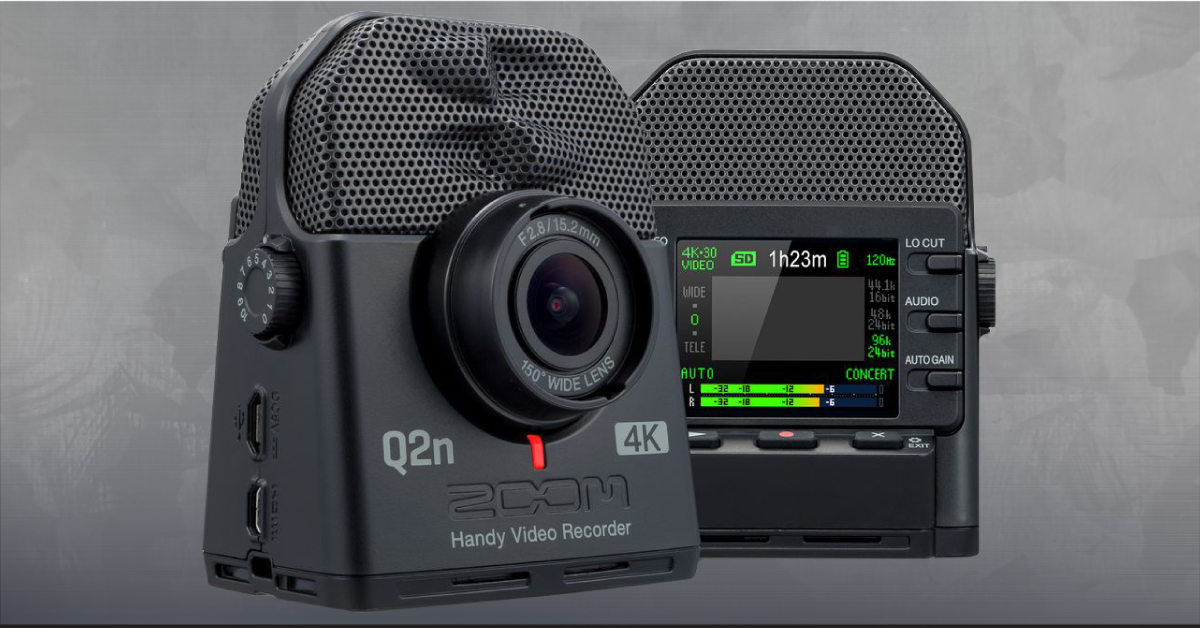
The Q2n-4K is a video camera with musicians in mind. With a plethora of video and audio options available, it’s easy to capture perfect recordings every time. All you need to do is press the RECORD button to start recording, then press it again to stop.
When recording for long periods of time with a microSDHC card, recordings will be split after 4 GB. When using a microSDXC card, recording will continue in one file even if the file size exceeds 4 GB.
To make things simple, almost every setting is adjustable with the press of the following buttons.
- VIDEO: Changes the camera resolution. Remember that the higher the quality, the larger the file size.
- FOV: Changes the Field Of View. This is similar to a zoom.
- SCENE: Changes the camera settings for the location conditions (e.g., club, night, outdoor)
- LO-CUT: Changes low frequency reduction. This is good for wind or background noise.
- AUDIO: Changes the audio resolution.
- AUTO-GAIN: Maintains a steady audio output level dependent on the option. Depending on the setting you choose, the auto-gain level may make the audio sound compressed or over-processed.
Use the Zoom Q2n-4K as a webcam
Not only can the Q2n-4K capture live performances, you can also use it as a webcam which is perfect for remote jam sessions with your friends. Setting it up is straightforward, as well. Since it’s class-compliant, no additional drivers are necessary.
- Press the X (cog) icon, then press the AUTO GAIN button once.
- Select WEBCAM, choose the resolution, then press the RECORD button.
- Connect the Q2n-4K to your computer, launch the software you’ll be using the camera with, go to its settings and select the Q2n-4K as your primary device.
Download and install HandyShare
HandyShare is a free app from Zoom that allows you to manage, edit, and share your videos. Whenever you connect your Q2n-4K to your computer, the HandyShare software will launch so you’ll be able to work with your audio and video files right away!
- Go to Zoom’s HandyShare download page, and select the download for your OS.
- Navigate to your Downloads folder, unzip the HandyShare file, then double-click the setup file to begin installation.
- PC: Right-click the HandyShare .zip file, select Extract all…, and then click Extract. Double-click the new Setup .exe file and follow the on-screen instructions.
- Mac: Double-click the HandyShare .zip file to unzip it and double-click the .dmg file. In the window that appears, double-click the HandyShare .pkg file and follow the on-screen instructions.
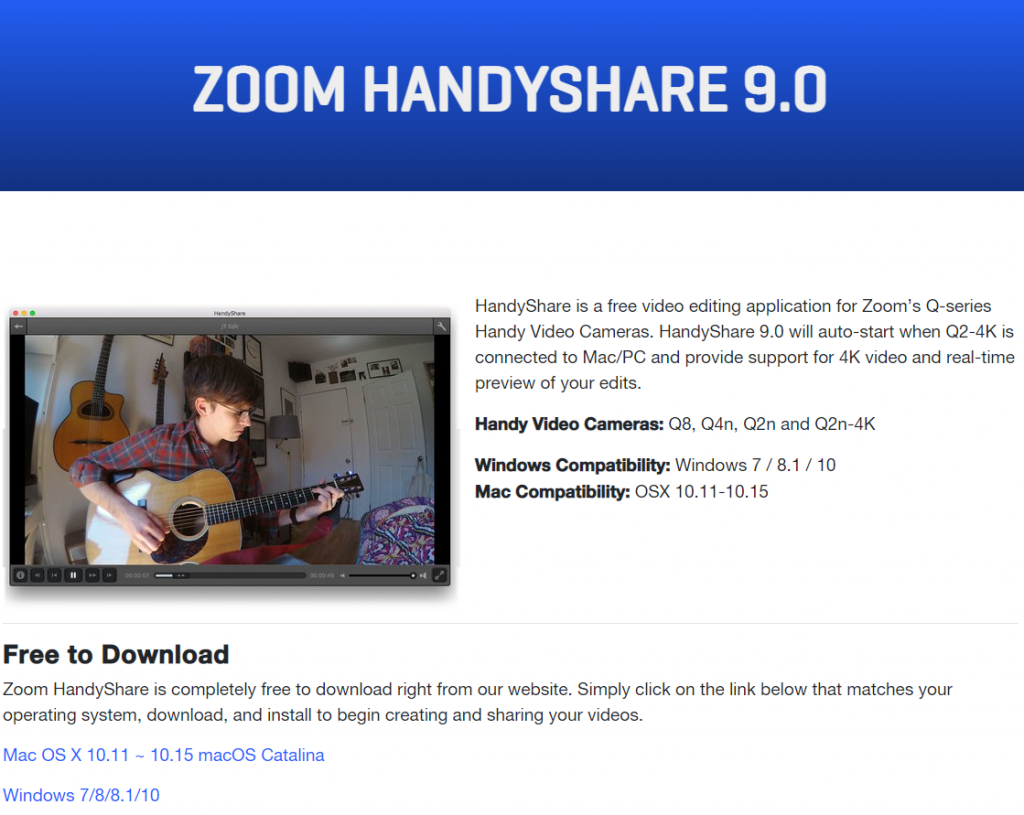
Click the image to download Zoom’s HandyShare
Related content

Learn more about the basics on how to shoot multicamera video!
Additional resources
Zoom Q1n-4K Tutorials and Creator Videos
When you need help, Sweetwater has the answers!
Our knowledge base contains over 28,000 expertly written tech articles that will give you answers and help you get the most out of your gear. Our pro musicians and gear experts update content daily to keep you informed and on your way. Best of all, it’s totally FREE, and it’s just another reason that you get more at Sweetwater.com.


Offer applies only to single-receipt qualifying purchases. Select manufacturers may require that only the manufacturer’s products qualify towards the minimum purchase amount needed to be eligible for promotional financing. Otherwise, an invoice that meets the minimum purchase amount and contains at least one qualifying manufacturer product is eligible for promotional financing. No interest will be charged on promo purchase balance, and equal monthly payments are required on promo purchase until it is paid in full. The payments equal the amount financed divided by the number of months in the promo period, rounded up to the next whole dollar. These payments may be higher than the payments that would be required if this purchase was a non-promo purchase. During the last month(s) of the promo period the required monthly payment may be reduced due to the prior months’ rounding. Regular account terms apply to non-promo purchases. New Accounts as of 07/31/2025: Purchase APR is 34.99%. Penalty APR is 39.99%. Min Interest Charge is $2. Existing cardholders: See your credit card agreement terms. Subject to credit approval.
Offer applies only to single-receipt qualifying purchases. No interest will be charged on the promo balance if you pay it off, in full, within the promo period. If you do not, interest will be charged on the promo balance from the purchase date. The required minimum monthly payments may or may not pay off the promo balance before the end of the promo period, depending on purchase amount, promo length and payment allocation. Regular account terms apply to non-promo purchases and, after promo period ends, to the promo balance. New Accounts as of 07/31/2025: Purchase APR is 34.99%. Penalty APR is 39.99%. Min Interest Charge is $2. Existing cardholders: See your credit card agreement terms. Subject to credit approval.
The estimated required monthly payment shown which excludes taxes and delivery equals the amount financed divided by the number of months in the promo period, rounded up to the next cent. During the last month(s) of the promo period the required monthly payment may be reduced due to this rounding. These payments apply only with the financing offer shown. If you make these payments by the due date each month, you should pay off this amount financed within the promo period, if it is the only balance you are paying off. If you have other balances on your account, this payment will be added to any other minimum monthly payments.
Applies only to select items from this manufacturer. Ask your Sweetwater Sales Engineer for more details.