
Yamaha YC Stage Keyboard Quickstart Guide

The Yamaha YC stage keyboards provide a versatile platform with a virtual drawbar organ, acoustic and electric pianos, and FM synth sounds, with extensive real-time control. With all that power, we can only scratch the surface here.
The printed manuals included in the box are also available online: the Yamaha YC61 Owner’s Manual and the Yamaha YC88 YC73 Owner’s Manual. The YC Stage Keyboard Supplementary Manual details improved functions in the newest firmware updates.
Let’s get started.
- Register the Yamaha YC Stage
- YC Stage Setup and Connections
- Sound Structure on the Yamaha YC Stage
- MIDI and Audio Interface over USB to Your Computer
- Share Sounds with Yamaha Soundmondo
Register the Yamaha YC Stage

Creating a new account on Yamaha USA’s website
We know you are eager to play your organ, but please take a minute to register your purchase with Yamaha. Go to usa.yamaha.com. In the upper right corner of the screen, click on the account icon next to the shopping cart. Create a new account and sign in. Click on the Product Registration link.
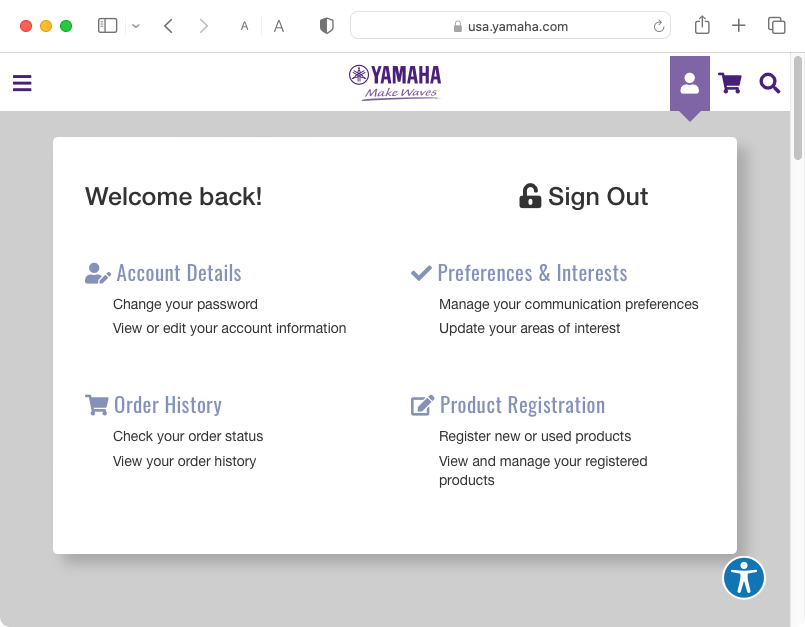
Yamaha Product Registration link
Provide your keyboard’s product name, serial number, purchase date, and other information.
Next, go to Yamaha’s Download page. Download and install the appropriate USB driver for your version of macOS or Windows, as you will want to connect your CP to your computer. Carefully follow the installation instructions that Yamaha provides with the download.
If you have a Mac with Apple silicon
If you have a Mac with Apple silicon, installing the Yamaha Steinberg USB Driver for macOS requires the extra step of booting into Recovery mode and changing your Mac’s security policy in order to grant permission for a piece of software called a kernel extension.
Follow the instructions in our SweetCare article Enabling Kernel Extensions on Mac with Apple silicon.
Complete the process by following the instructions in the Yamaha document Yamaha Steinberg USB Driver Installation Guide for macOS 11 or later (Intel/Apple silicon).
YC Stage Setup and Connections
Setting up
Connect the supplied power cord to the instrument’s rear panel jack. Connect the other end to a power outlet.
The instrument has no built-in speakers, so you will need to connect external speakers or headphones.
Make sure that the Master Volume on the front panel is turned all the way down.
Plug in all the connections you need before you power up the instrument.
Connections
Standby/On:The power switch has two positions. With the power cable connected and the switch in Standby mode, the keyboard is off, but a small amount of electrical power is provided to the unit. If you won’t use the keyboard for some time, unplug the power cable.
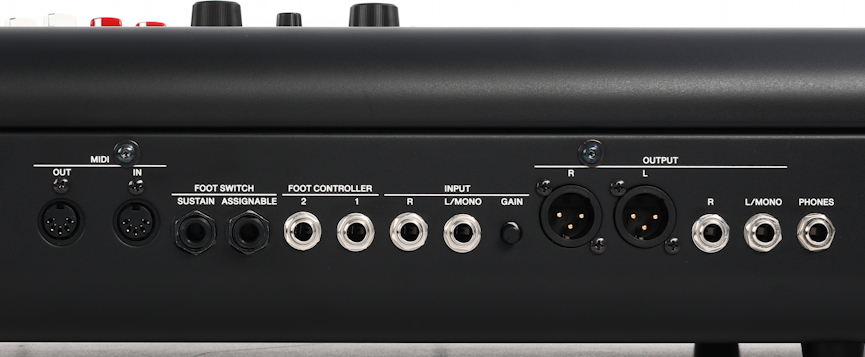
Back panel connections on the YC88 and YC73 keyboards
Phones: This is for stereo headphones with a 1/4-inch TRS plug.
Output:
- The YC61 provides 1/4-inch jacks for connecting unbalanced, line-level instrument cables. Connect a single cable with a 1/4-inch TS plug into the L/Mono jack to output a monaural audio signal to your speakers, mixer, or audio interface. Connect another cable with a 1/4-inch TS plug into the R jack for stereo output.
- The YC88 and YC73 provide the same pair of 1/4-inch jacks but also provide a pair of balanced XLR outputs. You can use one pair of jacks or the other. If you use both, the same audio will be output from each pair.
Input: Connect an external audio device using monaural cables with 1/4-inch TS plugs to get stereo input. The YC will mix the output of that device with that of the YC itself. Adjust the input volume using the Gain knob.
Foot Controller: Connect one or two Yamaha FC7 expression pedals, sold separately. You can assign the pedals to different functions. By default, Foot Controller 1 is assigned to “Expression,” and Foot Controller 2 is assigned to “Pedal Wah.” You can change function assignments on the front panel using the Settings button > Controllers > Foot Controller > Assign. Refer to page 60 in the YC Owner’s Manual, in the Control Change Number List chart, for a list of parameters that can be assigned.
Foot Switch:
- The Foot Switch Sustain jack accepts the included Yamaha FC3A continuous piano sustain pedal. You can also switch the pedal’s function to switch the Rotary Speaker effect from Slow to Fast. Use the Settings button > Controllers > Sustain Pedal.
- The Foot Switch Assignable jack can receive a Yamaha FC4A or FC5 footswitch, sold separately, which you can assign to piano soft pedal, sostenuto, or other functions.
MIDI: Connect standard 5-pin DIN MIDI cables to send and receive MIDI data from external keyboards or controllers.
USB:
- To Device: This USB-A connection accepts a compatible USB flash drive for saving your data, Voices and Live Sets, or installing a firmware upgrade. Format a flash drive on the YC itself, using the YC’s File utility. For more information, consult the Owner’s Manual in the section Saving / Loading Data.
- To Host: This USB-B port connects the instrument to a computer or device using a USB cable. This provides both MIDI over USB and digital audio over USB.
The YC73 and YC88 have two attachment brackets to hold Yamaha’s YMR-04 sheet music rest, sold separately.
Sound Structure on the Yamaha YC Stage
The YC Stage has three instrument sections, called Voices. These can be assigned to different zones on the keyboard (by split points) or layered. The Voices are:
- Organ
- Key A
- Key B
Each instrument section is engaged or disengaged by a small Section On/Off switch with an LED light.
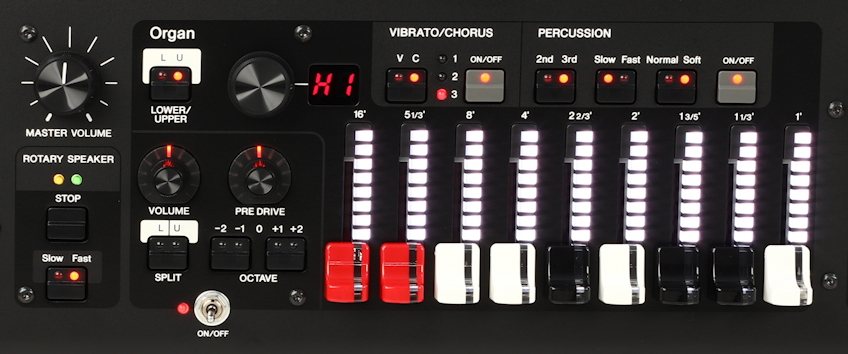
Yamaha YC Stage Organ Section
On the left of the front panel, the Organ section provides a virtual Rotary Speaker and amplifier section, the familiar nine Drawbars, and Vibrato/Chorus and Percussion settings. This section generates virtual models of the drawbars and transistors of the electromechanical and electronic organs it emulates, as well as newer-generation FM (Frequency Modulation) organ sounds.
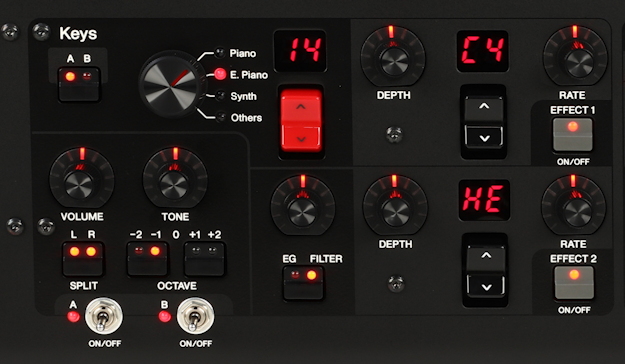
Yamaha YC Stage Keys Section
On the right of the front panel, the Keys section provides a knob to select Piano, E. Piano, Synth, and Others, which includes acoustic instrument and orchestral sounds. The red rocker switch enables the selection of different instrument sounds within each section. There are two Effects available in this section. Two independent effects can be called up; each has its own On/Off button.
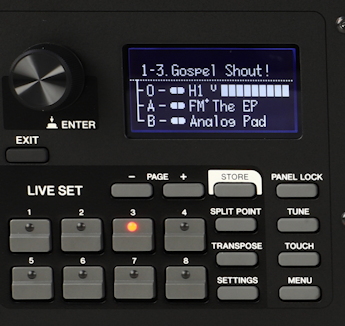
Yamaha YC Stage Live Set Section
Between the Organ and Keys sections is the Live Set control panel with the display screen and Encoder knob. This is where you can call up and select the different Voices and associated effects, set up layers and split points, adjust programming parameters, and save Voices and Live Sets.

Yamaha YC Stage Effects Sections
On the right-most side of the control panel are the Effects Sections.
The Effect can be chosen from all the effects on the YC and assigned to either Organ, Key A, or Key B.
The Speaker/Amp can be assigned to either Organ, Key A, or Key B, enabling you to assign the Organ’s Rotary Speaker and overdrive effects to a piano or other sound.
The Reverb effect applies to all three Voice sections, but you can use the Depth knob to adjust the send level for each Voice section independently.
The Master Equalizer affects the entire signal path and can be turned on or off.
Consult the Yamaha YC61 Owner’s Manual, the Yamaha YC88 YC73 Owner’s Manual, and the YC Stage Keyboard Supplementary Manual for more information.
Here are some Yamaha videos demonstrating the sounds and providing a library of short tutorials.
MIDI and Audio Interface over USB to Your Computer
To connect to a computer, you first need to download and install the appropriate Yamaha USB driver for your version of macOS or Windows. Follow the instructions with the installer.
After connecting the USB cable to your computer, set the instrument to send and receive MIDI through the cable by going to the Menu button > General > MIDI Settings > MIDI Port > USB > On.
As the YC keyboard transmits audio over USB, on your computer, you can select the instrument as an audio input source in your System Settings and in your DAW.
You can also connect your YC keyboard to an Android device, Apple iPhone or iPad, for MIDI and audio, for use with various apps.
Here are Yamaha’s instructions for connecting your keyboard to an Android device.
Here are Yamaha’s instructions for connecting to an iPhone or iPad.
Share Sounds with Yamaha Soundmondo
Yamaha’s “social sound-sharing community,” Soundmondo, can be accessed on your computer’s web browser or through an app for iPhone and iPad. Soundmondo is a great place to find presets, or Voices, for Organ and Keys sounds for the YC Stage, shared by users around the world, which you can load into your instrument. Check out Sweetwater’s guide:
Related Articles
When you need help, Sweetwater has the answers!
Our knowledge base contains over 28,000 expertly written tech articles that will give you answers and help you get the most out of your gear. Our pro musicians and gear experts update content daily to keep you informed and on your way. Best of all, it’s totally FREE, and it’s just another reason that you get more at Sweetwater.com.

