
Technics SL-1200MK7 Quickstart Guide

The Technics SL-1200 has been a household name for over 50 years, and for good reason. From studios to live setups, it’s the heart of any DJ’s setup, so in this guide, we will show you how to get it set up and connected for the first time. Follow the instructions below to get started.
SL-1200MK7 Setup
Before you get connected, you’ll need to get everything assembled. Technics has made this simple, but you’ll need to be precise so parts such as the cartridge needle aren’t bent.
Attach the cartridge
IMPORTANT: Don’t touch the stylus tip when attaching the cartridge to the tonearm!
The first and most crucial step in the setup process is attaching the cartridge to the tonearm. Although you need to insert it into the tonearm and lock it, you must align it beforehand to ensure you get the best performance and sound possible.
This is especially true if you have a headshell with a removable cartridge with adjustment screws. If it’s not installed or aligned correctly, you will run into playback issues. Our friends at Ortofon have a great video showing you how to align your cartridge correctly.
Cartridge setup | Lateral Alignment
Connect the leads correctly!
TIP: To make the leads easier to connect, we highly recommend using small needle-nose pliers to attach them.
The headshell has four colored leads: red, green, white, and blue. Each corresponds to the positive and negative terminals of each channel. Red (+) and green (-) are for the right channel; white (+) and blue (-) are for the left. You will hear humming and sound degradation if not connected to the correct post on your cartridge. Please refer to the cartridge manufacturer’s manual or website for the proper color coding and wiring diagrams.
Cartridge setup | Leads connections
Assemble the player
IMPORTANT: Keep any watches, phones, or credit cards away when removing the magnet cover.
Once you’ve attached the headshell, it’s time to assemble the player. It’s a simple process: you just need to connect the turntable, platter, and tonearm counterweight. Here are a few tips for assembling your SL-1200MK7.
- Once the magnet cover is removed, use a clean, dry microfiber cloth to remove any fingerprints or dirt before installing the turntable onto the center spindle.
- Place your fingers on the turntable’s two holes and press down the center spindle to remove it.
- Secure the tonearm while installing the turntable and platter so it doesn’t get in the way.
- After installing the turntable and slipmat, attach the tonearm counterweight.
Balance the Tonearm on the SL-1200MK7
IMPORTANT: Traction force plays a significant factor when making tonearm adjustments, so please take that into account when you are calibrating the tonearm. You can find the tracking force of your stylus on the manufacturer’s website.
After attaching the counterweight, you need to adjust and calibrate the tonearm to be perfectly parallel to the record. If it’s not balanced correctly, you will run into sound issues (stereo imaging specifically), and you could potentially damage the stylus.
- Place the turntable on a level surface and adjust the feet accordingly. For the most accurate results, we highly recommend using a level tool you can find at any hardware store.
- Twist the feet clockwise to lower the height and counterclockwise to raise the height.
- Remove the stylus cover, making sure it doesn’t bump into anything, and free the tonearm from the rest.
- Set Anti-Skating to 0, then slowly twist the counterweight until it’s perfectly parallel to the turntable.
- Once parallel, hold the counterweight and set the stylus pressure (inner dial) to 0.
- Turn the counterweight so the stylus pressure gauge reads the same as the traction force of your stylus. For example, if your stylus has a traction force of 3, ensure the pressure gauge reads 3.
- Set the Anti-Skating to the same number as the stylus pressure. If the traction force of your cartridge is more than 3g, Technics recommends setting the Anti-Skate to 3.
- You may need to make adjustments to control anti-skating depending on how you plan to use the SL-1200MK7. This is particularly true depending on your scratch movements.
Adjusting the tonearm height
TIP: Take the slipmat thickness and cartridge height into account when adjusting the tonearm height.
Adjusting the tonearm’s height is vital, as balancing the tonearm can make or break your performance and overall sound. This adjustment is similar to the weight. The arm must be perfectly parallel when vinyl is placed on the turntable. See Technics’s reference chart below for the height control setting based on your cartridge height.
- With the tonearm in the armrest, place vinyl on the SL-1200.
- Disengage the arm lock switch.
- Gently remove the tonearm from the armrest and place it so the stylus is lying on the outermost part of the vinyl.
- Use the tonearm height ring to raise or lower it.
- Once it’s perfectly parallel, set the arm lock switch to ENGAGED.
- If you’re unsure of the cartridge height, lower the cue arm, place the stylus on the record, then adjust the height as necessary.
- Technics recommends investing in some cartridge spacers if the cartridge height is too small to make the tonearm parallel.
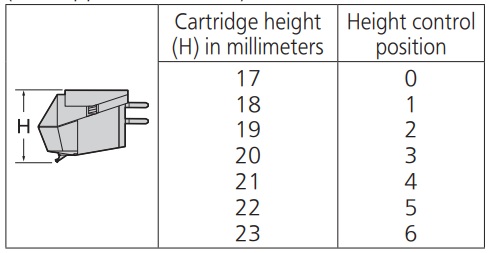
SL-1200 MK7 Height Control Reference Chart
Setup and Connections
Now that the SL-1200MK7 is correctly assembled and calibrated, it’s time to connect it to your audio system. Since it’s just connecting the earth leads and phono cables to your mixer or amplifier, here are a few tips to get you up and running.
- Like any other audio gear, you must make all your connections before powering on your system.
- Make sure the PHONO earth lead is connected and tightened. You may hear a hum from your speakers if it isn’t securely tightened.
- Be sure to disconnect the SL-1200MK7 if you won’t be using it for an extended period.
- There may be a few additional setup procedures depending on the amp or mixer you’re using, so make sure to refer to its Owner’s Manual while connecting the turntable.
SL-1200MK7 DIP switches
TIP: Use an appropriate-sized flathead or Phillips head screwdriver to flip the DIP switch. Another great option is a paper clip.
Eight DIP switches control various functions on the SL-1200MK7, such as brake speed, LED color, torque, and RPM speed. Here is the list of what each DIP switch controls.
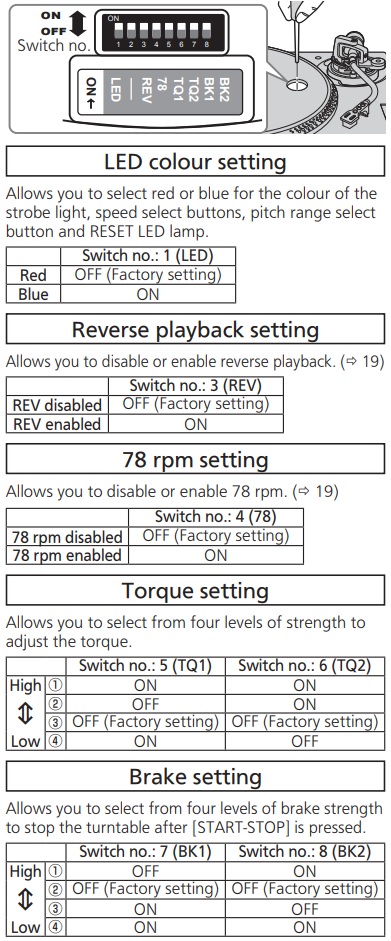
DL-1200 MK7 DIP Switch Positions
Related Articles
When you need help, Sweetwater has the answers!
Our knowledge base contains over 28,000 expertly written tech articles that will give you answers and help you get the most out of your gear. Our pro musicians and gear experts update content daily to keep you informed and on your way. Best of all, it’s totally FREE, and it’s just another reason that you get more at Sweetwater.com.


Offer applies only to single-receipt qualifying purchases. Select manufacturers may require that only the manufacturer’s products qualify towards the minimum purchase amount needed to be eligible for promotional financing. Otherwise, an invoice that meets the minimum purchase amount and contains at least one qualifying manufacturer product is eligible for promotional financing. No interest will be charged on promo purchase balance, and equal monthly payments are required on promo purchase until it is paid in full. The payments equal the amount financed divided by the number of months in the promo period, rounded up to the next whole dollar. These payments may be higher than the payments that would be required if this purchase was a non-promo purchase. During the last month(s) of the promo period the required monthly payment may be reduced due to the prior months’ rounding. Regular account terms apply to non-promo purchases. New Accounts as of 07/31/2025: Purchase APR is 34.99%. Penalty APR is 39.99%. Min Interest Charge is $2. Existing cardholders: See your credit card agreement terms. Subject to credit approval.
Offer applies only to single-receipt qualifying purchases. No interest will be charged on the promo balance if you pay it off, in full, within the promo period. If you do not, interest will be charged on the promo balance from the purchase date. The required minimum monthly payments may or may not pay off the promo balance before the end of the promo period, depending on purchase amount, promo length and payment allocation. Regular account terms apply to non-promo purchases and, after promo period ends, to the promo balance. New Accounts as of 07/31/2025: Purchase APR is 34.99%. Penalty APR is 39.99%. Min Interest Charge is $2. Existing cardholders: See your credit card agreement terms. Subject to credit approval.
The estimated required monthly payment shown which excludes taxes and delivery equals the amount financed divided by the number of months in the promo period, rounded up to the next cent. During the last month(s) of the promo period the required monthly payment may be reduced due to this rounding. These payments apply only with the financing offer shown. If you make these payments by the due date each month, you should pay off this amount financed within the promo period, if it is the only balance you are paying off. If you have other balances on your account, this payment will be added to any other minimum monthly payments.
Applies only to select items from this manufacturer. Ask your Sweetwater Sales Engineer for more details.