
Roland Fantom Tones, Zones, and Scenes
Getting started
In this guide, we will show you how to create, save, and load sounds. You’ll learn how to create different types of sounds and use them in a Scene. Follow the sections below to get started.
Tones, Zones, and Scenes
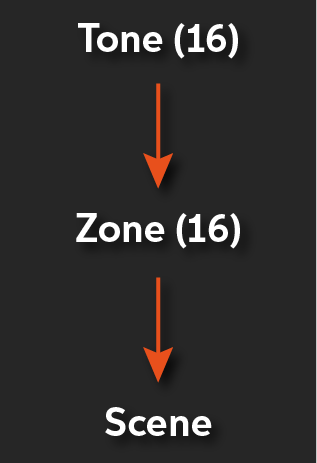
The Roland Fantom already comes preloaded with over a thousand presets, all fully customizable. The sounds break down into three categories; Tones, Zones, and finally, Scenes. Tones are individual sounds such as a piano or bass, which are stored in Zones. You can have up to 16 tones for each Zone. Finally, each Zone and its included settings like effects, volume, and mix, are saved as a Scene. Sequencer and song data are saved within Scenes, as well.
- There are three different types of Tones. Z-Core, which produces the sound of an individual instrument like a synth, Drums, and V-Piano. V-Piano tones can only be used in Zone 1.
- You can add up to 16 Tones to an individual Zone, and 16 Zones per Scene.
- Scenes are broken up into four banks; A, B, C, and D. To quickly navigate between banks, press the ENTER button and select the bank you wish to go to while in the SCENE SELECT window.
- Visit the Sound List for the full list of Tones available on the Roland Fantom.
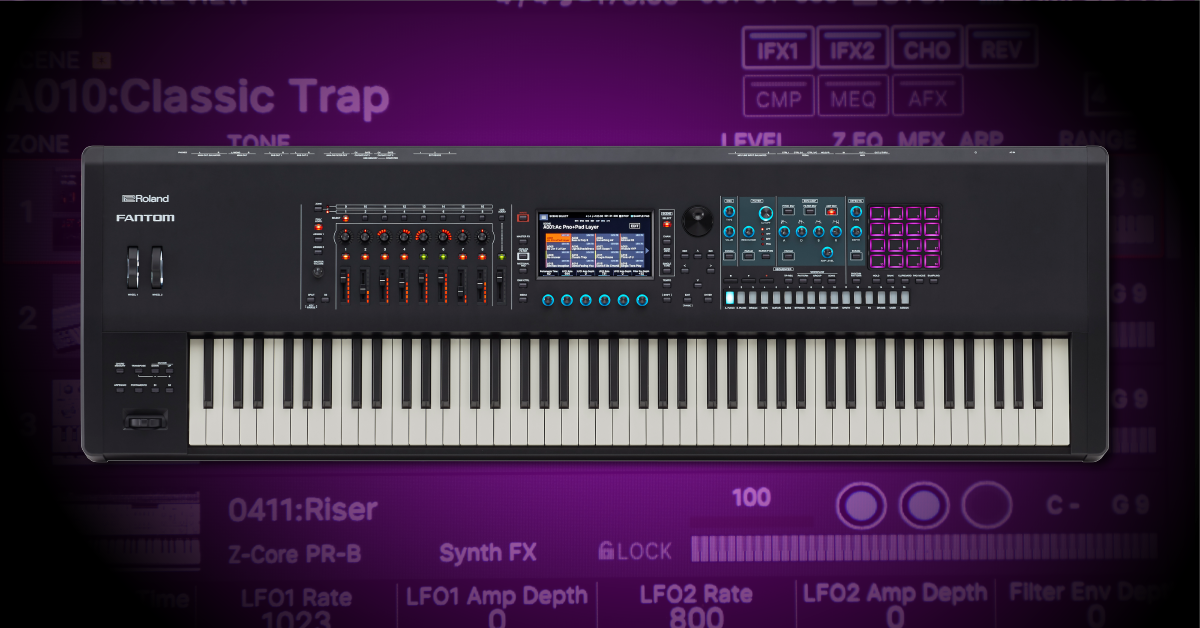
Fantom Signal Path.
Create a Zone
When you first turn on the Roland Fantom, the Scene Select window will appear, and you will see 16 Zones. You can navigate through the scenes using the touchscreen, jog wheel, or the cursor buttons. Once you’ve selected a Zone, you can edit individual Tones, perform splits, layers, and add effects. You can also perform quick edits to the tone via the knobs beneath the touchscreen. To get you started, let’s create a custom Zone from scratch.
- Press the SCENE SELECT button, press the ENTER button, and then press Bank D. This takes you to the User Scenes.
- Press the Zone you wish to edit and press the ZONE VIEW button.
- To display multiple tones, continue pressing the ZONE VIEW button, or press the DISP drop-down box on the touchscreen and select the number of tones to view.
- Select the tone you want to change and press the ENTER button to open the Tone List and press OK once you’ve selected a tone. Alternatively, you can press one of the 16 Tone Selection buttons to navigate through the presets.
- To layer multiple tones, press the Zone INT/EXT buttons above the faders to select them, then use the faders and pan knobs to adjust the mix.
Splitting tones
When splitting tones, you divide Zone 1 and Zone 4. This means the upper half of the workstation will trigger the Tone loaded on Zone 1, and the lower half will trigger Zone 4’s Tone. By default, the split occurs halfway, but you can also define your own split point. Follow these steps to split Tones.
- Press the SPLIT button to engage the split function.
- Hold the SPLIT button and then press the key to define the new split point.
Layering splits
The Fantom can layer and split multiple Zones, which allows you to create very complex and unique sounds. Instead of using the SPLIT function, you will assign the range of each Zone by using the KEY RANGE function. While in Scene Select, use the cursor buttons to navigate to the RANGE section and move the jog wheel to adjust the upper and lower note range.
Motional Pad
The Fantom’s Motional Pad lets you control the volume of four different Zones at the same time with your fingertip. This gives you the ability to create very dynamic effects while you’re playing. Any Motional Pad edits you make can be saved to the Scene, as well.
- Press the MOTIONAL PAD button to engage the function.
- Holding SHIFT while pressing the MOTIONAL PAD button will open the Motional Pad window without turning it on or off.
- Select a Zone by pressing Zone on the touchscreen and selecting the number it’s loaded on. If you press the tone name from the Motional Pad menu, it will also change in the Zone, as well.
- Hold a key down, and drag your finger across the screen to control the volume. Engaging AUTO mode will move the cursor around randomly.
- When HOLD is engaged, the cursor will stay in the position where you last touched.
Editing your sounds
Every Tone, Zone, and Scene on the Roland Fantom is fully editable. Both internal and external controls can be saved to each scene. If you’re using this in a studio, you’ll typically just be focusing on individual tones, but in a live setting such as a rock concert or a worship service, you will be focusing more on editing Zones and Scenes.
Tones
Depending on which tone is selected, you can edit its characteristics in different ways. For example, Z-Core tones such as synth or pad, allows you to change parameters such as the LFO, Envelope, Filter, and Oscillator. You can make quick edits like adjusting portamento or resonance using the knobs below the touchscreen, or you can fine-tune more characteristics in the Tone Edit menu. To learn about every parameter you can adjust for each tone and its effects, visit the Tone Edit guide and Effects Edit guide. Follow these steps to edit a Tone.
- Select the Tone you want to edit, and then press the MENU button.
- Press TONE EDIT and navigate through the menus to fine-tune the parameters available.
- Once you’ve finished, press WRITE, select TONE, rename it, and press OK.
Zones
Once you create a Zone, you can apply edits to it, such as Master EQ, pitch, Offset, and external MIDI settings. To learn more about what functions you can edit, visit the user reference guide. Follow these steps to edit a Zone.
- Select the Scene you wish to edit and press the MENU button.
- Press ZONE EDIT and use the knobs beneath the touchscreen to navigate and change the parameters.
- You can also reset the Zone to its default parameters by pressing UTILITY and selecting INITIALIZE SCENE.
- Press EXIT once the changes have been made.
Scenes
There are two menus to edit Scenes. One is to adjust the parameters such as general level and tempo, knob controls, and also foot pedal and external gear control. The other menu allows you to “rate” scenes, make memos (a brief description of the Scene), and change the scene color. One other feature of the Fantom is called a Scene Chain, which allows you to save a group of Scenes together and quickly recall them using the Tone Selection buttons. This is very useful in live applications.
Editing Scene parameters
- Select the Scene you wish to edit, and press the MENU button.
- Select SCENE EDIT and use the knobs beneath the touchscreen to navigate and adjust the parameters.
- Once the changes have been made, press WRITE, select SCENE, rename it and press OK.
Editing Scene appearances
- Select the Scene you wish to edit and press EDIT on the touchscreen.
- Use the knobs underneath the touchscreen to adjust the settings, and then press WRITE to save the changes.
Creating Scene Chains
- Press the CHAIN button to enter the Scene Chain mode, and then press EDIT to create a new chain.
- Press Select Scene, choose your scene and press OK to add it. You can also cut, copy, and paste scenes into specific slots.
- Press RENAME to rename the scene, and then press WRITE to save it.
Roland Fantom Synthesizer: Sound
When you need help, Sweetwater has the answers!
Our knowledge base contains over 28,000 expertly written tech articles that will give you answers and help you get the most out of your gear. Our pro musicians and gear experts update content daily to keep you informed and on your way. Best of all, it’s totally FREE, and it’s just another reason that you get more at Sweetwater.com.

