
Roland AIRA Compact Quickstart Guide

In this guide, we will show you how to register, set up, and connect Roland AIRA Compact series devices. Follow the sections below to get started.
Register the Device
Before we dive into setting up your AIRA Compact, the first thing to do is register the product with Roland. Registering the device gives you access to Roland’s product support, an extended warranty, and exclusive training content. Follow the steps below to register.
- Log in to your Roland Backstage account. If you don’t have one yet, you can create one here.
- Roland will then send an account activation email to the registered email address to complete the account creation process.
- If you don’t receive an email, be sure to check your spam folder!
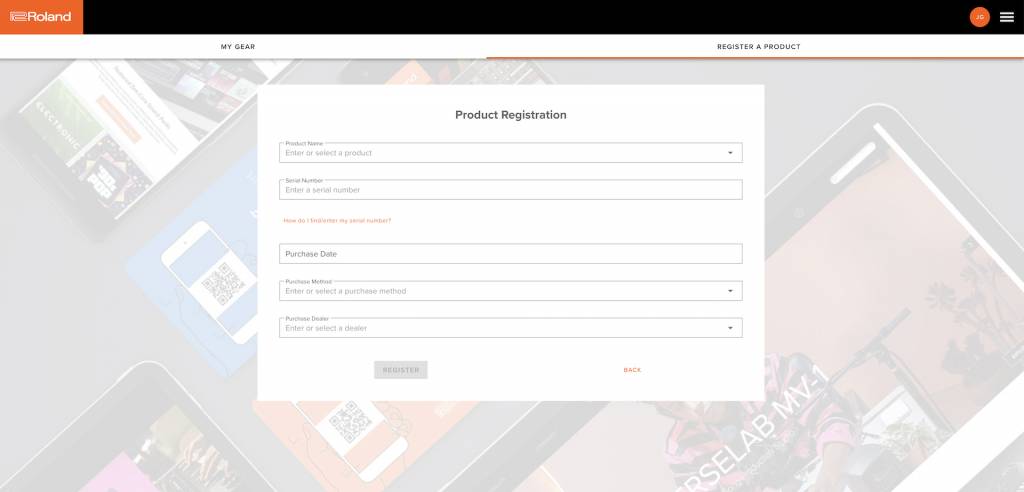
- On your account home page, click My Gear and select Register a Product.
- Fill out the required information, including the serial number located on the bottom of the unit, and click Register.
- Have your Sweetwater invoice with you, as you will need to enter the purchase date, method, and Dealer (Sweetwater).
- Have your Sweetwater invoice with you, as you will need to enter the purchase date, method, and Dealer (Sweetwater).
Click the image to register your AIRA Compact synth.
Setup and Connections
Now that your hardware is registered, let’s review the setup and hardware connections. They are relatively straightforward, but here are some tips to get you up and running.
- If syncing with external devices, use TRS to TRS MIDI cables or TRS to 5-pin MIDI cables. Standard 1/8-inch audio cables will not work.
- If you connect the AIRA Compact to your computer with a USB power cable, it cannot transfer MIDI data. You can also not use the device on your computer if connecting to a USB hub.
- The Mix IN/OUT jacks are for audio connections. If you are chaining two AIRA Compact devices and want audio from both to come through your headphones, connect the cable from the MIX OUT jack of one to the MIX IN jack of the other.
- Use MONO cables when using the SYNC IN/OUT jacks.
- Do NOT connect an audio device to the SYNC OUT jack, as this can damage the unit.
Connecting to Mobile Devices
IMPORTANT: Android devices may not function properly with Roland AIRA Compact hardware.
One great thing about the AIRA Compact is the ability to connect to iOS and iPadOS devices. If you have a mobile device with a USB-C connector, use a standard USB-C to USB-C cable.
However, if your device has a Lightning connector, follow these steps for functionality.
- Press and hold the C (exit) button while turning on the unit
- This will put the T-8 into Battery-Only mode.
- Connect the included USB-C to USB-A cable to an official Apple Lightning to USB-C Camera adapter or Apple Lightning to USB-C Camera adapter.
- Connect the Camera adapter to the AIRA Compact device.
Charging the AIRA Compact
TIP: If you want to use a USB wall charger, be sure the adapter is 5v, 5000mA, or higher!
While taking new gear out of the box and using it right away is always exciting, we recommend fully charging your AIRA Compact before use. If you want to use the T-8 while on your computer, use USB cables that can provide power and data transfer. USB cables that only provide power cannot transfer data.
- Green LED (lit):The device is fully charged.
- Orange LED (lit): The device is charging.
- Red (lit): The battery charge is low. Once the LED turns red, you have approximately a half hour of use before the battery is fully drained.
- Green and orange LED (flashing):Something is wrong with the unit. If this is the case, please get in touch with your dealer or Roland support.
Related Articles
When you need help, Sweetwater has the answers!
Our knowledge base contains over 28,000 expertly written tech articles that will give you answers and help you get the most out of your gear. Our pro musicians and gear experts update content daily to keep you informed and on your way. Best of all, it’s totally FREE, and it’s just another reason that you get more at Sweetwater.com.


Offer applies only to single-receipt qualifying purchases. Select manufacturers may require that only the manufacturer’s products qualify towards the minimum purchase amount needed to be eligible for promotional financing. Otherwise, an invoice that meets the minimum purchase amount and contains at least one qualifying manufacturer product is eligible for promotional financing. No interest will be charged on promo purchase balance, and equal monthly payments are required on promo purchase until it is paid in full. The payments equal the amount financed divided by the number of months in the promo period, rounded up to the next whole dollar. These payments may be higher than the payments that would be required if this purchase was a non-promo purchase. During the last month(s) of the promo period the required monthly payment may be reduced due to the prior months’ rounding. Regular account terms apply to non-promo purchases. New Accounts as of 07/31/2025: Purchase APR is 34.99%. Penalty APR is 39.99%. Min Interest Charge is $2. Existing cardholders: See your credit card agreement terms. Subject to credit approval.
Offer applies only to single-receipt qualifying purchases. No interest will be charged on the promo balance if you pay it off, in full, within the promo period. If you do not, interest will be charged on the promo balance from the purchase date. The required minimum monthly payments may or may not pay off the promo balance before the end of the promo period, depending on purchase amount, promo length and payment allocation. Regular account terms apply to non-promo purchases and, after promo period ends, to the promo balance. New Accounts as of 07/31/2025: Purchase APR is 34.99%. Penalty APR is 39.99%. Min Interest Charge is $2. Existing cardholders: See your credit card agreement terms. Subject to credit approval.
The estimated required monthly payment shown which excludes taxes and delivery equals the amount financed divided by the number of months in the promo period, rounded up to the next cent. During the last month(s) of the promo period the required monthly payment may be reduced due to this rounding. These payments apply only with the financing offer shown. If you make these payments by the due date each month, you should pay off this amount financed within the promo period, if it is the only balance you are paying off. If you have other balances on your account, this payment will be added to any other minimum monthly payments.
Applies only to select items from this manufacturer. Ask your Sweetwater Sales Engineer for more details.