
PreSonus ATOM Quickstart Guide
Overview
In this guide, we’ll show you how to get started with the PreSonus ATOM. That means we’ll walk you through how to register, connect, and set up the controller within your DAW. Follow the sections below to get started
Getting started with the PreSonus ATOM
Before you can start using your ATOM MIDI controller, there are a few things you need to do first. You’ll need to register the device, which gives you access to a free license of Studio One Artist.
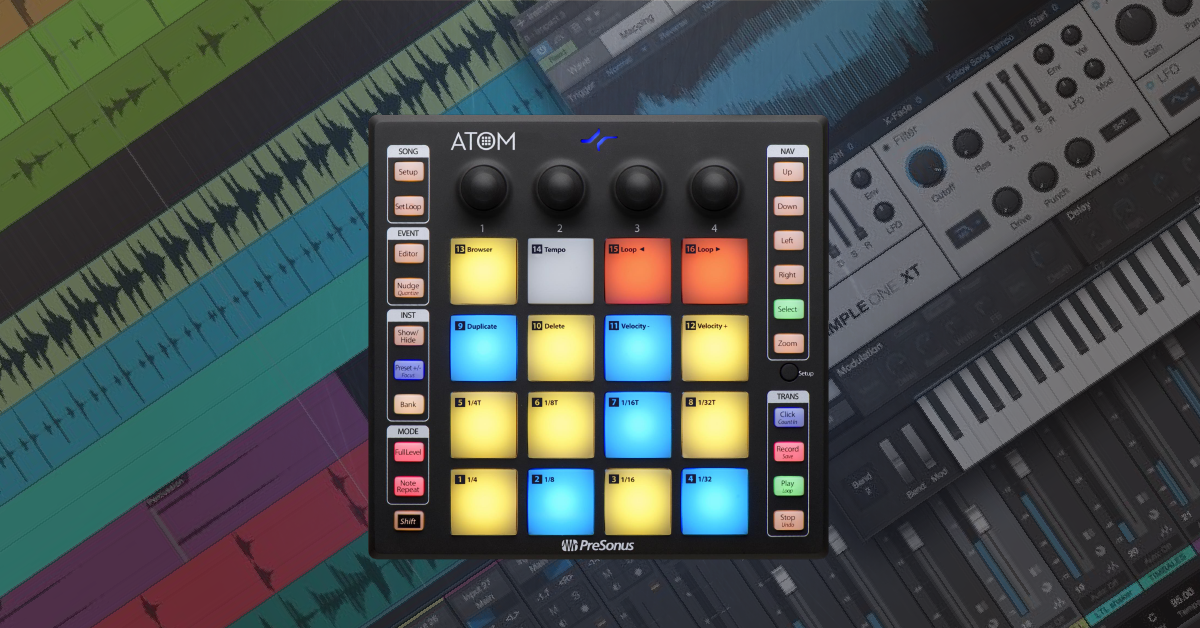
Basic controls
The PreSonus ATOM has many different functions which you can use in any DAW. We’ve laid out the basic functions for you in the diagram above. For a detailed list and advanced functions, visit the User Manual.
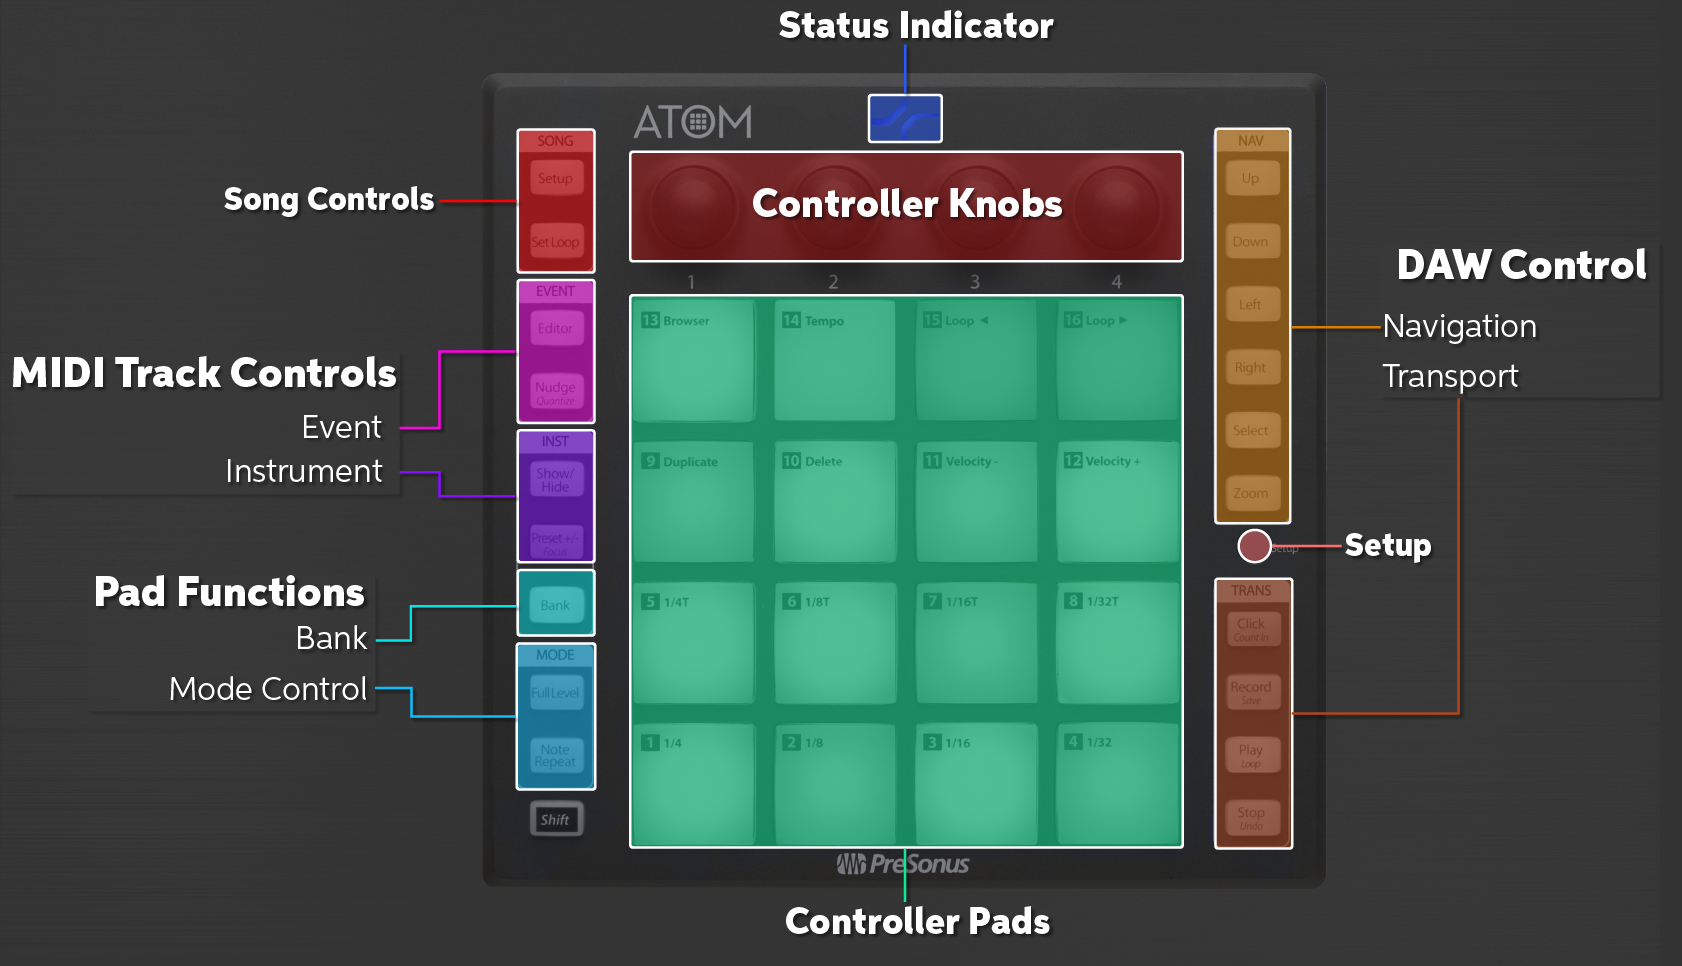
Status indicator
The Status Indicator light shows when it is connected. It will turn blue when you launch Studio One but will stay green otherwise.
Controller knobs
The controller knobs are used to adjust settings such as panning, volume, and various virtual instrument controls. They’re customizable as well to help with your workflow.
Controller pads
The pads can run in two different modes; MIDI Drum and MIDI Keyboard. When in MIDI Drum mode, each row of pads will illuminate with the same colors. When in MIDI Keyboard mode, the pads will illuminate the same pattern as a traditional keyboard. The yellow pads indicate the white keys, and blue indicates black.
DAW control
By default, the right row of buttons on the ATOM is for DAW control although you can customize their function.
- The Navigation section allows you to select a track, move the transport bar back and forth, and also zoom in and out of your project.
- The Transport section is for basic recording. Stop, Play, Record, and enabling/disabling the click track.
Pad Functions
The pad functions will change different parameters of how your pad reacts.
- The Bank button will switch between pad banks, which is particularly useful if you have, for example, a keyboard part that spans more than two octaves.
- Mode Control allows you to turn off velocity sensitivity (Full Level) and repeat a note as long as the pad is held (Note Repeat).
MIDI track controls
There are two groups that make up the MIDI Track Controls section; Event and Instrument.
- Event Controls let you insert, remove, and move instrument patterns around.
- Instrument Controls are dedicated to when you load a virtual instrument. You can show or hide the instrument window, and you can also navigate through presets.
Song controls
The Song Control section is primarily used for basic project set up and control.
- The Song Setup button allows you to open the virtual instrument browser window, create tracks, and change presets.
- The Set Loop button allows you to set loop points at the beginning and end of an area.
Register the ATOM
The ATOM includes a free copy of Studio One Artist and additional bonus plug-ins. To get the licenses, you’ll need to register the device on the PreSonus website using the serial number located on the bottom of the device. You’ll also need to enter the purchase date, so keep your Sweetwater invoice handy. Follow these steps to register the PreSonus A TOM controller.
- Log into your PreSonus account. If you haven’t created one yet, visit this page.
- On your account home page, click Register a Product, then select Hardware in the Choose product type… dropdown box.
- Enter the purchase date and serial number located on the bottom of your ATOM, then click Register.
- Once registered, click My Products on top of the PreSonus page, then click Software under My Products to download and register the software. For instructions on how to download and activate Studio one, follow our registration guide.

Download and install Universal Control
After registration, the next step is to download and install Universal Control for your OS. All PreSonus hardware drivers are included in the Universal Control installer file, so there is only one file you’ll need to download. ATOM controllers are class-compliant on Mac, so no additional drivers are necessary. Follow these steps to download and install Universal Control.
- Click the Hardware tab in the My Products section of your account, click View More Details under the ATOM, then click Download installer.
- If you need to download Universal Control for a different OS, click View Other Systems.
- Go to your Downloads folder and run the Universal Control installer.
- PC: Double-click the .exe file to begin the installation process.
- Mac: Double-click the .dmg file then double-click the .pkg to begin the installation process.
Which drivers should I install?
If you’re operating on Windows, you will be prompted to select which drivers you’d like to install during the Universal Control installation process. Uncheck all of the boxes except for the ATOM USB, then complete the installation.
Connections and Universal Control
After you’ve registered the device and downloaded the latest version of Universal Control, the next step is to connect the ATOM to your computer and verify that it’s recognized.
Connecting the ATOM
Connecting the ATOM is simple. Connect the USB cable from the device into your cable to power it on. While you can connect it to a USB hub, we recommend connecting it directly to the computer to ensure the best connectivity and performance. Follow these steps to get connected.
- Connect the USB cable into the computer.
- Navigate to your computer’s device settings to ensure that the device is recognized.
- PC: Go to Device Manager, then click Sound, video and game controllers to verify it’s listed.
- Mac: Go to Applications, then click Utilities and System Information. Verify it’s listed in the USB section.
- Launch Universal Control to check if a firmware update is needed. Complete it now if prompted.
Configure the ATOM within Studio One
The ATOM control surface works natively with Studio One, so no additional setup is required. As soon as you launch Studio One, the status indicator light on top of the unit should turn blue. Make sure that you have the latest version of Studio One or else the controller may not recognize native control! If you’re using a different DAW, the status indicator light will remain green, and you’ll need to enable it manually. For specific instructions on how to set it up outside of Studio One, visit our Quickstart guides.
Continue to the Studio One Quickstart Guide
Now that you have the Atom properly configured, you’re ready to use it in Studio One Artist for the first time! Visit our Studio One Quickstart Guide to continue.
Related Content
Starting Your Song
Getting Started with ATOM
Controlling Instrument Parameters
Recording in Real Time and Editing
When you need help, Sweetwater has the answers!
Our knowledge base contains over 28,000 expertly written tech articles that will give you answers and help you get the most out of your gear. Our pro musicians and gear experts update content daily to keep you informed and on your way. Best of all, it’s totally FREE, and it’s just another reason that you get more at Sweetwater.com.


Offer applies only to single-receipt qualifying purchases. Select manufacturers may require that only the manufacturer’s products qualify towards the minimum purchase amount needed to be eligible for promotional financing. Otherwise, an invoice that meets the minimum purchase amount and contains at least one qualifying manufacturer product is eligible for promotional financing. No interest will be charged on promo purchase balance, and equal monthly payments are required on promo purchase until it is paid in full. The payments equal the amount financed divided by the number of months in the promo period, rounded up to the next whole dollar. These payments may be higher than the payments that would be required if this purchase was a non-promo purchase. During the last month(s) of the promo period the required monthly payment may be reduced due to the prior months’ rounding. Regular account terms apply to non-promo purchases. New Accounts as of 07/31/2025: Purchase APR is 34.99%. Penalty APR is 39.99%. Min Interest Charge is $2. Existing cardholders: See your credit card agreement terms. Subject to credit approval.
Offer applies only to single-receipt qualifying purchases. No interest will be charged on the promo balance if you pay it off, in full, within the promo period. If you do not, interest will be charged on the promo balance from the purchase date. The required minimum monthly payments may or may not pay off the promo balance before the end of the promo period, depending on purchase amount, promo length and payment allocation. Regular account terms apply to non-promo purchases and, after promo period ends, to the promo balance. New Accounts as of 07/31/2025: Purchase APR is 34.99%. Penalty APR is 39.99%. Min Interest Charge is $2. Existing cardholders: See your credit card agreement terms. Subject to credit approval.
The estimated required monthly payment shown which excludes taxes and delivery equals the amount financed divided by the number of months in the promo period, rounded up to the next cent. During the last month(s) of the promo period the required monthly payment may be reduced due to this rounding. These payments apply only with the financing offer shown. If you make these payments by the due date each month, you should pay off this amount financed within the promo period, if it is the only balance you are paying off. If you have other balances on your account, this payment will be added to any other minimum monthly payments.
Applies only to select items from this manufacturer. Ask your Sweetwater Sales Engineer for more details.