
FL Studio Quickstart Guide

Getting started with FL Studio
In this guide, we’ll show you how to get up and running with FL Studio. That means we’ll show you how to create a song, set up audio and MIDI device, and then record with them. Once you’ve successfully activated and installed the software, follow the sections below to get started.
- Create a new project
- Select an audio device
- Record audio tracks in FL Studio
- Enable a MIDI device
- Record MIDI tracks in FL Studio
Create a new project
When you launch FL Studio for the first time, a demo song will load. This is a good starting point allowing you to see what you can do with the DAW. Image-Line has created many different templates to get you up and running. For example, you can load the EDM-House template that includes all of the essential instruments, mixer routing, and instrument arrangements. If you prefer, you can also create one from scratch. To create a new project, navigate to File, select New from template, and select the template you wish to load.
- You can change the default template that loads whenever you open the program. Go to File > New from template > Change default template. You can then use the dropdown box in the General Settings window to select whichever template you want to load.
Navigate the software
FL Studio consists of six primary windows. The Browser, Playlist, Channel Rack, Mixer, Piano Roll, and Toolbar. Besides the Toolbar, all windows can be moved around and resized. This helps you optimize and speed up your workflow. Check out Image Line’s interactive diagram to get an in-depth look at each of the main windows.
Select an audio device
Now that you know how to navigate the software, let’s select the primary audio device. Like most DAW’s, FL Studio has dedicated audio settings. This means you need to choose the audio device within the Audio Settings. If this is the first time connecting your audio interface, you’ll need to install its driver beforehand. Once done, the interface can then be connected to your computer and selected as the default audio device.
- Click Options in the Toolbar, and select Audio Settings.
- In the window that appears, use the Device dropdown box to select your primary audio device.
- Underneath the Device dropdown box, click Show ASIO panel and adjust the buffer length and sample rate that is most applicable to your project.
Is your audio device not showing up?
If your audio device doesn’t show up in the Device list, make sure you’ve downloaded the correct drivers, and also visit our troubleshooting guides for PC and Mac.
How to Set Up an Audio Interface in FL Studio
Record audio tracks in FL Studio
IMPORTANT: Audio recording is only available in FL Studio Producer Edition and higher.
Once your audio hardware is connected and your input and output channels are set up with FL Studio, the next steps are to create and record an audio track. The two most common types of audio tracks used are Mono (one channel) and Stereo (two channels). Once you create the audio track, you’ll need to update the track’s input to the correct channel from your audio device. Follow these steps to create and configure your audio tracks.
- If it isn’t opened already, open the Mixer window by going to the View menu and clicking Mixer. Alternatively, you can also press the F9 button on your keyboard to open it.
- Select the track (Insert) you want to record your audio, and select the Input channel by going to the top-right side of the Mixer and clicking the drop-down.
- Press the Record button. A window will appear asking if you want to record Audio, into the Edison audio editor/recorder or Audio, into the playlist as an audio clip.
Edison or Direct to playlist?
The Edison plug-in allows you to record and edit your audio tracks all in one place. If you want to record a short sample for looping, you can do that in Edison. You can then make your edits and send the sample to the playlist. If you’re recording a guitar or vocal track , however, record direct to the playlist. If you need to make edits at any time, add the Edison plug-in onto that track.
How to Record Audio in FL Studio
Enable a MIDI device
When you launch FL Studio, it will scan for any connected MIDI device, be it a MIDI interface, DAW controller, or MIDI controller. All you need to do is make sure that the MIDI ports of your device are enabled. Follow these steps to enable a MIDI device.
- Click Options in the Toolbar, and select MIDI Settings.
- In the MIDI Options window, go to the Input settings section. Select your MIDI controller and click Enable. If you see the input labeled as USB Audio Device, enable that, and change the Controller type to generic controller.
- Press a key/pad on your MIDI device to confirm you’re getting MIDI signal.
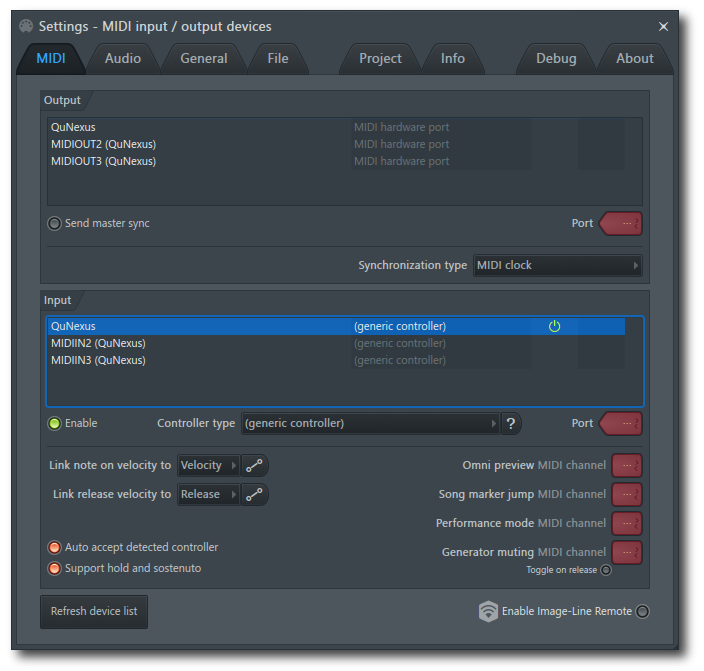
FL Studio’s MIDI Settings window
Is your MIDI device not being detected?
If your MIDI device doesn’t show up in FL Studio, click Refresh device list. If it still isn’t listed, make sure you’ve downloaded and installed the correct drivers, and also visit our MIDI device troubleshooting guide.
Record MIDI tracks in FL Studio
Triggering samples and virtual instruments in FL Studio require MIDI data. Most other DAW’s typically require additional channel setup and routing. In FL Studio, all you need to do is select the channel (Insert) you want to record, draw the MIDI notes in with your mouse on the Piano Roll, or record live using a MIDI controller.
Recording samples as MIDI
To record a preset sample or one you created in Edison, drag and drop it from the Browser onto the Playlist and then begin recording.
- Click the + icon on the bottom of the Channel Rack window, and select the sampler/virtual instrument you wish to record.
- Select the track(s) you want to record to, then press the Record button in the Transport section to arm recording.
- Select Notes and Automation and press the Play button to begin recording.
- Press the Stop button or the spacebar to stop the recording.
Additional resources
How to Make a Song in FL Studio
How to Quantize in FL Studio
How to Automate Tracks in FL Studio
How to Change Time Signatures in FL Studio
Related Articles
When you need help, Sweetwater has the answers!
Our knowledge base contains over 28,000 expertly written tech articles that will give you answers and help you get the most out of your gear. Our pro musicians and gear experts update content daily to keep you informed and on your way. Best of all, it’s totally FREE, and it’s just another reason that you get more at Sweetwater.com.


Offer applies only to single-receipt qualifying purchases. Select manufacturers may require that only the manufacturer’s products qualify towards the minimum purchase amount needed to be eligible for promotional financing. Otherwise, an invoice that meets the minimum purchase amount and contains at least one qualifying manufacturer product is eligible for promotional financing. No interest will be charged on promo purchase balance, and equal monthly payments are required on promo purchase until it is paid in full. The payments equal the amount financed divided by the number of months in the promo period, rounded up to the next whole dollar. These payments may be higher than the payments that would be required if this purchase was a non-promo purchase. During the last month(s) of the promo period the required monthly payment may be reduced due to the prior months’ rounding. Regular account terms apply to non-promo purchases. New Accounts as of 07/31/2025: Purchase APR is 34.99%. Penalty APR is 39.99%. Min Interest Charge is $2. Existing cardholders: See your credit card agreement terms. Subject to credit approval.
Offer applies only to single-receipt qualifying purchases. No interest will be charged on the promo balance if you pay it off, in full, within the promo period. If you do not, interest will be charged on the promo balance from the purchase date. The required minimum monthly payments may or may not pay off the promo balance before the end of the promo period, depending on purchase amount, promo length and payment allocation. Regular account terms apply to non-promo purchases and, after promo period ends, to the promo balance. New Accounts as of 07/31/2025: Purchase APR is 34.99%. Penalty APR is 39.99%. Min Interest Charge is $2. Existing cardholders: See your credit card agreement terms. Subject to credit approval.
The estimated required monthly payment shown which excludes taxes and delivery equals the amount financed divided by the number of months in the promo period, rounded up to the next cent. During the last month(s) of the promo period the required monthly payment may be reduced due to this rounding. These payments apply only with the financing offer shown. If you make these payments by the due date each month, you should pay off this amount financed within the promo period, if it is the only balance you are paying off. If you have other balances on your account, this payment will be added to any other minimum monthly payments.
Applies only to select items from this manufacturer. Ask your Sweetwater Sales Engineer for more details.