
Studio One Quickstart Guide
IMPORTANT! you are looking for Fender Studio Pro quickstart content, please visit our “Fender Studio Pro Quickstart Guide”.
In this guide, we’ll show you how to get up and running with Studio One. That means we’ll show you how to create a session, set up audio and MIDI devices, and then record with them. Follow the sections below to get started.
- Select your audio interface in Studio One
- Create a song in Studio One
- Create and record audio tracks
- Enable MIDI devices
- Create and record MIDI tracks
- How to load effects plug-ins and virtual instruments in Studio One
Select your audio interface in Studio One
Like other DAW’s, Studio One has its own audio settings, which means you’ll need to choose your audio device within Studio One’s Audio Setup page. If this is your first time setting up your interface, you’ll first want to download its driver beforehand. Once that’s completed, you can then connect it to your computer and set it as the primary audio device.
- One the Studio One Start Page, click the box underneath the Audio interface icon to open the Audio Setup menu.
- Alternatively, click Configure Audio Device, then click the Audio Setup tab.
- In the Audio Setup window, select the interface you’re using from the drop-down box.
- If you need to update the buffer size of your interface, click Control Panel to launch the interface’s driver window.
Is your audio interface not showing up?
If your audio interface isn’t showing up in the Audio Setup window of Studio One, be sure that you’ve installed the latest drivers for your interface. Also, be sure to check out our guides for resolving audio interface issues on PC and Mac.
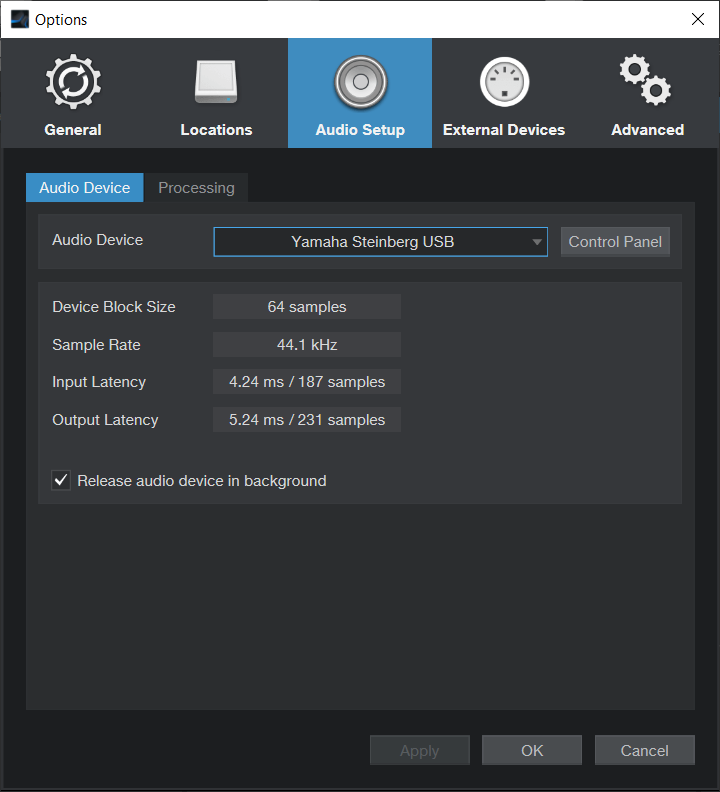
Studio One Audio Setup Window
Create a song in Studio One
Not only will you configure your audio interface from the Studio One Start Page, but this is also where you’ll create and load songs. You can create a song from scratch, but PreSonus has also included project templates that include audio tracks, busses, effects, and more to get you up and running fast.
If you own a PreSonus audio interface or digital mixer, you can create a project which has all of the channels automatically routed. If you’ve created a template, you can also load them from here.
- Click New Song, then select Styles, Interfaces or User.
- If you own a PreSonus interface, scroll through the interface tab to locate and select your interface.
- Update the Song Title, file location and audio settings, then click OK.
Update input and output routing
After a new song has been created, you’ll need to update the audio interface’s routing for the project, which means you’ll tell Studio One what input and outputs you’ll use for your project.
- Go to the Studio One menu from the top toolbar, and click Options.
- Click Song Setup, then Audio I/O settings.
- Alternatively, from the Start page, select the interface and scroll to the model of your interface, then click Create.
- Select the Audio I/O Setup tab, update your routing, then click the Make Default button in the lower-left of the window and confirm the pop-up window
- All new songs will now have this configuration for input and output mapping.
Need to update the routing in an existing song?
If you ever need to update the routing of an old song to match that of your new audio I/O configuration, you can also do so from the Song Setup menu.
- To make an existing song conform to this mapping, open the song file.
- Select the Song menu from the top of the window and then Song Setup.
- Select the Audio I/O Setup tab.
- Click the Reset to Default button in the lower-left of the window and confirm the pop-up window.
Customizing the Audio I/O
Create and record audio tracks
Once your interface is selected, and the routing has been updated, it’s time to create an audio track. All you need to do is create a stereo or mono track, update its settings, and start recording.
TIP: If you have similar tracks (i.e., drums, electric guitars, vocals) you’ll be recording, check the Pack Folder box. This will create a folder track that you can then open or close, which is a great way to speed up your workflow.
- Right-click on the left side of the window, then select Add Tracks…
- Alternatively, you can press the T key on your keyboard to open the Add Tracks window.
- Update the name, set the Type to Audio, and update the rest of the settings such as the routing, then click OK.
- When the Auto-Color box is checked, it will automatically assign different colors to the tracks you’ve created.
- Use the Preset dropdown box to select one of many great presets for your instrument. This includes EQ, compressors, effects, and more.
- Press the Record button on the track to arm it, then press the Record button on the bottom transport panel to begin recording. Alternatively, you can use the * key on your keyboard to start recording.
- To listen to yourself while you’re playing, click the Speaker icon on the track. This is known as input monitoring.
Inserting effects plug-ins
If you want to add an audio effect plug-in on your audio track, click the Effects tab on the right-hand side of your project window, locate the plug-in you wish to add, then click and drag it onto the track. Jump to How to load effects plug-ins and virtual instruments for more information.
Enable MIDI devices
When you launch Studio One, it will scan for any connected MIDI device. While it does scan for devices, you’ll go to the MIDI Device Setup window to update its settings. Follow these steps to enable a MIDI device.
- Navigate to Studio One in the top toolbar, then select Options.
- Click External Devices, and then click Add.
- In the window that appears, click Add Keyboard or look for your MIDI controller in the vendor folder directly underneath. Lastly, change the Receive From and Send To from None to your MIDI controller by clicking the drop-down box.
- Before you go further, press a key/pad on your MIDI device and look at the MIDI Monitor on the bottom left side of the screen to make sure that it’s triggering correctly.
MIDI Device Setup
Create and record MIDI tracks
To trigger virtual instruments or external synths, you’ll need MIDI data. You can draw the MIDI data in via the piano roll, but also with your MIDI device. To record or draw MIDI data in Studio One, you will create an Instrument track.
One great thing about Studio One is that both audio and MIDI data are on the same track, which means you don’t have to route it to an Aux bus or audio track. This means that you can convert the Instrument track to audio while preserving the MIDI data at the same time. Because of this, you don’t need to create a new audio track each time you need to edit any of the MIDI data.
There are a few ways to create an Instrument track. Either by dragging a virtual instrument to the track section or by creating an empty one. Creating an empty instrument track is especially useful if you’re using external synthesizers. If you’d like to learn more about using external MIDI devices with Studio One, be sure to check out their Setup guide!
Virtual instrument
- Find your virtual instrument in the Browser section, then click and drag it over.
- Press the Record button to arm the track, then press the Record button on the bottom transport panel to begin recording.
- Alternatively, you can press the * key on your keyboard to begin recording.
MIDI
- Navigate to Track on the upper toolbar, then click Add Instrument Track.
- If you want to add multiple Instrument tracks at once, press the T key on your keyboard, use the dropdown box, select Instrument, then update the number of Instrument tracks you want to add.
- Press the Record button to arm the track, then press the Record button on the bottom transport panel to begin recording.
- Alternatively, you can press the * key on your keyboard to begin recording.
MIDI Editing
How to load effects plug-ins and virtual instruments in Studio One
To apply an effect or instrument onto a track, you need to insert it as a plug-in. Plug-ins come in many different file formats, and for Studio One, you can use AU and VST3 plug-in formats. When you first install a plug-in, be sure to take note of the file location it’s installed to, as you will need to add this folder path to Studio One’s plug-in scan list.
IMPORTANT: 32 bit plug-ins are no longer supported. Please make sure the 64-bit version of your plug-ins and virtual instruments are installed.
- Navigate to Studio One in the top toolbar, click Options, then click the Locations button.
- Go to the VST Plug-Ins tab, click Add, then navigate to the folder where your plug-ins are installed. Once you’ve done that, click OK, then restart Studio One.
- If you already have a song loaded, right-click anywhere in the Browser window and click refresh.
If the plug-in isn’t showing up
If you receive an error when launching Studio One or if it’s not listed in the Effects or Instruments tab in the Browser window, here are a few things you can try.
- Click the Plug-In Manager button at the bottom of the Browser section to pull up the Project Manager window. If the plug-in is in the Blocklist Click Reset Blocklist. If the plug-in is showing up in the plug-ins window, make sure that it’s turned on, indicated by the white circle.
- Go to the VST Plug-Ins tab in Locations and verify that the plug-ins folder location is included in the Locations section of the window.
- Make sure that the correct format of the plug-in is installed. Studio One only accepts AU and VST 3 plug-ins.
Studio One Plugin Tricks
Related content
Keyboard Shortcuts to the Rescue
How to Mix in Studio One
How to Edit in Studio One
How to Use the Arranger Page in Studio One
When you need help, Sweetwater has the answers!
Our knowledge base contains over 28,000 expertly written tech articles that will give you answers and help you get the most out of your gear. Our pro musicians and gear experts update content daily to keep you informed and on your way. Best of all, it’s totally FREE, and it’s just another reason that you get more at Sweetwater.com.


Offer applies only to single-receipt qualifying purchases. Select manufacturers may require that only the manufacturer’s products qualify towards the minimum purchase amount needed to be eligible for promotional financing. Otherwise, an invoice that meets the minimum purchase amount and contains at least one qualifying manufacturer product is eligible for promotional financing. No interest will be charged on promo purchase balance, and equal monthly payments are required on promo purchase until it is paid in full. The payments equal the amount financed divided by the number of months in the promo period, rounded up to the next whole dollar. These payments may be higher than the payments that would be required if this purchase was a non-promo purchase. During the last month(s) of the promo period the required monthly payment may be reduced due to the prior months’ rounding. Regular account terms apply to non-promo purchases. New Accounts as of 07/31/2025: Purchase APR is 34.99%. Penalty APR is 39.99%. Min Interest Charge is $2. Existing cardholders: See your credit card agreement terms. Subject to credit approval.
Offer applies only to single-receipt qualifying purchases. No interest will be charged on the promo balance if you pay it off, in full, within the promo period. If you do not, interest will be charged on the promo balance from the purchase date. The required minimum monthly payments may or may not pay off the promo balance before the end of the promo period, depending on purchase amount, promo length and payment allocation. Regular account terms apply to non-promo purchases and, after promo period ends, to the promo balance. New Accounts as of 07/31/2025: Purchase APR is 34.99%. Penalty APR is 39.99%. Min Interest Charge is $2. Existing cardholders: See your credit card agreement terms. Subject to credit approval.
The estimated required monthly payment shown which excludes taxes and delivery equals the amount financed divided by the number of months in the promo period, rounded up to the next cent. During the last month(s) of the promo period the required monthly payment may be reduced due to this rounding. These payments apply only with the financing offer shown. If you make these payments by the due date each month, you should pay off this amount financed within the promo period, if it is the only balance you are paying off. If you have other balances on your account, this payment will be added to any other minimum monthly payments.
Applies only to select items from this manufacturer. Ask your Sweetwater Sales Engineer for more details.