
Mixer Quickstart Guide
In this guide, we will show you how to set up and get sound out of an analog sound mixer. That means we’ll show you how to connect microphones, instruments, and loudspeakers. We’ll also show you how to get sound out and create a mix. Follow the sections below to get started, but feel free to use the page jumps to move from one section to another.
What is a mixer?
Mixers are used in many different ways, but each is designed with the same purpose: to receive inputs and send them to outputs. Before you start making connections, let’s start by learning how mixers work and how to set up a PA system. Continue to the mixer setup instructions further below when you’re ready to set it all up.
How mixers work
Before making connections and powering on your new mixer, let’s learn a bit about how mixers work. Essentially every mixer functions the same way: combine input signals from microphones or instruments and send them to outputs jacks connected to loudspeakers. What differentiates one mixer from another is how you navigate it and additional features or I/O (USB recording, routing, wireless control, etc.).
The first thing to do with your new mixer is to review its layout or configuration. Start with the basics, such as connecting a microphone and getting sound out. Microphones will pass through the Gain, Equalization, and Level controls before being sent to the Main Mix and main outputs. Once you’ve finished this guide, practice setting your system up before taking it to the stage. This will help you better understand the mixer and prevent any unexpected surprises at your next event. We’ve broken down the main sections and parts you need to know below.
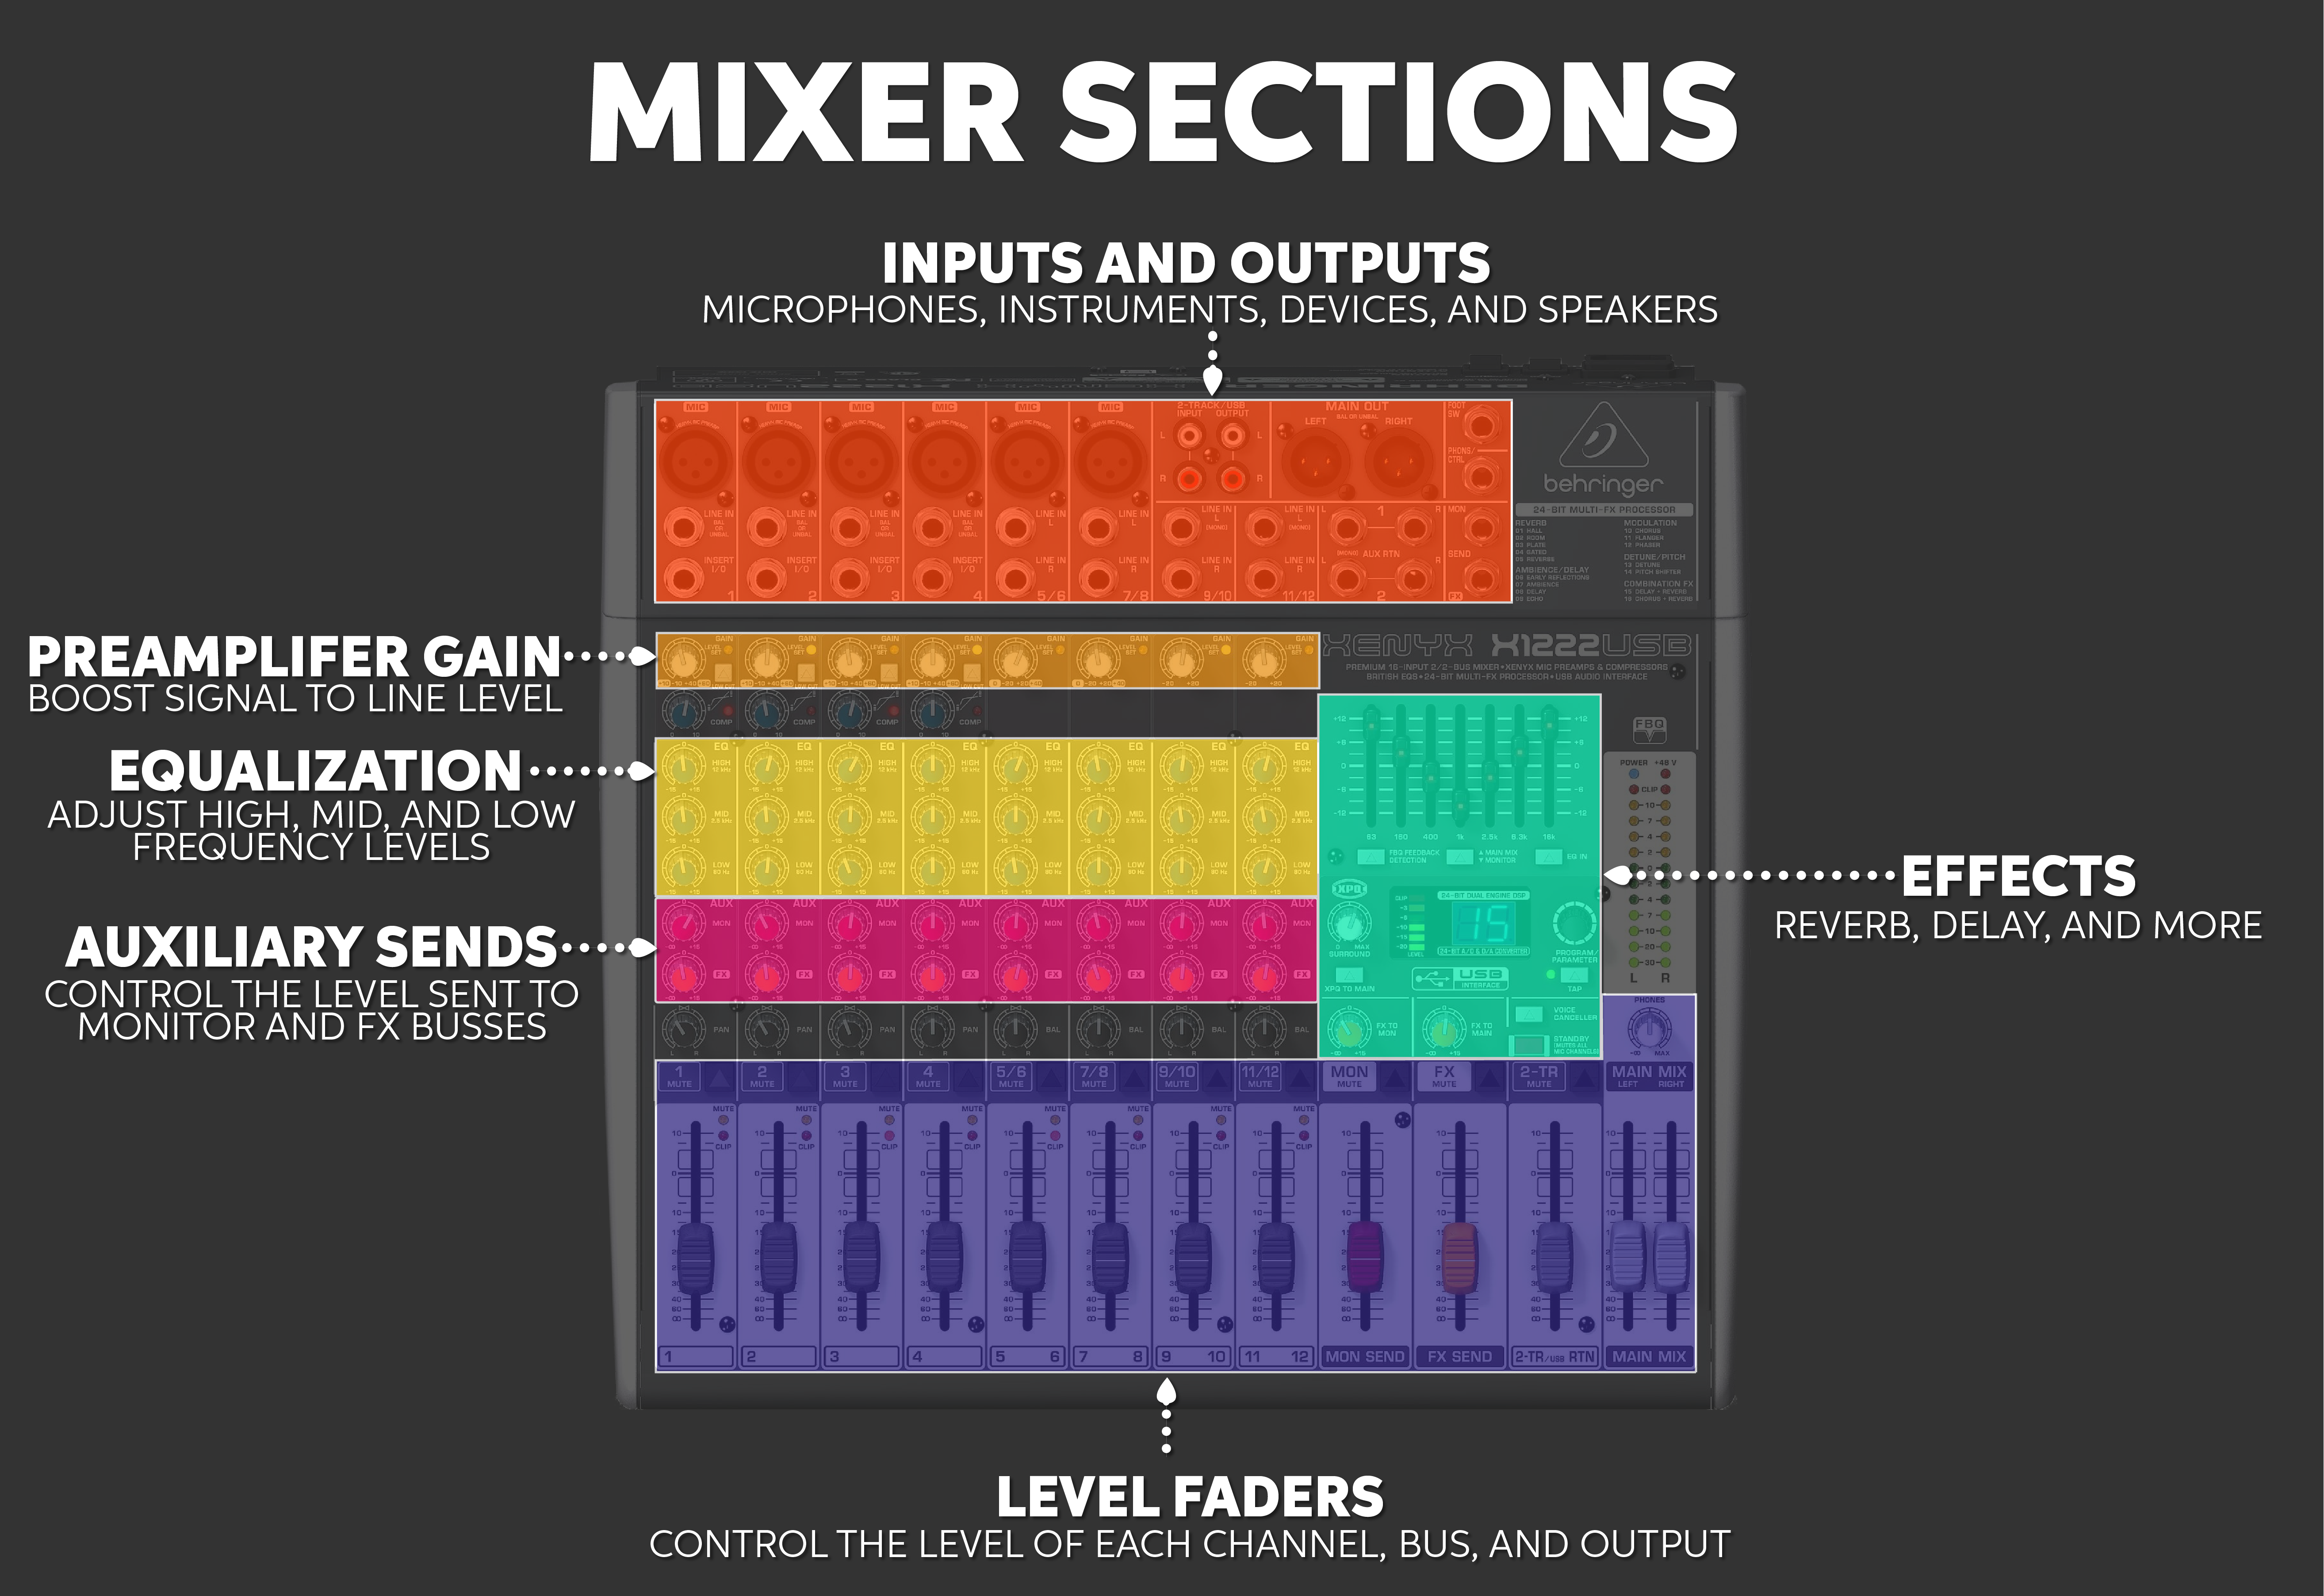
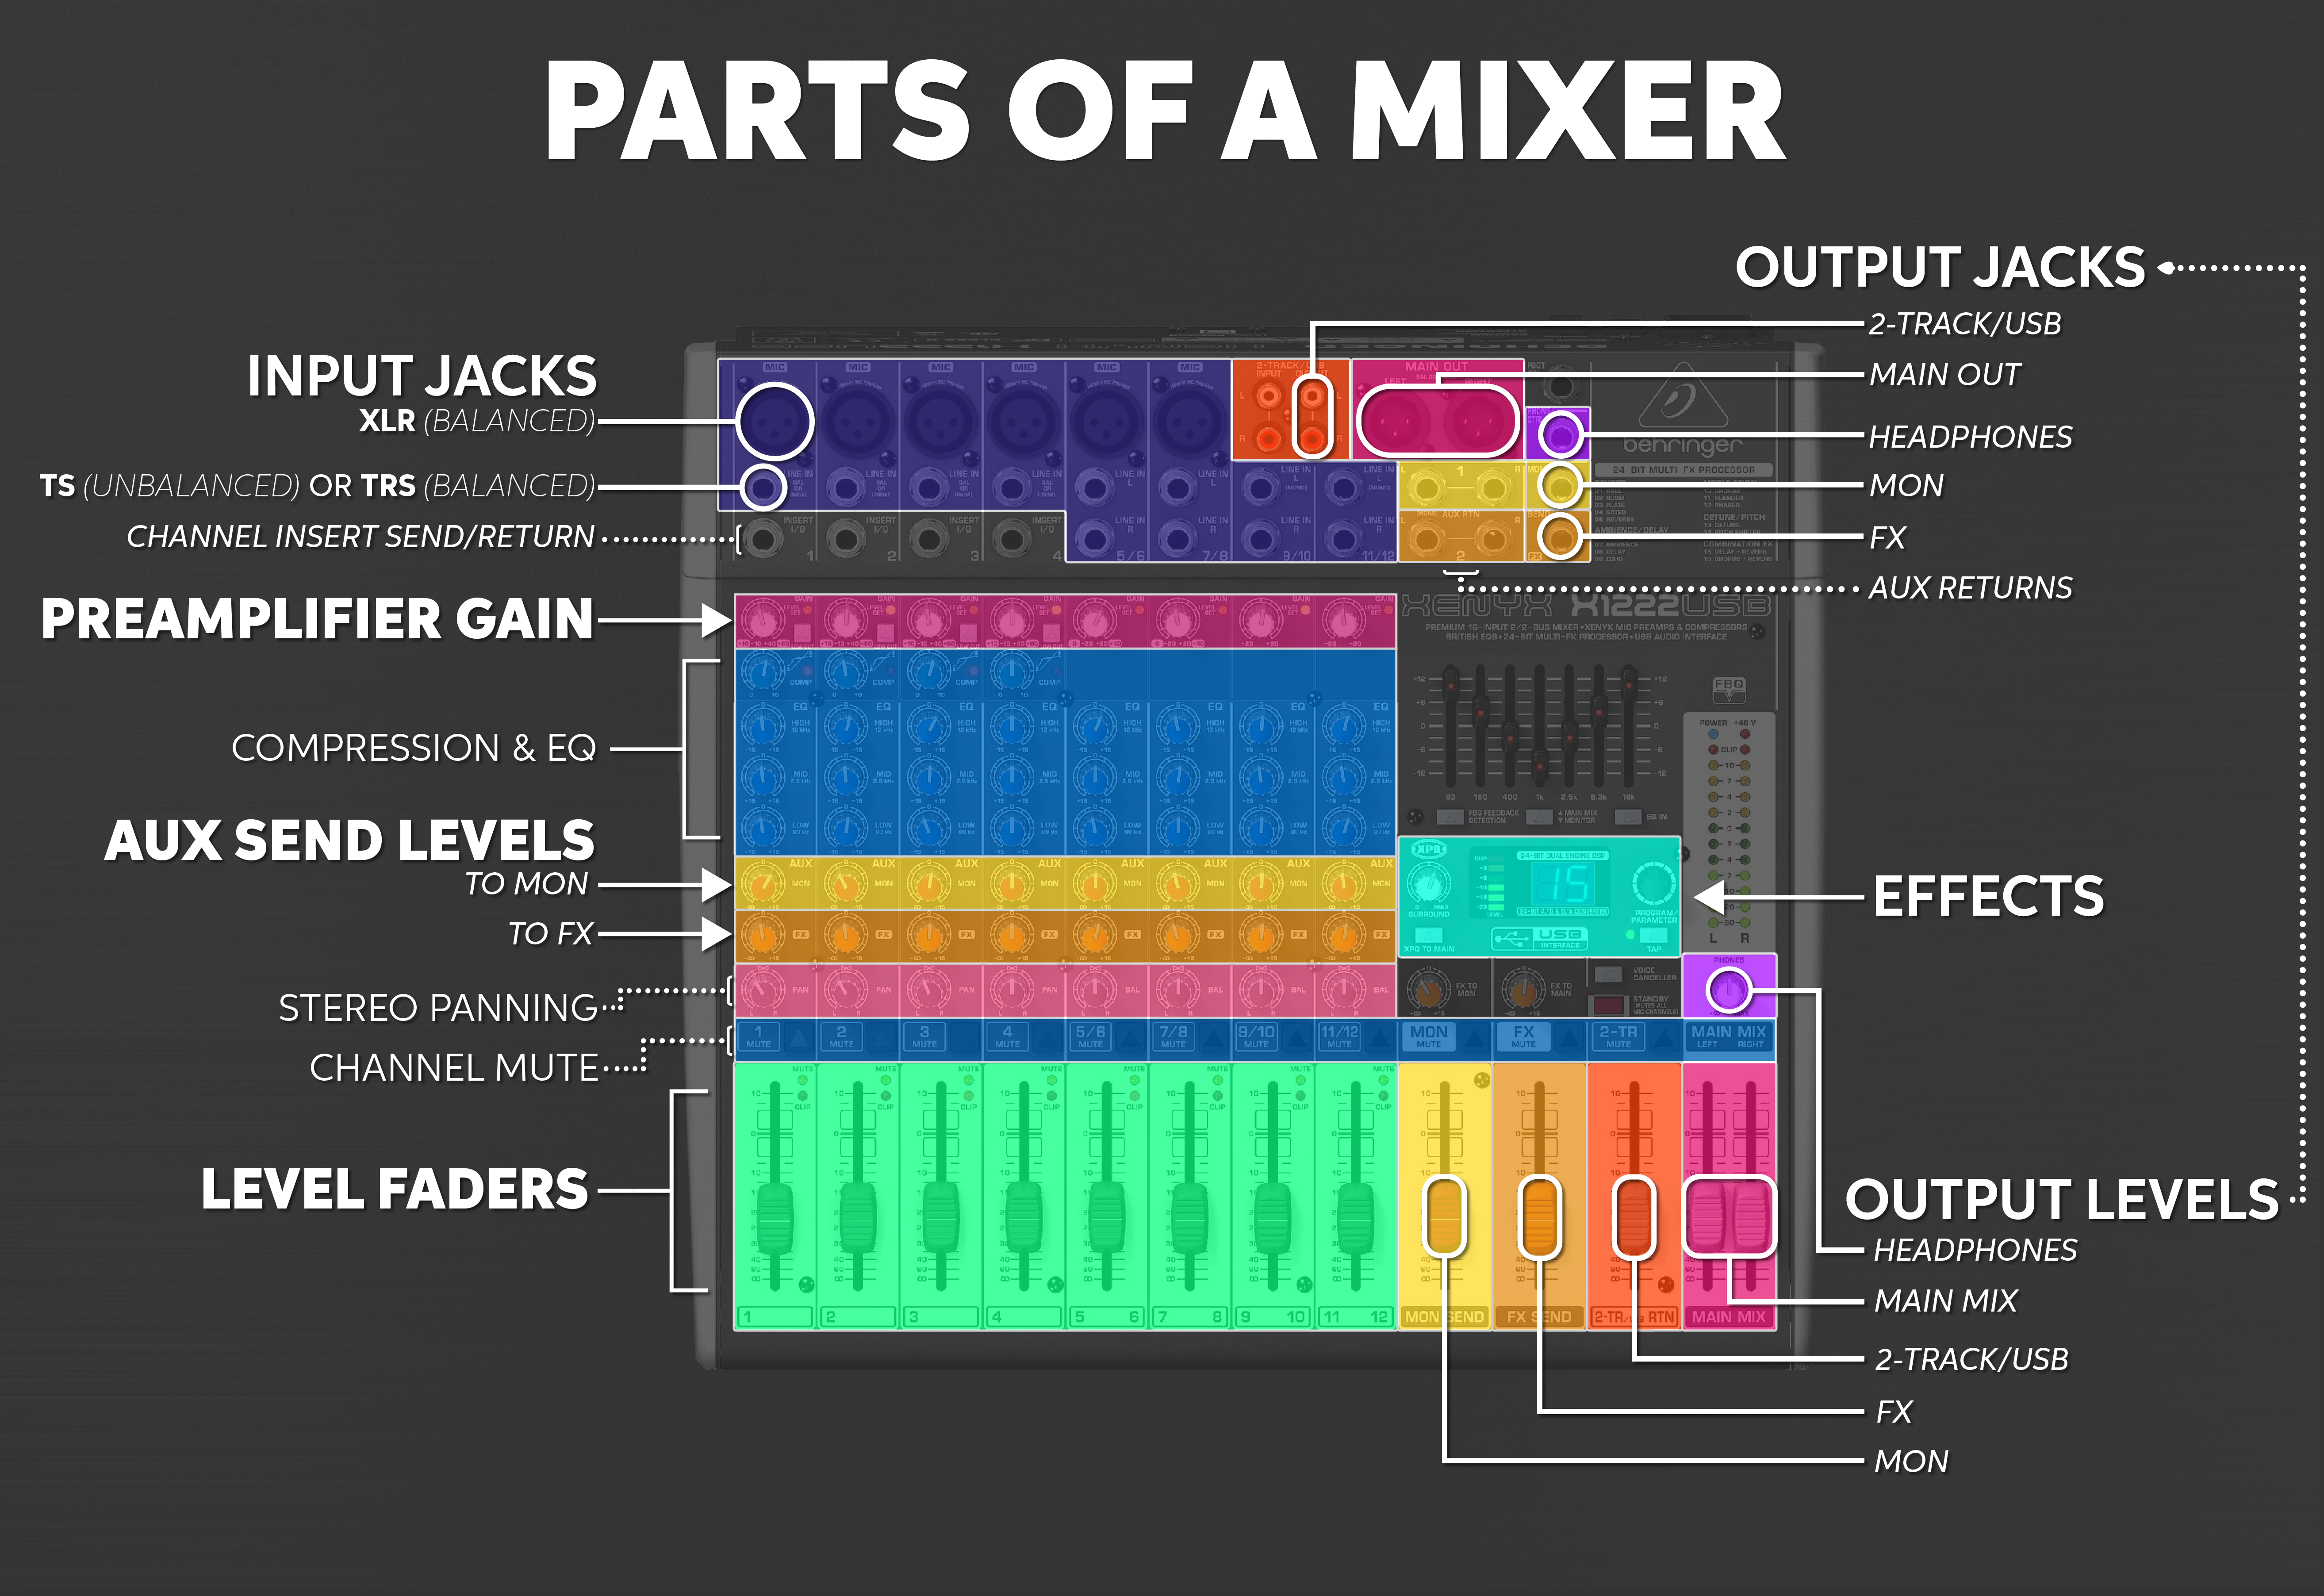
Click to view mixer diagrams.
PA system/mixer setup order
When it’s time to set up your mixer, keeping everything organized will help prevent troubleshooting connections during a sound check. When setting up your mixer or PA system, we recommend doing it in four phases: turn everything down, plug everything in, turn everything on, and get sound out. Setting up this way will prevent accidental sound or loud pops when making connections. Learn more about how to set up a PA system or continue below to get sound out of your mixer.
- Turn all gain knobs and level controls all the way down.
- Connect each piece of gear in the following order:
- Main speakers
- Monitor speakers
- Microphones
- Instruments
- Playback devices
- Once levels are down and everything is connected, power everything on.
- Set gain/mix/speaker levels and sound check.
Setup tips
- Choose a layout that compliments the venue’s acoustics, walkways, and power.
- Use gaffer tape to keep cables on the ground and prevent tripping.
- Protect everyone’s ears and turn down output levels before powering on equipment.
Once you’re ready, continue to the mixer setup instructions.

Setup order: levels down, make connections, power up, create a mix.
Mixer setup instructions
We’ll show you how to make connections to a mixer and get sound out in the sections below. Have your mixer’s user manual handy if you need to find a specific feature or setting. You can connect to your mixer however you like, but we recommend starting with the Main speakers and powering everything on last. Once everything is connected and powered on, continue to Sound Check.
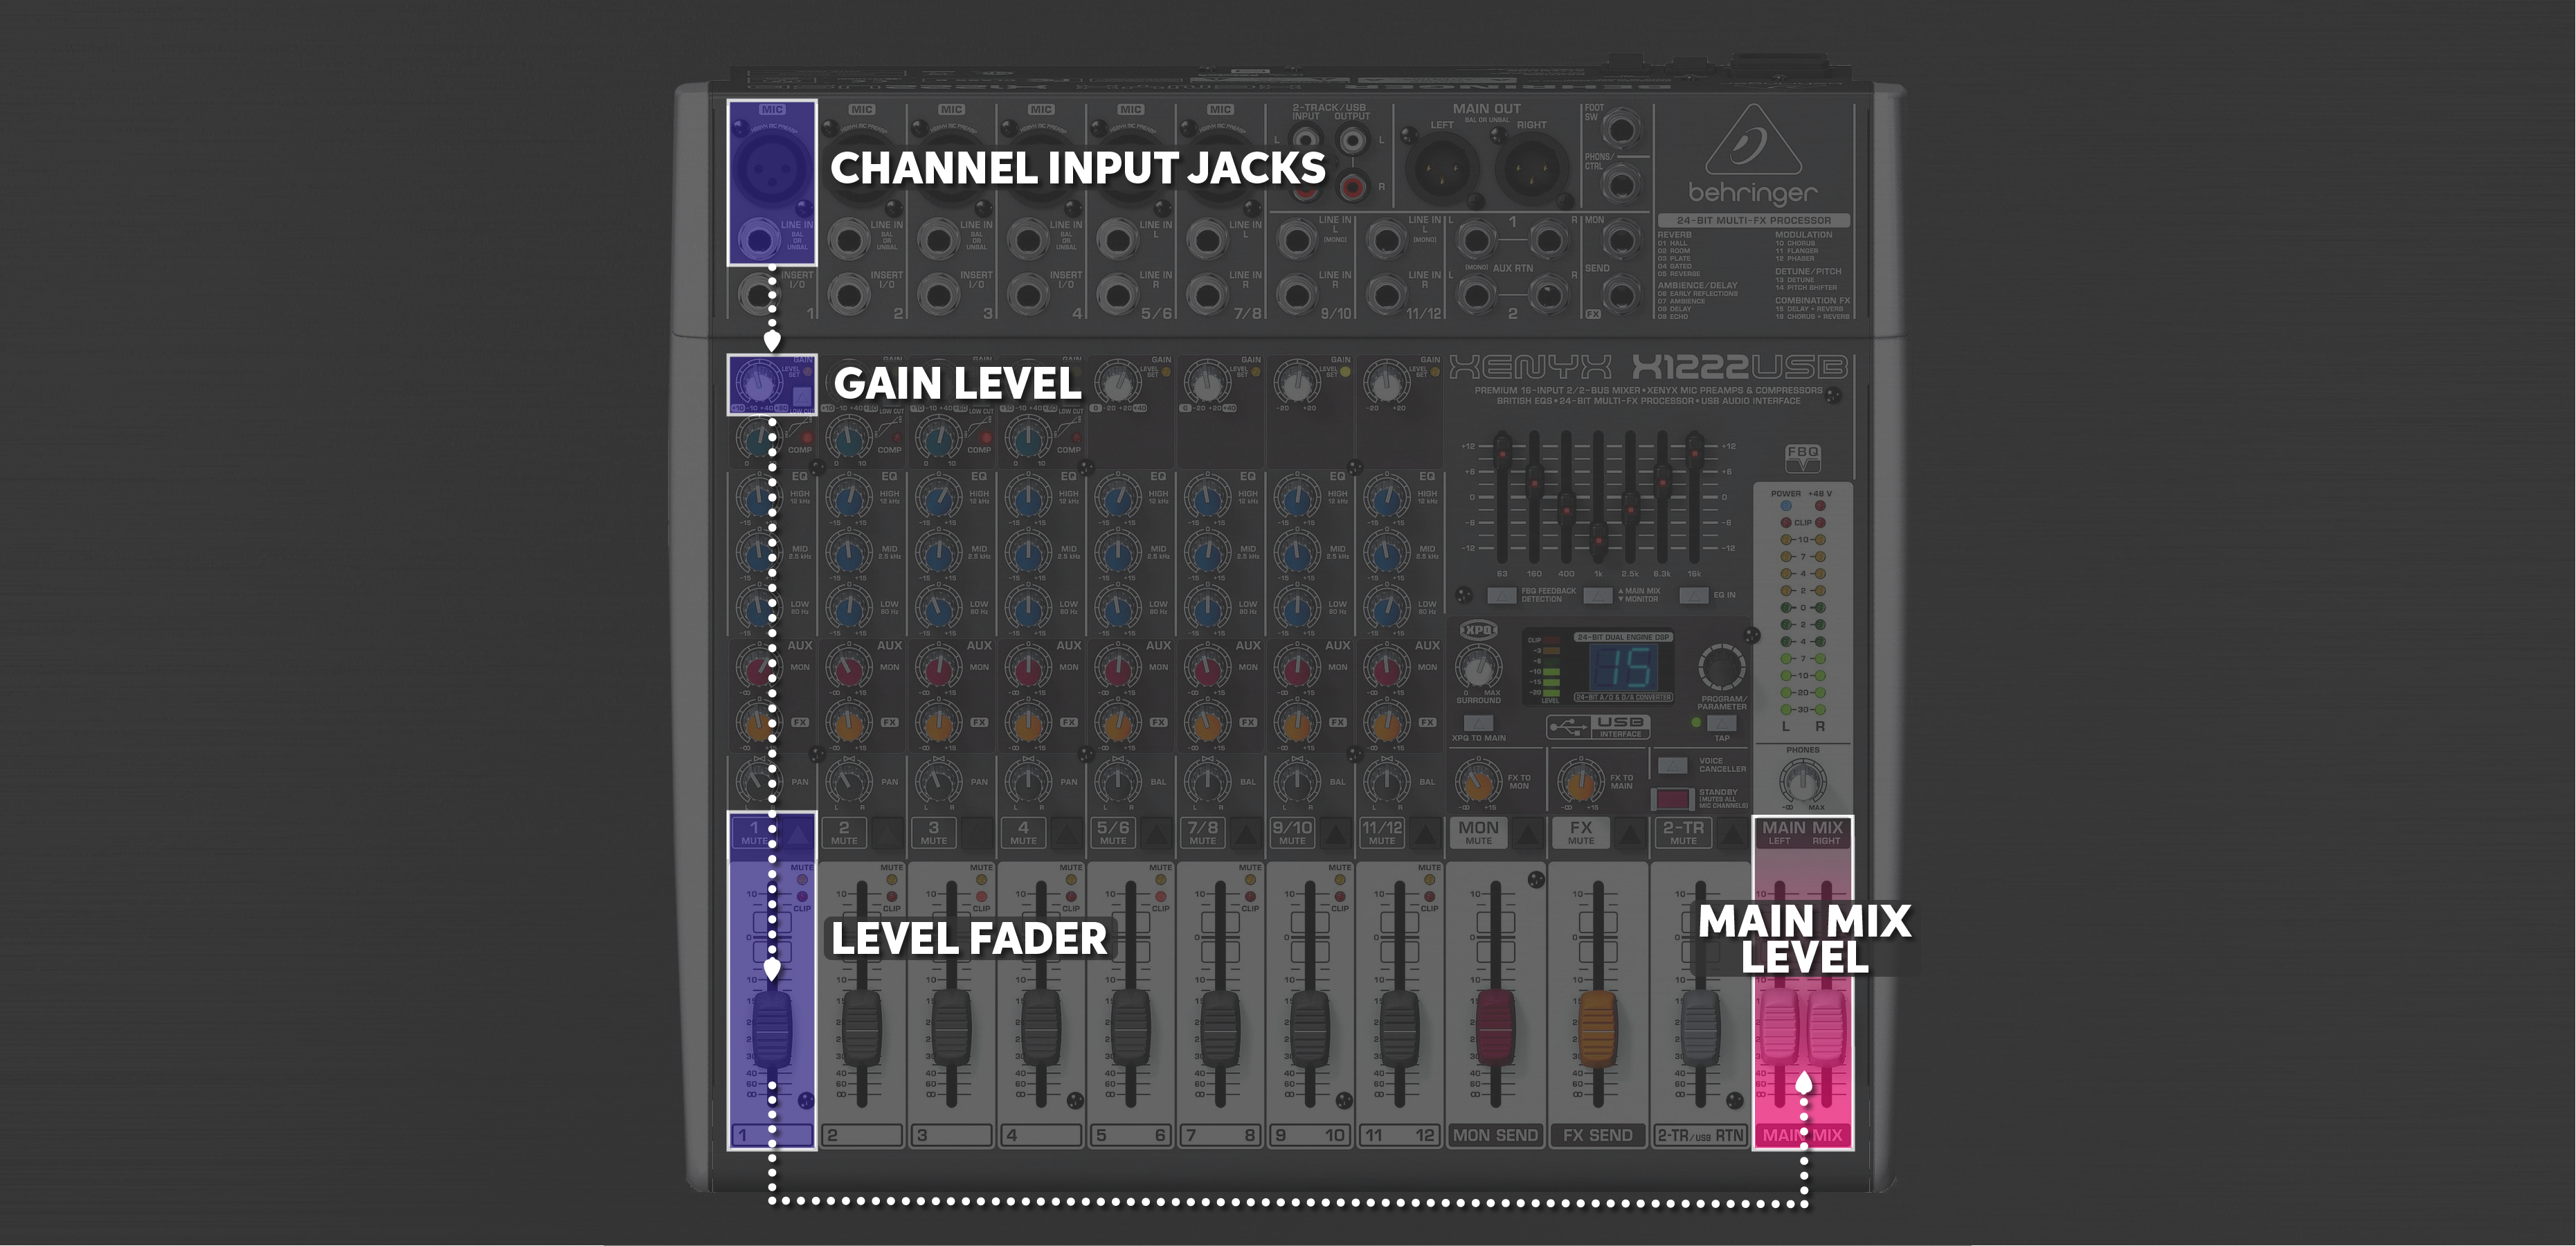
Connect Main speakers
The Main loudspeakers (mains for short) are the primary speakers used to amplify your mix to the audience. The mains consist of two speakers, one stage left and the other right. If you don’t need both, just connect one, but know that the panning feature will not be able to blend between the two speakers. Both speakers will face the audience and evenly distribute sound throughout a venue. The main output jacks on the mixer are typically XLR, so you’ll need the right cables to connect the speakers.
- Turn each channel’s gain knob and level fader all the way down.
- Connect your main speakers to the mixer’s Main out jacks.
- For passive speakers, connect the Main out jacks to the power amplifier inputs. Once done, connect the power amplifier outputs to the speaker inputs.
- Power on the mixer and speakers (or power amplifier).
- Set mixer levels to unity and adjust the speaker output level
- Turn up the Main mix fader level to 0 (unity).
- Play audio through a channel (microphone, guitar, or phone/computer playback). Be sure to set the channel’s gain knob while its level fader is at 0 (unison).
- Turn up each main speaker’s level knob until the volume compliments the venue.
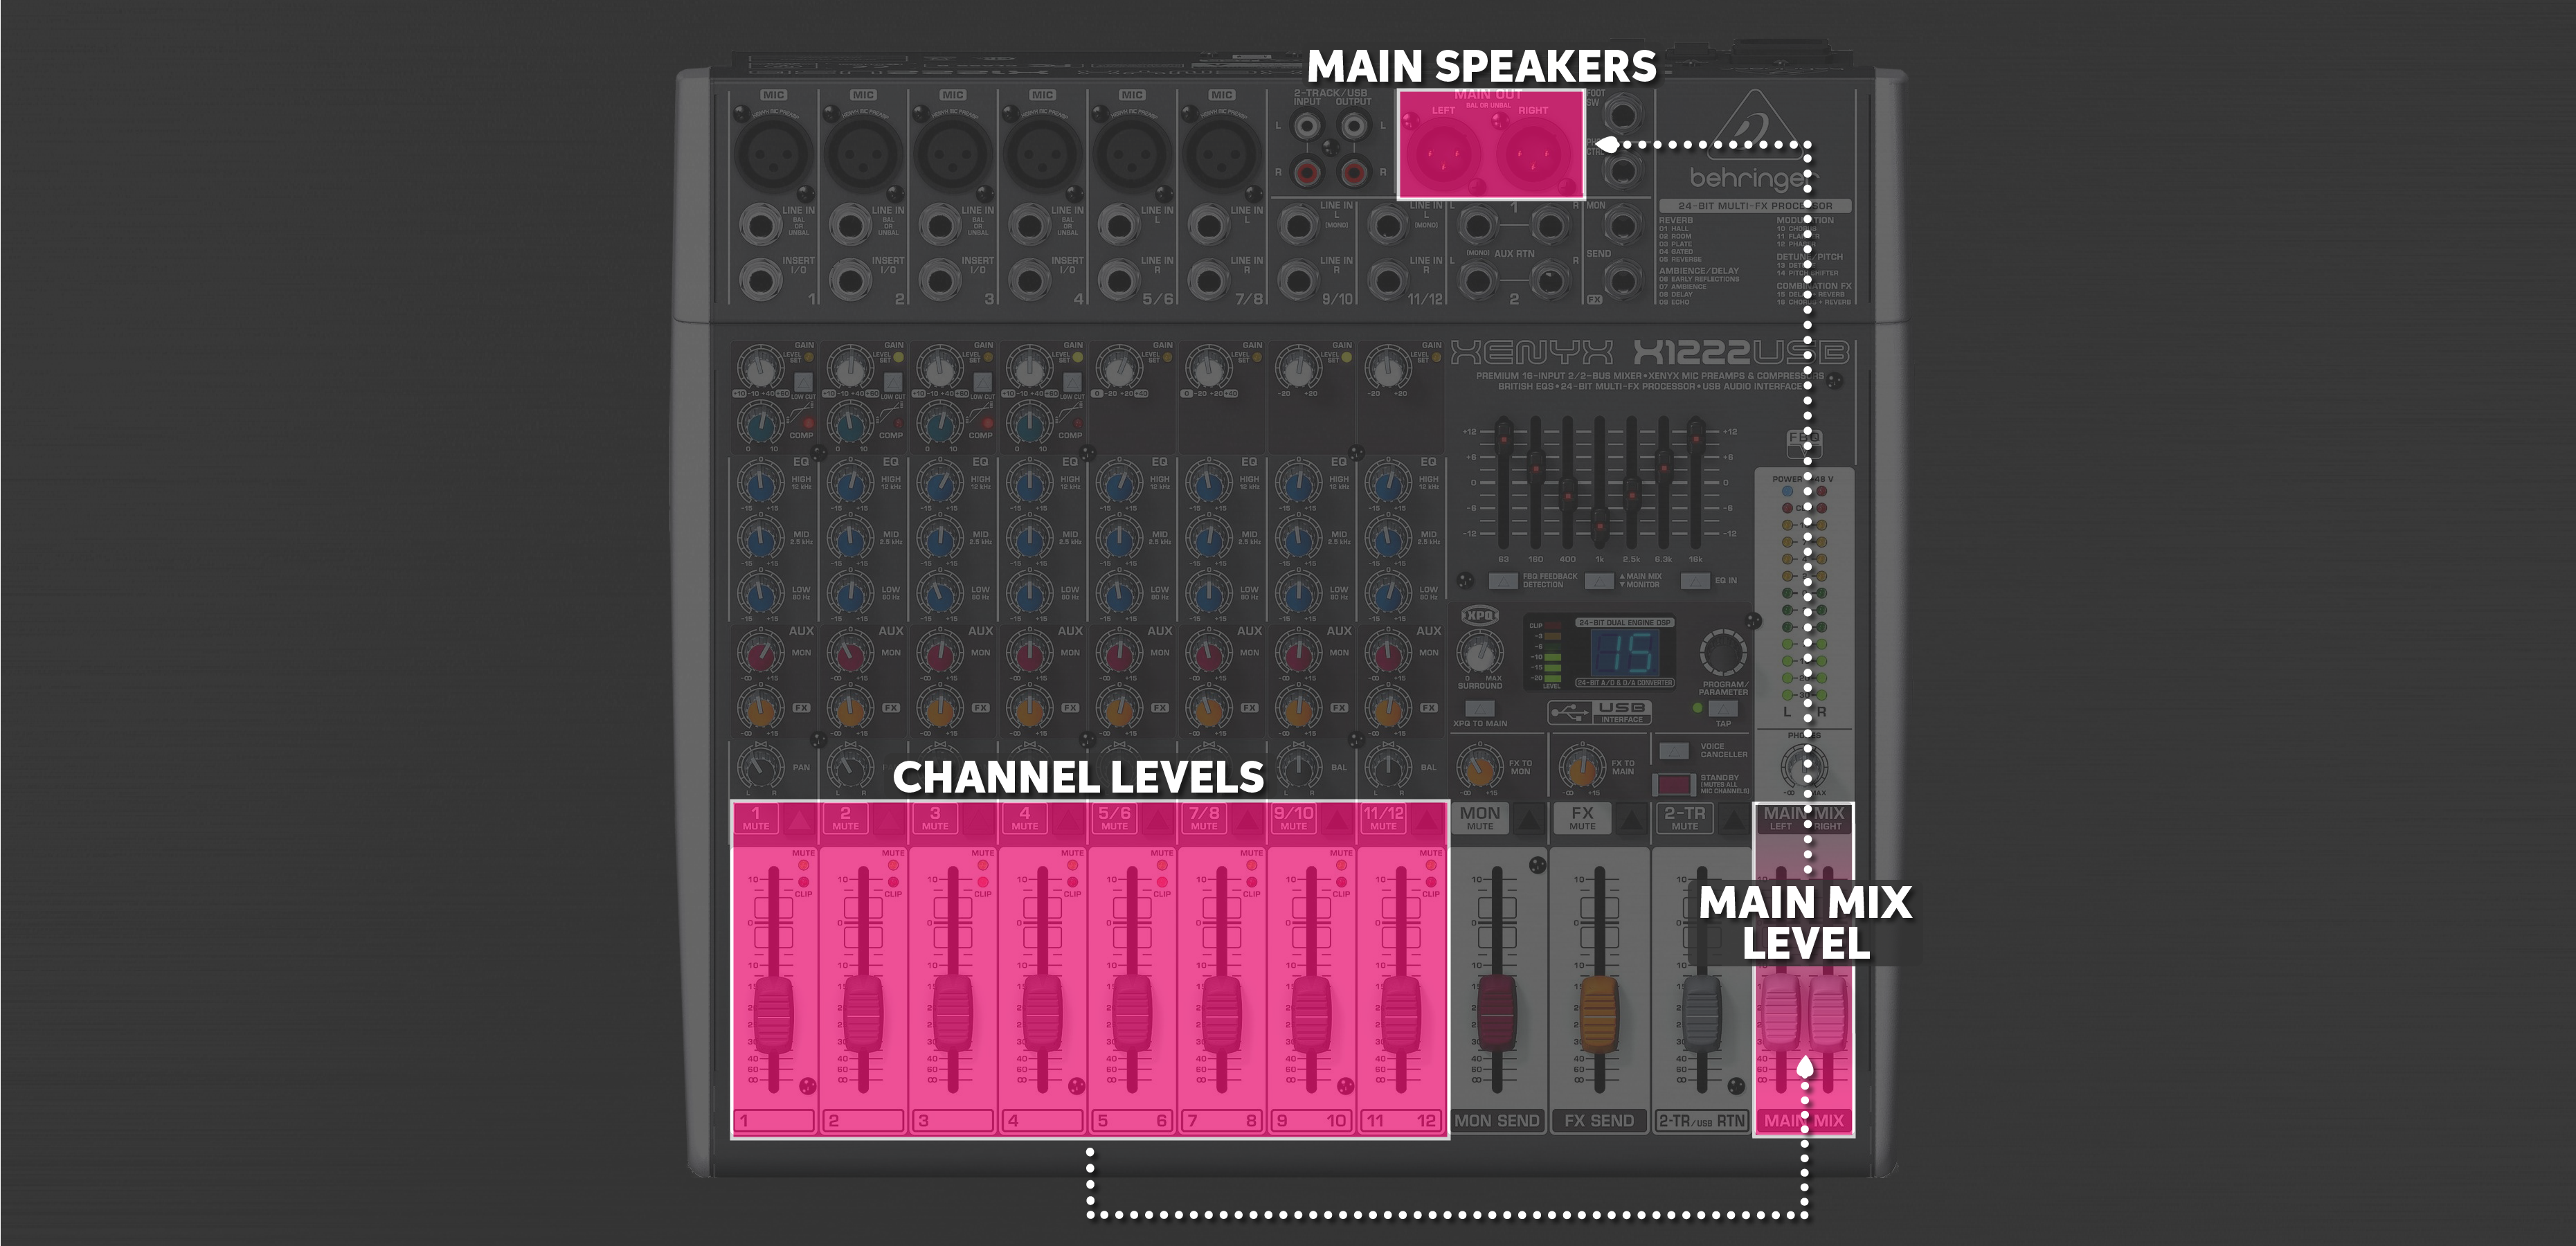
Channel levels create the main mix, which is sent to the main outputs.
Passive speakers and power amps
There are two kinds of speakers: active and passive. Active speakers have an amplifier built inside while passives don’t. Theirs are external. That means that active speakers can connect directly to the Main outputs of your mixer, but passive speakers will need an amplifier in between.
Passive speakers and amplifiers require a compatible impedance configuration, and failure to match their impedance could damage your gear, so take caution. We recommend reviewing the speaker and amplifier owner’s manuals for configuration instructions specific to your power amp.
Continue to:
How to Connect Speakers to an Amplifier
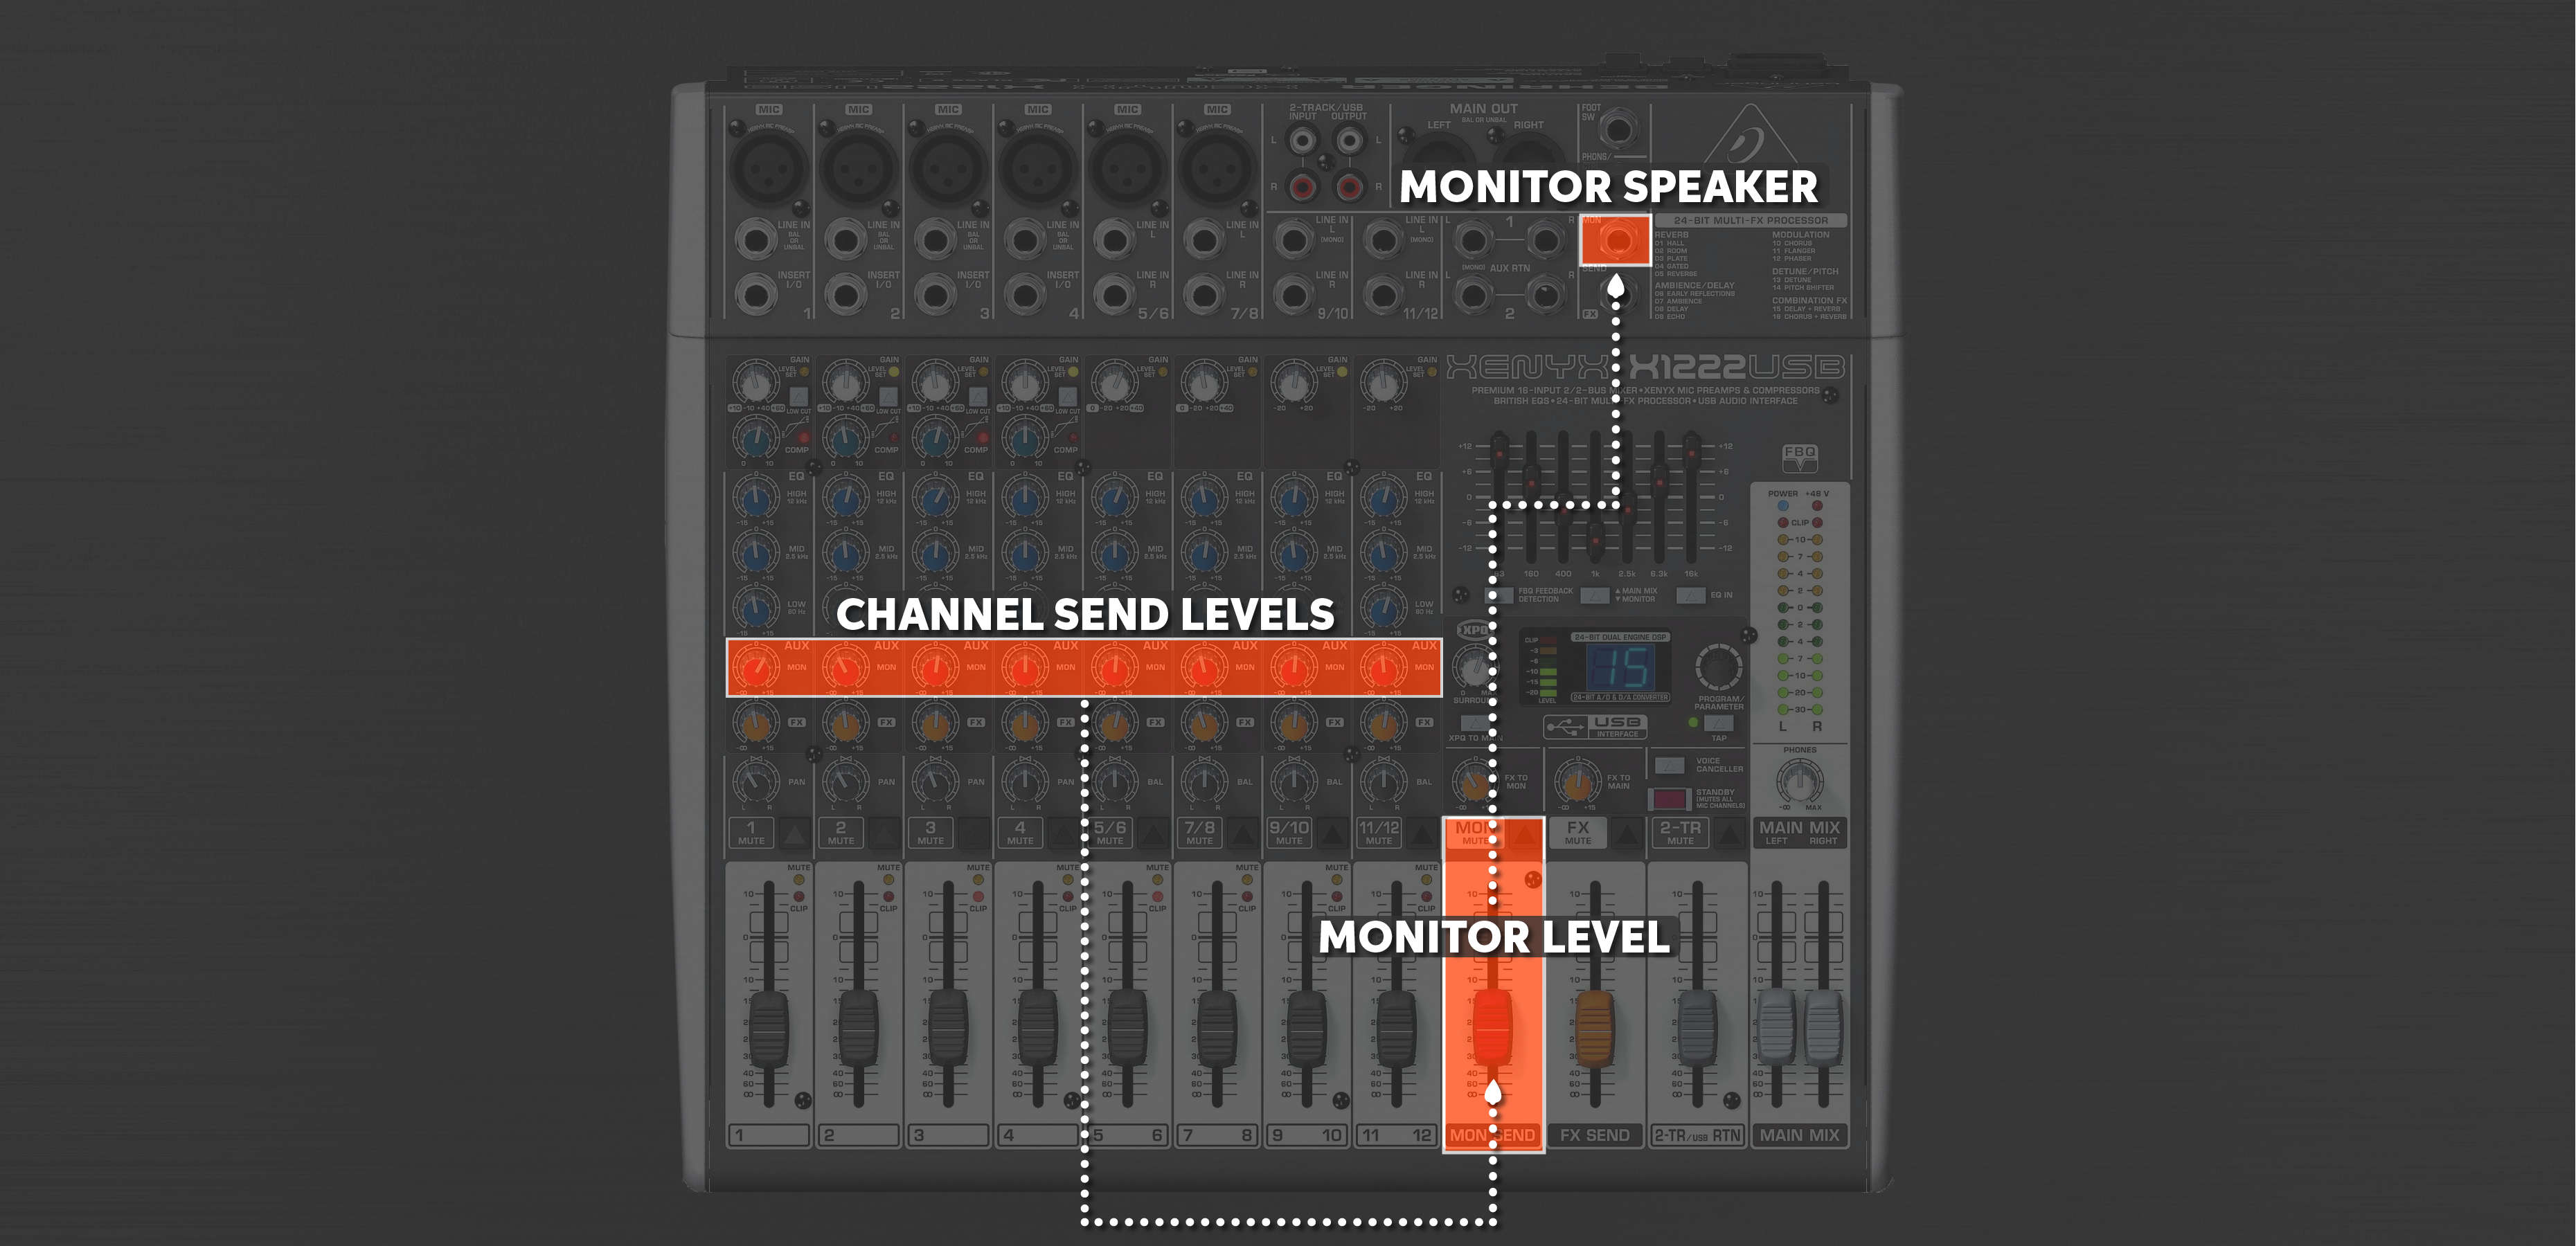
Connect stage monitors
Stage monitors are slightly different from main speakers because they are placed on the stage and face each performer. What you hear from a stage monitor is almost always different from the mains because what the performer needs to hear to perform is different from what the audience needs to enjoy the performance.
While each channel’s volume level determines the main mix, stage monitor mixes are instead defined by each channel’s Aux Send level. Aux sends can have a few names, but you’ll use Auxiliary (Aux), or Monitor (Mon) sends and outputs for stage monitors. The more you turn up a channel’s Aux or Mon knob, the more you will hear it in the connected stage monitor. Once the monitor mix is created, control how much total level is sent to the speaker, adjusting the mixer’s (not an individual channel’s) Aux send level.
- Turn each stage monitor’s and Mon send’s level all the way down.
- Connect the mixer’s Mon output to the stage monitor and power it on.
Set mixer levels to unity and adjust the speaker output level
- Turn up the mixer’s Mon send level to 0 (unison).
- Play sound through your mixer (microphones, instruments, or phone/computer playback). Turn that channel’s Mon send level 0 (unison).
- Turn up the stage monitor’s level to the desired volume. Once done, adjust each channel’s Mon send to create the monitor mix.
Effects send for monitoring: Some mixers also have an FX send, which sends the channel to an optional built-in effects processor or FX send/return for external signal processing. Without applying effects, FX sends and outputs can be used just like Aux and Mon sends for an additional stage monitor. Do not use the FX output for a stage monitor if you are using the built-in effects, all you’ll hear is effects!
Continue to:
Send an Aux mix to a monitor output.
Connect a microphone or instrument
Once the speakers are connected, the next thing to do is connect the microphones and instruments. Connect each one to a mixer channel and set its gain and mix levels. The gain knob controls the preamplifier level, and its job is to bring the incoming signal up to line level. An excellent way to set the gain level is by performing the loudest they will play in the performance. You then turn the gain until it clips or triggers the overload (OL) indicator.
This is the maximum gain level you should use for that channel; otherwise, the signal will be overdriven and sound distorted. Without adding enough gain, the signal will be too quiet, and you’ll have to increase the channel level fader to hear it again. This is not optimal and will produce an overall noisier signal. Instead, set the gain level as high as possible before the channel starts clipping. Once you set the gain, use the channel fader to balance its level within the main mix.
- Connect a microphone to Channel 1 with a standard XLR cable.
- Strongly speak 1” from the microphone and turn up the Gain knob until the channel’s Peak/Level Set LED lights up.
- Send the channel to your Main mix by turning up the channel’s Level fader/knob.
Connect a guitar, keyboard, or electronic drums
Connecting an instrument is just like a microphone, but you’ll need to use the correct cable and gain level. Guitars have a bit more level (Hi-Z) than microphones but have a TS (unbalanced) connector. Keyboards and electronic drums are typically line level, so they’ll need TRS (balanced) cables to connect to Line in jacks.
- Guitars: ¼” TS (unbalanced) cable, Hi-Z or Line In.
- Keyboards and electronic drums: TRS or XLR (balanced) cable, Line In (mono or stereo).
Continue to:
Connect a mic or instrument and send channel to main mix.
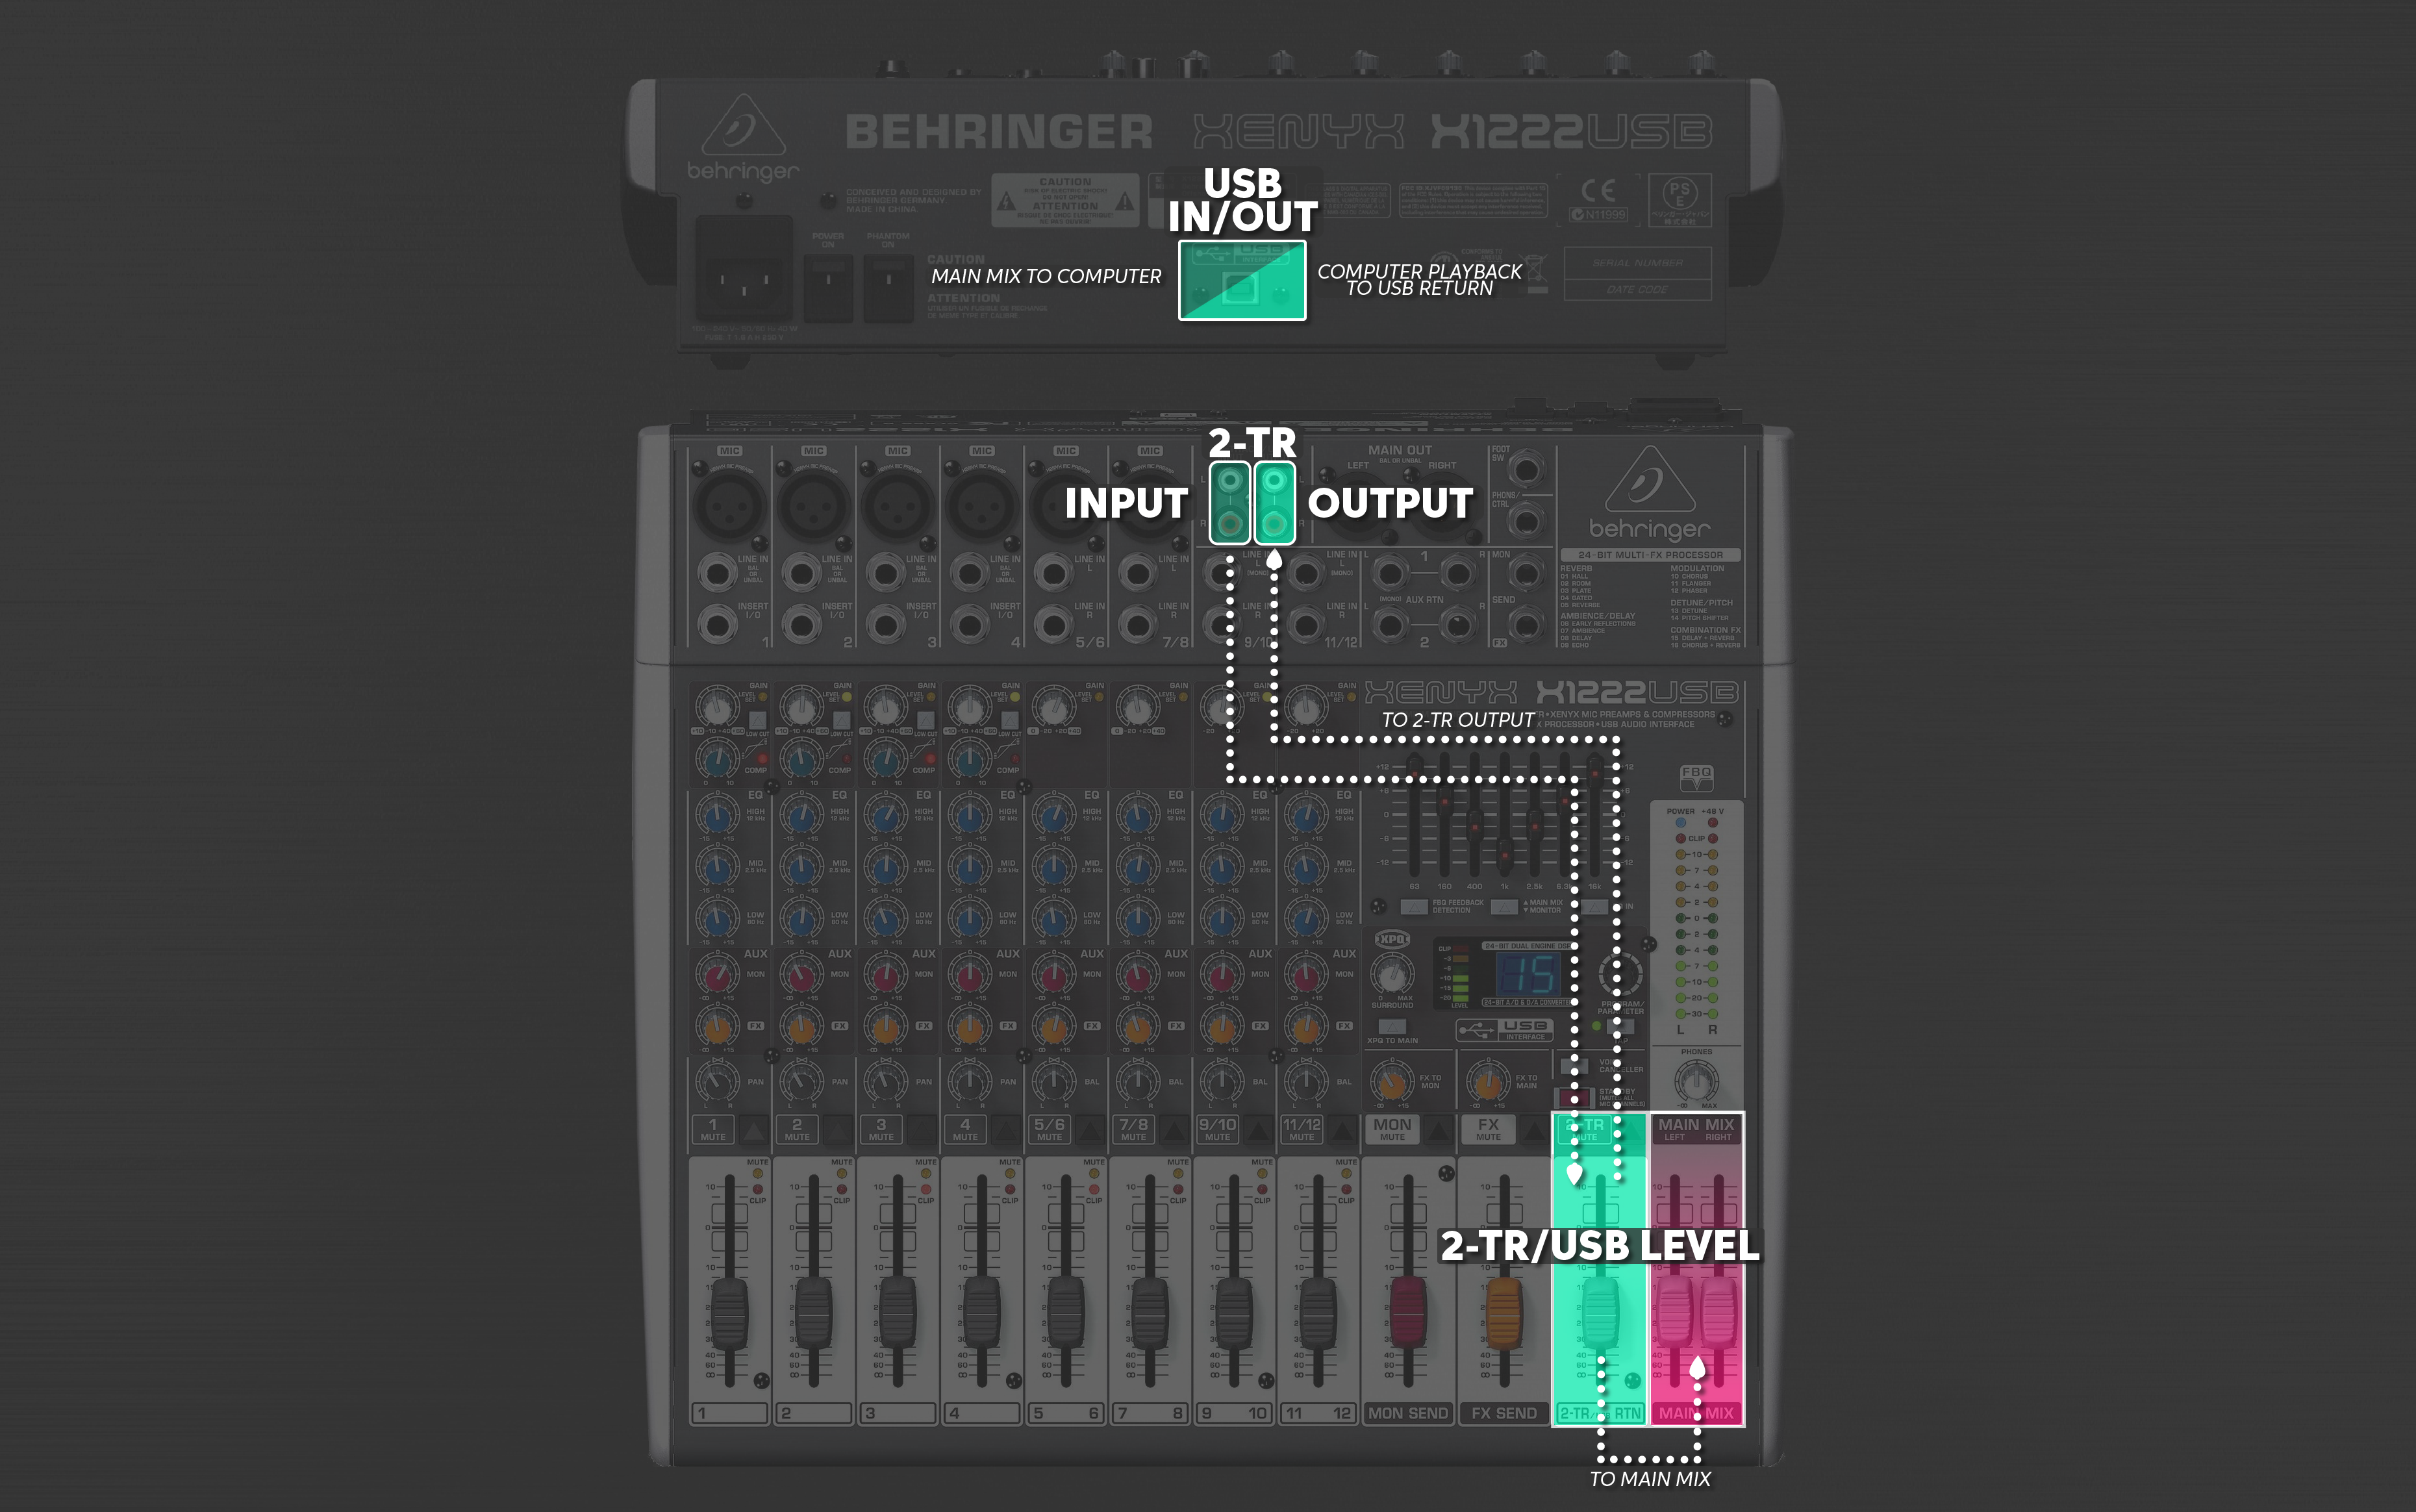
Connect a device
Connecting a phone, tablet, or computer is just like a microphone, but you don’t connect it to a microphone input. Most mixers will have more than one input option, such as Phono or TRS. If your device has a 3.5mm (⅛”) output jack, you can use a stereo RCA or ¼” TRS adapter cable to connect to 2-Track or Line inputs. If your mixer has a USB connection, you can connect it to a computer for playback or recording. Keep in mind that the way you connect the device will determine which level faders you use to adjust its level in the main and monitor mixes.
When connecting to a computer via USB, you must also configure its playback and recording settings. That means installing any necessary drivers and updating the Windows or macOS sound settings. If you record the mix into a DAW, its hardware settings will also need to be updated to select the mixer. If your mixer does not show up on your computer, follow our troubleshooting guides for PC and Mac to get it connected.
- Select the connection type, turn down its level control, and then connect your playback device:
- 2-TRACK: Connect your device to the 2-TRACK phono inputs.
- LINE IN: Connect your device to a channel’s Line in jack (mono) or jacks (stereo)
- 3.5mm (⅛”) > TRS (mono) or dual TS (stereo)
- TRS > TRS (mono) or dual TRS > TRS (stereo)
- RCA > dual TRS (stereo)
- USB: Connect the mixer to your computer with a USB cable and then select it within your computer’s audio playback/recording settings.
- Turn the output volume on the playback device all the way up.
- Send the channel to your Main mix by turning up the channel’s level fader.
Continue to:
- Connect Main speakers
- Connect stage Monitors
- Connect a microphone or instrument
- Add effects (FX)
- Sound check
Connect a playback device and send to the main mix.
Add effects (FX)
Some mixers have built-in FX that you can use to add reverb, delay, and other effects to your mix. For a channel to receive an effect, you’ll need to send it to the effects bus, which is basically a unique mix created from all the FX send levels. The controls will vary from mixer to mixer, but keep in mind that some mixers have additional controls to adjust how much FX bus is sent to the Main and/or Monitor mixes.
- Set the FX send fader and any FX to Main/Monitor knobs levels to 0 (unity).
- Use the FX encoder to select the desired effect.
- Adjust each channel’s FX Aux send knob to control its level to the FX bus.
Continue to:
- Connect Main speakers
- Connect stage Monitors
- Connect a microphone or instrument
- Connect a device
- Sound check

Channel level to FX bus
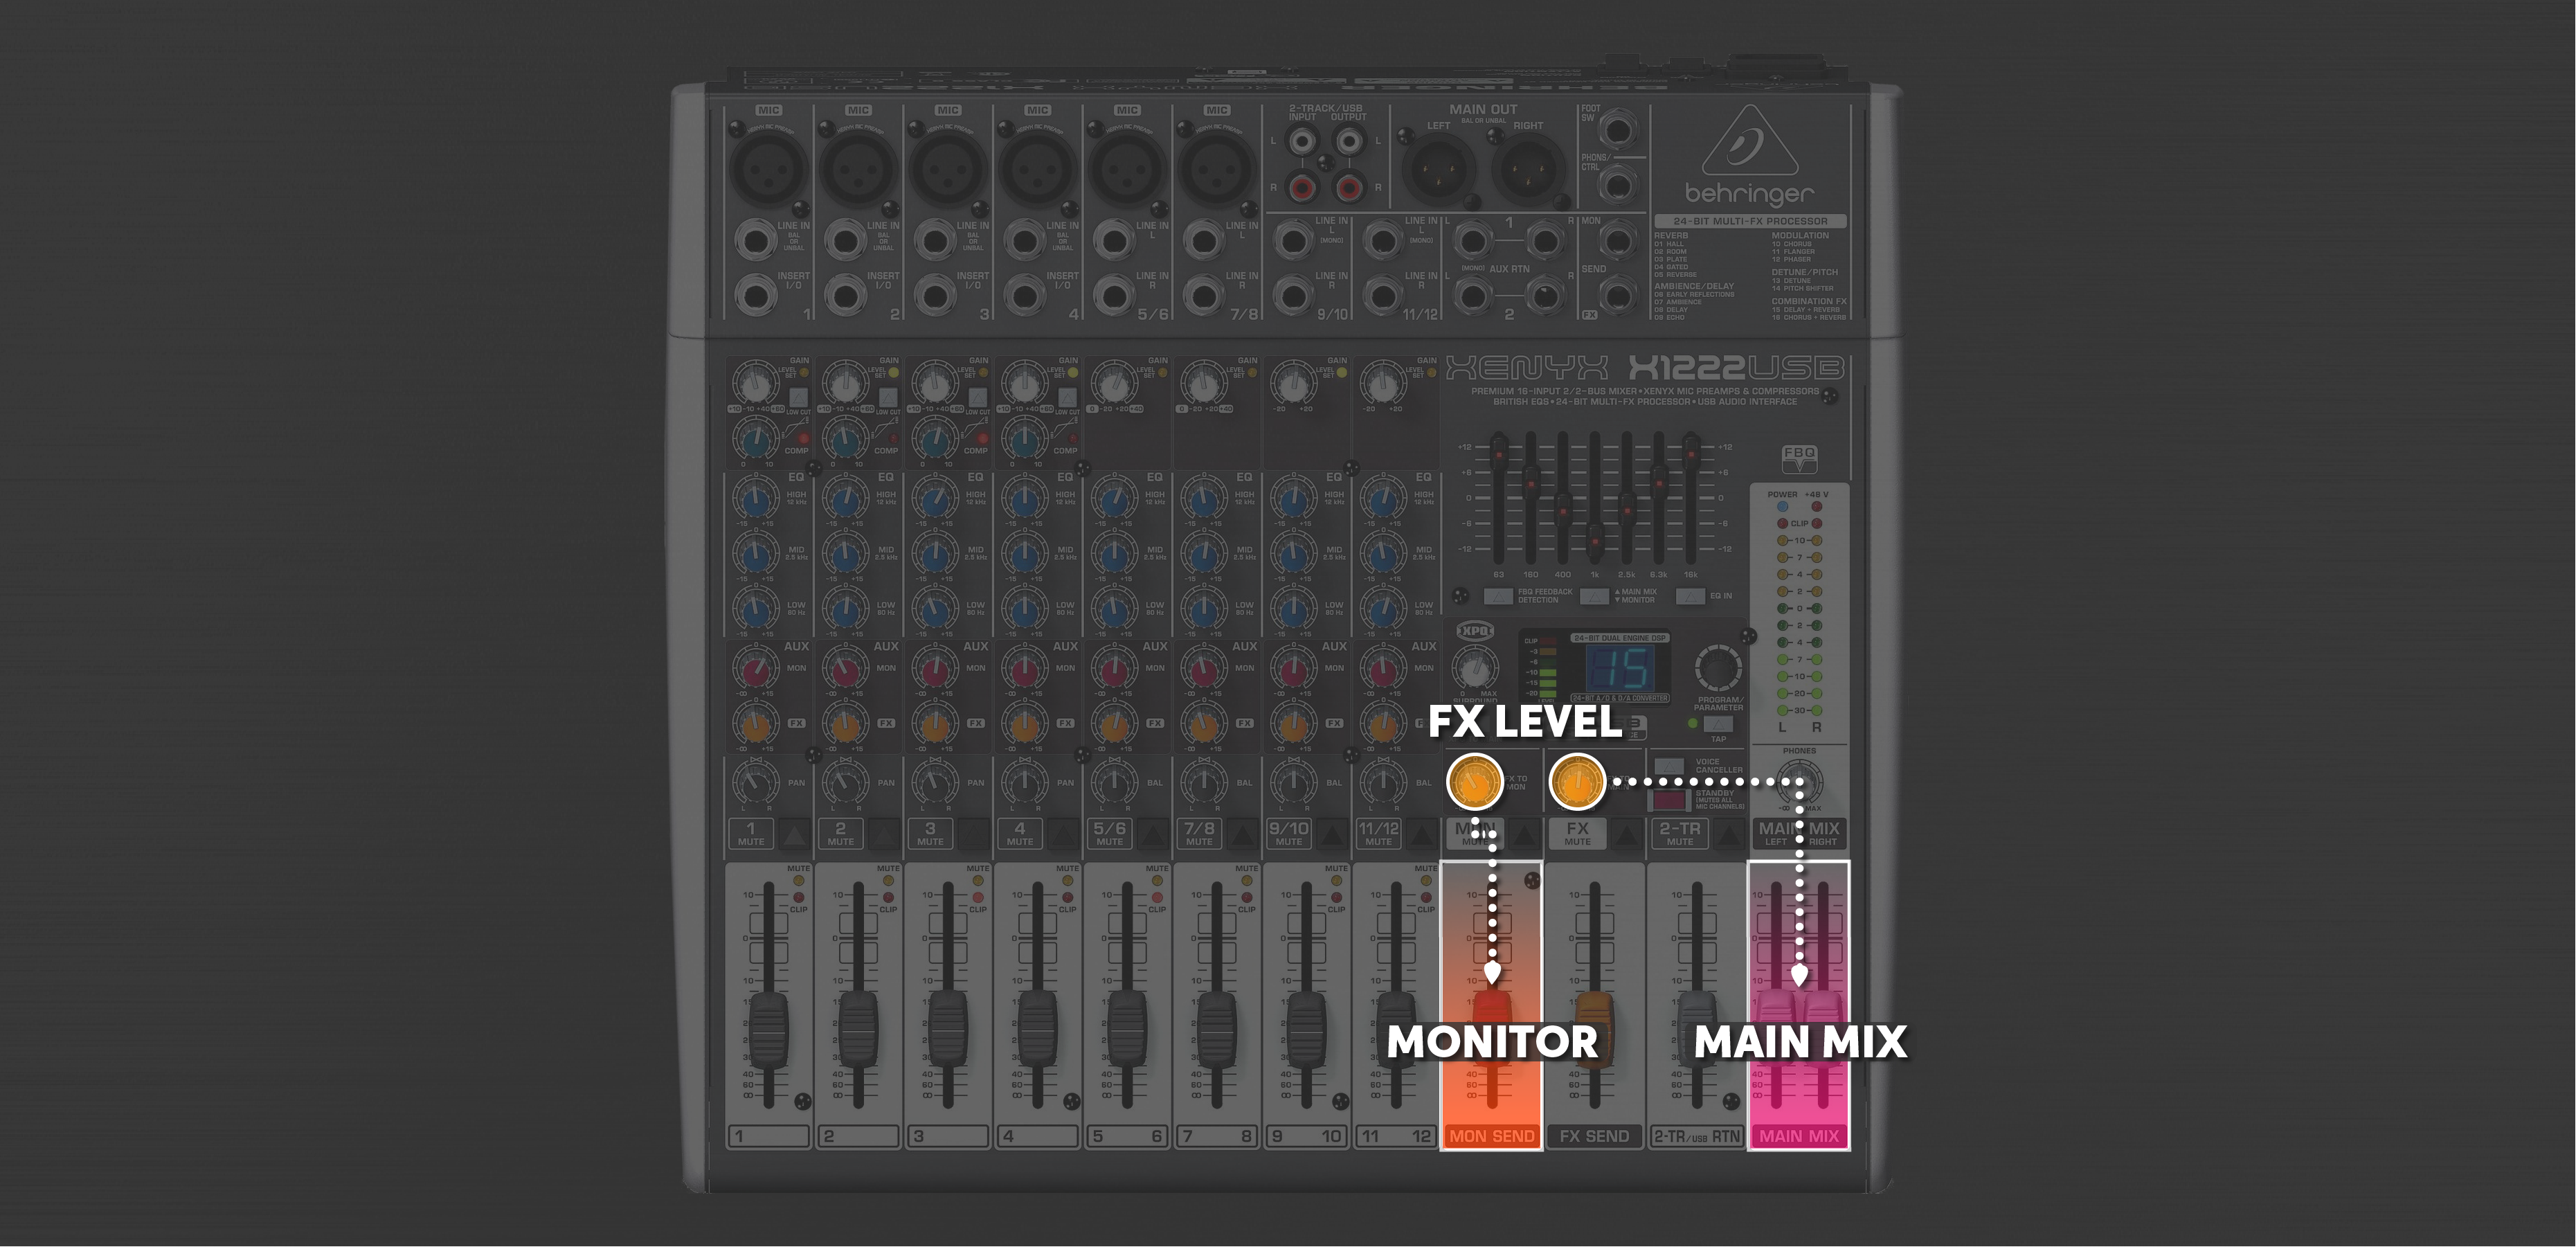
FX level to Mains and Monitors
Sound check
Once you’re getting signal from all the inputs and sound out of the speakers, it’s time to perform a sound check. That means you’re going to double-check each channel’s gain level, each stage monitor mix, and then the main mix. The difference between a bad mix and a good one can make or break an event!
Create a mix
Creating a good mix means balancing each channel’s level within the main and monitor mixes. Every event will be unique, so set aside time to get a good sound check. To do that, either go one performer at a time or mix the band on the fly. You choose what works best, but make sure each mic is working and then have them perform one or two songs from their set.
When making adjustments, have each performer play or sing as loud as they will during the performance and then add them into the main and monitor mixes by adjusting their channel’s level. Use this time to communicate with each performer and be on alert for too much volume (too loud), feedback (loud ringing tone), or problematic acoustics (boominess).
- Set the mixer’s Main mix level to 0 (unison).
- One at a time, carefully turn up and adjust each channel’s volume fader.
- Apply EQ, compression, and FX to channels which complement the event/performance.
Mixer tips
Here are some tips to make your mix sound great!
- Use equalization (EQ) to shape a channel’s frequency content. Boost (increase) favorable frequencies or cut (decrease) problematic ones.
- Too boomy? Decrease the low frequencies.
- Adjust the mids to add or subtract body/warmth.
- Not enough clarity? Boost the high frequencies.
- Smooth out dynamic fluctuations with compression.
- Use effects like reverb subtly. A little extra space goes a long way.
Tips for Mixing Live Vocals
PA system tips
There are a lot of components and features within a PA system, and we know it takes time to learn everything. Below are a few helpful tips we think will make the most impact on your next gig.
- Never point microphones and speakers at each other.
- Mute unused channels when they’re not in use.
- No signal from a channel? Check the gain, level, and mute controls.
- No signal from the mixer or speakers? Check the mixer level, cable connections, and speaker levels.
- Use longer cables or stage snakes to reach the stage.
- Use speaker stands to elevate the loudspeakers for better projection
- Use gaff tape to secure cables and board tape to label channels
- Save setup time with properly wrapped cables.
- Bring an extra power strip and extension cable.
- Always have backup cables.
Related Articles
When you need help, Sweetwater has the answers!
Our knowledge base contains over 28,000 expertly written tech articles that will give you answers and help you get the most out of your gear. Our pro musicians and gear experts update content daily to keep you informed and on your way. Best of all, it’s totally FREE, and it’s just another reason that you get more at Sweetwater.com.


Offer applies only to single-receipt qualifying purchases. Select manufacturers may require that only the manufacturer’s products qualify towards the minimum purchase amount needed to be eligible for promotional financing. Otherwise, an invoice that meets the minimum purchase amount and contains at least one qualifying manufacturer product is eligible for promotional financing. No interest will be charged on promo purchase balance, and equal monthly payments are required on promo purchase until it is paid in full. The payments equal the amount financed divided by the number of months in the promo period, rounded up to the next whole dollar. These payments may be higher than the payments that would be required if this purchase was a non-promo purchase. During the last month(s) of the promo period the required monthly payment may be reduced due to the prior months’ rounding. Regular account terms apply to non-promo purchases. New Accounts as of 07/31/2025: Purchase APR is 34.99%. Penalty APR is 39.99%. Min Interest Charge is $2. Existing cardholders: See your credit card agreement terms. Subject to credit approval.
Offer applies only to single-receipt qualifying purchases. No interest will be charged on the promo balance if you pay it off, in full, within the promo period. If you do not, interest will be charged on the promo balance from the purchase date. The required minimum monthly payments may or may not pay off the promo balance before the end of the promo period, depending on purchase amount, promo length and payment allocation. Regular account terms apply to non-promo purchases and, after promo period ends, to the promo balance. New Accounts as of 07/31/2025: Purchase APR is 34.99%. Penalty APR is 39.99%. Min Interest Charge is $2. Existing cardholders: See your credit card agreement terms. Subject to credit approval.
The estimated required monthly payment shown which excludes taxes and delivery equals the amount financed divided by the number of months in the promo period, rounded up to the next cent. During the last month(s) of the promo period the required monthly payment may be reduced due to this rounding. These payments apply only with the financing offer shown. If you make these payments by the due date each month, you should pay off this amount financed within the promo period, if it is the only balance you are paying off. If you have other balances on your account, this payment will be added to any other minimum monthly payments.
Applies only to select items from this manufacturer. Ask your Sweetwater Sales Engineer for more details.