
Minimoog Model D Quickstart Guide
Congratulations on your purchase of one of the most iconic synthesizers in history. Its explosive success in the 1970s was due to its astonishingly powerful sounds and the groundbreaking simplicity of its front panel controls, keyboard, and left-hand controls.
This beautiful combination of fantastic sound controlled by a simple user interface makes it an ideal instrument for studio and live performance.
This Minimoog Model D QuickStart Guide has been designed to help you on your first days with the synth. It contains suggested settings that will ensure that you will be able to hear something and then be able to hear the results of tweaking those settings. Follow the steps below to get started!
Before we begin
One feature it does not have though is the ability to store presets that instantly recall all the settings needed to make a specific sound. The knobs and switches must be moved by hand to create a different sound. This may initially seem insurmountable, especially if you’re new to synthesis. But I would argue that a Moog Minimoog Model D is the perfect way to learn synthesis and real-time knob tweaking.
The best way to think about tweaking a Model D is to not worry about memorizing exact knob values. Instead, keep getting more comfortable moving the knobs while you’re playing. Listen to what is happening while turning each knob and switch. Soon, you will be able to morph from one sound to another without even worrying about the exact parameter values; it’ll just all be done by ear.
- Initial cable connections
- Initial switch settings
- Initial knob settings
- Tuning
Initial cable connections
- Connect the AC cable between the Minimoog and a wall outlet.
- Connect a ¼” Unbalanced TS cable to an amp or mixer from either of the two MAIN OUTPUT jacks (LOW for guitar amps or guitar pedals, HIGH for a mixer input).
- Or connect a pair of headphones to the PHONES jack on the bottom right of the front panel.
- Turn the POWER switch to ON. Make sure the POWER light is lit
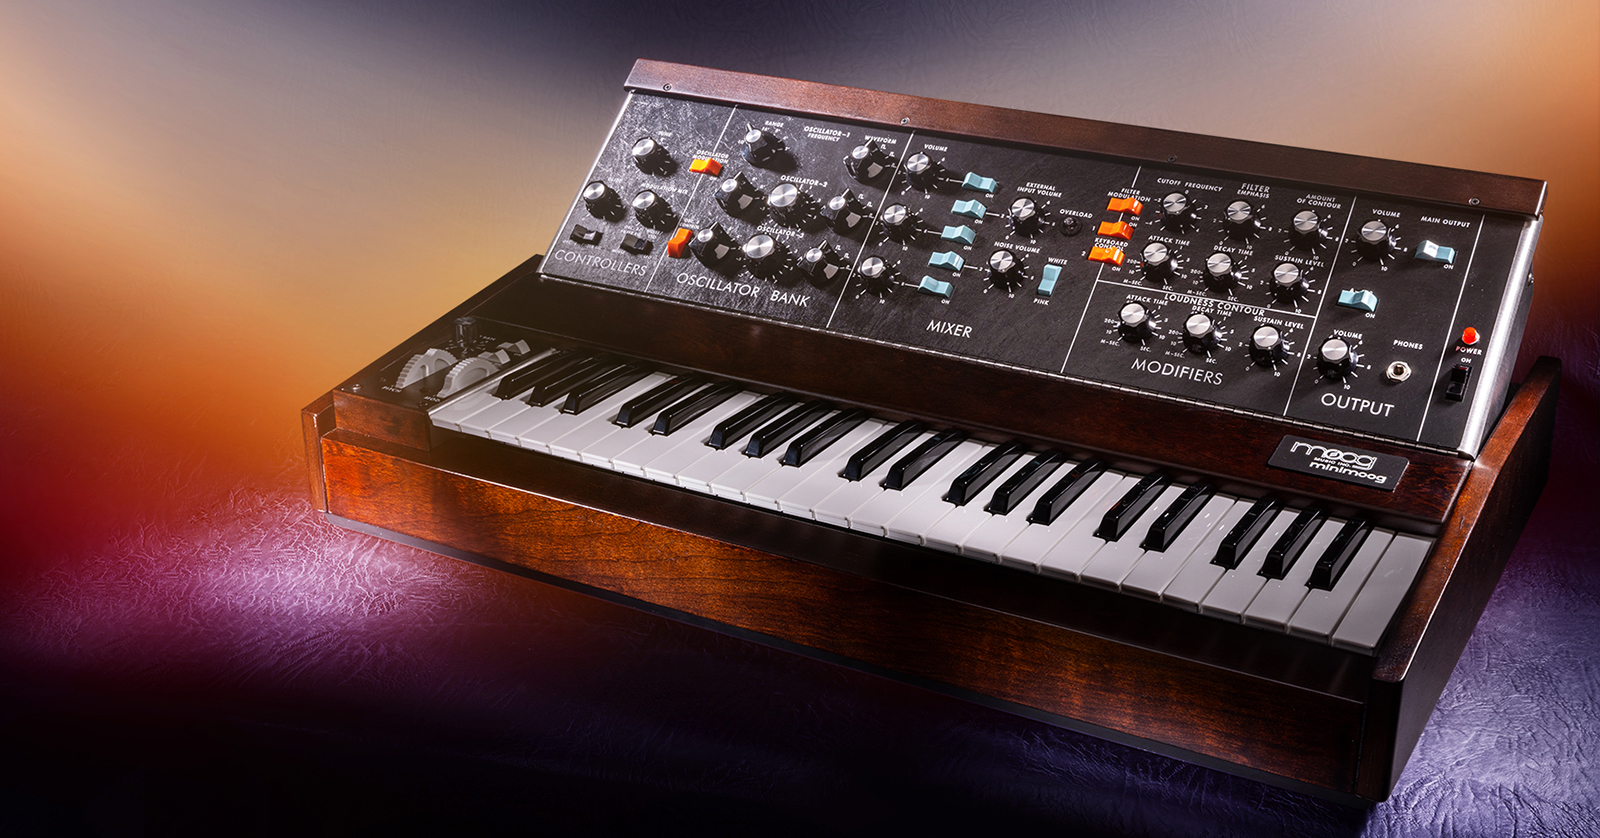
Initial switch connections (left to right)
- OSC. 3 FILTER EG (black) switch to OSC. 3
- NOISE LFO (black) switch to LFO
- GLIDE (white) switch to off
- DECAY (white) switch to off
- OSCILLATOR MODULATION (orange) switch to ON
- OSC. 3 CONTROL (orange) switch to ON
- OSC. 1 Mixer (blue) switch to ON
- All other (blue) Mixer switches to off.
- NOISE (blue) switch to WHITE
- FILTER MODULATION (orange) switch to off
- KEYBOARD CONTROL (orange) switch both to ON
- MAIN OUTPUT (blue) switch to ON
- A – 440 (blue) switch to off.
Initial knob settings
- TUNE = 0
- GLIDE = 5
- MODULATION MIX = 10
- All three OSC. RANGE = 16’
- OSCILLATOR –2 and –3 tuning = 0
- All three OSC WAVEFORM to SAW (third choice)
- All five MIXER VOLUME = 5
- CUTOFF FREQUENCY = 0
- EMPHASIS = 0
- AMOUNT OF CONTOUR = 5
- ATTACK TIME = 0
- DECAY TIME = 1
- SUSTAIN LEVEL = 0
- LOUDNESS ATTACK TIME = 0
- LOUDNESS DECAY TIME = 600
- LOUDNESS SUSTAIN LEVEL = 4
- MAIN OUTPUT VOLUME = Start low and turn up as necessary
- PHONES VOLUME = Start low and turn up as necessary
You should now be able to hear a one-oscillator Model D sound.
Tuning
- Turn A – 440 (blue) switch to ON.
- Press an A key to make the same note as the tuning note.
- Use the TUNE knob (on the left) to get in tune with the reference note.
- Turn OSC. 1 MIXER switch (blue) to OFF.
- Turn OSC. 2 MIXER switch (blue) to ON.
- Use the OSCILLATOR – 2 knob to get in tune with the reference note.
- Turn OSC. 2 MIXER switch (blue) to OFF.
- Turn OSC. 3 MIXER switch (blue) to ON.
- Use OSCILLATOR –3 to get in tune with the reference note.
- Turn A – 440 (blue) switch to OFF.
- Turn OSC. 1 MIXER switch (blue) to ON.
- Turn OSC. 2 MIXER switch (blue) to ON.
You now have your Minimoog Model D ready to play all three Oscillators through the Mixer, then the Filter, and then the Amplifier, to finally come out of the MAIN OUTPUT or PHONES OUTPUT.
Enjoy!
When you need help, Sweetwater has the answers!
Our knowledge base contains over 28,000 expertly written tech articles that will give you answers and help you get the most out of your gear. Our pro musicians and gear experts update content daily to keep you informed and on your way. Best of all, it’s totally FREE, and it’s just another reason that you get more at Sweetwater.com.


Offer applies only to single-receipt qualifying purchases. Select manufacturers may require that only the manufacturer’s products qualify towards the minimum purchase amount needed to be eligible for promotional financing. Otherwise, an invoice that meets the minimum purchase amount and contains at least one qualifying manufacturer product is eligible for promotional financing. No interest will be charged on promo purchase balance, and equal monthly payments are required on promo purchase until it is paid in full. The payments equal the amount financed divided by the number of months in the promo period, rounded up to the next whole dollar. These payments may be higher than the payments that would be required if this purchase was a non-promo purchase. During the last month(s) of the promo period the required monthly payment may be reduced due to the prior months’ rounding. Regular account terms apply to non-promo purchases. New Accounts as of 07/31/2025: Purchase APR is 34.99%. Penalty APR is 39.99%. Min Interest Charge is $2. Existing cardholders: See your credit card agreement terms. Subject to credit approval.
Offer applies only to single-receipt qualifying purchases. No interest will be charged on the promo balance if you pay it off, in full, within the promo period. If you do not, interest will be charged on the promo balance from the purchase date. The required minimum monthly payments may or may not pay off the promo balance before the end of the promo period, depending on purchase amount, promo length and payment allocation. Regular account terms apply to non-promo purchases and, after promo period ends, to the promo balance. New Accounts as of 07/31/2025: Purchase APR is 34.99%. Penalty APR is 39.99%. Min Interest Charge is $2. Existing cardholders: See your credit card agreement terms. Subject to credit approval.
The estimated required monthly payment shown which excludes taxes and delivery equals the amount financed divided by the number of months in the promo period, rounded up to the next cent. During the last month(s) of the promo period the required monthly payment may be reduced due to this rounding. These payments apply only with the financing offer shown. If you make these payments by the due date each month, you should pay off this amount financed within the promo period, if it is the only balance you are paying off. If you have other balances on your account, this payment will be added to any other minimum monthly payments.
Applies only to select items from this manufacturer. Ask your Sweetwater Sales Engineer for more details.