
Minilogue XD Quickstart Guide
Getting started with the Korg minilogue XD
The Korg minilogue XD is a polyphonic analog synth with built-in effects, programs (patches), and also a recordable sequencer. In this guide, we’ll explain each section of the synthesizer, create a sound, and teach you how to record sequences. Follow the sections below to get started.
minilogue XD power sequence
To get the best performance possible, it’s recommended to follow a specific power-up sequence. Doing so improperly may shorten the life of your speakers. Follow these steps for the proper power sequence.
Power on
- Connect the power supply from the synth into an available outlet.
- Connect output devices like speakers, but make sure that the volume is turned down.
- Press and hold the power button until you see the minilogue logo displayed on the screen, then let go. “Tuning” will display for approximately 10 seconds before you can begin playing.
- Turn the volume of the minilogue and external outputs up to the desired level.
Power off
- Turn the volume of all outputs down, then turn them off.
- Press and hold the power switch until the display turns off.
Why does it have to tune?
Since the minilogue XD is an analog synthesizer, the internal circuits need to warm up and calibrate before you can start playing.
Navigating the Korg minilogue XD
The minilogue has four primary sections, all of which affect the overall program (patch) and sequence. You can also access more functions while in EDIT or SEQUENCER mode. For a full list of functions, visit the parameter list located in the Korg minilogue manual.
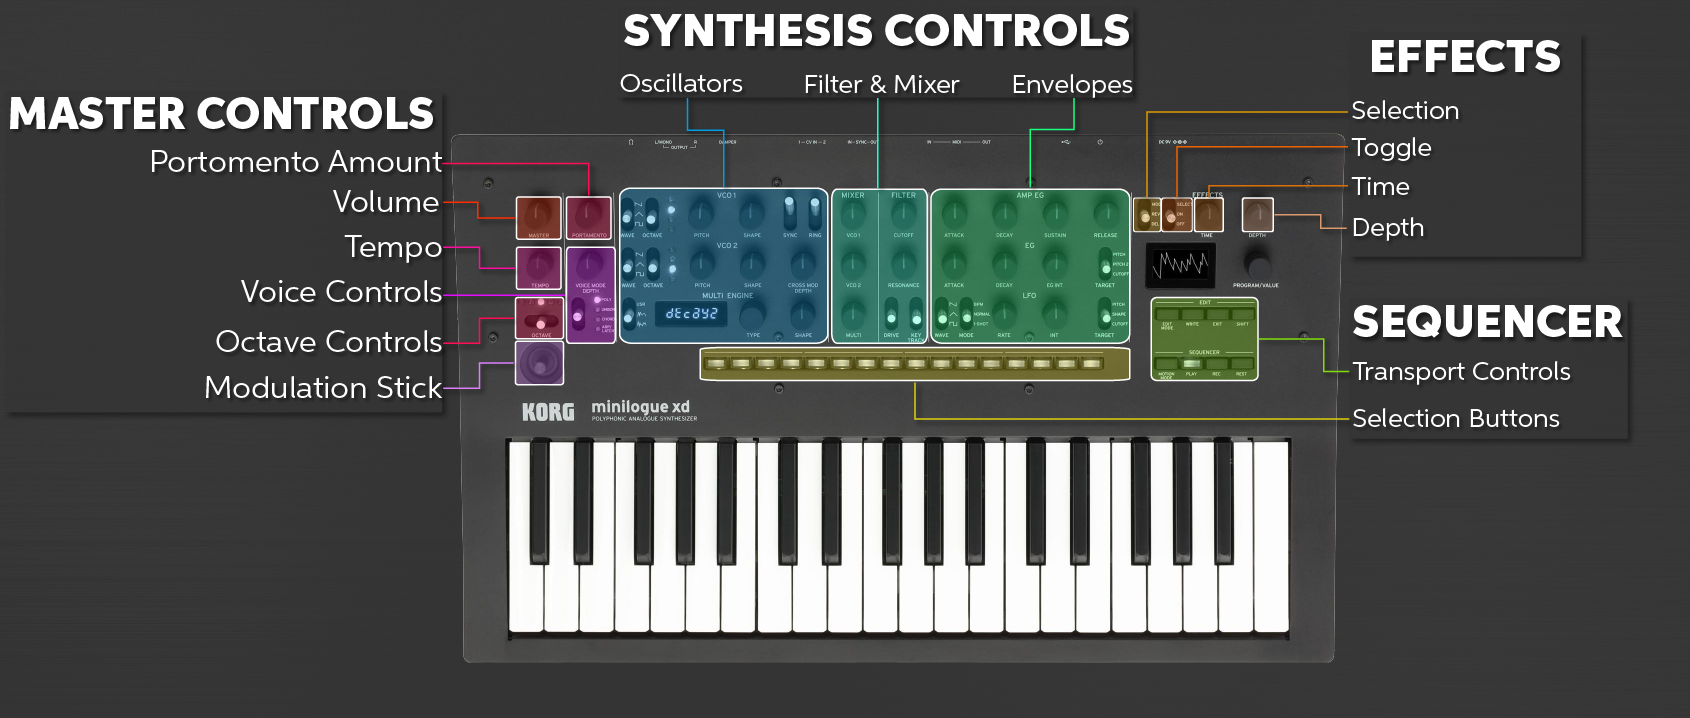
Sections of the Minilogue XD. Click to enlarge.
Master controls
This section will make changes to the master controls such as the volume, portamento, tempo of the sequence, and octave and voice changes.
Synthesis controls
This is the primary section to alter the overall sound of the program (patch). It’s comprised of oscillators, a mixer, and filter as well as envelopes.
Effects
The effects will add modulation, delay, and reverb to the program. For a full list of all effects, visit the Korg minilogue Effects List in the Korg minilogue manual.
Sequencer
In this section, you can record and edit both patches and control changes like changing the filter’s resonance.
What’s the minilogue XD’s Multi Engine function?
The Multi Engine is an independent digital oscillator that can be used with the analog oscillators or on its own. You also can save and load sound generator presets as well. For a full list of options, visit the Korg minilogue Manual.
External connections
The minilogue XD It has quite a few ports on the back of it, allowing you to connect external devices such as additional sequencers, sound modules, and footswitches. Learn more about external connections in the Korg minilogue manual!
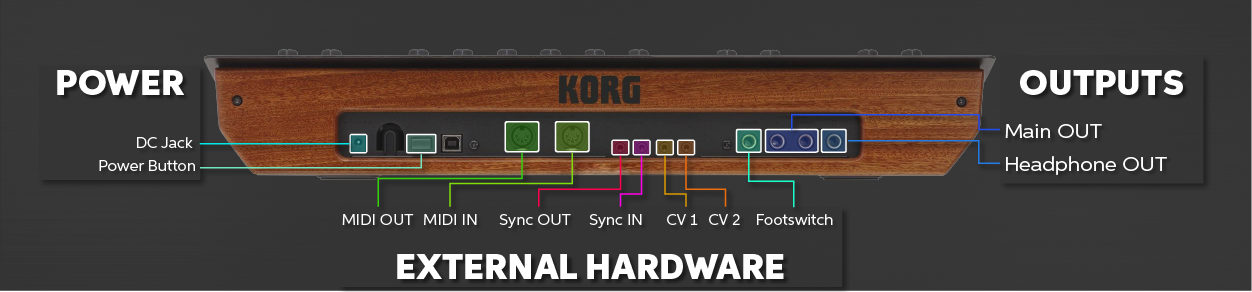
minilogue XD external connections. Click to enlarge.
Main outputs
These are where you’ll connect external speakers and headphones. The headphones will output the same signal as the main outs.
Footswitch
Connect either a damper pedal or pedal switch to this port. Korg recommends using the DS-1H sustain pedal or the PS-3 Footswitch.
CV ports
Connect up to two external devices that have CV outputs to control certain parameters.
Sync
Connect external sequencers via the sync jacks on the device. Make sure to use stereo cables!
MIDI connections
You can connect the minilogue XD with external MIDI devices such as keyboard or drum machines.
USB
Connecting a minilogue XD to a computer via the USB port will turn it into a MIDI controller for use within your DAW.
Working with the minilogue XD
Creating and saving a program
You can create a program (patch) in a few ways: either editing an existing one or building one from scratch. Once you’re happy with the program you created, you can then save it to one of the 200 user slots available. Follow these steps to create a program. Don’t forget to check out the Korg minilogue manual to learn more about the program architecture, as well!
SAVE OFTEN! After you have created the sound you want, make sure to save, or else it will be removed if turning the unit off or switching to a different program.
Edit the current preset
Turn the Program/Value to select the preset, then use the knobs in the Synthesis Controls section to alter the sound.
Create a new preset
Press and hold the SHIFT button and press PLAY to enter Panel Load. Use the knobs in the Synthesis Controls section to alter the sound.
Save a preset
- Press the WRITE button to enter Write Mode.
- Use the Program/Value knob to select the patch number slot you want to save, and then press Write to save it.
Creating and saving a sequence
There are two ways to record a sequence; real-time or step recording. You can record four motion sequences (switch and knob changes) as well. Once they’re recorded, you can go back and edit them to fine-tune the performance. For a full list of edit options, visit the Sequence Edit mode list located in the Korg minilogue manual. Follow these steps to create and record a sequence.
Real-time recording
- Press the PLAY button, then press the REC button to start recording.
- Start performing, then press the REC button to stop. If you need to restart, press the REC button again.
- Press the PLAY button to complete the recording.
Step recording
- Press the REC button to enter Step Rec mode.
- Press one key at a time to trigger that step. The step button which is flashing is the step you’re currently on. Once finished, step recording will automatically stop.
- Press PLAY to preview. If you need to remove a step, press that step button, so its light goes dark.
Motion recording
- Press the PLAY button, then press MOTION MODE.
- Press the REC button to begin real-time recording, then move the knobs and switches you’d like. You can only record up to four changes; anything more will give you a “Motion Full” error.
- Once the sequence has finished, the motion recording will automatically stop.
Related content
Synth Clips with Daniel Fisher
Synth Lesson: Arpeggios Explained
Additional resources
minilogue xd Tutorial/How-to 1: Intro to minilogue XD
minilogue xd Tutorial/How-to 3: Modulation and Effects
minilogue xd Tutorial/How-to 2: Multi Engine Oscillator and Filter
minilogue xd Tutorial/How-to 4: Sequencer, Voice Modes, and Performance Features
When you need help, Sweetwater has the answers!
Our knowledge base contains over 28,000 expertly written tech articles that will give you answers and help you get the most out of your gear. Our pro musicians and gear experts update content daily to keep you informed and on your way. Best of all, it’s totally FREE, and it’s just another reason that you get more at Sweetwater.com.


Offer applies only to single-receipt qualifying purchases. Select manufacturers may require that only the manufacturer’s products qualify towards the minimum purchase amount needed to be eligible for promotional financing. Otherwise, an invoice that meets the minimum purchase amount and contains at least one qualifying manufacturer product is eligible for promotional financing. No interest will be charged on promo purchase balance, and equal monthly payments are required on promo purchase until it is paid in full. The payments equal the amount financed divided by the number of months in the promo period, rounded up to the next whole dollar. These payments may be higher than the payments that would be required if this purchase was a non-promo purchase. During the last month(s) of the promo period the required monthly payment may be reduced due to the prior months’ rounding. Regular account terms apply to non-promo purchases. New Accounts as of 07/31/2025: Purchase APR is 34.99%. Penalty APR is 39.99%. Min Interest Charge is $2. Existing cardholders: See your credit card agreement terms. Subject to credit approval.
Offer applies only to single-receipt qualifying purchases. No interest will be charged on the promo balance if you pay it off, in full, within the promo period. If you do not, interest will be charged on the promo balance from the purchase date. The required minimum monthly payments may or may not pay off the promo balance before the end of the promo period, depending on purchase amount, promo length and payment allocation. Regular account terms apply to non-promo purchases and, after promo period ends, to the promo balance. New Accounts as of 07/31/2025: Purchase APR is 34.99%. Penalty APR is 39.99%. Min Interest Charge is $2. Existing cardholders: See your credit card agreement terms. Subject to credit approval.
The estimated required monthly payment shown which excludes taxes and delivery equals the amount financed divided by the number of months in the promo period, rounded up to the next cent. During the last month(s) of the promo period the required monthly payment may be reduced due to this rounding. These payments apply only with the financing offer shown. If you make these payments by the due date each month, you should pay off this amount financed within the promo period, if it is the only balance you are paying off. If you have other balances on your account, this payment will be added to any other minimum monthly payments.
Applies only to select items from this manufacturer. Ask your Sweetwater Sales Engineer for more details.