
Korg drumlogue Quickstart Guide
The Korg drumlogue is a powerful drum machine in your arsenal, so in this guide, we will walk you through how to register, set up, and use it for the first time. This article only scratches the surface, so check out the drumlogue Owner’s Manual for more information! Follow the sections below to get started.
Register the drumlogue
While it’s always exciting to plug in your new gear and start playing, you must first register the drumlogue with Korg. You will receive an extended warranty if you register the drumlogue within 90 days of purchase. Keep your Sweetwater invoice handy; you’ll need to provide some information during the registration process.
- Go to the Korg account login page and enter your Korg account information. You will be prompted to enter a password if you don’t have a Korg account.
- Korg will send you an account confirmation email. Check your spam folder if you don’t see it in your inbox!
- Once you’re logged in, click Register a Product. On the next page, enter the necessary information, including the serial number, the purchase date, and the place of purchase (Sweetwater).
- Click Save to finish the registration process.

Update the Firmware
After registering your drumlogue, it is important to update the firmware! Korg periodically releases firmware that addresses bugs and adds new features to the device. Check out our firmware instruction page to learn how to update your drumlogue!
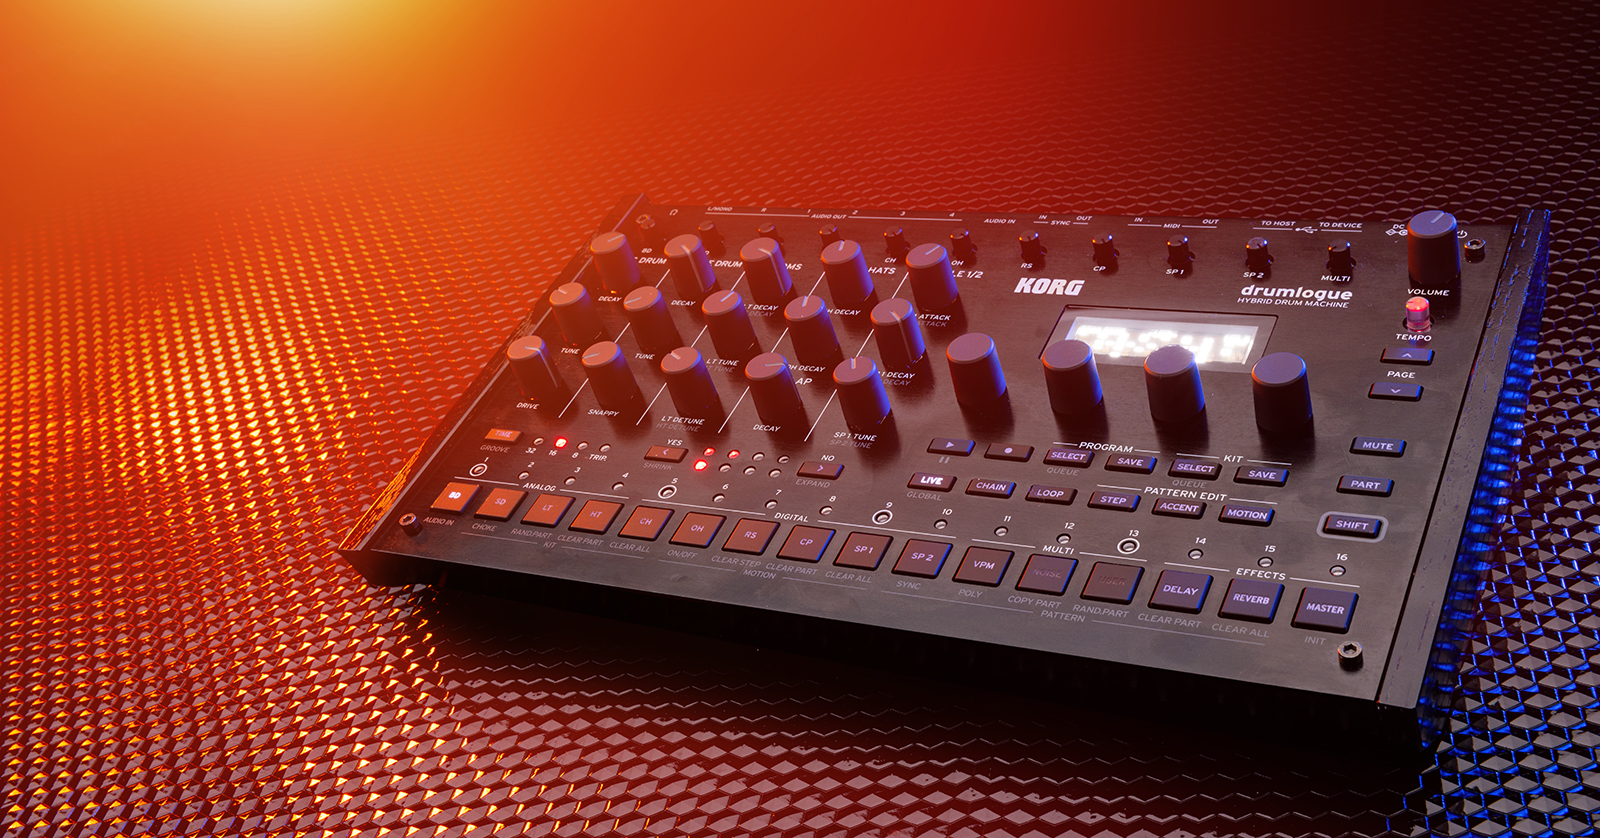
Korg drumlogue Connections
The Korg drumlogue has plenty of connections that allow you to integrate it with external sound modules, sequencers, and audio players.
USB
- The USB to Device port is for connecting MIDI devices to receive MIDI data. Please note this port is only for receiving MIDI data.
- The USB to Host port is for sending MIDI data to your computer.
MIDI
- Connect traditional 5-pin DIN MIDI cables to transmit and receive MIDI data or to use an external device.
Sync
- Use the SYNC IN/OUT jacks to connect to Korg Volca products and to sync steps and output pulses.
- The SYNC OUT jack provides a 15ms long, 5v pulse at the beginning of a step. Make sure to use mini stereo cables for this connection!
Audio IN/OUT
- The AUDIO IN jack is for connecting to external audio sources.
- AUDIO OUT 1–4 are independent audio outputs separate from the Main outputs. This allows you to assign specific parts to the individual outputs without affecting the overall mix.
- Connect 1/4-inch TRS cables from the Audio L(MONO)/R to external audio sources like mixers, audio interfaces, and speakers.

drumlogue Power Sequence
Korg recommends following a specific power-up sequence so you get the best experience. Following the sequence improperly may shorten your speakers’ lifespans and potentially the drumlogue itself. Follow these steps for the proper power-up sequence.
Power On
- With the drumlogue’s volume turned down and all connected external devices and speakers turned off, press and hold the POWER button until you see the drumlogue logo display.
- Once powered on, turn on your external devices and speakers, then slowly turn up the speakers and drumlogue until it’s at a comfortable listening level.
Power Off
- Turn down the volume on your speakers and drumlogue, then power off the external devices and speakers.
- Press and hold the POWER button on the drumlogue, then wait until the display turns off.
- Wait at least 10 seconds before powering the device back on.
Auto Power Off
The Korg drumlogue has an auto power-off feature that will turn off the device after four hours of not turning any knobs, changing settings, etc. By default, Auto Power Off is enabled. If you wish, you can turn the feature off.
- Press and hold the SHIFT button and press LIVE to enter the Global Settings.
- Press the DELAY button to enter the Hardware (HW) Settings.
- You can also switch between pages using the PAGE UP/DOWN buttons.
- Turn the second parameter encoder (beneath the display) to select OFF.
- Press the LIVE button to exit the Global Settings menu. Any changes made in Global Settings will be saved automatically.
Creating a Pattern
You can store 128 kits and programs over 16 banks. Programs contain the kit, parameters, effects, rhythmic patterns, etc. Let’s create a pattern from scratch to get you up and running.
- Select a Program by pressing SELECT, then use functions (F) 1 and 4 encoders. For this article, select Program E1.
- If you want to clear the pattern, hold SHIFT and press CLEAR ALL (step 15 button). You can undo this by pressing the CLEAR ALL button again.
- Press LIVE.
- By default, each pattern is 16 steps long. To change the length of a pattern, press and hold SHIFT and press the NO button. Once selected, you can use the YES and NO buttons to navigate the pages.
- Alternatively, press and hold the TIME button, then use the fourth function (F4) encoder underneath the display to change the length.
- You can also change the length of a part by following the procedure above while holding the PART button and selecting the sample you want to change.
- Hold PART and press the instrument you want to play.
- Press the STEP button to create your pattern step-by-step.
- To record live, press the RECORD button. It will start recording once you begin playing. Once you’ve reached the end of the pattern, it will then start to overdub.
- Once you’re finished, press the Program SAVE button, rename it, then press SAVE.
- Use F2 and F4 to select where to save the Program, then press SAVE again.
Chaining Patterns
One great feature of the drumlogue is the ability to chain up to 64 patterns. The process is straightforward, too.
- Press the CHAIN button to enter CHAIN SELECT mode, then press buttons 1–16 to select the program for each button.
- Buttons 1 through 16 directly correspond to CHAIN 1 through 16.
- Turn the parameter knob to choose a program.
- Press the PROGRAM SELECT button to add the program to CHAIN.
- Repeat steps 2 through 4 to add the program to CHAIN.
When you need help, Sweetwater has the answers!
Our knowledge base contains over 28,000 expertly written tech articles that will give you answers and help you get the most out of your gear. Our pro musicians and gear experts update content daily to keep you informed and on your way. Best of all, it’s totally FREE, and it’s just another reason that you get more at Sweetwater.com.


Offer applies only to single-receipt qualifying purchases. Select manufacturers may require that only the manufacturer’s products qualify towards the minimum purchase amount needed to be eligible for promotional financing. Otherwise, an invoice that meets the minimum purchase amount and contains at least one qualifying manufacturer product is eligible for promotional financing. No interest will be charged on promo purchase balance, and equal monthly payments are required on promo purchase until it is paid in full. The payments equal the amount financed divided by the number of months in the promo period, rounded up to the next whole dollar. These payments may be higher than the payments that would be required if this purchase was a non-promo purchase. During the last month(s) of the promo period the required monthly payment may be reduced due to the prior months’ rounding. Regular account terms apply to non-promo purchases. New Accounts as of 07/31/2025: Purchase APR is 34.99%. Penalty APR is 39.99%. Min Interest Charge is $2. Existing cardholders: See your credit card agreement terms. Subject to credit approval.
Offer applies only to single-receipt qualifying purchases. No interest will be charged on the promo balance if you pay it off, in full, within the promo period. If you do not, interest will be charged on the promo balance from the purchase date. The required minimum monthly payments may or may not pay off the promo balance before the end of the promo period, depending on purchase amount, promo length and payment allocation. Regular account terms apply to non-promo purchases and, after promo period ends, to the promo balance. New Accounts as of 07/31/2025: Purchase APR is 34.99%. Penalty APR is 39.99%. Min Interest Charge is $2. Existing cardholders: See your credit card agreement terms. Subject to credit approval.
The estimated required monthly payment shown which excludes taxes and delivery equals the amount financed divided by the number of months in the promo period, rounded up to the next cent. During the last month(s) of the promo period the required monthly payment may be reduced due to this rounding. These payments apply only with the financing offer shown. If you make these payments by the due date each month, you should pay off this amount financed within the promo period, if it is the only balance you are paying off. If you have other balances on your account, this payment will be added to any other minimum monthly payments.
Applies only to select items from this manufacturer. Ask your Sweetwater Sales Engineer for more details.