
How To Set Up Your Electric Guitar Part 2: Setting Action
In Part 1 of the Guitar Setup series, we adjusted the truss rod to set the neck relief. In Part 2, we will fine-tune your string height to perfectly tailor your guitar to your playing style. To do this, we will measure your guitar neck’s action and adjust it for both Fender and Gibson-style bridges. Follow along with the guide below to get started.

How to measure action
The term ‘action’ refers to the distance between the top of your frets to the bottom of your strings. This distance plays a crucial role in your setup because it determines how easy it is to fret each note and how aggressive you can play the instrument before causing fret buzz. When measuring action, you’ll want to keep in mind some target numbers, but ultimately, your playing style and personal taste will determine the string height.
“Low action, no buzz.”
Our #1 request for a custom setup is “low action, no buzz.” This is always tough to tackle because what’s low for us may be high for you. Also, the lower the strings are to the frets, the more likely you are to have buzz. This is why setting the action is always a compromise between getting it as low as possible and avoiding fret buzz.
Since the focus of these articles will be on electric guitars, we will always want to verify how much buzz is translating through the amplifier. You won’t hear most of the buzz you hear while you’re sitting on your couch and strumming your guitar through an amp. Keep this in mind if fret buzz is a deal-breaker in your setup.

- Tune the guitar to pitch and ensure that your neck relief has been properly adjusted.
- Some Luthiers will install a capo at the first fret to prevent the nut height from being a factor in their measurements. If you opt to do this, be sure that you repeat this on your next setup as well.
- The capo will give you a lower measurement when installed, so you’ll want to be sure you have it in place at every setup once you’ve figured out your desired action.
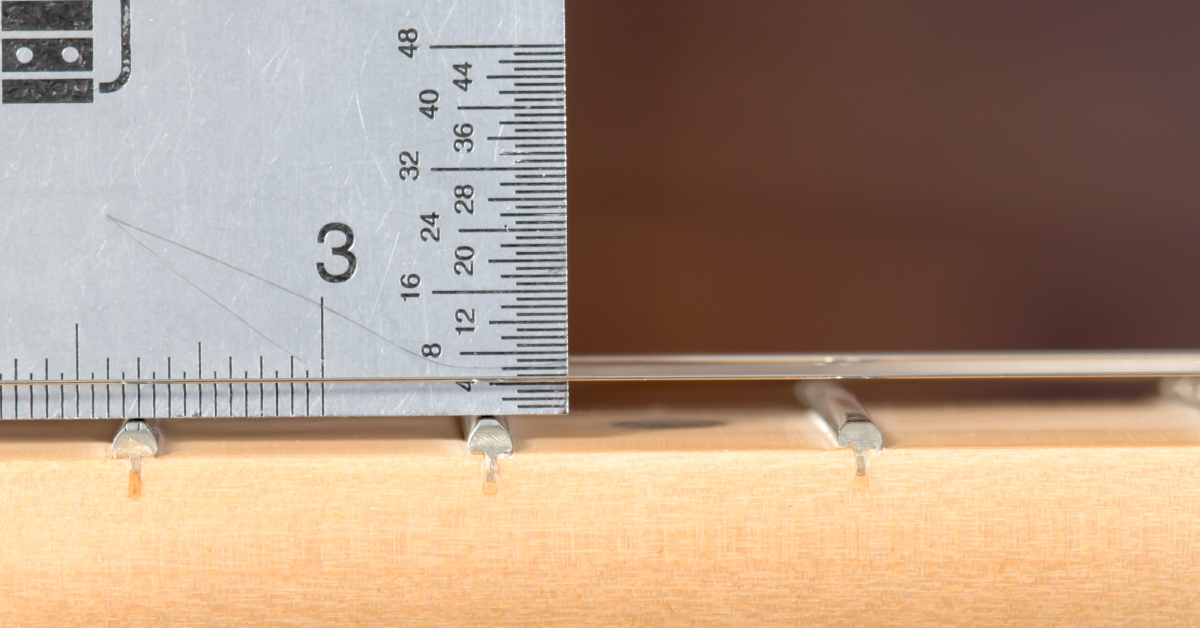
- Place the ruler on the 12th fret, making sure the ruler ticks are parallel to the string. Do this so that you’re accurately measuring the gap from the top of the fret to the bottom of the low E- string.
- Raise, lower, or leave the action.
Decisions, decisions
After setting up, you’ll need to decide to raise, lower or leave the action alone. Everyone’s setup preferences are a bit different. For example, Jeff Beck prefers low action (3/64th), whereas Stevie Ray Vaughn prefers a higher action (7/64th) to accommodate his more aggressive technique. You may want to experiment and determine what’s best for your playing style.
How to adjust action
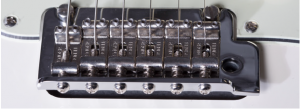
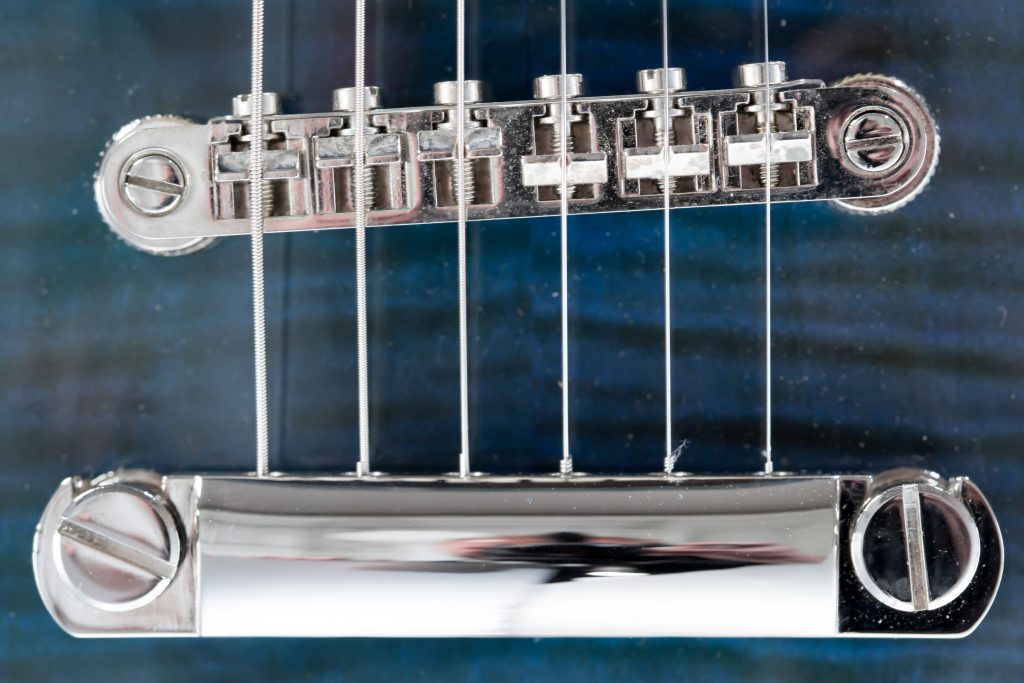
Most guitars have either a Fender or Gibson-style bridge. The Fender-style bridge allows you to adjust each saddle height individually. When adjusting these, it’s up to you to maintain or adjust them to the proper radius. A Gibson-style bridge has two bridge posts that allow you to adjust only the bass and treble side of the bridge. The radius of the saddle slots on a Gibson bridge should have already been set when the bridge was initially installed.
Adjust action on a Fender bridge
SADDLE HEIGHT: Increasing the saddle height will also increase the string tension. Strings are easier to bend with less tension, so set the height to best suit your playing style.
- First, adjust your Low E-string height by raising or lowering the saddle. Always ensure that you’re using the correct wrench size.
- Adjust both set screws, re-tune your guitar to pitch, and take another action measurement at the 12th fret. You may want to play that string a little to see if the playability has improved for you. If so, accurately measure the action height and adjust the rest of the strings to that same distance. This will give you the correct radius.
- Many of the Technicians here at Sweetwater prefer to have a slightly lower action on the treble strings since these strings’ vibrational pattern is tighter and requires less clearance. If you’d like to try this, set the action of your high E string (1st) 1/64th of an inch lower than your low E string (6th). You can cascade your measurements from tallest to lowest, or you can more accurately set your strings to the proper radius by verifying with a radius gauge.
Fender action specifications

Adjust action on a Gibson bridge
STOPBAR TIP: Be sure that the stopbar is not causing the strings to make contact with the back of the bridge. This will inhibit vibrations and reduce overtones.
The radius of a Gibson Tune-o-Matic bridge is set at the factory and should not be changed. For all other Gibson bridges, do the following:
- Measure the action at the 12th fret and determine whether you’d like to raise or lower the string height.
- Adjust the bridge height by turning the slot-head screw on the bridge post or whichever method applies to your bridge style. Always be sure to tune your guitar back to pitch before taking any further measurements.
- We like to set our treble side action about 1/64th of an inch lower on the treble side but feel free to experiment and find the height that best suits your playing style.
While there are no specific rules to set the height of the stopbar tailpiece, you may wish to fine-tune it while setting up your guitar. Keep in mind that lowering the stopbar will increase the string tension and make them a little harder.
Gibson action specification

When you need help, Sweetwater has the answers!
Our knowledge base contains over 28,000 expertly written tech articles that will give you answers and help you get the most out of your gear. Our pro musicians and gear experts update content daily to keep you informed and on your way. Best of all, it’s totally FREE, and it’s just another reason that you get more at Sweetwater.com.


Offer applies only to single-receipt qualifying purchases. Select manufacturers may require that only the manufacturer’s products qualify towards the minimum purchase amount needed to be eligible for promotional financing. Otherwise, an invoice that meets the minimum purchase amount and contains at least one qualifying manufacturer product is eligible for promotional financing. No interest will be charged on promo purchase balance, and equal monthly payments are required on promo purchase until it is paid in full. The payments equal the amount financed divided by the number of months in the promo period, rounded up to the next whole dollar. These payments may be higher than the payments that would be required if this purchase was a non-promo purchase. During the last month(s) of the promo period the required monthly payment may be reduced due to the prior months’ rounding. Regular account terms apply to non-promo purchases. New Accounts as of 07/31/2025: Purchase APR is 34.99%. Penalty APR is 39.99%. Min Interest Charge is $2. Existing cardholders: See your credit card agreement terms. Subject to credit approval.
Offer applies only to single-receipt qualifying purchases. No interest will be charged on the promo balance if you pay it off, in full, within the promo period. If you do not, interest will be charged on the promo balance from the purchase date. The required minimum monthly payments may or may not pay off the promo balance before the end of the promo period, depending on purchase amount, promo length and payment allocation. Regular account terms apply to non-promo purchases and, after promo period ends, to the promo balance. New Accounts as of 07/31/2025: Purchase APR is 34.99%. Penalty APR is 39.99%. Min Interest Charge is $2. Existing cardholders: See your credit card agreement terms. Subject to credit approval.
The estimated required monthly payment shown which excludes taxes and delivery equals the amount financed divided by the number of months in the promo period, rounded up to the next cent. During the last month(s) of the promo period the required monthly payment may be reduced due to this rounding. These payments apply only with the financing offer shown. If you make these payments by the due date each month, you should pay off this amount financed within the promo period, if it is the only balance you are paying off. If you have other balances on your account, this payment will be added to any other minimum monthly payments.
Applies only to select items from this manufacturer. Ask your Sweetwater Sales Engineer for more details.