
Fender Tone Master Pro Quickstart Guide

The Fender Tone Master Pro is the kind of device you can plug in and start playing with right away, achieving great results. With all its features for processing not only guitar, but also vocals, it may take you a while to learn everything it can do. We’ve written this guide to get you started and give you an overview of its deeper features.
- Register Your Purchase and Update the Firmware
- Tone Master Pro Setup and Connections
- Navigating the Tone Master Pro
- Creating and Saving Presets
- Setting Up Input and Output Options
- Using the Fender Pro Control App
- Controlling Fender Studio Pro from Your Fender Tone Master Pro
- Using Your Tone Master Pro as an Audio Interface for Your DAW
- Re-amp from Your DAW
- Fender Tone Master Pro Tutorial Playlist
Register Your Purchase and Update the Firmware
Register
First things first: create an account with the Fender website and register your purchase.
Go to Fender.com. Click on the person icon in the upper-right corner. Sign in to your existing account, or click Sign up if you need to create one.
After you enter your email address and password, click on the person icon to go to your Profile page. In the pane on the left, under Product Registration, click on Add Products.
On the next page, enter the serial number from your Tone Master Pro and follow the prompts. Then, your unit will appear in the My Gear section.
Download the Tone Master Pro Owner’s Manual and Model Guide
The Tone Master Pro comes with Fender’s two-page Quickstart Guide in the box; please check it out. To learn about all the Tone Master Pro’s capabilities, you will need to download the Owner’s Manual and the Tone Master Pro Model Guide. Trust us when we say that they are well written and easy to understand.
Go to Fender’s Tone Master Pro product page. Scroll down and click on the Downloads tab. You will see all the guides you can download.
Update the Firmware
From time to time, Fender will release a new firmware, or operating system, for the Tone Master Pro. The firmware will fix bugs and may add new effects and features. When you first get your Tone Master Pro, you should check to see if there is a more recent version of the firmware. If so, install it.
With Firmware Update 1.7.69 (1/13/2026) Fender provides DAW Mode and integration with Fender Studio Pro 8, the digital audio workstation (DAW) app for your computer that was formerly known as PreSonus Studio One.
Head on over to our SweetCare Fender Tone Master Pro Firmware Update article. Follow the instructions.
Now that you have ensured you have the newest firmware, let’s hook up some cables.
Tone Master Pro Setup and Connections
Make all cable connections with the Tone Master Pro turned off.
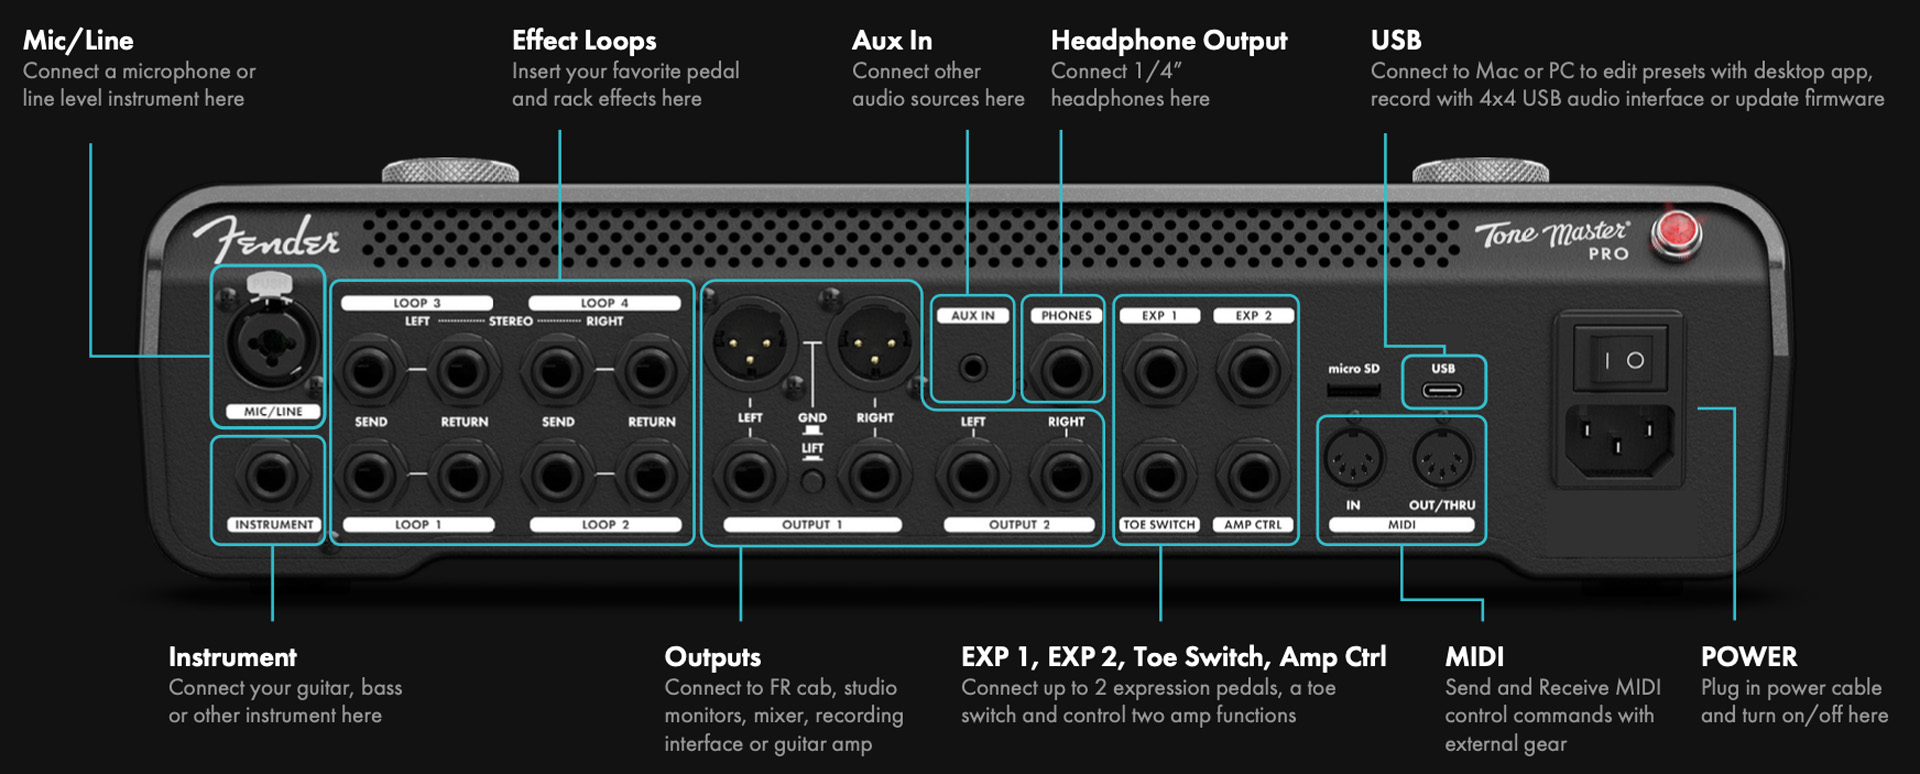
- Jewel Light. The Tone Master Pro has a “jewel light” like the one found on the classic Fender amplifiers going back to the 1940s. It only tells you that the power is turned on, but it’s a familiar touch.
- Power Switch.
- USB-C. Connect a USB-C data cable to your Mac or your Windows PC. Through the USB connection you can use the Pro Control app, upgrade the firmware, and use the Tone Master Pro as an audio interface for your DAW.
- microSD. Insert a memory card for backing up and restoring presets.
External Control
- MIDI. Connect 5-pin MIDI cables to control the Tone Master Pro’s features from a MIDI control device.
- Expression Pedals. Connect expression pedals, such as the Mission Engineering Fender pedal, (sold separately) with a 1/4-inch TRS plug to provide programmable, real-time control over the unit’s parameters.
- Toe Switch Input. Connect a compatible external footswitch or the toe switch from an expression pedal using a 1/4-inch TS connection. Within each Preset in the Tone Master Pro, you can assign different parameters to the expression pedals and Toe Switch Input. Up to five parameters can be controlled by one expression pedal.
Learn more about configuring external control in the Tone Master Pro Owner’s Manual > EXP Assignment.
- Amp Control Output. You can assign footswitches on the Tone Master Pro to control an external amplifier. For example, you can switch channels on a compatible external amp and turn the reverb on and off. This requires a 1/4-inch TRS-to-dual mono insert cable connected to the corresponding jacks on your amp. Learn more in the Tone Master Pro Owner’s Manual > Footswitch Assignment Types > Amp Control.
- Phones. Connect stereo headphones using a 1/4-inch TRS plug.
- Reset Switch and Update Button. Next to the Phones jack is a tiny, recessed reset switch to perform a factory reset. Below that is a small button that you hold in to put the unit into firmware update mode. This is explained in the Firmware Update guide.
- Aux In. Connect a 1/8-inch TRS plug to an external device to play back music tracks through the Tone Master Pro for practice or performance.
- Bluetooth. The unit also provides digital Aux In over Bluetooth to play tracks wirelessly from your phone or tablet.
- Outputs. The two stereo outputs can be used to connect the Tone Master Pro to a full-range powered speaker cabinet, such as the Fender Tone Master FR-12 or Tone Master FR-10, and to monitors, mixers, an audio interface, or external guitar amps. You can configure outputs as stereo, mono, line level, and instrument level. Learn more in the Tone Master Pro Owner’s Manual > Global Settings > I/O Settings.
- Effect Loops. The Tone Master Pro provides four effects loops for routing signals to and from external pedals and rack effects. Each preset on the Tone Master Pro can be configured with its own effects loop settings. Learn more in the Tone Master Pro Owner’s Manual > Presets > Block Types > FX Loops. You can even configure the Tone Master Pro to act as an external effects processor for a guitar amplifier with an effects loop, before and after its preamp section, using the 4-cable method. Learn more in the Tone Master Pro Owner’s Manual > Setup Diagrams.
- Instrument Input. Connect your guitar’s cable here.
- Mic/Line Input. The Tone Master Pro can accept a vocal microphone, dynamic or condenser with 48-volt phantom power, and provide vocal effects alongside the guitar effects. Connect a microphone using an XLR cable. You can also use this combi jack to connect a 1/4-inch TS cable for a line-level input. Configure the appropriate input settings in the Global Settings menu. Learn more in the Tone Master Pro Owner’s Manual > Global Settings > I/O Settings.
Navigating the Tone Master Pro
Although the Tone Master Pro is a floor unit with footswitches, you will want to start by placing it on a tabletop and putting your hands on it. The display is a touchscreen, and the footswitches double as control knobs.
After you gain some experience configuring your rig and presets, you can put the unit on the floor and control everything with your feet.
Let’s dive in.
- Connect a guitar to the Instrument input jack using a 1/4-inch instrument cable.
- Connect an XLR cable to the Output 1 left jack to the input of a full-range powered speaker cabinet or a studio monitor. Connect headphones to the Phones jack.
- Turn on the power. It takes about 45 seconds for the Tone Master Pro to start up.
- Turn on the power to the FR cabinet or studio monitors.
- Slowly turn up the Master Volume knob to the desired level.
Touchscreen Display
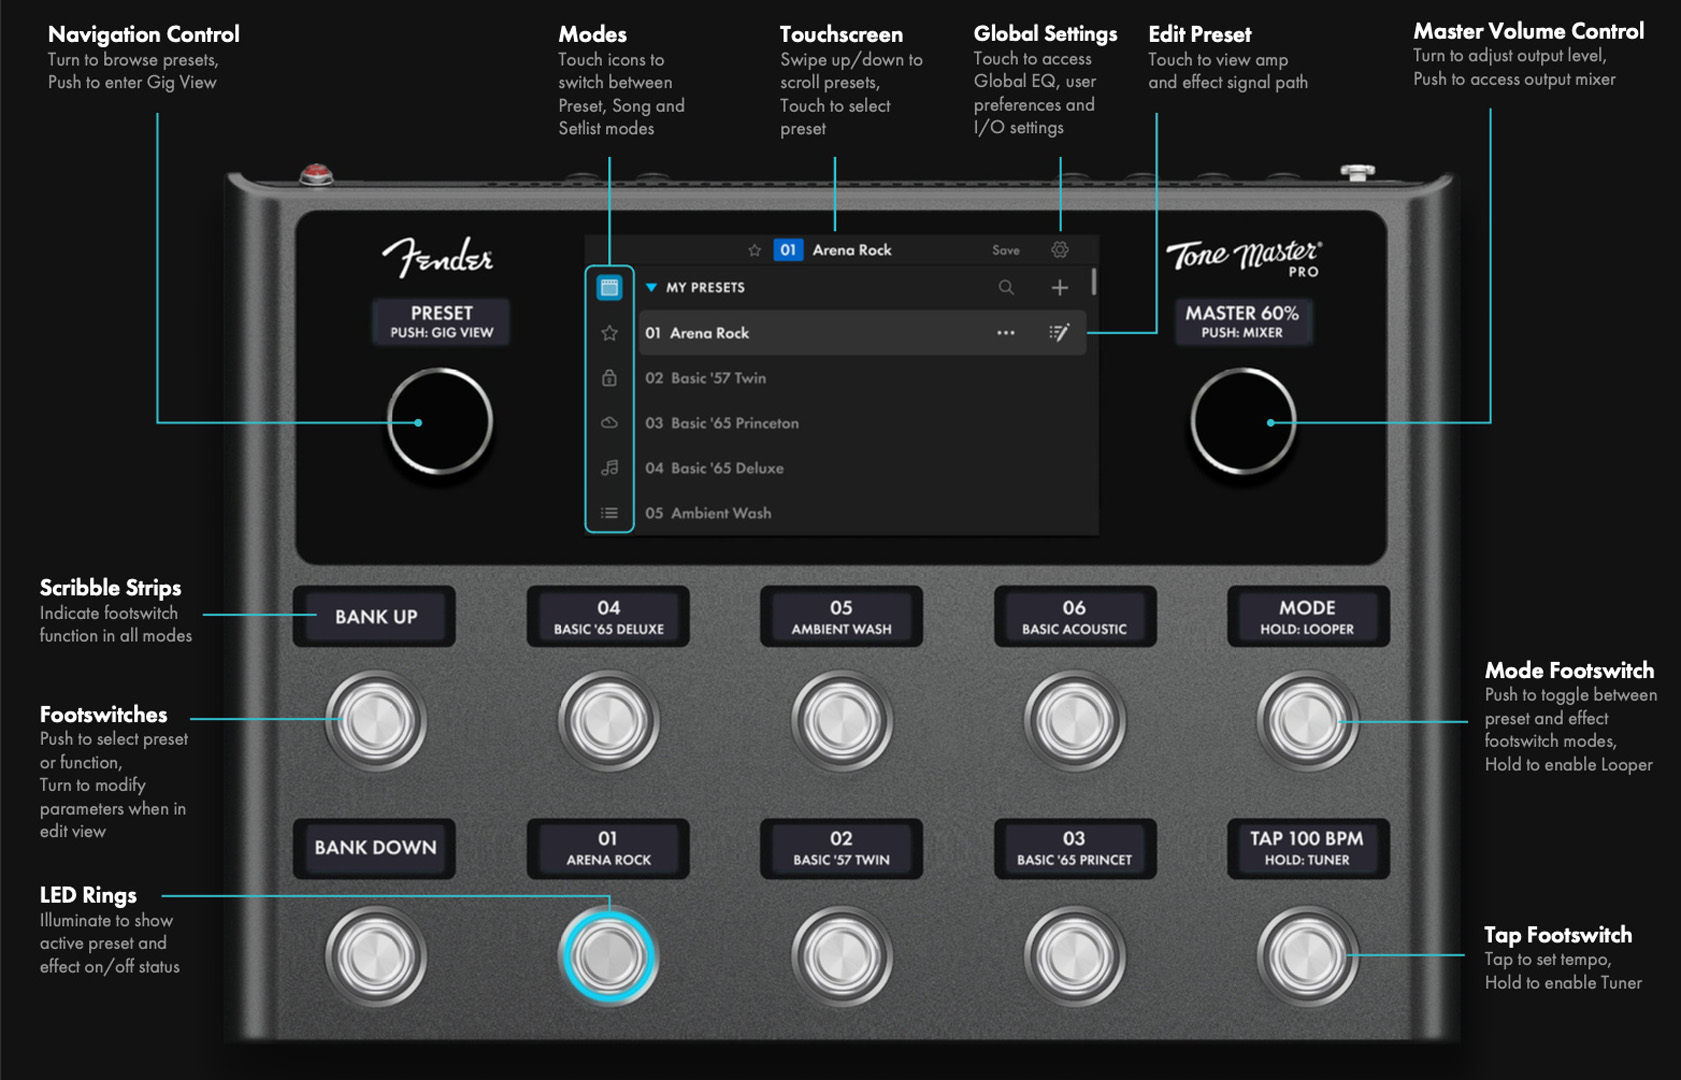
The Tone Master Pro’s touchscreen enables you to adjust all kinds of parameters and even turn virtual knobs up and down with a movement of your finger. The touchscreen also works in conjunction with the footswitch rotary control knobs for more precise control.
Footswitches and Knobs
Footswitches can be programmed to work in one of two modes:
- A latching switch remains active after it has been pressed. You tap it again to turn it off.
- A momentary switch only remains active while you hold it down.
The footswitches on the Tone Master Pro do a great deal more. Each is also a rotary control knob, which you can turn up or down to change a parameter’s value. Each footswitch is surrounded by a glowing LED ring, which changes color to indicate whether the switch is on or off. It can also differentiate functions by color.
Scribble Strips
Each footswitch/knob has a scribble strip above it. “Scribble strip” is a term that comes from the days of analog mixers, when an engineer would put pieces of tape above the faders and scribble the name of the instrument assigned to each channel.
Modern scribble strips are individual LCD screens positioned above knobs and buttons. When you change to a new preset or function, the text on each scribble strip changes to show you what new function is controlled by that knob.
Using the Touchscreen, Footswitches, and Knobs Together
Use the Bank Up and Bank Down footswitches to call up the Tone Master Pro’s banks of Presets. The scribble strips on the six footswitches in the center will change to display the names of different presets. You can press one of these footswitches to call up that preset.
The touchscreen will then display a graphic that shows the signal chain within the preset. These consist of modeled effects pedals, amplifiers, speaker cabinets, splitters, mixers, or an external device in an effects loop. Each of these elements is called a block.
Tap any block. The block will expand to fill the screen, showing you each knob and control for that pedal or amplifier on the screen.
You will notice that the scribble strips on the footswitches have changed. Each parameter for a knob or control on the block is now assigned to a physical rotary control knob.
At this point, you can:
- Touch a virtual knob on the touchscreen and drag your finger to increase or decrease the value
- Turn the rotary control knob for that parameter for more precise control
Once you have set the knobs, use the upper-left-most footswitch to save the changes. The scribble strip on this footswitch reads Hold:Save. The changes on this one effect are now saved to the Preset.
As you pull up each block, you can turn it on or off using the Bypass button on the touchscreen.
FS Mode
When looking at a Preset, tap the footswitch on the upper right labeled FS Mode. Up to six footswitches in the center will now function as an on/off switch for an effect or combinations of effects blocks. Each footswitch will be labeled by a scribble strip and surrounded by a different LED color to help you find it onstage. You can customize switch assignments and save them with each Preset.
Navigation Control and Gig View
The large knob on the upper left of the unit is the Navigation Control. It’s an alternate means of scrolling through presets.
The large knob at the upper right is the Master Volume Control. Press it to display the Output Mixer, where you can adjust levels for Headphones, the two separate Outputs, and the USB audio channels that can be used when you connect the Tone Master Pro to your Mac or your Windows PC and your DAW. You can also enable Aux input and Bluetooth audio input for each channel.
Creating and Saving Presets
To create a Preset from scratch:
- Turn the Navigation Control to an empty Preset, number 135 or above.
- In the row of icons on the bottom of the touchscreen, tap Preset Settings. Tap Signal Path Type.
- Choose between one of the 12 Signal Paths, which enable you to create a straight signal, various combinations of parallel paths for using multiple amplifier models or parallel effects routing, and several signal paths for using the Tone Master Pro with a microphone for singing while you also process your guitar. Let’s choose the straight Instrument Series path to keep things simple. Hit the back button to return to the Preset view.
- On the left side of the touchscreen, tap the plus symbol.
- Scroll through the list of Combo Amps, Cabinets, Effects, FX Loops, and other blocks. Make a selection. Click Confirm. Your block will appear on the screen.
- Click the Plus Sign on the left or the right to add another block to the chain.
- After adding several blocks, you can change the order of effects by simply tapping and holding on a block, then dragging it to a new location.
- Tap the Save button in the upper right, next to the Gear icon.
- As the Preset is named Empty, on the next screen, you can use the on-screen keyboard to type in a different name. Click the Save button.
- By tapping the Footswitch Assign icon, you can set up which footswitches control which effects in Footswitch Mode. Be sure to use the Save command when you’re done.
There are many more parameters you can program. Learn more in the Tone Master Pro Owner’s Manual > Presets > Editing Presets.
Setting Up Input and Output Options
Here is an overview of several common scenarios.
Using the Tone Master Pro with a Vocal Microphone
With the power turned off, connect a microphone to the Mic/Line Input. Use the Global Settings to enable phantom power if needed and to set input levels. Create a new Preset with one of the Signal Path Types for Instrument + Mic/Line Mix. Set up one signal path for your guitar effects and the other for your vocal effects.
Using the Tone Master Pro with a Full-range Cabinet
Connect the FR speaker with an XLR or balanced 1/4-inch cable. In Global Settings, set the rear-panel outputs to Line Level. You can connect two full-range cabinets and configure stereo output.
Using the Tone Master Pro as an Effects Pedalboard with an External Amplifier
When you want to use the Tone Master Pro as an effects pedalboard going into your regular guitar amp, go to Global Settings and set the Rear-panel Outputs to Instrument Level.
To get the best sound going into an external guitar amp, use presets with only effects and no amp or cabinet blocks. Alternately, you can select the amp and cabinet blocks and put them in Bypass mode. It’s easy to construct your own set of presets for this purpose.
Using the Tone Master Pro for Studio Monitoring with a PA System
Connect a pair of speakers or mixer channels to the rear outputs. In Global Settings, set the outputs to Line Level.
Using the Tone Master Pro as Effects for an External Amplifier Using the 4-cable Method (4CM)
4CM is a method used with an external amplifier to place effects before and after the amp’s preamp section. Use Presets with effects only and no amp or cabinet blocks. In Global Settings, set the Tone Master Pro rear-panel outputs and effects loop to Instrument Level, and note that the connected Tone Master Pro effects loop must be added to the Preset’s signal path.
Learn more in the Tone Master Pro Owner’s Manual > Setup Diagrams.
Using the Fender Pro Control App
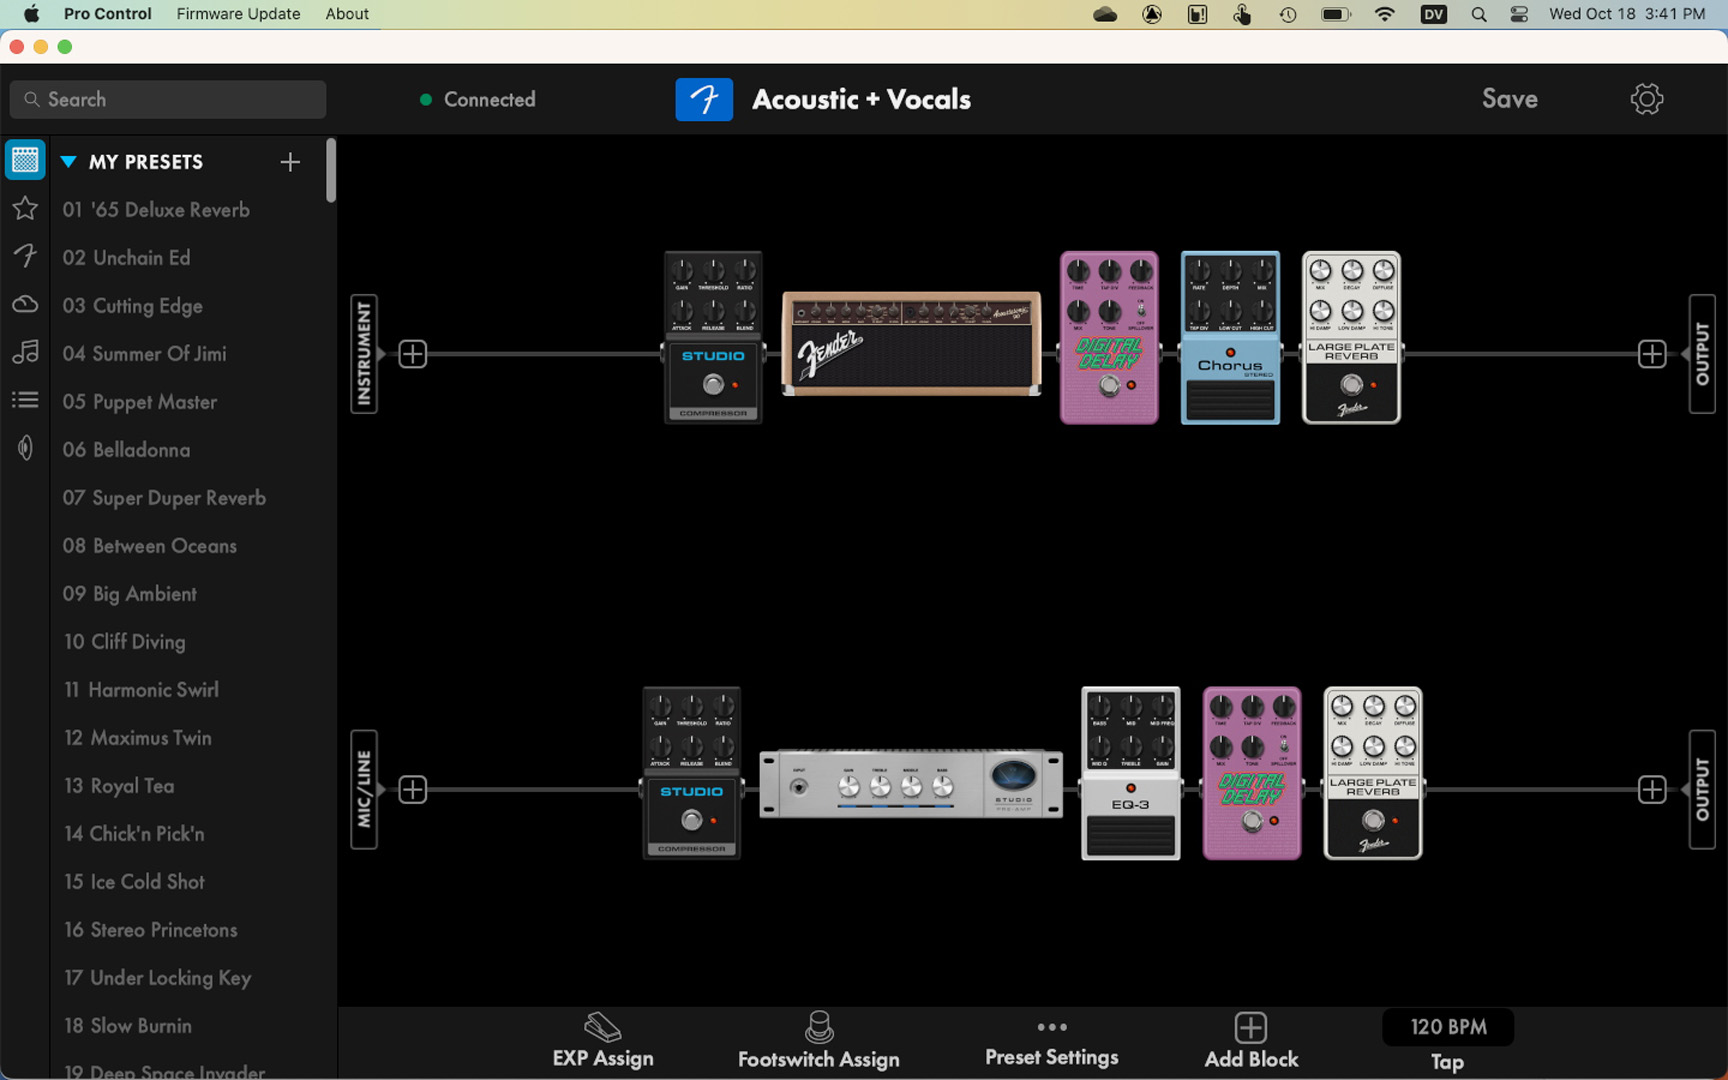
Your Fender Tone Master Pro is easy to use, stand-alone. The free Fender Pro Control app makes it even easier to program and edit amp models, effects, and signal chains, to create set lists, and more. With the app, you can download new presets from the Fender Cloud, and back up and restore your presets and settings. The app provides the means for you to load your own speaker cabinet impulse responses to the Tone Master Pro as well.
The app is available for your Mac or Windows PC, connecting over a USB-C data cable.
It’s also available for iPhone and Android, connecting over Bluetooth.
In order for your Tone Master Pro to work with the newest version of either app, you need to update the unit to the newest firmware.
Here’s our SweetCare Fender Tone Master Pro: Pro Control App Guide which shows you how to set up the app on your computer or phone.
Controlling Fender Studio Pro from Your Fender Tone Master Pro
With Firmware 1.7.69 (1/13/2026), the Fender Tone Master Pro becomes a hands-free controller for the Fender Studio Pro DAW (digital audio workstation) on your Mac or Windows PC. You can use the footswitches to start and stop playback, punch in and record, loop, and more.
Learn about this in our SweetCare Fender Tone Master Pro with Fender Studio Pro: DAW Mode guide.
Using Your Tone Master Pro as an Audio Interface for Your DAW
The Tone Master Pro can be configured as a 4-in / 4-out USB digital audio interface for your DAW on macOS or Windows. If you are on Windows, you must install the Fender Windows ASIO Audio Driver first. Download it from www.fender.com/tonemaster_pro.
Connect your unit using the USB-C port.
Within Windows Settings or the macOS Audio MIDI Setup app, select the Tone Master Pro as your audio device, then select 24-bit at the desired sample rate: 44.1KHz, 48KHz, 88.2KHz, or 96KHz.
Consult the owner’s manual for your DAW to configure inputs and outputs.
Learn more in the Tone Master Pro Owner’s Manual > USB Audio.
Re-amp from Your DAW
An outstanding feature of the Tone Master Pro is re-amping: the ability to use its USB audio interface to process a previously recorded audio track of a dry, clean guitar from your DAW, sending it out from your computer to be processed by the Tone Master Pro’s amp, speaker, and effects models, and then returning it to your DAW for recording on another track. You can even do this with a vocal track or a recording of another instrument, such as a keyboard or drums.
Learn more in the Fender Tone Master Pro Owner’s Manual > USB Audio.
Fender Tone Master Pro Tutorial Playlist
Fender provides a playlist of brief tutorial videos on YouTube. Check them out.
Related Content
Here’s Sweetwater’s demo video from the product launch.
Sweetwater: Fender Tone Master Pro: Uncompromising Sonic Design & Control
Fender: Exploring the Tone Master Pro
When you need help, Sweetwater has the answers!
Our knowledge base contains over 28,000 expertly written tech articles that will give you answers and help you get the most out of your gear. Our pro musicians and gear experts update content daily to keep you informed and on your way. Best of all, it’s totally FREE, and it’s just another reason that you get more at Sweetwater.com.


Offer applies only to single-receipt qualifying purchases. Select manufacturers may require that only the manufacturer’s products qualify towards the minimum purchase amount needed to be eligible for promotional financing. Otherwise, an invoice that meets the minimum purchase amount and contains at least one qualifying manufacturer product is eligible for promotional financing. No interest will be charged on promo purchase balance, and equal monthly payments are required on promo purchase until it is paid in full. The payments equal the amount financed divided by the number of months in the promo period, rounded up to the next whole dollar. These payments may be higher than the payments that would be required if this purchase was a non-promo purchase. During the last month(s) of the promo period the required monthly payment may be reduced due to the prior months’ rounding. Regular account terms apply to non-promo purchases. New Accounts as of 07/31/2025: Purchase APR is 34.99%. Penalty APR is 39.99%. Min Interest Charge is $2. Existing cardholders: See your credit card agreement terms. Subject to credit approval.
Offer applies only to single-receipt qualifying purchases. No interest will be charged on the promo balance if you pay it off, in full, within the promo period. If you do not, interest will be charged on the promo balance from the purchase date. The required minimum monthly payments may or may not pay off the promo balance before the end of the promo period, depending on purchase amount, promo length and payment allocation. Regular account terms apply to non-promo purchases and, after promo period ends, to the promo balance. New Accounts as of 07/31/2025: Purchase APR is 34.99%. Penalty APR is 39.99%. Min Interest Charge is $2. Existing cardholders: See your credit card agreement terms. Subject to credit approval.
The estimated required monthly payment shown which excludes taxes and delivery equals the amount financed divided by the number of months in the promo period, rounded up to the next cent. During the last month(s) of the promo period the required monthly payment may be reduced due to this rounding. These payments apply only with the financing offer shown. If you make these payments by the due date each month, you should pay off this amount financed within the promo period, if it is the only balance you are paying off. If you have other balances on your account, this payment will be added to any other minimum monthly payments.
Applies only to select items from this manufacturer. Ask your Sweetwater Sales Engineer for more details.