
Expressive E Osmose Quickstart Guide
Congratulations on purchasing an Osmose 49-key or Osmose 61-key synthesizer and MIDI controller.
This highly expressive instrument has innovative features. We can only scratch the surface in this Quickstart Guide. (But with the Osmose, you will soon be scratching the surface with Expressive E’s Augmented Keyboard Action® using MIDI Polyphonic Expression, and we think you’ll be amazed.)
Let’s get started.
- Register Your Purchase with Expressive E
- Update the Osmose Firmware
- Osmose Connections
- Powering on the Osmose
- Playing the Osmose Keyboard
- Osmose Program Architecture and Controls
- Controlling External Synthesizers and Plug-ins
- Read the Expressive E Osmose Online Manual
- The Haken EaganMatrix Editor
Register Your Purchase with Expressive E
We know you are excited about trying out this new keyboard, but first, you need to register your purchase. This will enable you to update the firmware.
As of this writing, the Osmose is a new platform, and Expressive E is releasing updates frequently. These updates will improve the performance of the instrument, fix bugs, and may add new features. Let’s make sure you are up to date.
When you open the Osmose’s box, you will find a sealed manilla folder containing your Activation Code along with other documentation. Open this envelope and take out the enclosed Quickstart Guide.
The 16-digit Activation Code is printed on a sticker affixed to Page Two. The Activation Code is not the same as the serial number on the underside of the unit.
Go to the Expressive E website’s login page.
Create an account if you don’t already have one.
After you log in, click on the “person symbol” in the upper right corner of the screen.
On the Product Registration page, click the Product Registration button in the pane on the left and enter the Activation Code.
After you enter the number, you should see a message displaying the serial number of your Osmose. Click on the black Continue button below the serial number.
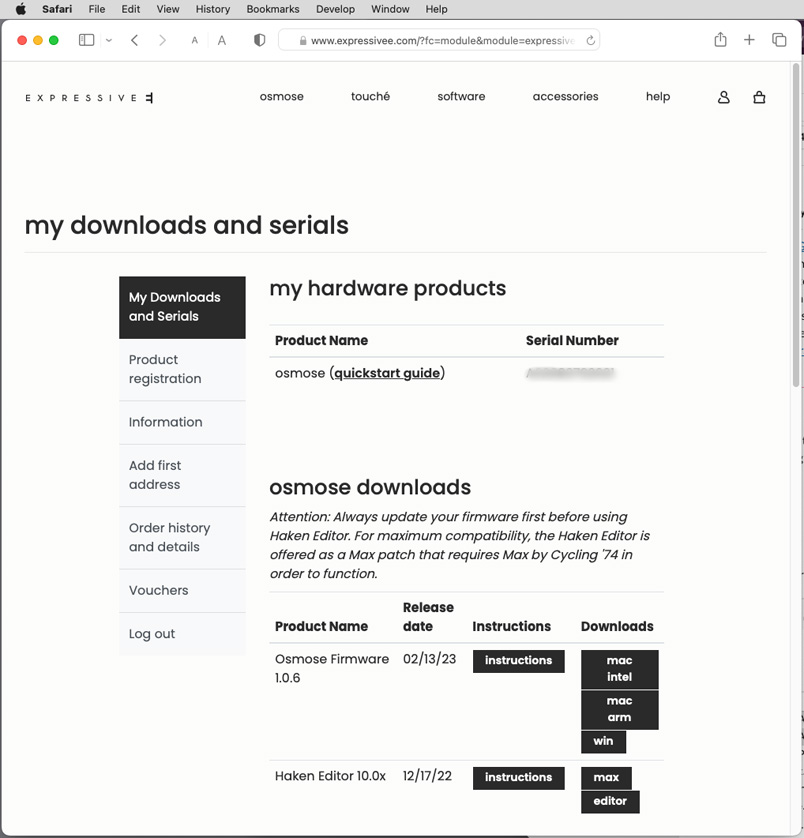
Under Product Name, download Expressive E’s Osmose Quickstart Guide in PDF format. You will want to refer to it.
Update the Osmose Firmware
Go to this companion article and follow the instructions on updating the firmware. Then come back to this page, and we can help you get started playing this amazing instrument.
Osmose Connections
Here’s how to hook up connections to your Osmose. Connect everything while the power is turned off.
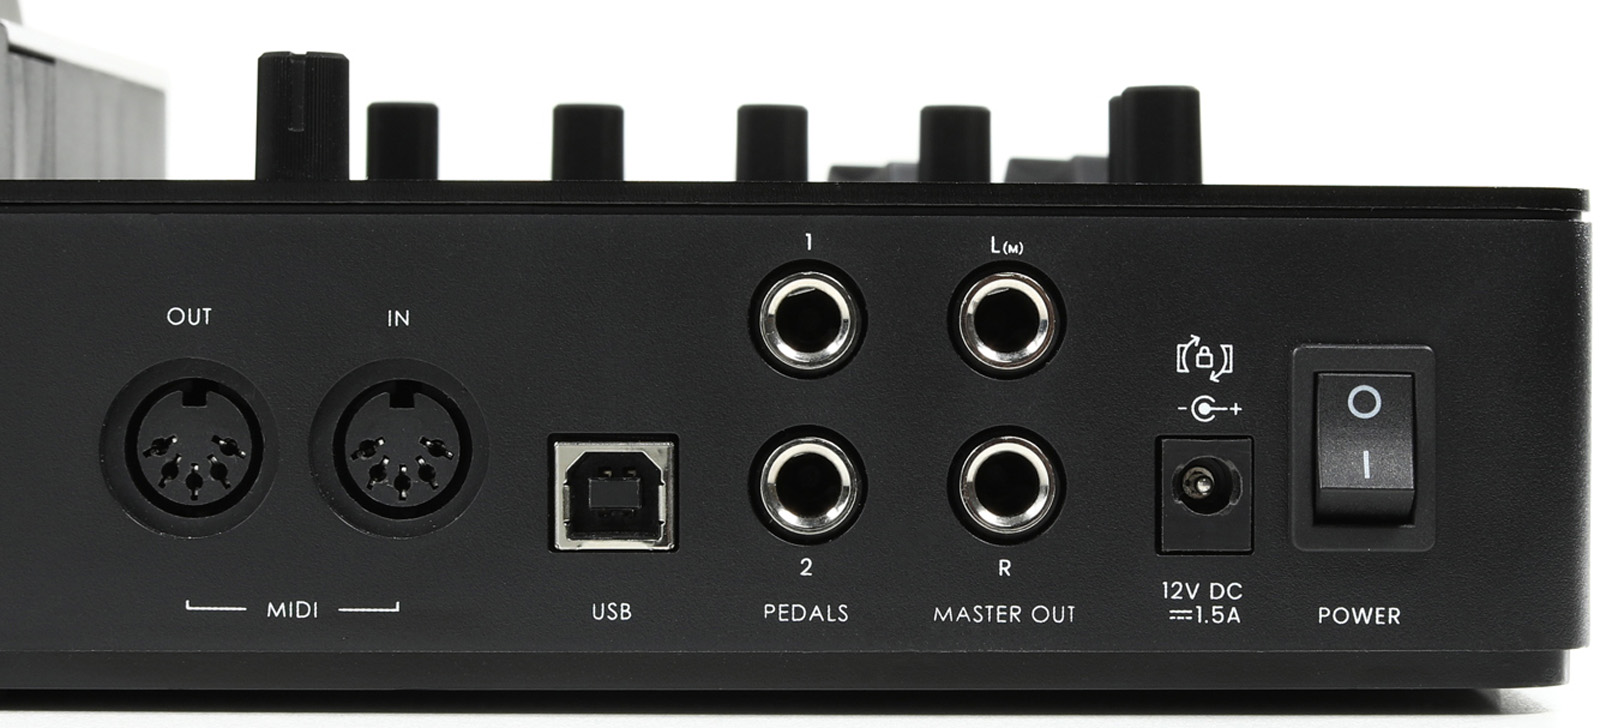
TIP: The Osmose’s included 12V DC center-positive external power supply has a locking connector. When inserting the plug, align the power connector’s wings to match the horizontal notches on the power input jack. Push the plug in firmly (it seats rather deeply), then rotate the barrel clockwise to secure it in the casing. If your unit’s power will not stay on, you have probably not seated the plug correctly and have not rotated it to lock it.
- Power: Connect the included 12V DC power supply according to the Tip above.
- Master Out: The L/Mono and R jacks provide pseudo-balanced TRS connections. You can connect either 1/4-inch TRS cables or unbalanced TS cables to your speakers, mixer, or audio interface.
- Pedals: If you wish, you can connect a sustain pedal to Input 1 and an expression pedal to Input 2. Consult the Online Manual > Global Settings > Calibration Tab for instructions on setting up the pedals.
- USB: Connect a USB cable to your computer or device for class-compliant MIDI over USB. The USB connection does not transmit digital audio.
- MIDI IN and OUT: Connect standard 5-pin DIN MIDI cables to external MIDI devices.

On the left side of the front of the keyboard’s case, below the front panel controls and facing the player, is the Headphones jack, which has a small spring-loaded retracting volume knob to its right. Connect a pair of headphones to the 1/4-inch TRS connection.
Powering on the Osmose
Turn both the Master Volume knob and the Headphones Volume knob all the way down.
Turn on the power switch on the back.
IMPORTANT: When the Osmose powers up, it performs an internal calibration that senses the position of each key on the keyboard. Make sure that nothing is touching the keys until the display screen indicates that the unit has finished booting up.
Now you can turn up the Master Volume and the Headphones Volume a little and start playing.
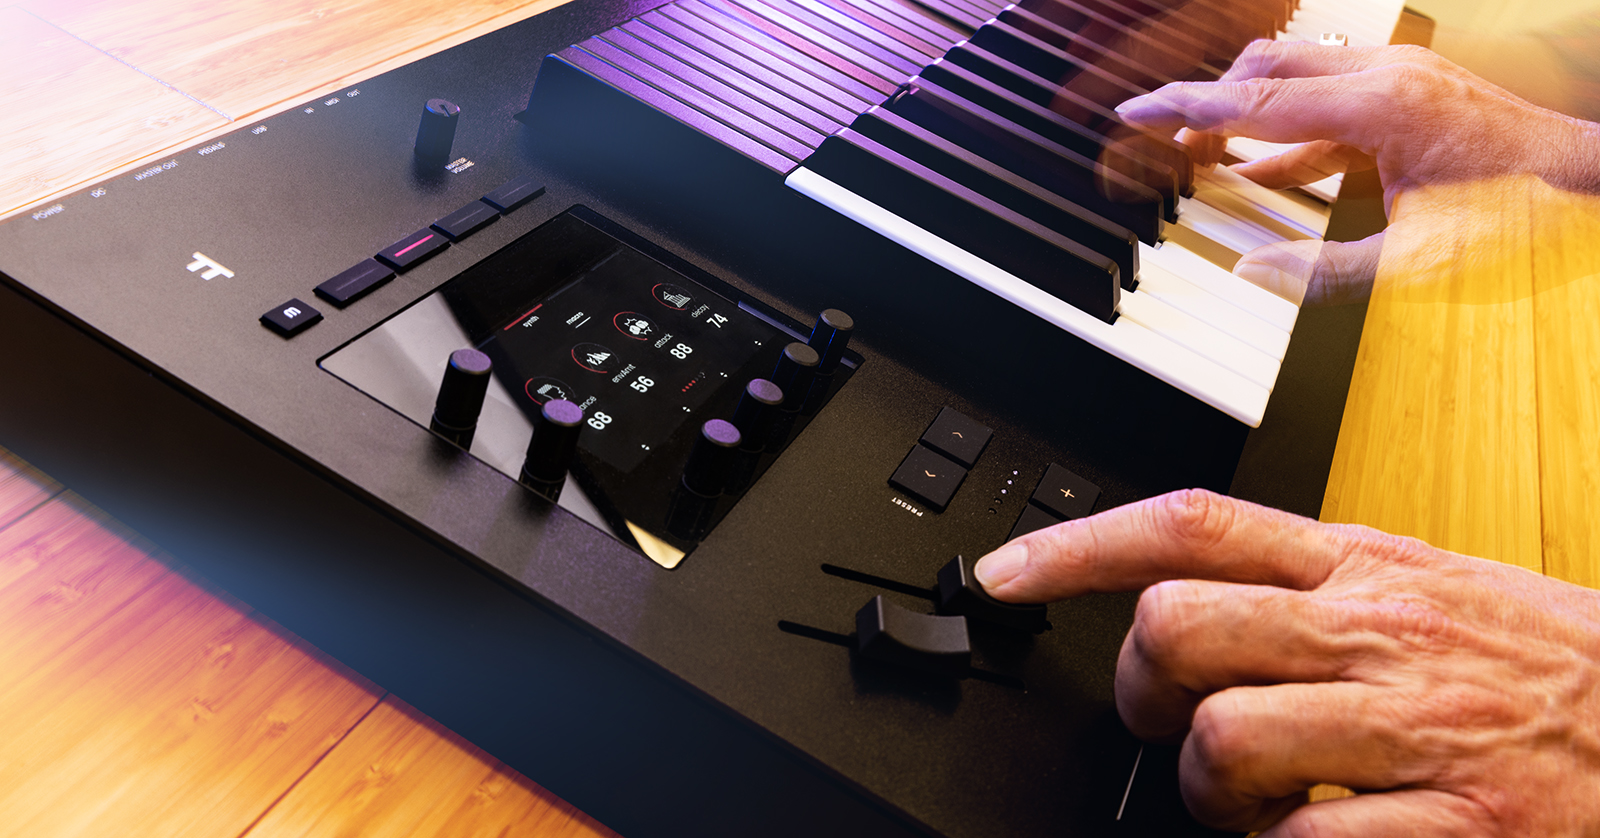
Playing the Osmose Keyboard
Each key on the Osmose independently senses three axis motions. The first, key pressure, is similar to that found on other velocity-sensitive keyboards. The second, aftertouch, is the additional vertical movement of key travel that modulates the sound. The third, note bending, is engaged when you shift the key a couple of millimeters to the left or right.
You’ll get a better understanding by watching these videos:
Osmose Program Architecture and Controls
What’s an EaganMatrix?
The Osmose is a keyboard controller instrument from Expressive E that incorporates a custom version of the EaganMatrix sound engine synthesizer from the Haken Audio company. The Osmose provides hundreds of customized EaganMatrix sounds to take advantage of the keyboard’s unique expressive capabilities.
Modes, Buttons, Encoders, and Functions
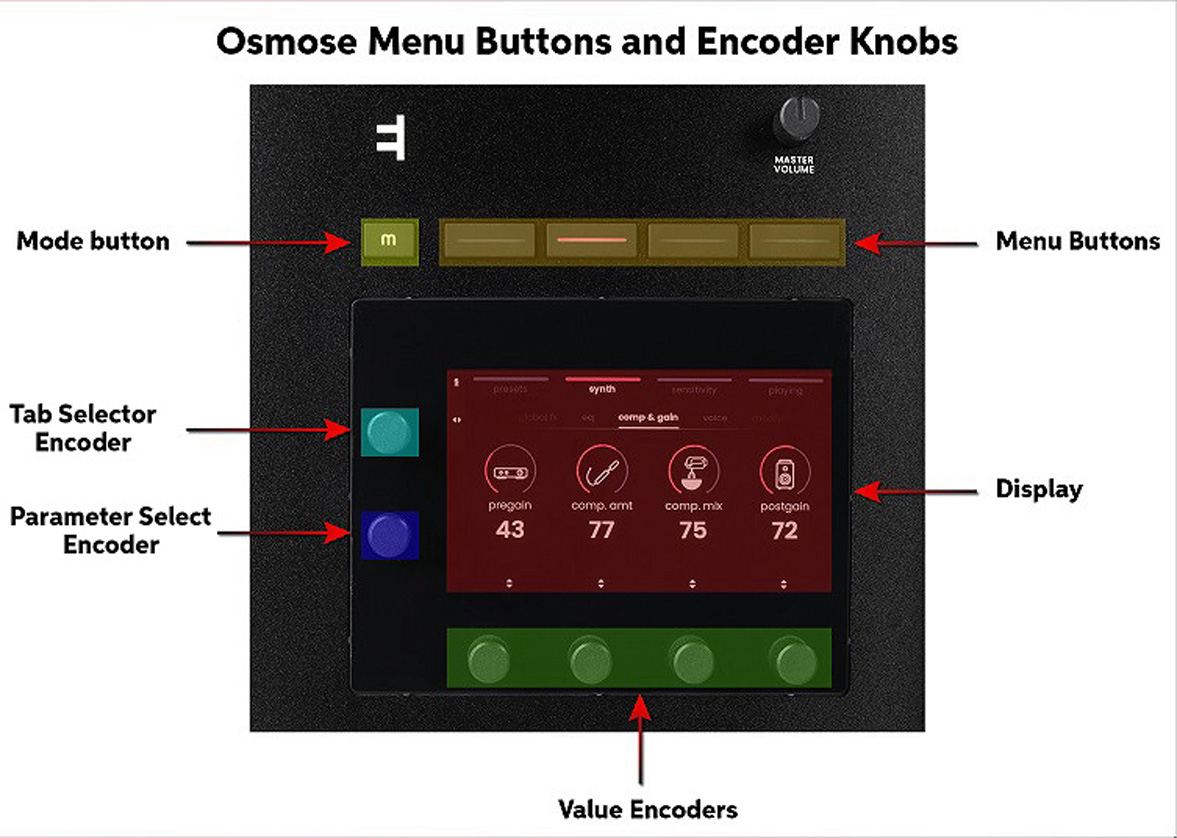
Encoder Knobs can be turned to scroll through options and enter numerical values. Press them in to make a selection.
The Mode button, labeled M, lets you choose between two modes:
- Sound Engine for playing the internal EaganMatrix synthesizer
- External MIDI for using the Osmose as an MPE controller for external synthesizers and virtual instruments
Since you will start out playing the Osmose with its internal Sound Engine, let’s start there.
Sound Engine Mode
In Sound Engine Mode, the four rectangular Menu Buttons along the top pull up different Tabs which provide access to different parameters:
- Presets: scroll through and select the preset sounds saved in the instrument.
- Synth: allows you to use the Encoder knobs to adjust the Sound Macros and Effects for each preset sound.
- Sensitivity: contains parameters that allow you to fine-tune the expressive response of the Osmose keybed to enable you to create polyphonic aftertouch, modulation, pitch bend, and vibrato independently for each key. These parameters are set differently for each preset.
- Playing: provides two functions, Portamento and Arpeggiator.
Sound Macros and Effects
In the Synth tab, you can control sound parameters in real time using the rotary Encoder knobs or alter parameters within a preset, which you can then save to a new user preset.
Each preset provides four or more Sound Macros. Each Sound Macro is a combination of programming parameters that affect how the sound is shaped. Each preset sound in the Osmose has its own different set of Sound Macros. You can vary each Sound Macro’s value using the Encoder knob directly below where the Sound Macro appears on the display. Usually, one of the Sound Macros is also mapped to the Modulation Slider for ease of use in real-time performance.
Selecting sounds and manipulating them is explained in this short tutorial from Expressive E:
Pitch Bend, Modulation, and Octave Buttons
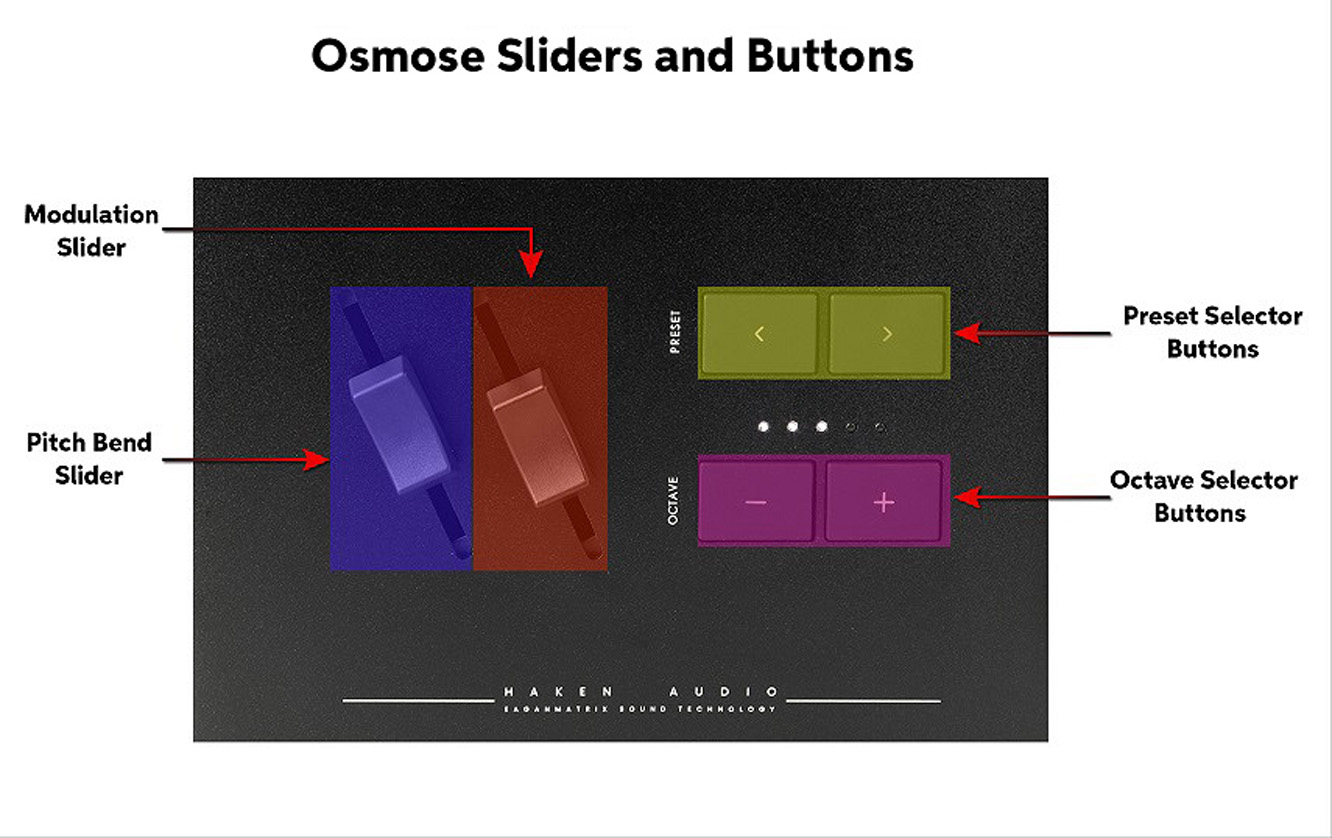
Below the display screen and the encoder knobs, you will find the Osmose’s Pitch Bend Slider and Modulation Slider, which work the same as the traditional pitch bend wheel and mod wheel on other synthesizers. The important thing to note here is that these sliders affect all the keys you are holding down at once.
Whereas the various presets on the EaganMatrix enable you to control modulation and pitch parameters independently and polyphonically with each finger’s pressure, and the movement of each key from side to side, the Osmose also provides you with the ability to reach over with your left hand and shift the pitch or add modulation to the whole sound, rather than to each note individually. The parameters of the Pitch Bend Slider and the Modulation Slider are programmed individually in each preset.
Next to the two sliders are a pair of Preset Selector buttons and a pair of Octave Selector buttons.
Controlling External Synthesizers and Plug-ins
MIDI Polyphonic Expression (MPE)
The Osmose is an ideal controller for playing external synthesizers and virtual instruments using MIDI Polyphonic Expression (MPE). Even if your synths don’t have support for MPE built-in, there are workarounds you can use to map parameters on your instruments to respond to expressive control from the Osmose keyboard.
Use the Mode button followed by the Tab Selector Encoder to switch from Sound Engine Mode to External MIDI Mode to access the parameters you can configure to use the Osmose as a controller for other synths.
Expressive E provides their FAQ Controlling External Synths, which will show you how to start configuring presets on external synthesizers to take advantage of the Osmose’s unique, expressive capabilities.
MIDI over USB
When you connect a USB cable to your Mac or Windows PC, the Osmose shows up on your computer as two separate MIDI connections.
The first is the External MIDI port. It is set to MPE (MIDI Polyphonic Expression) mode by default. Use this port to control external synths or virtual instruments from the Osmose keyboard.
The second is the Haken Audio port. Use this port to record and replay the Osmose’s internal synthesizer sounds through your DAW. By default, on this port, the Osmose receives MIDI but does not transmit MIDI.
Consult the Osmose Online Manual > 3. External MIDI Mode for details.
Read the Expressive E Osmose Online Manual

The Osmose Online Manual provides all the details for diving deep into the Osmose’s features. You will find it indispensable, so bookmark it in your browser.
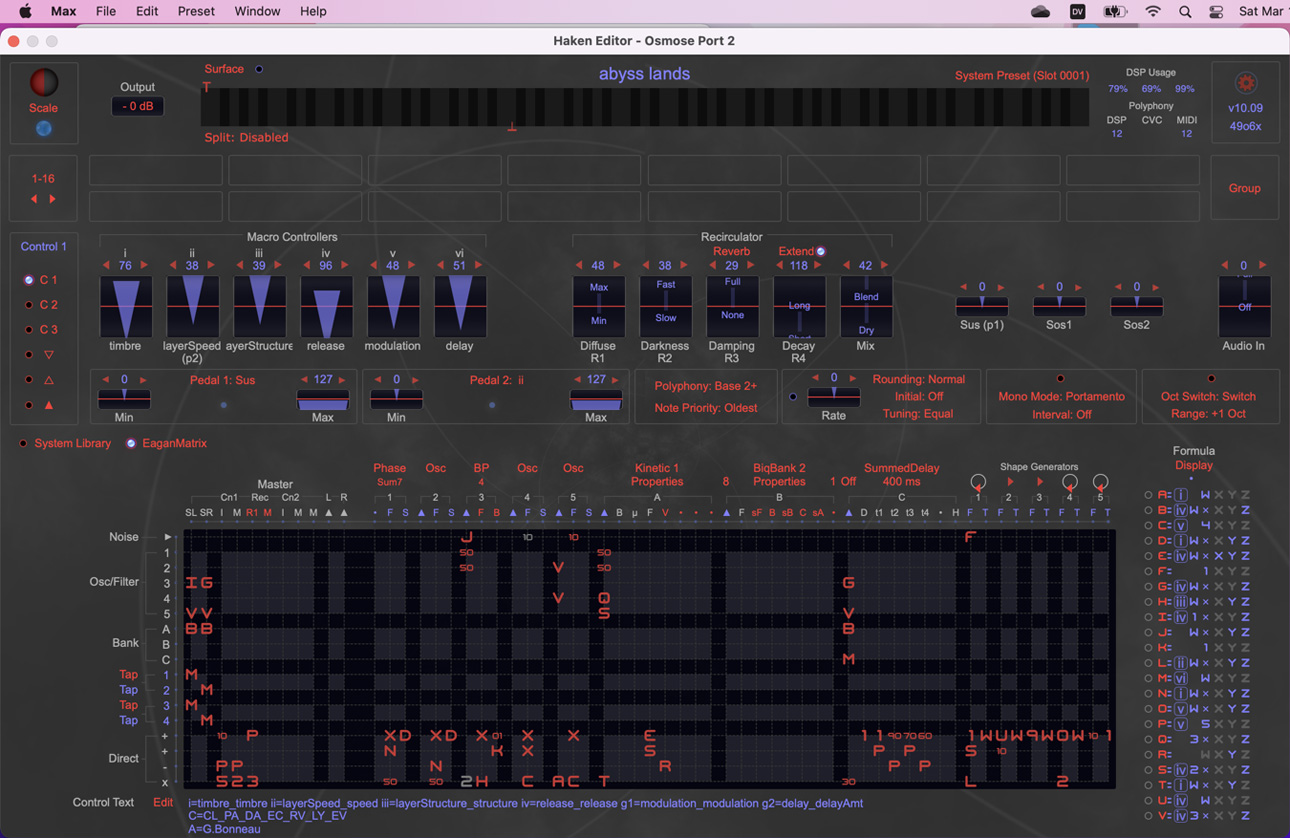
The Haken EaganMatrix Editor
Expressive E provides the Haken Editor for Osmose for Mac and Windows PC.
This is an advanced and somewhat experimental feature that most users will not need.
The Haken Editor for Osmose displays the programming parameters and the elaborate modulation matrices for the preset sounds in the Haken EaganMatrix synthesizer engine that resides in the Osmose.
If you would like to install the Haken Editor, Osmose provides instructions.
Related Content
When you need help, Sweetwater has the answers!
Our knowledge base contains over 28,000 expertly written tech articles that will give you answers and help you get the most out of your gear. Our pro musicians and gear experts update content daily to keep you informed and on your way. Best of all, it’s totally FREE, and it’s just another reason that you get more at Sweetwater.com.


Offer applies only to single-receipt qualifying purchases. Select manufacturers may require that only the manufacturer’s products qualify towards the minimum purchase amount needed to be eligible for promotional financing. Otherwise, an invoice that meets the minimum purchase amount and contains at least one qualifying manufacturer product is eligible for promotional financing. No interest will be charged on promo purchase balance, and equal monthly payments are required on promo purchase until it is paid in full. The payments equal the amount financed divided by the number of months in the promo period, rounded up to the next whole dollar. These payments may be higher than the payments that would be required if this purchase was a non-promo purchase. During the last month(s) of the promo period the required monthly payment may be reduced due to the prior months’ rounding. Regular account terms apply to non-promo purchases. New Accounts as of 07/31/2025: Purchase APR is 34.99%. Penalty APR is 39.99%. Min Interest Charge is $2. Existing cardholders: See your credit card agreement terms. Subject to credit approval.
Offer applies only to single-receipt qualifying purchases. No interest will be charged on the promo balance if you pay it off, in full, within the promo period. If you do not, interest will be charged on the promo balance from the purchase date. The required minimum monthly payments may or may not pay off the promo balance before the end of the promo period, depending on purchase amount, promo length and payment allocation. Regular account terms apply to non-promo purchases and, after promo period ends, to the promo balance. New Accounts as of 07/31/2025: Purchase APR is 34.99%. Penalty APR is 39.99%. Min Interest Charge is $2. Existing cardholders: See your credit card agreement terms. Subject to credit approval.
The estimated required monthly payment shown which excludes taxes and delivery equals the amount financed divided by the number of months in the promo period, rounded up to the next cent. During the last month(s) of the promo period the required monthly payment may be reduced due to this rounding. These payments apply only with the financing offer shown. If you make these payments by the due date each month, you should pay off this amount financed within the promo period, if it is the only balance you are paying off. If you have other balances on your account, this payment will be added to any other minimum monthly payments.
Applies only to select items from this manufacturer. Ask your Sweetwater Sales Engineer for more details.