
Eventide H90 Quickstart Guide
In this guide, we will show you how to register, set up, and use an Eventide H90 Harmonizer for the first time. Follow the sections below to get started.
- Register the Eventide H90
- Setup and Connections
- Sounds and Settings
- Reset H90 Settings
- Update the Eventide H90 Firmware
- Eventide H90 Control App
Register the Eventide H90
Go to eventideaudio.com, click Log In, and if you need to, click Create Account. After you log in, register your unit’s serial number.
From your account page, download the H90 Control app for Windows or macOS. We’ll discuss its use at the end of this guide.
Setup and Connections
Power up the H90 by plugging in the 12V power supply provided with the unit. There is no on/off switch.
Eventide H90 back panel connections
The back panel provides:
- Four input jacks and four output jacks that accept standard mono (unbalanced) ¼” plugs. The inputs and outputs can be configured for Instrument Level (such as a guitar) or Line Level. The eight LEDs on the back will light up to indicate which inputs and outputs are set for Line Level.
- Two EXP/CTL jacks for connecting expression pedals or aux footswitches with TRS connectors
- One USB-C port for connecting to a Windows PC or Mac to use the Eventide H90 Control app and send and receive MIDI controls
The side panel provides 5-pin DIN connectors for MIDI controllers.
Eventide H90 inputs, outputs, and routing
The four audio inputs and four outputs provide extensive configuration options.
Insert Routing is enabled by default. We will use this to get started.
Under System settings, you can also set up Dual Routing, setting up the H90 as two independent mono or stereo effects processors. Different jacks can be configured for inputs, sends, or returns depending on the mode.
You can set up two independent stereo signal paths, and you can even set up the H90 to process guitar and vocals on separate channels if you hook up a preamp for the vocal mic. For guitar, you can also set up Dual Routing for the four-cable method or pre/post in an amp effects loop. Consult the Eventide H90 User Manual for all the input/output routing options.
Connecting the H90 to a guitar rig
To get started, let’s keep things simple. Connect a guitar directly to Input 1 and connect Output 1 to an amp. If you want to hear the effects in stereo, hook up Output 2 to a second amp; the H90 will automatically set the effects to stereo mode. Now we can navigate the front panel and begin to work with the sounds.
Sounds and Settings
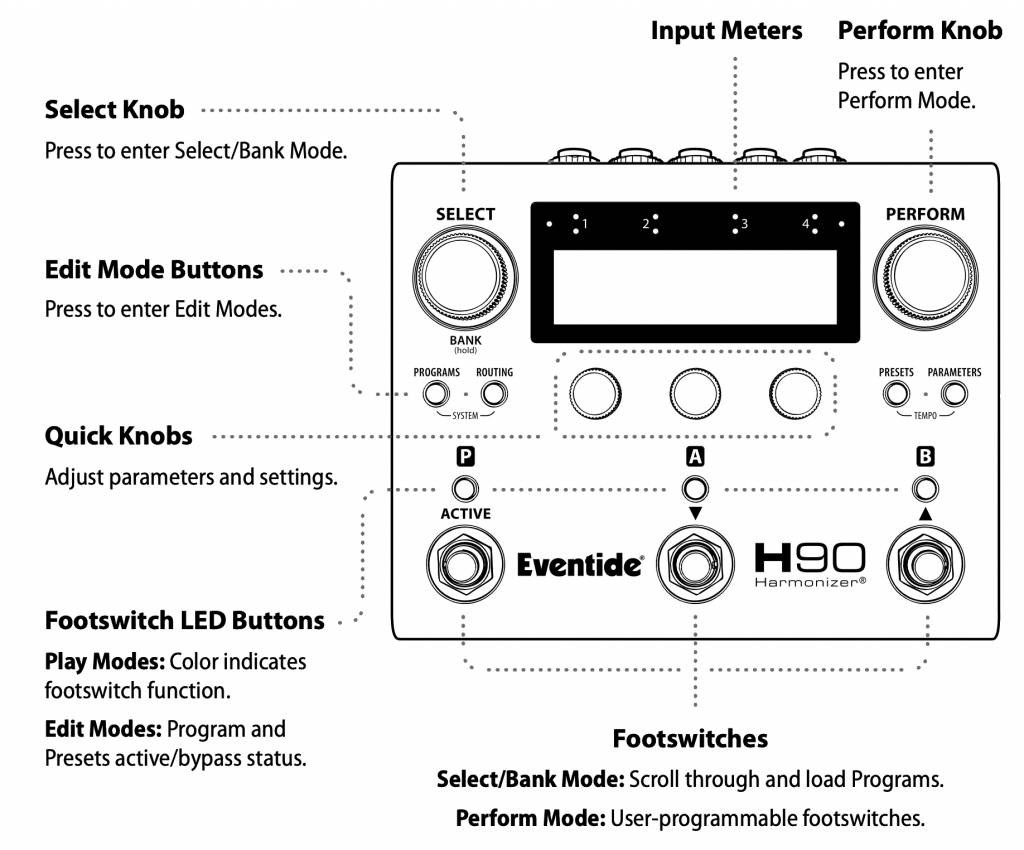
Selecting and editing programs
Each Program on the H90 consists of two Presets labeled A and B. Programs can be saved into Playlists.
To choose a Program, turn the Select knob to scroll through the active Playlist. Press the knob to activate that Program. You can also page through the Programs by using the A and B footswitches and tapping the Active footswitch to activate the Program.
Filtering programs by category
You can zero in on the type of effect you want by pressing the Program button again and using the categories above the three Quick Knobs. The display will show List, Type, and Algorithm. Use these to narrow down your choices. For example:
- Turn the first knob under List to select Lead sounds.
- Under Type, select Modulation.
- Then turn the knob under Algorithm, and from the 62 effects algorithms in the unit, you will see the list of those that pertain to Lead and Modulation sounds.
- Turn the Select knob, and you will only be shown the shorter list of effects in those categories.
- Press the Select knob again to activate the Program.
Using Quick Knobs to adjust parameters
The three Quick Knobs give you access to the three parameters most helpful to adjust in a live setting, depending on which Program you selected. (Each Program has many more parameters you can access through deeper editing.) You’ll see three settings labeled A. Turn each knob to adjust these parameters on the A Effect. Tap one of the Quick Knobs again to toggle to the three settings for the B Effect.
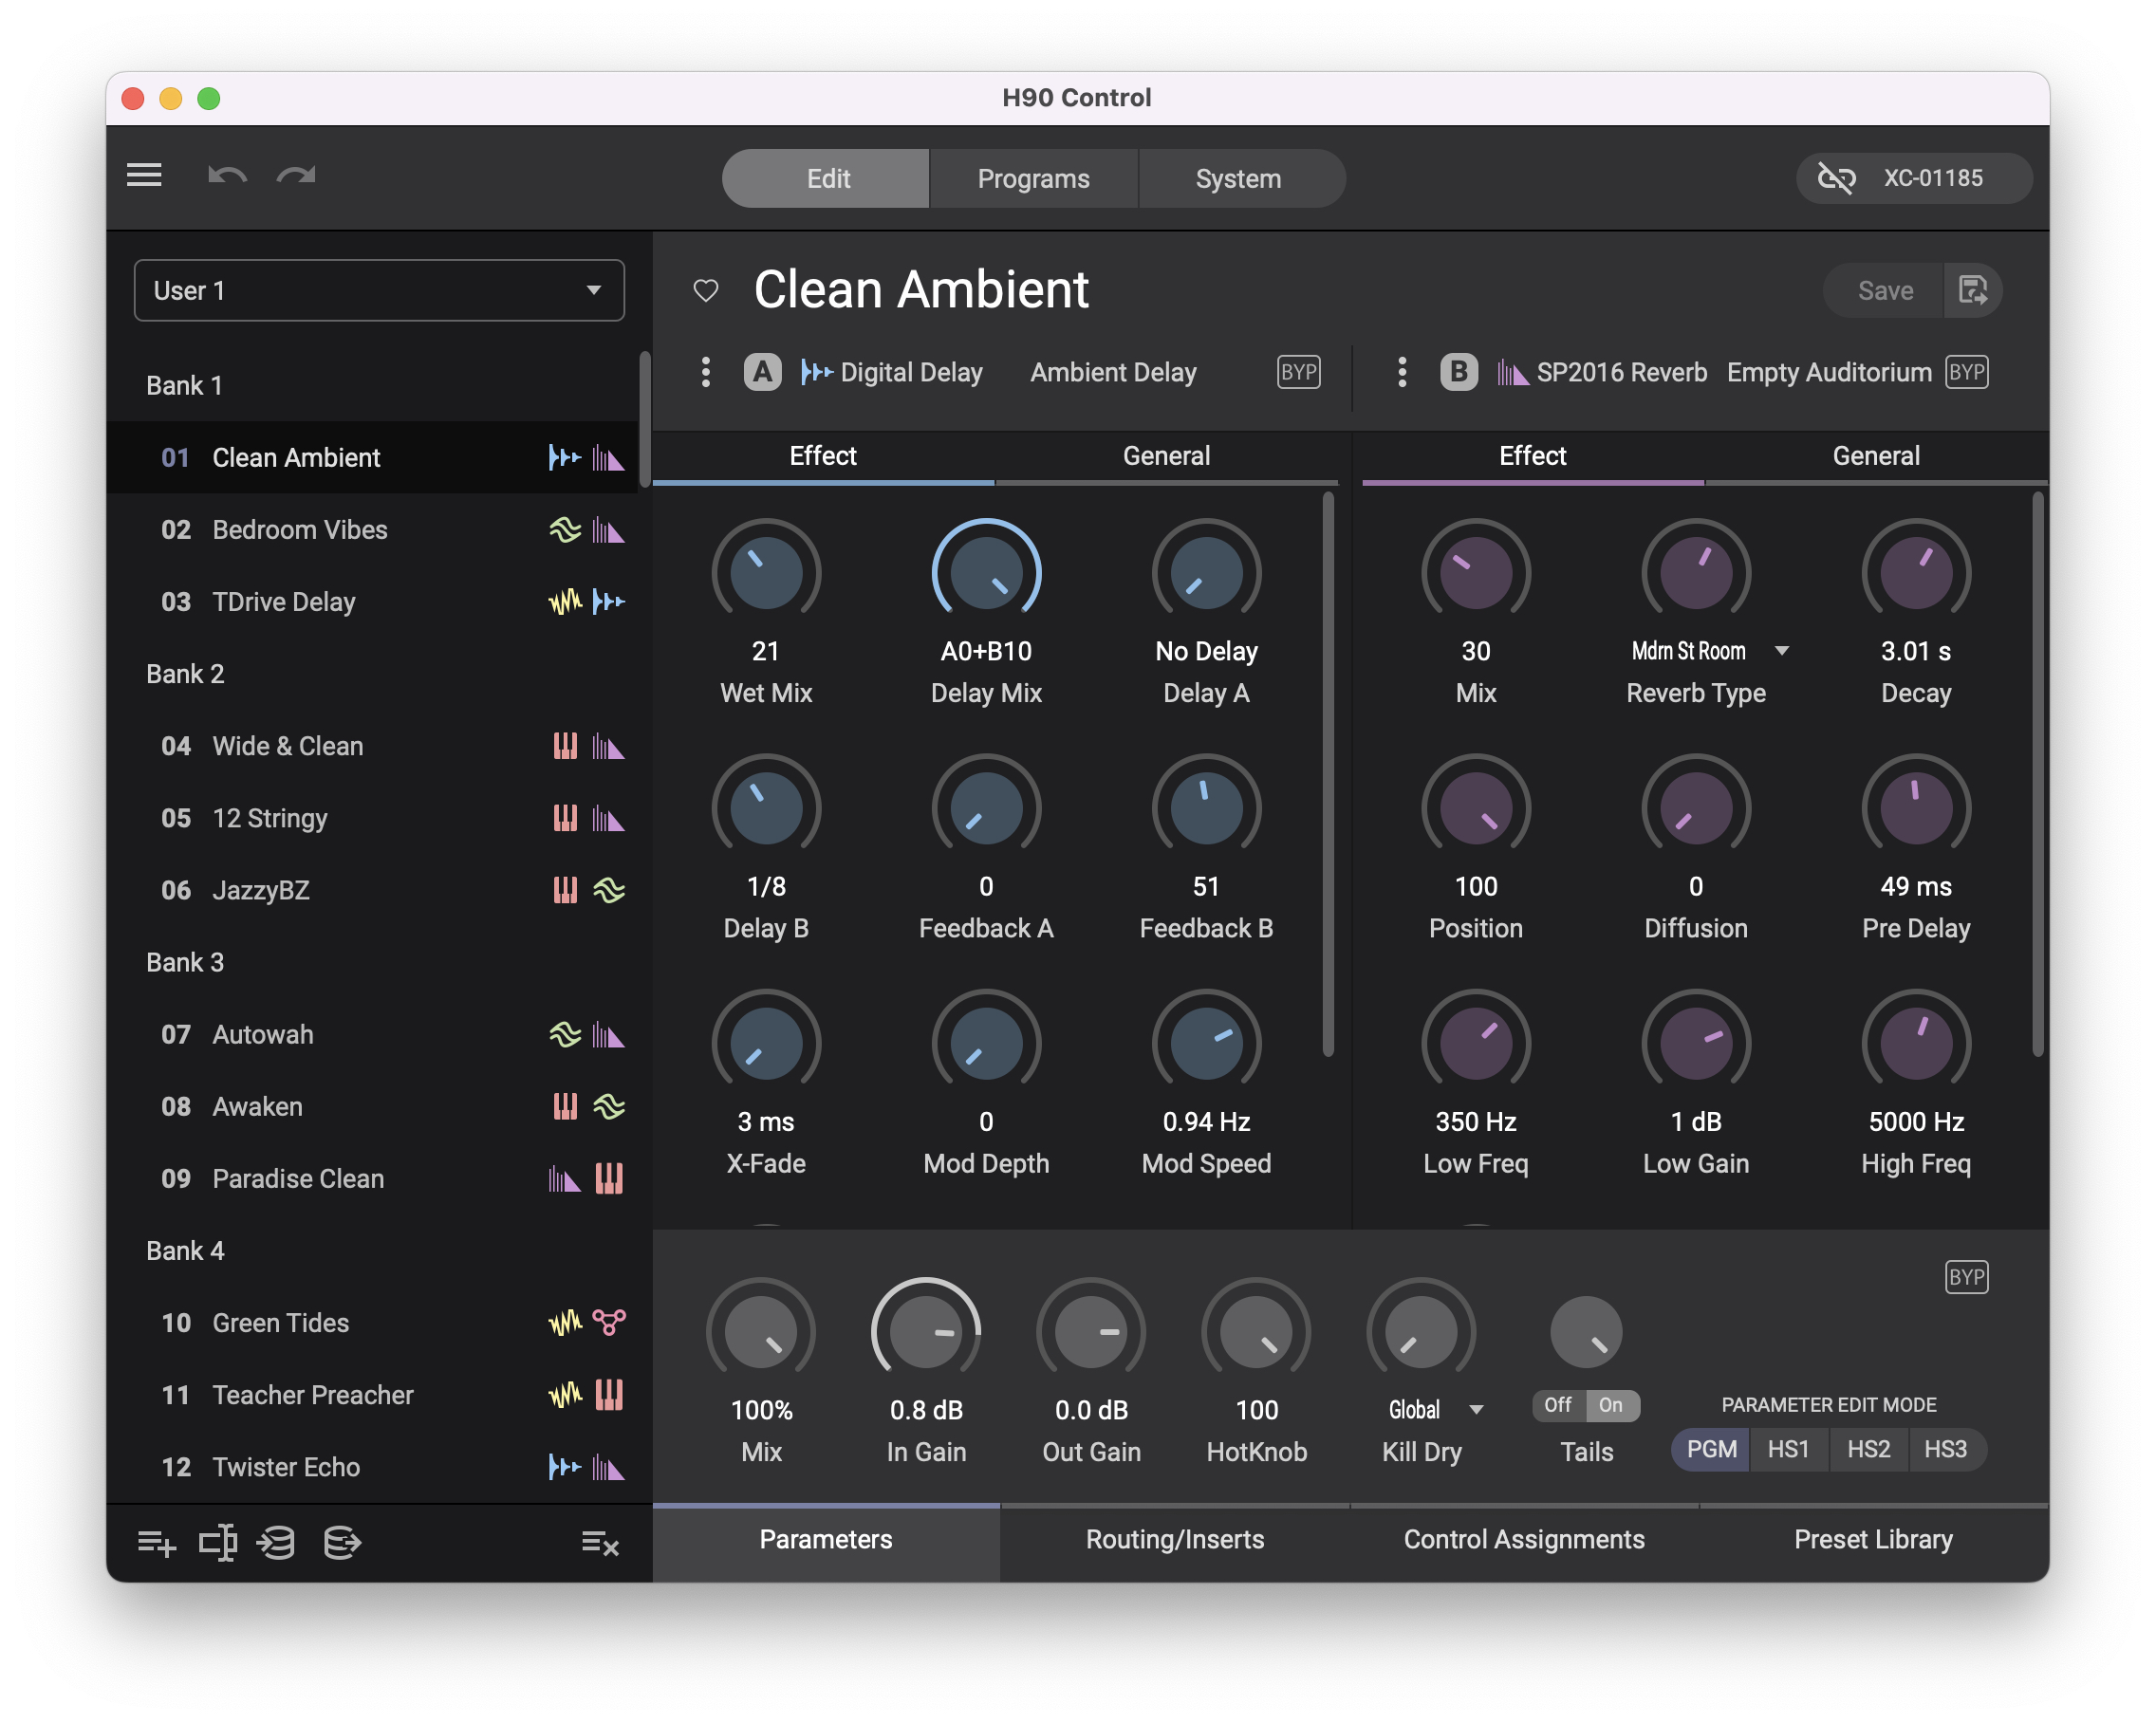
Change the Effects in a Program
You can choose a different Effect to be a part of your Program.
- Press the Presets button.
- Toggle between A and B and turn the Select knob to find another Effect.
- Tap Program again to activate it.
- Press the LED buttons above the A and B footswitches to engage or bypass the A Effect and the B Effect independently.
Once you have selected an Effect, you can customize it.
- Press the Parameters button.
- Scroll through each page of three parameters using the Select knob.
- Adjust each parameter with the Quick Knobs.
Hot Knob
In this mode, the display shows HK next to the Perform knob. This is the Hot Knob function. You can assign one parameter in the Program as the Hot Knob to quickly adjust it with the Perform knob.
Setting Tempo for time-based effects
Press the Presets and Parameters buttons together to enter Tempo mode. Set the Tempo in beats per minute (bpm) using the left Quick Knob. With the middle Quick Knob, you can set the clock source to Program or Global.
When you select one of these, the P Active button flashes, and you can set a tap tempo with the P footswitch. You can also set Source to MIDI Clock for external control over USB or MIDI cables, which bypasses the internal tempo settings. Press the Perform knob again to exit this mode.
Hot Switches
Tap the Perform knob again. The display will show Hot Switch assignments for the three footswitches on board. You can assign Program parameters to the footswitches. You can also assign Hot Switch parameters to external aux footswitch controllers with deeper editing.
Bank mode
Press and hold the Select knob to enter Bank mode. This enables you to navigate the Playlist in Banks of three programs simultaneously. Pressing a footswitch activates a Program. Pressing the footswitch again bypasses it. Move between the Banks by pressing and holding the A footswitch (down) or the B footswitch (up).
Routing
Press the Routing button to go into Routing mode. You can set the two Effects in a Program in Series or Parallel modes. As an advanced capability, if you are using either of two Inserts, you can position each Insert in different positions in the signal chain.
By turning the Select knob, you will go to the second page, where you can set Send Level, Return Level, and Mix percentage for the Inserts.
By turning the Select knob again, you will go to the third page, where you can set three parameters:
- Tails, on or off. This determines whether an Effect or Program continues to ring out when you disable an Insert.
- Latency and Polarity are used to correct phasing issues if you have configured the H90 with an external effects loop and are sending an output to external hardware and back again.
There are even more routing options if you use Dual Routing rather than Insert Routing.
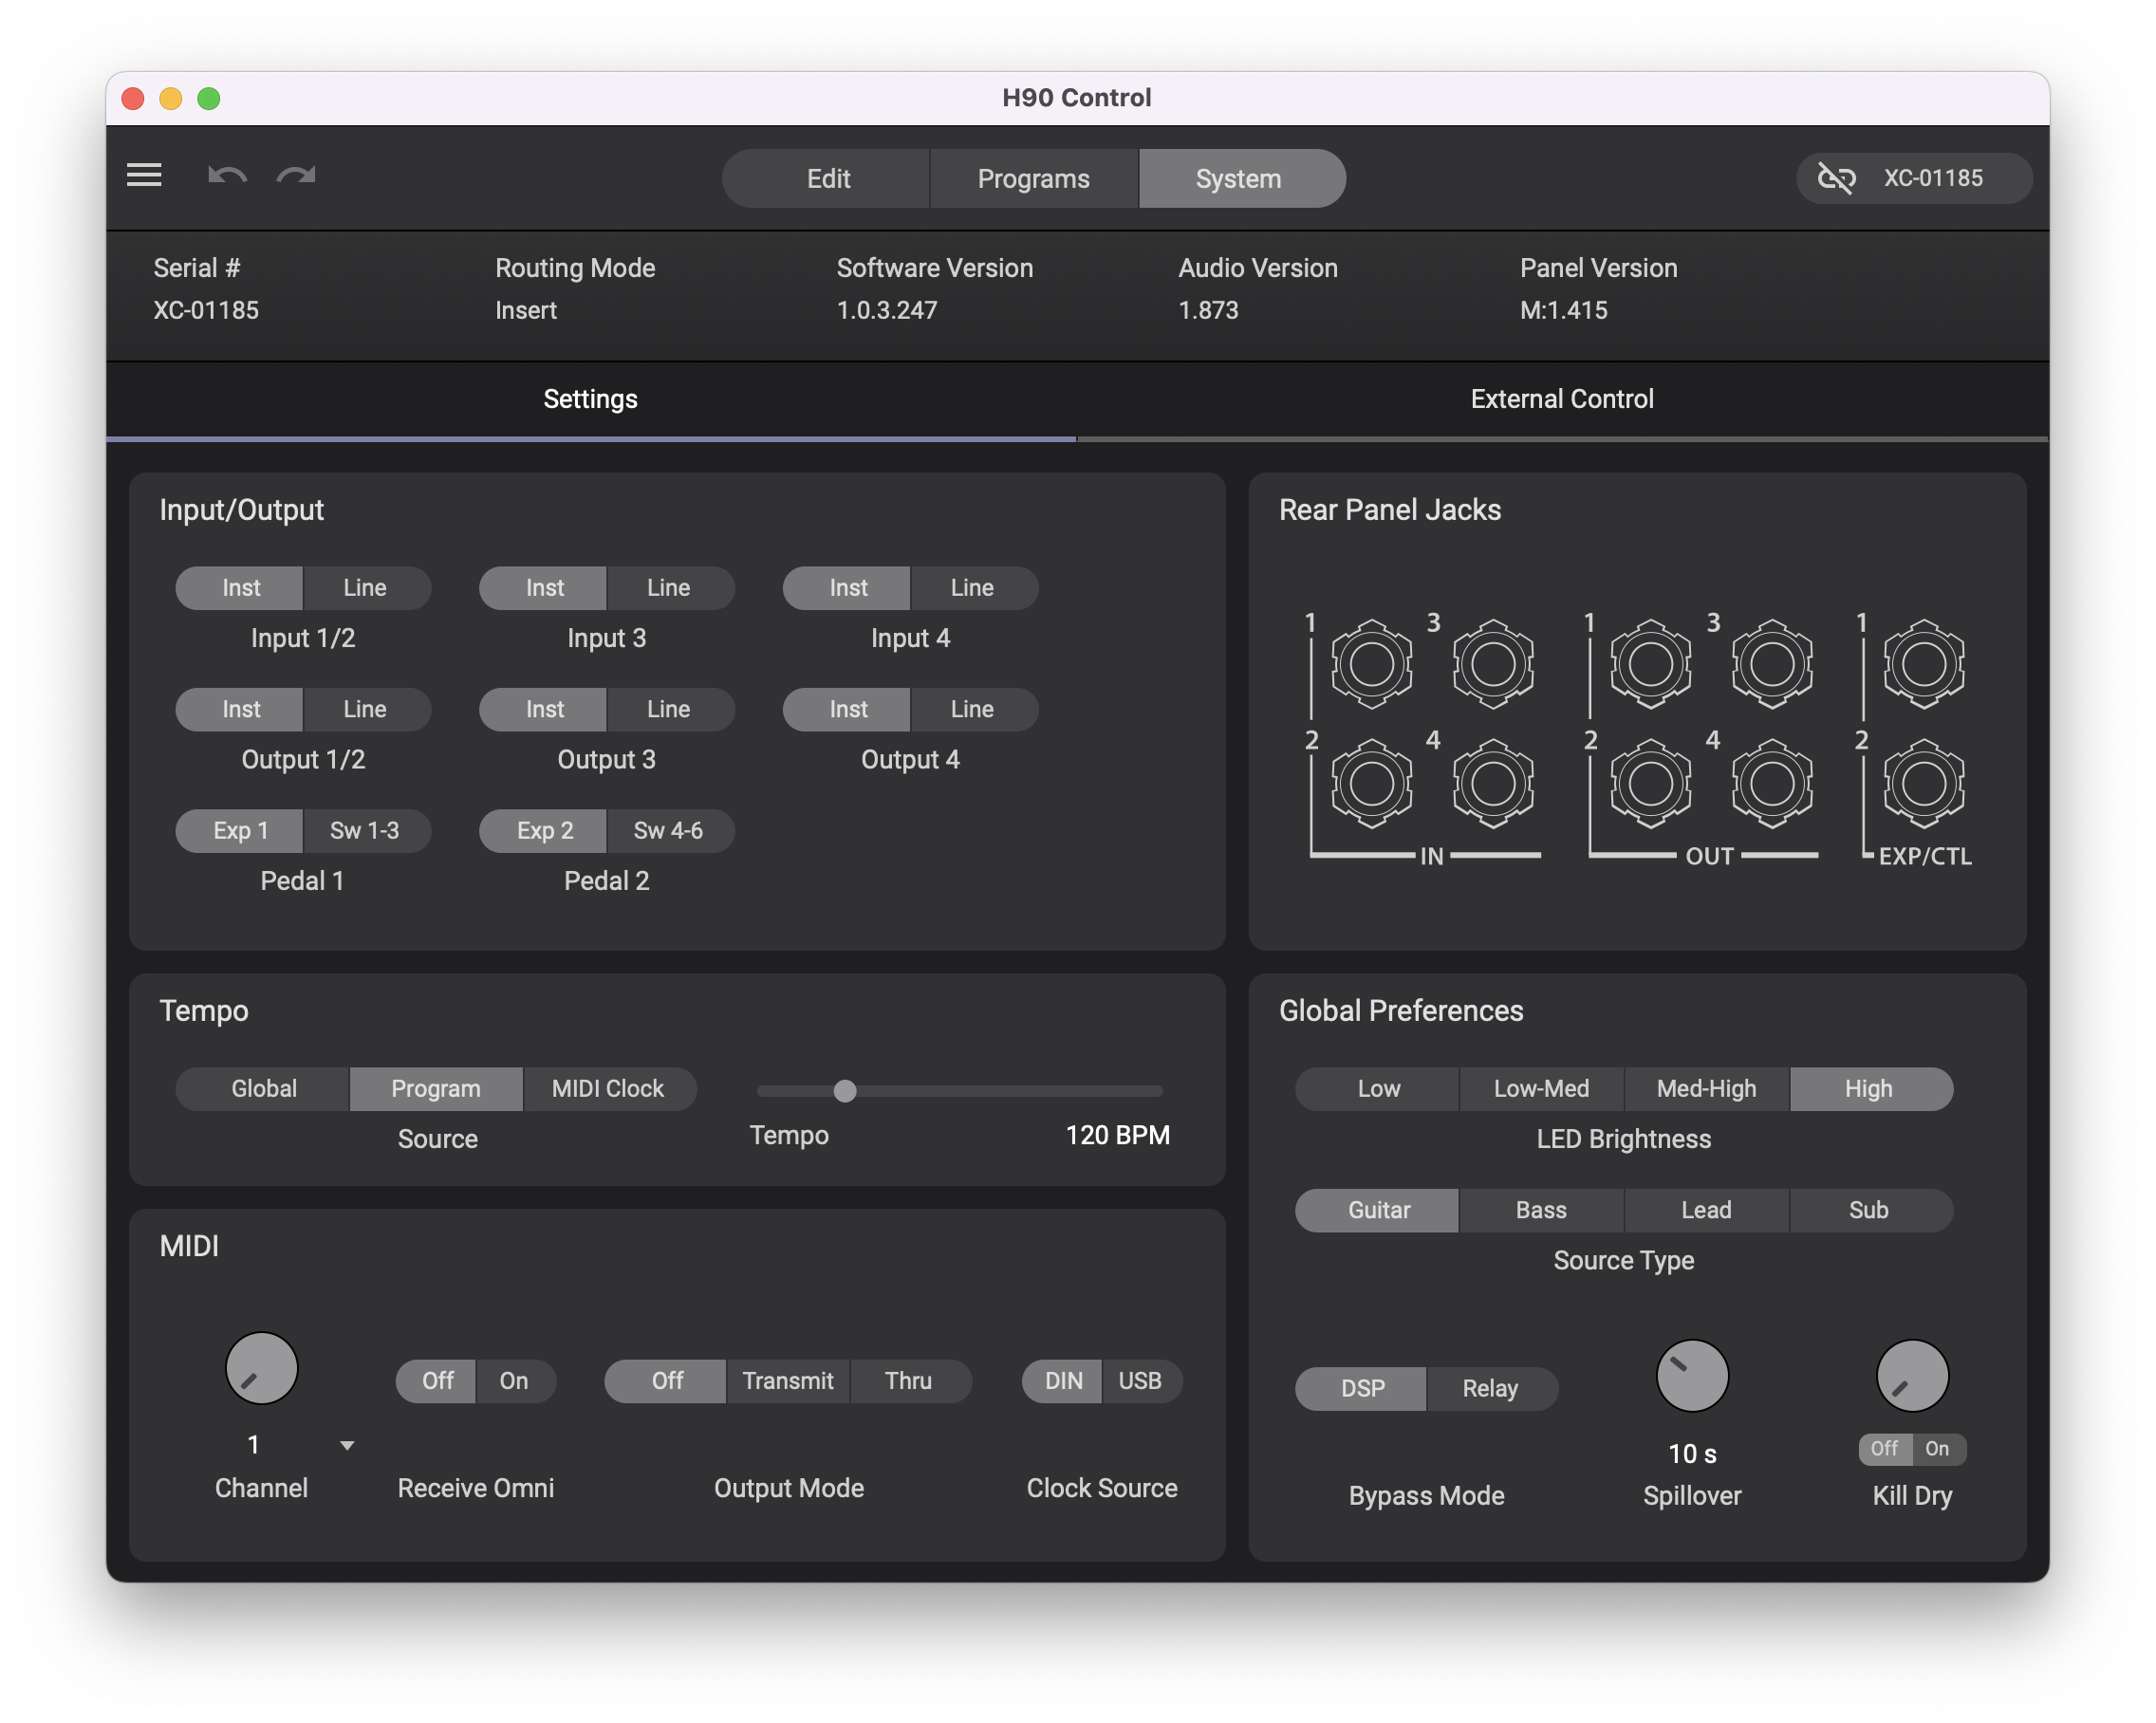
System settings
Press the Programs and Routing buttons together to go into System settings. There are five areas.
Global
Under Global, you can designate which of four User Playlists is the master Playlist that you are working with. Under Routing, you can switch the H90 from Insert Routing to Dual Routing. Under Bypass, you can select whether the effects ring out when you bypass the unit or whether it switches off immediately.
Turn the Select knob for the next page of parameters. You can set a Spillover Time in seconds, which is how long a Program’s Effects will ring out after you switch to a new Program.
Source Type is an important setting, as it makes global changes that optimize the algorithms to the frequency range of the instrument you are playing. The Source Types are Guitar, Bass guitar, Lead (synthesizer), and Sub (bass synthesizer).
Kill Dry is a setting you need for Dual Routing mode.
Press the Select knob to go back to the System menu.
I/O
Select each of the four inputs and four outputs and set each for either Instrument level (guitar, bass) or Line level (for connecting synthesizers, preamps, or hooking up an audio interface). It is also where you set the two EXP/CTL inputs to accept either an expression pedal or a set of three footswitches and where you can calibrate the range of expression pedals.
MIDI
Set MIDI channel parameters for external MIDI control, and also set them to transmit MIDI commands from the knobs, buttons, and switches of the H90.
Preferences
Raise or lower the H90’s LED brightness.
About
Displays the unit’s serial number, the software (firmware) version, and the version of the Factory Pack, which is the set of presets provided by Eventide.
Built-in Tuner
Finally, if you are in Perform mode and you depress the A and B footswitches simultaneously, you go into Tuner mode to tune your guitar. You can set the base pitch and whether the signal is muted while you tune or whether it passes through.
Reset H90 Settings
If your unit seems to be malfunctioning, or if you want to restore it to its default settings, there are two reset modes.
- Reset System Settings: Press and hold Quick Knob 1 while powering on, and continue holding until the on-screen message appears. This preserves user data.
- Factory Reset: Press and hold all three Quick Knobs while plugging in the power adapter. Continue holding until the on-screen message appears. This deletes all user data (Lists, Programs, Presets, System Settings and Tempo).
Update the Eventide H90 Firmware
It’s a good idea to make sure your H90 is running the newest software update from Eventide.
Use the included USB-C to USB-A cable to connect your H90 to your Windows PC or Mac. If your computer only has USB-C connectors, you will need a USB-A to USB-C adapter, which is not included. You can also use a USB-C to USB-C cable.
Launch the H90 Control app. In the upper-right-hand corner, click Add Device. Choose your pedal from the drop-down menu and click Add. Once your pedal is detected, click the Connect button. The app will connect to the internet and check for a firmware update. If you receive a Software Update message, follow the on-screen instructions, and the app will install the new firmware on your H90.
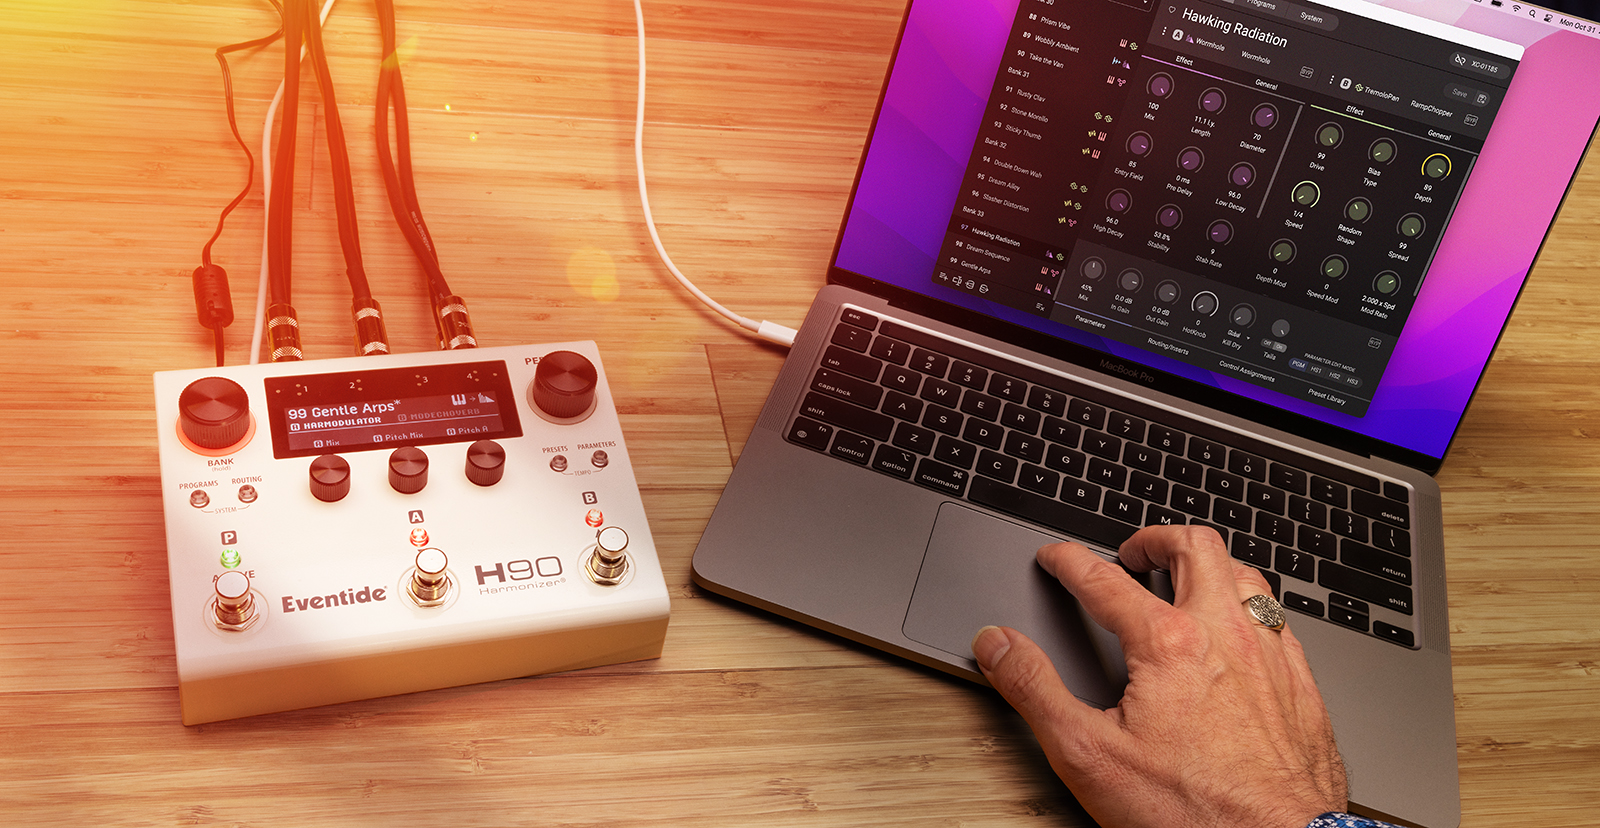
Eventide H90 Control App
The H90 Control app for Mac and Windows PC provides a user interface to program all the H90’s parameters; to configure Inputs, Outputs, and signal routing; to manage Program and Preset settings; and to import and export User Lists. H90 Control is for programming only; the H90 does not transmit audio over USB.
When you need help, Sweetwater has the answers!
Our knowledge base contains over 28,000 expertly written tech articles that will give you answers and help you get the most out of your gear. Our pro musicians and gear experts update content daily to keep you informed and on your way. Best of all, it’s totally FREE, and it’s just another reason that you get more at Sweetwater.com.


Offer applies only to single-receipt qualifying purchases. Select manufacturers may require that only the manufacturer’s products qualify towards the minimum purchase amount needed to be eligible for promotional financing. Otherwise, an invoice that meets the minimum purchase amount and contains at least one qualifying manufacturer product is eligible for promotional financing. No interest will be charged on promo purchase balance, and equal monthly payments are required on promo purchase until it is paid in full. The payments equal the amount financed divided by the number of months in the promo period, rounded up to the next whole dollar. These payments may be higher than the payments that would be required if this purchase was a non-promo purchase. During the last month(s) of the promo period the required monthly payment may be reduced due to the prior months’ rounding. Regular account terms apply to non-promo purchases. New Accounts as of 07/31/2025: Purchase APR is 34.99%. Penalty APR is 39.99%. Min Interest Charge is $2. Existing cardholders: See your credit card agreement terms. Subject to credit approval.
Offer applies only to single-receipt qualifying purchases. No interest will be charged on the promo balance if you pay it off, in full, within the promo period. If you do not, interest will be charged on the promo balance from the purchase date. The required minimum monthly payments may or may not pay off the promo balance before the end of the promo period, depending on purchase amount, promo length and payment allocation. Regular account terms apply to non-promo purchases and, after promo period ends, to the promo balance. New Accounts as of 07/31/2025: Purchase APR is 34.99%. Penalty APR is 39.99%. Min Interest Charge is $2. Existing cardholders: See your credit card agreement terms. Subject to credit approval.
The estimated required monthly payment shown which excludes taxes and delivery equals the amount financed divided by the number of months in the promo period, rounded up to the next cent. During the last month(s) of the promo period the required monthly payment may be reduced due to this rounding. These payments apply only with the financing offer shown. If you make these payments by the due date each month, you should pay off this amount financed within the promo period, if it is the only balance you are paying off. If you have other balances on your account, this payment will be added to any other minimum monthly payments.
Applies only to select items from this manufacturer. Ask your Sweetwater Sales Engineer for more details.