
DJ Mixer Setup Guide
DJ mixers are the heart of a DJ’s setup, so in this guide, we will show you how to set up and operate your DJ mixer. This means we’ll show you how to connect external gear, get sound out, and get the perfect mix. Follow the sections below to get started.
- What Is a DJ Mixer?
- How DJ Mixers Work
- Parts of a DJ Mixer
- DJ System/Mixer Setup Order
- DJ Mixer Setup Instructions
- Soundcheck
What Is a DJ Mixer?
From DJ controllers to turntables, the mixer is the central hub of any DJ setup. Like live sound mixers, its primary purpose is to receive and alter input signals, then send them to outputs. Let’s first discuss how a DJ mixer works and explain the correct setup order.
How DJ Mixers Work
Before making any connections, knowing how DJ mixers work is essential. In short, they accept any incoming audio signal, which you can alter and send to output sources like headphones or monitors. The only differences between DJ mixers are how you navigate them and any unique features or connections specific to a mixer.
The first thing you want to do when you take your DJ mixer outside of the packaging is get familiar with its layout and configuration. After reading this guide, practice setting your mixer up before taking it to a gig.
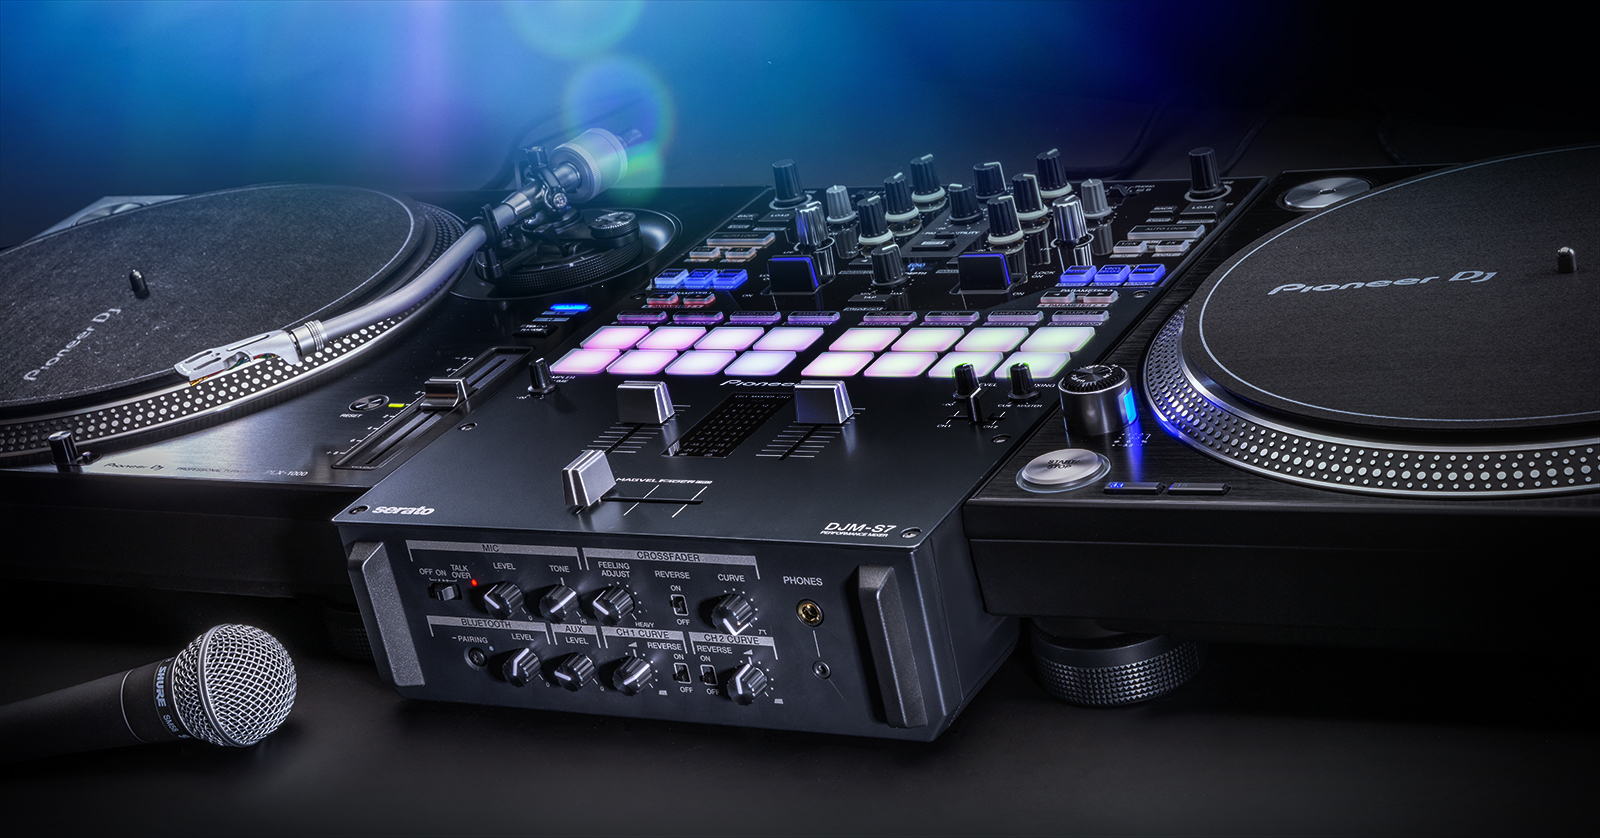
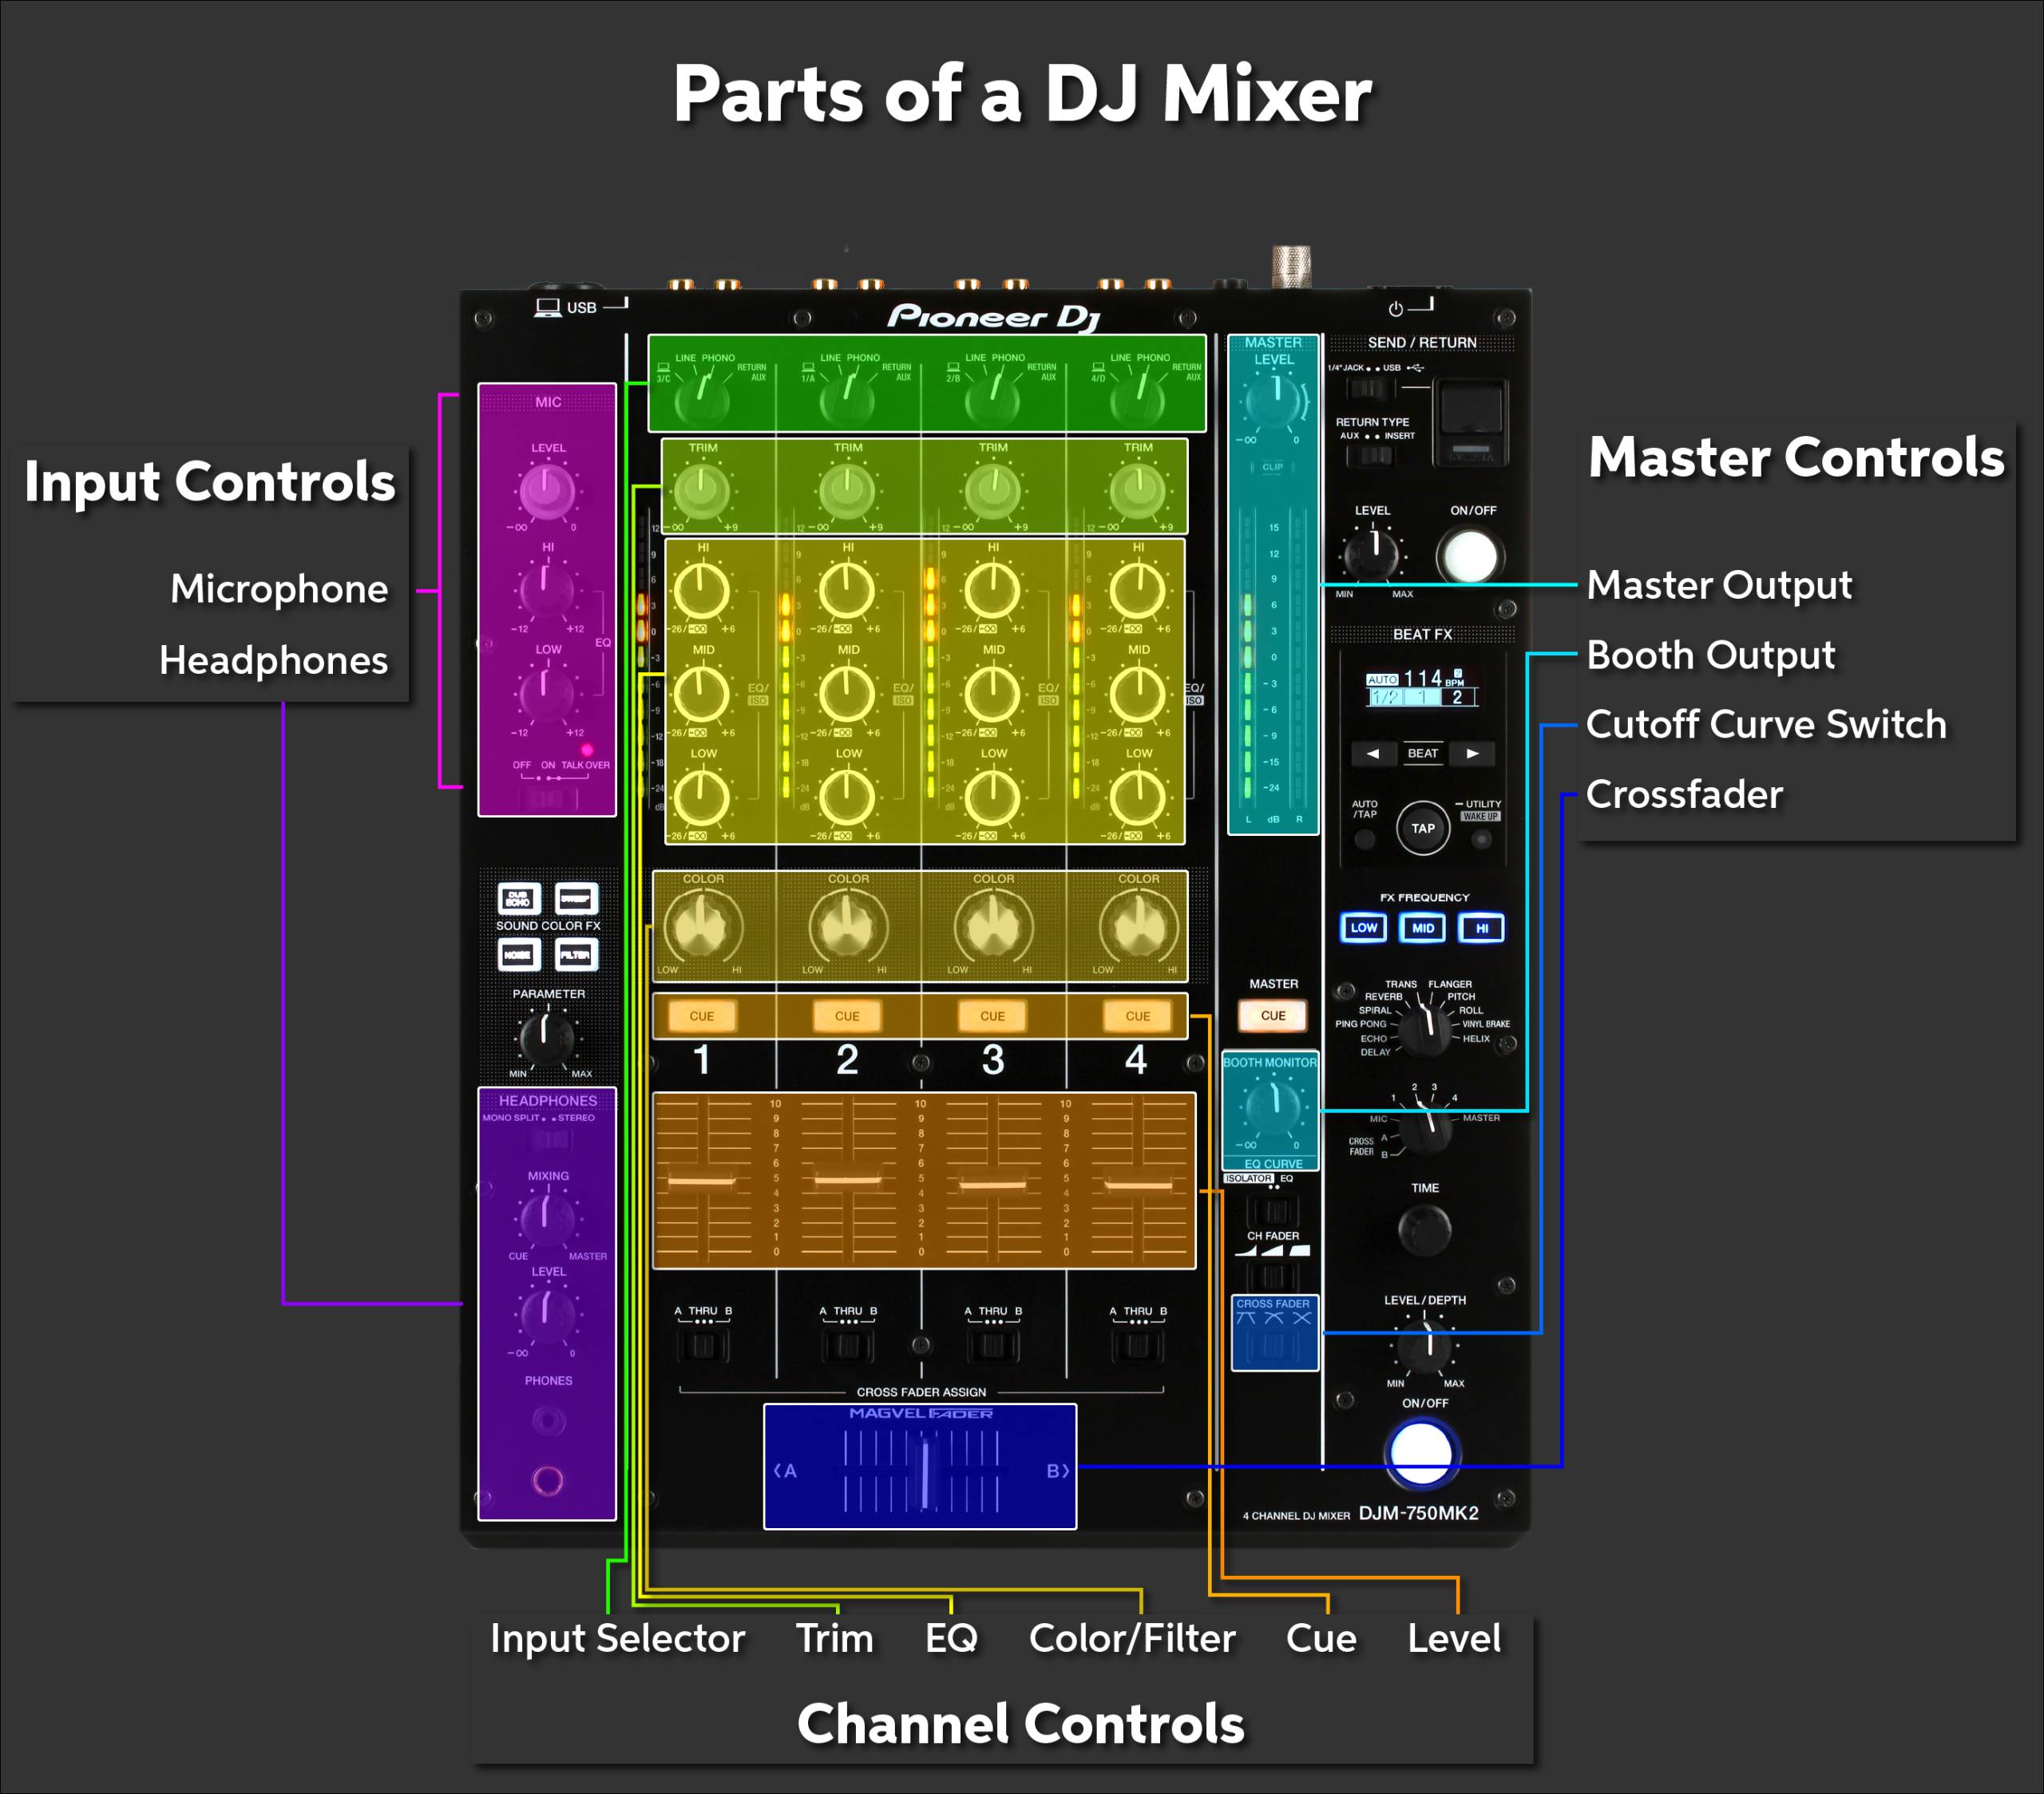
Parts of a DJ Mixer
Many DJ mixers will have product-specific features and controls, but they can be broken down into three sections: channel controls, master controls, and the I/O.
Channel controls
Think of DJ mixer channel controls as a waterfall. There will be a trim/gain knob at the very top of each channel. This sets the incoming audio input level (the audio before any processing occurs).
It will then pass through an EQ and filter (color) section, followed by any effects, such as reverb or delay. You can then cue the audio, which allows you to listen to incoming audio without it being sent through the main outs.
- The channel faders are often called Up Faders.
Master controls
Regardless of advanced features, every DJ mixer has basic master controls. These controls include the Crossfader, Master, Booth, Headphone, and Cue output levels and a Cue/Mix blend knob.
- Some Crossfaders have an onboard switch that allows you to adjust the cutoff curve. You’ll find that a steeper curve will be closer to an ON/OFF switch; this is how scratch DJs work their magic. On the other hand, softer curves allow smoother blends and are more common in techno, house, and styles with long blends.
I/O
IMPORTANT! Almost every turntable requires a preamp, and DJ mixers provide that via the phono jacks. The preamp will amplify the signal produced by the turntable. So, if you connect turntables to your mixer, only use the PHONO RCA jacks!
Almost every DJ mixer on the market will have RCA connections for input and output devices (e.g., turntables, mobile devices, CDJs, and media players). Some will also have XLR and TRS connections for the master outputs, microphones, and headphones.
Additional features
Some DJ mixers have drum pads and touchpads that can be assigned to trigger specific software controls or effects. Some mixers even have touchscreen displays that allow you to control certain software features without touching your laptop!
Parts of a DJ mixer
DJ System/Mixer Setup Order
To set up your system, follow these four basic steps: first, turn the volume and gain down on all devices. Then, connect your gear, power on your system, and adjust the levels as needed. Remember to connect input and output devices before powering on to avoid any loud pops or potential damage.
- Turn all volume and gain knobs down on any input and output source you plan on connecting.
- Connect your speakers and headphones to the outputs, then connect any input devices (e.g., microphones, turntables) to the appropriate input jacks.
- Power everything on.
- Set the channel and master levels, then soundcheck.
DJ Mixer Setup Instructions
Now that you know the basics, we will guide you through setting up your DJ system. Keep the User Manual handy, as there may be additional features and functions unique to your mixer that aren’t covered in this guide.
PRO TIP: Make sure you have everything you need for your performance beforehand! It’s always a good idea to contact the venue ahead of time and ask about their PA setup. Bringing some extra cables is also a smart move just in case the venue doesn’t have enough for your needs. Knowing you have everything you need to sound your best will help you feel more confident.
Connect Main and Booth Outputs
The first step in setting up your DJ mixer is connecting the DJ mixer’s Main and Booth outputs. You will often connect the outputs to a sound mixer, but if there’s no mixer available, you will connect directly to the Mains (primary speakers).
- Make sure all your speakers are turned off before making your connections.
- If your Booth outputs use an RCA connection, it’s best to use RCA-XLR or RCA-TRS cables.
- If you are using passive speakers (speakers without dedicated power), you will first need to connect the speakers to a dedicated power amp.
Connect Input Devices
After you’ve connected the DJ mixers to the Main and Booth Outputs, you’ll next need to connect any input devices such as microphones, turntables, and mobile devices.
- Connect DJ turntables to the ground posts on the mixer, then connect their outputs to any channel’s PHONO inputs.
- Connect other input devices to the LINE inputs.
- If you’re using a computer, connect it directly to your DJ mixer.
- Power on the DJ mixer and speakers.
Do I need to ground my DJ mixer?
Most DJ mixers have ground posts on the back designed specifically for turntables. These ground posts are essential because the mixer and turntable must share the same ground to prevent a ground loop and the associated 60Hz hum. If your turntable has a ground post or comes with a two-prong ground wire, you must ground it. However, if you are not using turntables or your turntable does not have grounding posts, there is no need to ground the DJ mixer.
Soundcheck
PRO TIP: Play the loudest part of your tracks throughout the soundcheck process. This ensures that the loud parts aren’t too loud and the quiet parts are clearly audible.
After you’ve hooked everything up, it’s a good idea to do a simple soundcheck. Not only will this help you understand how the final mix will sound, but it also allows you to test all the connections. Once you’re done with the soundcheck, you’re ready to make the final mix!
Create a Mix
Creating a mix is critical during the setup process. Every venue is different, so this gives you a chance to fine-tune all your input and output levels, adjust any EQ and effects settings, and double-check to ensure everything is working. The difference between a good and bad DJ mix can really make or break your set, so take your time!
- Power on all your gear.
- Start playing audio and turn the Trim/Gain levels up of the channels you use to a point where it reaches just below clipping.
- If you see it clip, roll it back a little bit. This gives you the optimal level.
- Turn the Master and Booth outputs up.
- If you’re connected to a live sound mixer, set its Main out level to 0 (unity).
- Slowly increase the DJ mixer input level one channel at a time, again to a point where it’s barely clipping, then roll it back.
- Turn the speakers up to performance level.
- Start performing your set and adjust any EQ, compression, or effects settings. This also allows you to practice one last time before your set!
Related Articles
When you need help, Sweetwater has the answers!
Our knowledge base contains over 28,000 expertly written tech articles that will give you answers and help you get the most out of your gear. Our pro musicians and gear experts update content daily to keep you informed and on your way. Best of all, it’s totally FREE, and it’s just another reason that you get more at Sweetwater.com.


Offer applies only to single-receipt qualifying purchases. Select manufacturers may require that only the manufacturer’s products qualify towards the minimum purchase amount needed to be eligible for promotional financing. Otherwise, an invoice that meets the minimum purchase amount and contains at least one qualifying manufacturer product is eligible for promotional financing. No interest will be charged on promo purchase balance, and equal monthly payments are required on promo purchase until it is paid in full. The payments equal the amount financed divided by the number of months in the promo period, rounded up to the next whole dollar. These payments may be higher than the payments that would be required if this purchase was a non-promo purchase. During the last month(s) of the promo period the required monthly payment may be reduced due to the prior months’ rounding. Regular account terms apply to non-promo purchases. New Accounts as of 07/31/2025: Purchase APR is 34.99%. Penalty APR is 39.99%. Min Interest Charge is $2. Existing cardholders: See your credit card agreement terms. Subject to credit approval.
Offer applies only to single-receipt qualifying purchases. No interest will be charged on the promo balance if you pay it off, in full, within the promo period. If you do not, interest will be charged on the promo balance from the purchase date. The required minimum monthly payments may or may not pay off the promo balance before the end of the promo period, depending on purchase amount, promo length and payment allocation. Regular account terms apply to non-promo purchases and, after promo period ends, to the promo balance. New Accounts as of 07/31/2025: Purchase APR is 34.99%. Penalty APR is 39.99%. Min Interest Charge is $2. Existing cardholders: See your credit card agreement terms. Subject to credit approval.
The estimated required monthly payment shown which excludes taxes and delivery equals the amount financed divided by the number of months in the promo period, rounded up to the next cent. During the last month(s) of the promo period the required monthly payment may be reduced due to this rounding. These payments apply only with the financing offer shown. If you make these payments by the due date each month, you should pay off this amount financed within the promo period, if it is the only balance you are paying off. If you have other balances on your account, this payment will be added to any other minimum monthly payments.
Applies only to select items from this manufacturer. Ask your Sweetwater Sales Engineer for more details.