
Behringer MS-1 Getting Started Guide
In this guide, we will show you how to get started with the Behringer MS-1. We will go over how to set it up, create a sound, and how to use the sequencer and arpeggiator. We will also go over the different settings available in the Synthtribe software for the MS-1.
- MS-1 connections
- MS-1 hardware setup
- Creating sounds on a Behringer MS-1
- MS-1 arpeggiator and sequencer
- Synthtribe settings
MS-1 connections
- OUTPUT: Line level output to connect to an audio interface/mixer/powered speakers.
- PHONES: Headphone connection.
- EXT AUDIO IN: Line input to connect an external audio device. Please note that the EXT AUDIO IN still goes through the Source Mixer, VCF, and VCA on the MS-1. This means that to hear the external audio, you will need to turn up the EXT AUDIO fader in the source mixer section, the FREQ fader in the VCF section will need to be turned up, and the VCA needs to be open, meaning that a key will need to be pressed and held.
- HOLD: Footswitch connection to hold or release a pattern playing in the sequencer or normal performance.
- VCF CV IN: Control voltage input to control the filter frequency cutoff with an external CV source like a eurorack LFO module, for example.
- EXT CLK IN: Control voltage clock input to sync the sequencer and arpeggiator to an external CV clock source.
- CV IN: Control voltage pitch input to control the pitch of the oscillators on the MS-1 from a eurorack sequencer, for example.
- GATE IN: Control voltage gate input to trigger the VCA and Envelope.
- CV OUT: Control voltage pitch output to control the pitch of external modular gear like a eurorack oscillator, for example.
- GATE OUT: Control voltage gate output to control external modular gear like a eurorack envelope, for example.
- VELOCITY OUT: Control voltage output generated from the key velocity on the keyboard. Used to control external modular gear.
- MIDI IN: MIDI input to control the MS-1 from an external MIDI keyboard or MIDI sequencer.
- MIDI OUT: MIDI output to control external MIDI gear from the MS-1 keyboard, arpeggiator, or sequencer.
- MIDI THRU: Outputs the MIDI data received from the MIDI IN port.
- USB PORT: Sends MIDI information in and out to a computer/tablet. The MS-1 will be recognized as a class-compliant MIDI device on the computer/tablet. This connection is also used to adjust the settings of the MS-1 with the Synthtribe application on the computer/tablet.
- GRIP/MOD: Connections for the live performance grip.
MS-1 hardware setup
Let’s first show you how to set everything up. While you can play the MS-1 while it is warming up, the tuning may not be stable right away. This is because the MS-1 has analog circuits that need to warm up to operating temperature for its tuning to stabilize. The warmup time may take a little longer, depending on the room temperature.
- Turn the volume down on the middle left of the MS-1.
- Connect the MS-1 PHONES output to headphones, or connect the OUTPUT with a TS or TRS cable to the line input of a device like a keyboard amp, powered speaker, mixer, or interface
- Power it on and let it warm up for about 15-20 minutes.
Creating sound on the MS-1
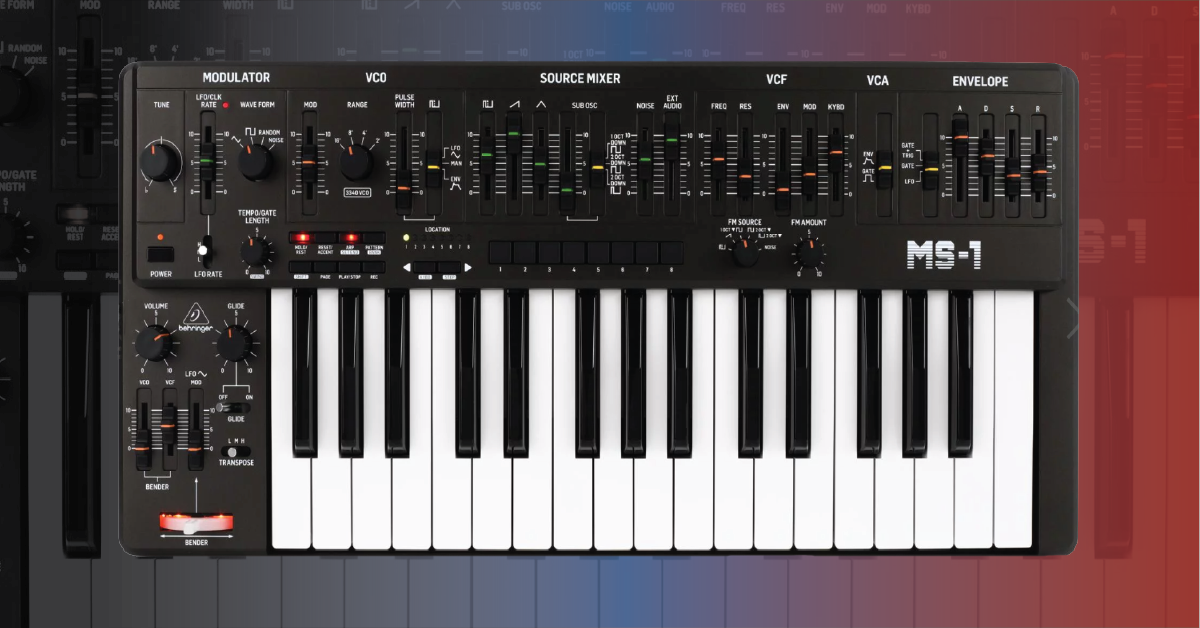
Once you have everything set up and connected, let’s create a basic sound! The patch we’ll be providing should create a simple sawtooth sound. This is a basic sound, and we’ll go through the settings, section by section (left to right, top then bottom), but once you’ve dialed it in, feel free to adjust the controls more to get the sound you want!
Tune
Set this to the 12 o’ clock position.
Modulator
- LFO/CLK RATE: Set to 5
- WAVEFORM: Set to triangle
- LFO RATE: Set to M
- TEMPO/GATE LENGTH: Set to 0
VCO
- MOD: Set to 0
- RANGE: Set to 8′
- PULSE WIDTH: Set to 0
- Pulse Width Modulation: Set to Man
Source Mixer
- Pulse Wave: Set to 0
- Sawtooth Wave: Set to 10
- Triangle Wave: Set to 0
- SUB OSC: Set to 0
- NOISE: Set to 0
- EXT AUDIO: Set to 0
VCF
- FREQ: Set to 10
- RES: Set to 0
- ENV: Set to 0
- MOD: Set to 0
- KYBD: Set to 0
- FM SOURCE: Set to Pulse Wave
- FM AMOUNT: Set to 0
VCA
- Set to ENV
Envelope
- A (Attack): Set to 0
- D (Decay): Set to 0
- S (Sustain): Set to 10
- R (Release): Set to 0
Left of keyboard
- VOLUME: Set to 5
- GLIDE: Set to 0
- VCO BENDER: Set to 2
- VCF BENDER: Set to 0
- LFO MOD: Set to 4
- GLIDE: Set to OFF
Transpose
- Set to L
Default patch for the MS-1. Click to enlarge.
MS-1 arpeggiator and sequencer
The Behringer MS-1 has a built-in arpeggiator with eight modes and a 32 step sequencer that can hold up to 64 patterns. We will go over the basics of using each of these features.
Arpeggiator
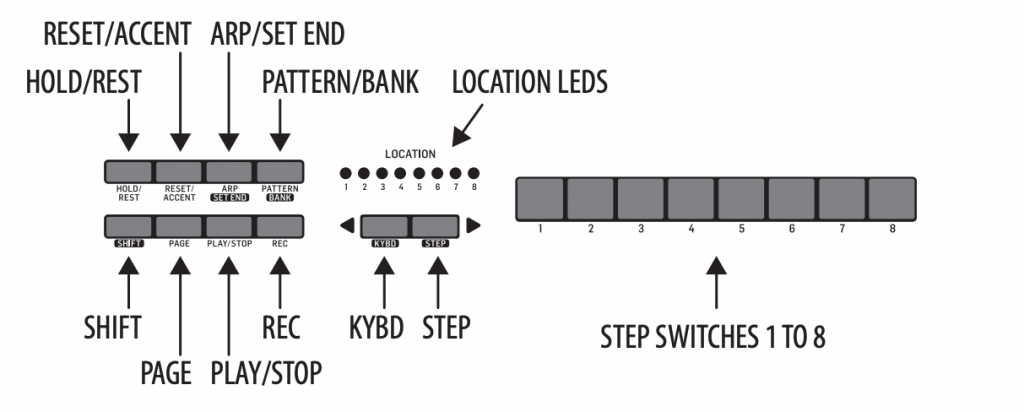
You can activate the arpeggiator by pressing the ARP/SET END button in the sequencer section right above the keyboard on the left side. The ARP/SET END button should light up, indicating that you are in the arpeggiator mode.
Under the LOCATION LED lights, the left and right buttons will scroll through the eight different arpeggiation patterns. The currently lit location LED indicates what arpeggiator mode is selected.
If you would like the arpeggiator to keep playing (Hold) after releasing the keys, press the HOLD/REST button while holding down the keys you want to arpeggiate. The ARP button should be flashing, and the HOLD/REST button should be lit, indicating that you are in the hold arpeggiator mode. To release the hold, press the HOLD/REST button. To exit the arpeggiator mode, simply press the ARP button so that it is unlit.
The eight different modes are:
- UP 1 octave
- DOWN 1 octave
- DOWN and UP 1 octave
- RANDOM 1 octave
- UP 2 octaves
- DOWN 2 octaves
- UP 2 octaves (Shifted 1 octave down)
- DOWN 2 octaves (Shifted 1 octave down)
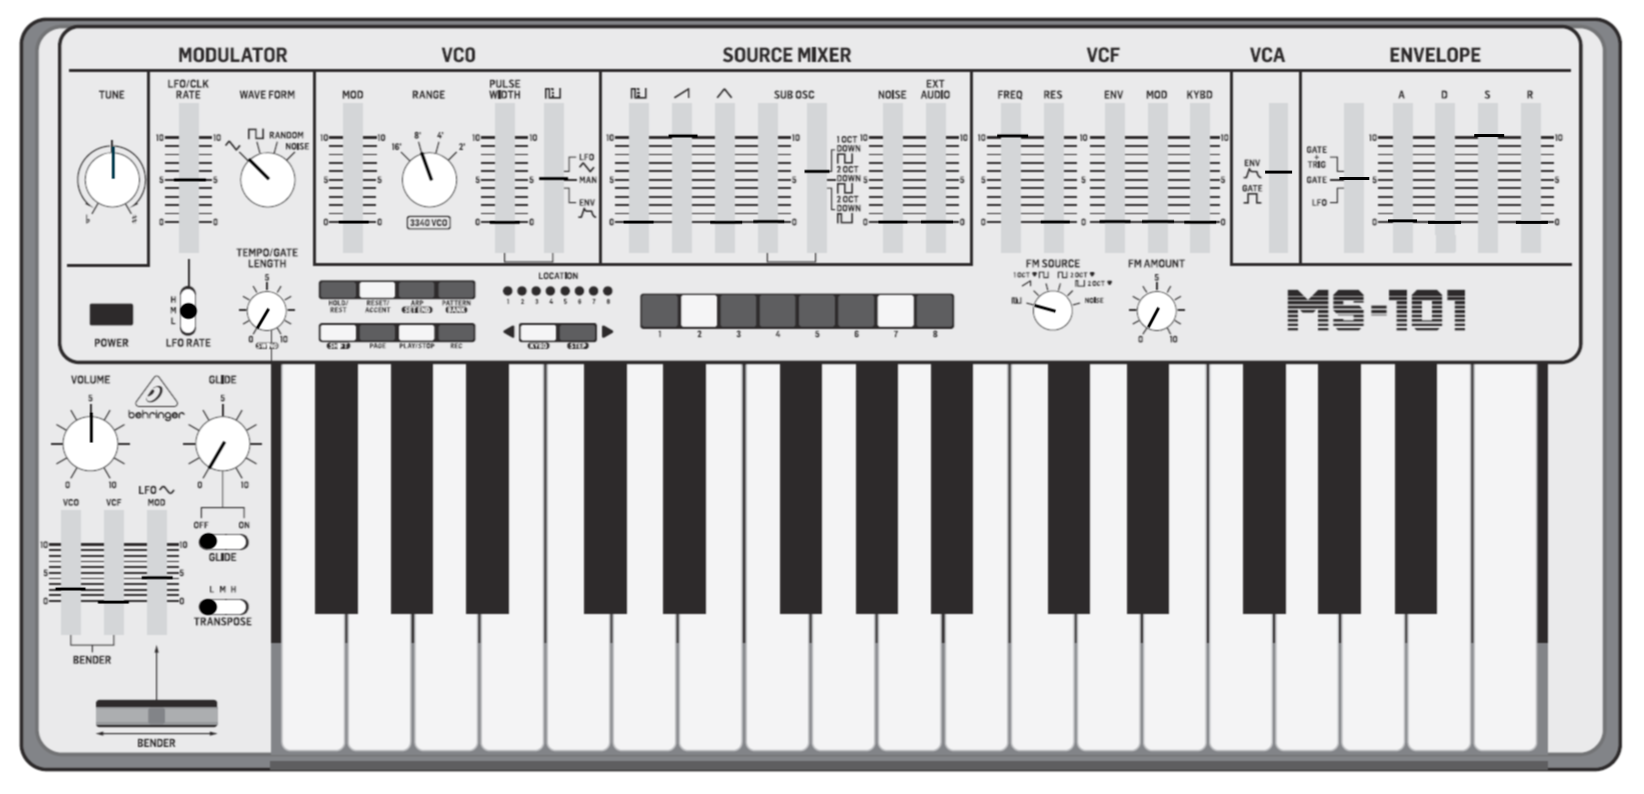
Sequencer
The sequencer has 2 different modes of operation. To create our basic pattern we will use the keyboard mode.
Sequencer section. Click to enlarge.
Creating a new sequence
- Hold the SHIFT button and press the left arrow (KYBD) to enter keyboard mode.
- Press the SHIFT, RESET/ACCENT, and PATTERN buttons at the same time to clear the current pattern selected.
- Press the REC button, and the first step button will begin flashing.
- Press a note on the keyboard or the HOLD/REST button to assign it to step 1. If you press the HOLD/REST button, LOCATION LED 8 will light up, indicating that a rest has been entered. Step button 1 should still be flashing after entering the first note/rest.
- Keep entering as many notes/rests as you’d like. You can enter up to 32 notes/rests.
- Once you are done entering notes/rests, press the REC button again.
- You can start playing your sequence back by pressing the PLAY/STOP button. Press the PLAY/STOP button again to stop the sequence from playing.
Save the pattern
- Hold the SHIFT button then the PLAY/STOP button together for 2 seconds to enter the save mode. The LOCATION LED of the currently selected pattern will begin flashing.
- Press one of the 8 step buttons to select which pattern you would like to save the pattern within the bank.
- Hold the PATTERN/BANK button while pressing one of the 8 step buttons to select the bank you would like to save the pattern.
- Hold the SHIFT button and press the REC button to save the pattern and exit the save mode.
Loading a pattern
- Hold the SHIFT button and the PATTERN/BANK button.
- While holding SHIFT and PATTERN/BANK, press one of the 8 step buttons to load a bank.
- Hold the PATTERN/BANK button.
- While holding PATTERN/BANK, press one of the 8 sep buttons to load a pattern.
Editing the sequence
- Load the pattern you would like to edit by following the steps in the previous section.
- Hold the SHIFT button and press the left arrow (KYBD) to enter keyboard mode.
- Press the REC button.
- Select the step you would like to start making changes. Pressing the PAGE button will scroll through pages 2 through 4 of the pattern if you would like to edit steps 9-32.
- Once you have the step selected, you can change its note by pressing a new key or change it to a rest by pressing the HOLD/REST button.
- Repeat instructions 4 and 5 to change any additional steps.
- If you would like to change a rest to a note, you need to select the step that is a rest and press the HOLD/REST button to remove the rest. Then you can press a new note on the keyboard to assign it to that step. Note, the LOCATION LED 8 lights up when a step that is a rest is selected.
- Once you are done editing the sequence, press the REC button.
Synthtribe settings
Connecting the MS-1 to a computer with a USB cable will allow you to access additional settings for the MS-1 through the Synthtribe application. The Synthtribe application also allows you to create, edit, back up, and restore sequences and factory reset the MS-1, and update its firmware.
General
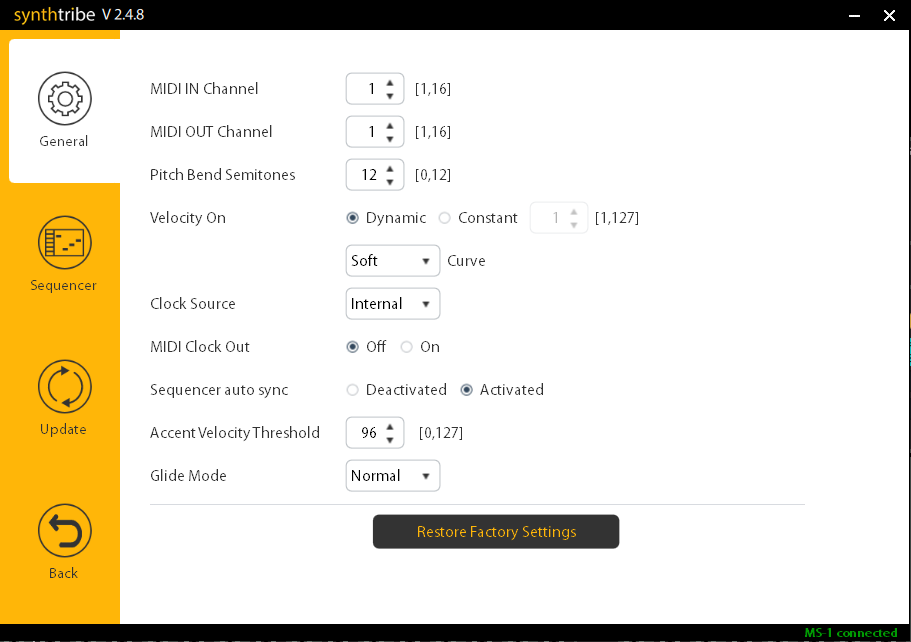
MS-1 Synthtribe settings
MIDI IN Channel: Selects the MIDI channel the MS-1 will receive to be controlled from an external MIDI device.
MIDI OUT Channel: Selects the MIDI channel that the MS-1 Keyboard, Arpeggiator, and Sequencer will control external MIDI instruments.
Pitch Bend Semitones: Adjusts the range of the pitch bend wheel in semitones.
Velocity On: Setting this to Dynamic enables velocity control on the keyboard. Setting this Constant will have the keyboard always play at a fixed velocity. When Constant is chosen, you can select what you should set velocity level (0-127) on the keyboard.
Curve: Changes the response of the velocity when Dynamic is selected for the Velocity On setting.
Clock Source: Selects where the MS-1 should receive a clock signal from. The clock signal will control the tempo of the Arpeggiator and Sequencer.
- Internal: The MS-1 will use its internal clock. Sequences will start playing when the PLAY/STOP button is pushed, and arpeggios will start when keys are pressed in the arpeggiator mode.
- MIDI DIN/MIDI USB: The MS-1 will respond to MIDI clock from the 5-pin MIDI in port or from MIDI clock from the USB port. Sequences and arpeggios will not start until the MS-1 is receiving MIDI clock from the selected port. Hitting the PLAY/STOP button will have the Sequence ready for playback, and once you hit play on the master clock device, the sequence on the MS-1 will start.
- TRIG: The MS-1 will respond to the clock from an external CV clock source when connected to the EXT CLK IN. Sequences and arpeggios will not start until the MS-1 is receiving the clock from the EXT CLK IN port. Hitting the PLAY/STOP button will have the Sequence ready for playback, and once you hit play on the master clock device, the sequence on the MS-1 will start.
- Rate: When TRIG is selected as the clock source, this setting will help with compatibility with different gear as there are different standards on the rate of a CV clock signal. Change this if the sequence/arpeggio is not playing at the correct speed with your external CV clock source.
- Polarity: This allows you to choose whether you’d like the clock to respond to the rise of the CV clock signal or the fall of the cv clock signal. The default setting is Fall.
- Auto: When this is selected, the sequencer and arpeggiator will use the internal clock when the MS-1 is not receiving the clock from MIDI DIN, MIDI USB, or TRIG. Once the MS-1 starts receiving a clock signal from MIDI DIN, MIDI USB, or TRIG, the sequencer and arpeggiator will begin following that external clock source.
MIDI Clock Out: When this is turned on, the MS-1 will output its internal clock out of the MIDI OUT port. It will also output the clock that it receives from the MIDI DIN, MIDI USB, and TRIG if the clock source is set to any of those settings.
Sequencer Auto Sync: This setting affects how the sequencer starts if the clock source is set to an external source. If this is activated, the sequencer will start playing when the MS-1 starts receiving a clock signal regardless of whether you pushed the PLAY/STOP button or not. If this is deactivated, the sequencer will only begin when the PLAY/STOP button is pushed to be lit, and the MS-1 starts receiving a clock signal.
Accent Velocity Threshold: This setting sets the velocity where the accent notes should trigger. Accented notes have the filter opened more than where it is set on the FREQ slider and decay quickly to the position the FREQ slider is set. The decay is like a preset envelope that is independent of the ADSR envelope.
Glide Mode: If set to Normal, notes will always glide to the following note even if the notes are played detached. If set to Legato, notes will only glide to the following note if the notes were played legato.
Restore Factory Settings: This will reset all Synthtribe settings for the MS-1 and erase all sequencer patterns stored on the MS-1. Be sure to back up any sequencer patterns on the MS-1 you would like to keep before restoring the factory settings.
Sequencer

Synthtribe Sequencer mode
Bank and Pattern: Selects the storage location of a pattern on the MS-1.
Store: This will save the sequence from the Synthtribe sequencer into the MS-1 at the selected storage location.
- If the sequence was saved to the storage location that is currently selected on the MS-1, you will need to reload the pattern by loading a different pattern on the MS-1 then load the pattern again.
Recall: This will load a sequence from the MS-1 at the selected storage location into the Synthtribe sequencer.
Export: Saves the sequence in the Synthtribe Sequencer, not onto the computer as a .seq file.
Import: Loads a .seq sequence file from the computer into the Synthtribe sequencer. To load the sequence onto the MS-1, you will need to use the Recall function.
Dump: Saves all sequences from the MS-1 onto the computer as a .sqs file.
Merge: Replaces all sequences on the MS-1 from a .sqs file on the computer.
SEQ Length: Sets the length of the sequence on the Synthtribe sequencer.
Swing: Sets the amount of swing between steps on the Synthtribe sequencer.
Piano Roll: Use this to draw in your sequence. Left-click will create notes. Left-clicking notes will erase them. Right-clicking notes will give you additional settings for that note.
Update
You can check if your MS-1 is up to date in the update tab of the Synthtribe software. This tab will display the version number and let you know if there is an update available for your MS-1.

Learn more about how to get up and running with Behringer’s SYNTHTRIBE software!
Related content
Playlist – Synth Clips by Daniel Fisher
Additional resources
Behringer MS-1 Quickstart Guide
Creating Synth Soundscapes
When you need help, Sweetwater has the answers!
Our knowledge base contains over 28,000 expertly written tech articles that will give you answers and help you get the most out of your gear. Our pro musicians and gear experts update content daily to keep you informed and on your way. Best of all, it’s totally FREE, and it’s just another reason that you get more at Sweetwater.com.


Offer applies only to single-receipt qualifying purchases. Select manufacturers may require that only the manufacturer’s products qualify towards the minimum purchase amount needed to be eligible for promotional financing. Otherwise, an invoice that meets the minimum purchase amount and contains at least one qualifying manufacturer product is eligible for promotional financing. No interest will be charged on promo purchase balance, and equal monthly payments are required on promo purchase until it is paid in full. The payments equal the amount financed divided by the number of months in the promo period, rounded up to the next whole dollar. These payments may be higher than the payments that would be required if this purchase was a non-promo purchase. During the last month(s) of the promo period the required monthly payment may be reduced due to the prior months’ rounding. Regular account terms apply to non-promo purchases. New Accounts as of 07/31/2025: Purchase APR is 34.99%. Penalty APR is 39.99%. Min Interest Charge is $2. Existing cardholders: See your credit card agreement terms. Subject to credit approval.
Offer applies only to single-receipt qualifying purchases. No interest will be charged on the promo balance if you pay it off, in full, within the promo period. If you do not, interest will be charged on the promo balance from the purchase date. The required minimum monthly payments may or may not pay off the promo balance before the end of the promo period, depending on purchase amount, promo length and payment allocation. Regular account terms apply to non-promo purchases and, after promo period ends, to the promo balance. New Accounts as of 07/31/2025: Purchase APR is 34.99%. Penalty APR is 39.99%. Min Interest Charge is $2. Existing cardholders: See your credit card agreement terms. Subject to credit approval.
The estimated required monthly payment shown which excludes taxes and delivery equals the amount financed divided by the number of months in the promo period, rounded up to the next cent. During the last month(s) of the promo period the required monthly payment may be reduced due to this rounding. These payments apply only with the financing offer shown. If you make these payments by the due date each month, you should pay off this amount financed within the promo period, if it is the only balance you are paying off. If you have other balances on your account, this payment will be added to any other minimum monthly payments.
Applies only to select items from this manufacturer. Ask your Sweetwater Sales Engineer for more details.